The Ultimate Guide to a Spooky Halloween Cheese Board
Nearly 70% of hosts say a themed spread makes a party feel more memorable, and a well-planned grazing arrangement delivers that wow with minimal fuss.
This Website contains affiliate links. That means I may earn a small commission if you purchase through my links, at no extra cost to you.
This guide shows how to build an easy, photogenic charcuterie display that balances color, texture, and flavor for a cozy movie night or larger party.
Start with a palette—orange, purple, yellow, brown, and black—and use small pumpkins or gourds for height. Place bowls and a small pumpkin first to anchor the layout, then space out cheeses and tuck salami into gaps.
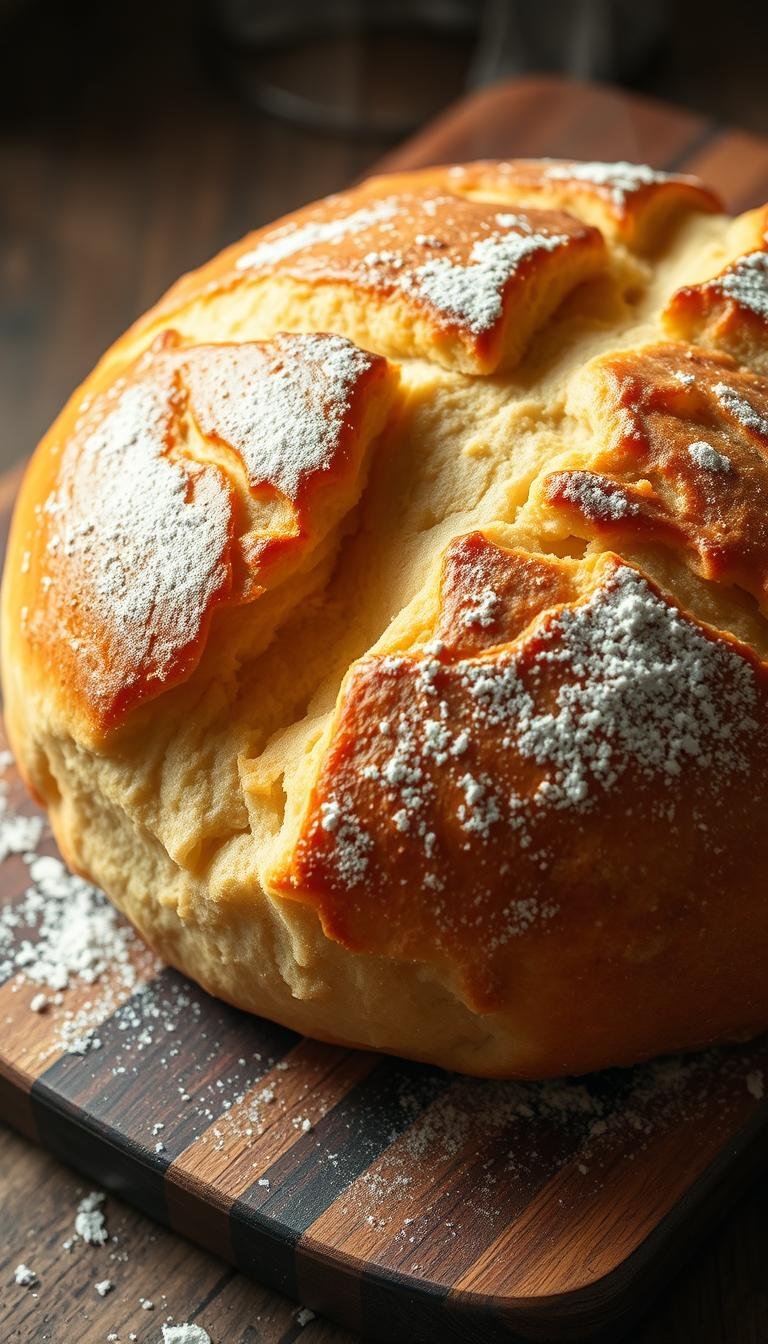
Signature touches include a Mummy Baked Brie made with an 8 oz wheel, raspberry jam, and puff pastry, plus mozzarella “eyeballs” with sliced olives for instant on-theme charm.
Use tools like an 18″ acacia serving board, ramekins for jams, and black cheesecloth for display. Bring items to room temp and assemble about 15 minutes before serving for best flavor and freshness.
Key Takeaways
- Plan a bold color palette and anchor the layout with bowls and a small pumpkin.
- Place cheeses spaced out; tuck meats into gaps and keep sweets separate from meats.
- Feature a Mummy Baked Brie and mozzarella eyeballs for quick, dramatic impact.
- Use an 18″ acacia serving board, ramekins, and simple decor for height and texture.
- Assemble 15 minutes before serving and bring cheeses to room temperature.
What makes a Halloween cheese board irresistible
An irresistible spread starts with contrast—flavors, textures, and shapes that invite guests to explore.
Start by mixing families: aged, soft, blue, and hard styles create flavor and mouthfeel contrast. Pair those cheeses with cured meats, crisp crackers, and a few sticky spreads like jam or honey to add sweetness and tang.
- Variety wins: include multiple textures so every guest finds a favorite.
- Balance sweet, salty, creamy, crunchy, and tangy using fruits, nuts, and spreads.
- Use seasonal accents—pears, pomegranate arils, and cinnamon apple nuts—for autumn character.
- Add playful cues like a Mummy Baked Brie or mozzarella eyeballs and a few plastic spiders for theme.
- Arrange pathways of pairings and vary slice shapes so the layout feels dynamic and easy to navigate.
Tip: place small knives and spoons by spreads and label allergens to make the charcuterie board welcoming and easy to refill during the party.
Choose your spooky palette: colors, textures, and fall vibes
Let your color scheme do the heavy lifting—it’s the fastest way to a photo-ready spread.
Start with five reliable tones: orange, purple, yellow, brown, and black. These hues instantly telegraph a festive vibe and help you place items without guesswork.
Hit orange with sharp cheddar or twisted snacks. Use purple vegetables and dark grapes for depth. Bright yellow comes from popcorn and alpine-style selections, while rich browns appear in bite-sized chocolate pieces. Add black accents like blackberries or olives to push the theme.
Textures matter as much as color. Mix smooth rinds, crumbly shards, glossy fruits, and airy popcorn so the eye keeps moving.
- Place one or two small decor pumpkins or gourds as sculptural anchors; wash and dry them first and label them non-edible.
- Scatter a few small bowls with contrasting jams or pomegranate arils at key points to punctuate the palette.
- Layer light and dark clusters so the layout looks balanced from every angle.
Finish with cocoa-dusted or dark chocolate pieces to complement brown tones without overpowering your dairy selection. Keep the color story consistent from center to edges for the best photos and flow.
Cheeses, meats, and more: building a balanced flavor lineup
Compose a tasting path that highlights mellow rounds, tangy bites, and bold wedges. Aim for four cheese families so the spread moves from smooth to assertive. Pick an aged Cheddar or Gouda, a soft option like brie or goat cheese, a blue such as Gorgonzola or Stilton, and a hard Manchego or Parmesan.
Seasonal pairings bring autumn character. Add pears, pomegranate arils, dried apricots or cranberries, and cinnamon apple nuts. Offer honey and a berry jam and tuck in specialty picks like White Stilton with Apricots or a Creamy Toscano soaked in Syrah.
Choose one or two cured meats—salame secchi, Calabrese, or prosciutto—to complement but not overwhelm the cheeses. Keep proportions heavy on dairy, moderate on meats, and light on sweets.
For carbs, use neutral options: whole wheat mini toasts, light entertainment crackers, or taralli. Slice firmer wedges for easy grabbing and leave soft rounds partially intact for scooping.
- Sweets: small chocolate mousse pumpkins, a few gummies, and candy corn for a playful touch.
- Pairing tips: blue with honey and walnuts; goat cheese with jam and pears; aged cheddar with apple slices.
Signature Halloween touches that wow
A few simple props and one baked centerpiece turn a platter into a showpiece. Use a warm, melty focal item and repeat small visual cues to guide guests toward it.
Mummy baked brie centerpiece
Make a showstopping centerpiece: place an 8 oz brie wheel on a square of puff pastry spread with raspberry jam. Roll pastry to about 13×11 inches, wrap the brie, and egg wash the seams.
Bake at 400°F for 10 minutes, re-brush with egg wash, then bake 10–12 minutes until golden and melty. Finish by pressing a few candy eyeballs into the top for instant character.
Mozzarella eyeballs
Create quick savory eyeballs by draining small fresh mozzarella balls. Press sliced ripe black olives into the centers to form pupils.
Cluster these in a small dish so they read like a playful garnish and are easy for guests to grab.
Elevate the scene
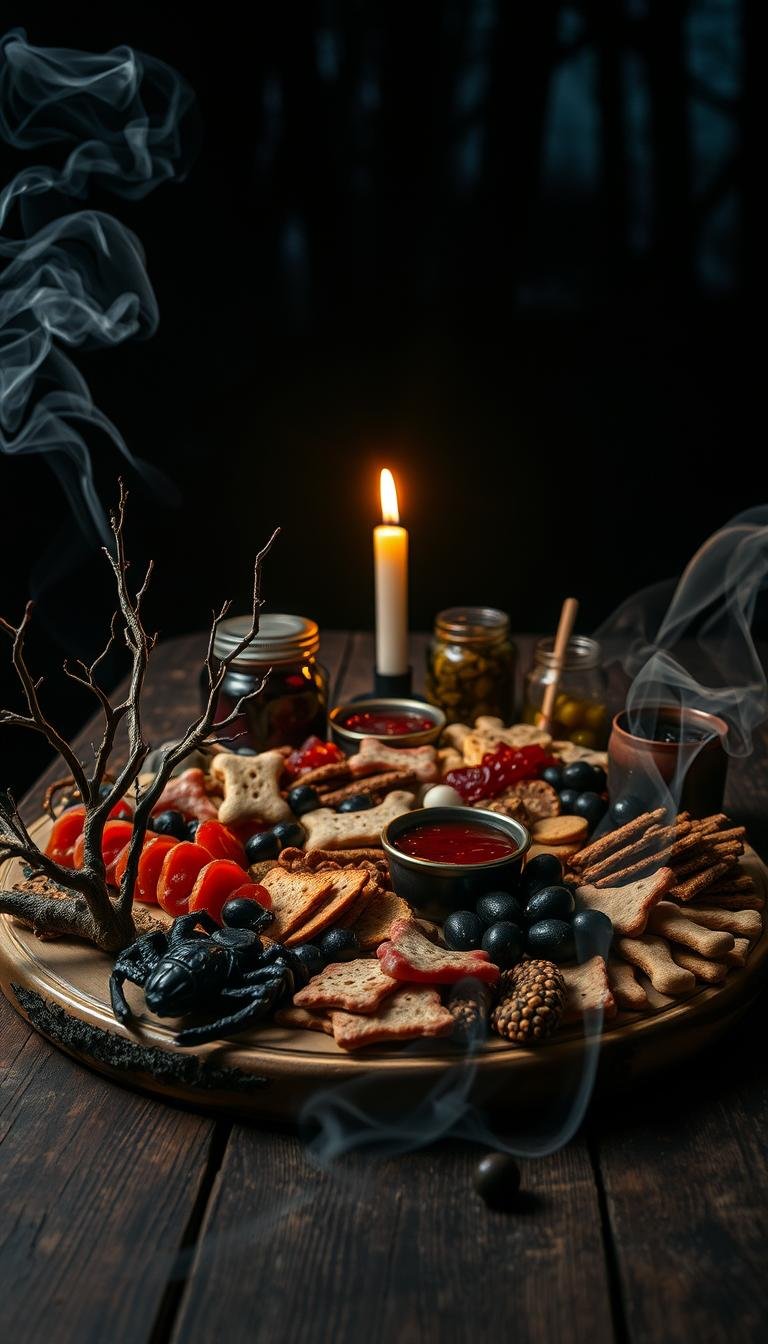
Set the mood: layer black cheesecloth under the serving surface to add texture and depth. Place a couple of plastic spiders beside non-food props for scale, keeping them off edible items.
Corral loose items—pomegranate arils, nuts, and candy—in mini bowls so the layout stays tidy. Scatter a few dark chocolate squares around the centerpiece to echo brown tones and add richness.
- Tip: add non-edible props right before guests arrive and keep them away from cutting zones.
- Flow: build outward from the brie so crackers and pairings form natural paths to the center.
- Photo tip: take pictures immediately after styling for the best look.

| Item | Quantity | Placement | Why it works |
|---|---|---|---|
| Mummy Baked Brie | 8 oz wheel | Center | Warm focal point, visually dramatic |
| Mozzarella eyeballs | 6–8 balls | Small bowl near center | Playful, easy grab-and-serve |
| Black cheesecloth & plastic spiders | Small pieces | Under and around display | Adds texture and theme without touching food |
| Mini bowls (nuts, jam, olives) | 3–4 | Evenly spaced | Controls roll-away items and keeps layout tidy |
How to assemble your halloween cheese board step by step
Think like a stylist: anchor one area first, then build outward in layers. This simple approach saves time and keeps the layout airy and inviting.
Anchor first: set bowls, dips, and a pumpkin
Place small bowls with dips, popcorn, and pomegranate arils to form your anchor. Add a small decor pumpkin next to the largest bowl to create height and a visual focal point.
Place and space cheeses for visual balance
Set cheeses spaced across the board so colors and shapes balance from edge to edge. Leave room for soft rounds and give each one a dedicated knife to prevent smears.
Add meats, crackers, and fruit; keep sweets away from meats
Fan crackers and ribbons of meats near compatible cheeses but keep sweets separate to avoid flavor transfer. Tuck salami or prosciutto into nooks so they add texture without crowding the center.
Fill gaps with nuts, dried fruit, berries, and themed candies
Use small clusters of nuts, dried apricots, and berries to fill gaps and make the surface look lush. Spoon jam into a small bowl for neat serving and edge the display with orange slices for color and a citrus reset.
Finish and serve
Place the Mummy Baked Brie last so it is warm at serving time and nestle it near crackers to encourage pairing. Do a quick sweep for crumbs, rotate bowls so handles face out, and step back to check flow around board before guests arrive.
Smart shopping: Trader Joe’s picks and easy substitutions
Plan your shopping list around a few seasonal hits and simple swaps to save time and keep flavor strong.

Trader Joe’s finds
Shop seasonal at TJ’s for instant flair. Look for Ghost & Bat Chips, Candy Corn Flavored Popcorn, Halloween Gummies, and Baked Cheese Crunchies.
Grab limited-run cheeses like Autumn Chimay, Creamy Toscano soaked in Syrah, or White Stilton with Apricots to add color and pairings. Pick up Thomcord grapes and multicolor carrots for fresh contrast.
No TJ’s? Easy swaps
If you don’t have a store nearby, pick bat- or ghost-shaped chips online, a sweet-and-salty popcorn, and fruit gummies to mimic the effect. Replace specialty cheeses with local aged cheddar, a berry-rind option, or a herbed goat log.
- Buy a couple salami styles to fold or tuck around the layout.
- Use mozzarella pearls + sliced black olives for quick eyeballs.
- Build your list by category—cheese, meats, carbs, produce, sweets—so you don’t miss essentials.
| Category | Trader Joe’s Pick | Simple Swap |
|---|---|---|
| Snacks | Ghost & Bat Chips | Themed chips online |
| Popcorn | Candy Corn Flavored Popcorn | Sweet-and-salty popcorn mix |
| Seasonal cheese | Creamy Toscano / White Stilton | Aged cheddar or berry-rind cheese |
| Produce | Thomcord grapes, multicolor carrots | Local grapes, orange/purple carrots |
Tools, bowls, and boards that make assembly easier
The right gear turns a fiddly task into a smooth, fast setup. Choose pieces that help you style, serve, and transport without stress. Small decisions—like using a handled surface or shallow ramekins—change how your spread reads.
Round acacia boards, ramekins, and knives
Choose a sturdy 18″ round acacia board with a handle for ample space and easy rotation while styling. Keep one or two sharp cheese knives and spreaders nearby so guests can cut firm wedges and scoop soft rounds cleanly.
Small bowls for jams, olives, pomegranate arils, and popcorn
Use porcelain ramekins and small bowls for jams, olives, and pomegranate arils to stop tiny items from rolling away. A shallow bowl works best for popcorn or chips so crisp snacks stay crunchy and contained.
Slip a layer of black cheesecloth under the cheeseboard to frame the scene and protect your surface. Tuck a few plastic spiders on non-food props for a removable accent, and pre-stage napkins, knives, and serving spoons to be ready when guests arrive.
| Item | Why it helps | How to place |
|---|---|---|
| 18″ round acacia board | Large styling surface + handle for transport | Center, rotate while arranging |
| Porcelain ramekins / small bowls | Contain jams, olives, pomegranate arils, popcorn | Evenly spaced near compatible cheeses |
| Cheese knives & spreaders | Clean cuts and easy scoops | One per soft round or firm wedge |
| Black cheesecloth & props | Frame display and add theme without touching food | Under board; spiders on non-food props |
Serving timing, food safety, and storage tips for parties
Timing matters: let soft rounds and wedges sit at room temperature to reach peak flavor. Aim to bring most cheeses out 30–45 minutes before guests arrive and finish assembly about 15 minutes before serving.
Make-ahead pointers: bake warm centerpieces just before guests come and keep chilled backups ready. Use small bowls for olives, berries, and candy corn so tiny items don’t roll or cross-contact with meats.
Allergen notes and safe decor
Label nuts, blue cheeses, and other allergens clearly. Place potential triggers in distinct zones or separate bowls to reduce cross-contact.
Wash and dry decorative pumpkins and gourds; add plastic spiders and non-edible props only moments before guests arrive. Keep non-food decor away from cutting paths.
Leftovers and quick next-day recipes
Wrap leftovers separately: airtight for meats, waxed paper then foil for cheeses, and sealed containers for crackers. Refrigerate promptly.
Repurpose extras into simple recipes: grilled cheese with brie and jam, a salad with pears and nuts, or pasta tossed with blue cheese and roasted fruit.
| Action | When | Why |
|---|---|---|
| Bring cheeses to room temp | 30–45 minutes before serving | Best texture and aroma for tasting |
| Assemble final spread | 15 minutes before guests arrive | Keeps warm items fresh and decor tidy |
| Swap in chilled backups | Every 45–60 minutes | Refresh perishables and maintain food safety |
| Store leftovers | Within 2 hours | Prevents spoilage and preserves flavor |
- Offer toothpicks or small forks near olives and berries to limit hand contact.
- When unsure about time at room temp, discard perishable items—safety first.
- Snap a quick photo for your post to track portions and favorite pairings for next time.
Conclusion
Wrap up your planning with a simple checklist that turns inspiration into a tasty, stress-free spread.
Quick recap: pick a bold color palette, center a warm Mummy Baked Brie, and add playful mozzarella eyeballs for instant charm. Use bowls and ramekins to corral jam, fruits, and small sweets so the layout stays neat.
Shop smart with Trader Joe’s picks or easy swaps. Assemble in order: anchor bowls, space cheeses, tuck salami and crackers, then fill gaps with nuts, fruits, and a restrained touch of candy or chocolate.
Keep decor safe—add a few spiders or black cloth at the end—and store leftovers separately. With knives, spoons, and napkins ready, your charcuterie board will be board perfect for guests and easy to recreate at home.