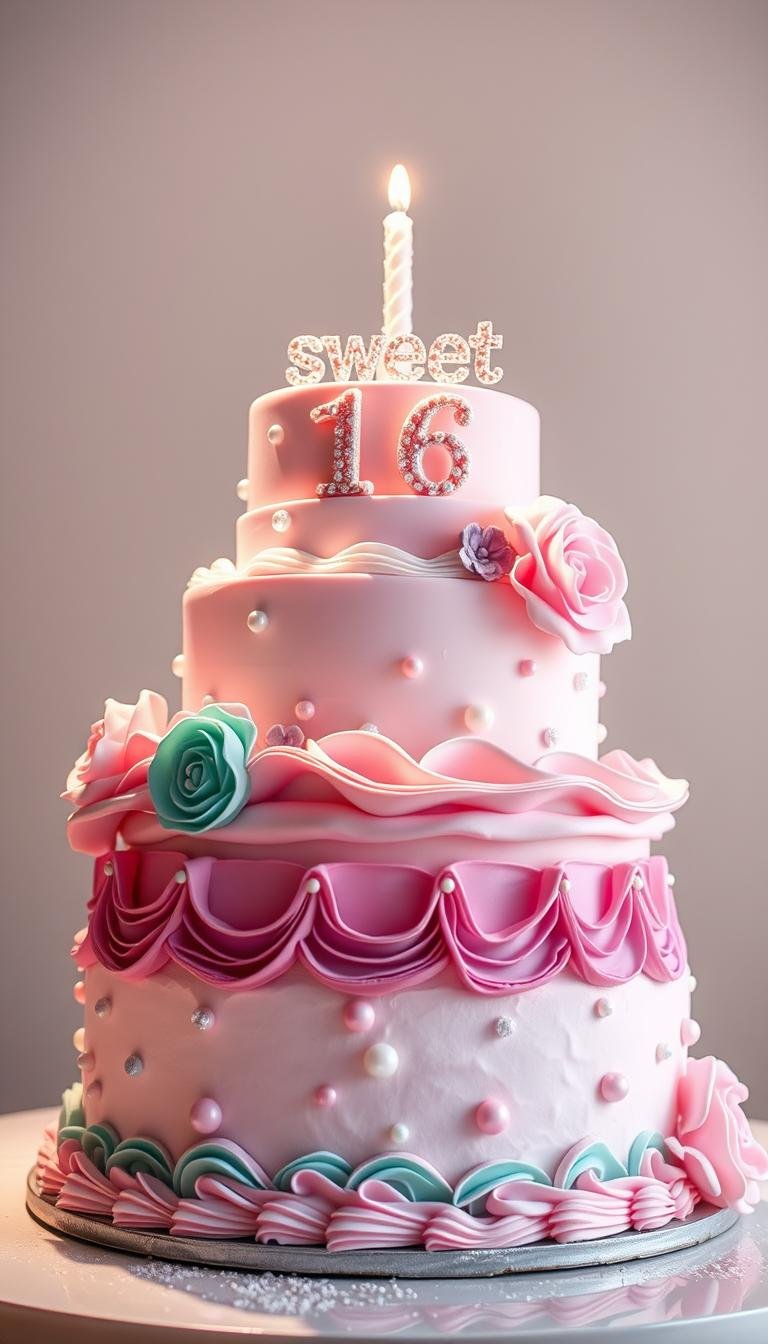
Sweet 16 Birthday Cake Designs for Teenagers
Surprising fact: over 70% of parents say the numbered pair on the party table is the most photographed element at teen celebrations. That simple duo now defines modern, minimalist styling for milestone events.
This Website contains affiliate links. That means I may earn a small commission if you purchase through my links, at no extra cost to you.
This guide maps a clear, step-by-step route to planning a stylish 16 birthday cake that looks pro but is doable at home. You’ll learn how the “1” and “6” pair works with clean palettes and how to choose tools that matter versus extras that just take space.
We cover theme selection, baking reliable layers, and frosting tips that resist melting. Practical fixes for tearing layers, messy transport, and structure are included so your centerpiece arrives picture-ready.
Result: a polished, on-trend centerpiece made with clear timing, simple structural hacks, and easy decorating moves anyone can follow.
Key Takeaways
- Follow a step-by-step plan for a high-impact yet simple design.
- Prioritize essential tools and skip pricey extras.
- Use clean color and number styling for strong photos.
- Learn quick fixes to avoid common mishaps in transport and finish.
- Recipe and timing tips help deliver consistent, tender layers.
Trend-led Sweet 16 birthday cake designs teens love right now
Current styling mixes crisp numeric shapes with minimalist color stories for an editorial centerpiece. These looks pair clean silhouettes with a few curated textures so the display reads clearly in photos and on social feeds.
Number duo: sleek, modern shapes
The “1” and “6” forms give you bold, graphic outlines that frame toppings like macarons, meringues, berries, or fondant accents. They create negative space that helps candles and toppers sit in balanced compositions.
Pastels and metallic accents for a chic vibe
Soft blush, lavender, sky blue, or sage paired with gold leaf or rose-gold sprinkles feels modern and editorial. Use matte buttercream with a single shiny highlight to avoid visual clutter.
Sports, themes, and personalization
Filter ideas by “By Sport,” “By Theme,” or “For Who?” to match interests. Varsity piping, K-pop graphics, or skincare-inspired pearls make the design feel custom.
- Keep add-ons small: micro-florals, candy clusters, or wafer-paper toppers.
- Match sprinkle mixes and ribbon trims to accent metals for a cohesive table.
- Plan serving and photo angles so the numeric shapes read clearly from the main view.
16 birthday cake recipe: step-by-step number cake you can bake at home
Follow this clear, kitchen-ready recipe to bake two crisp number layers that hold their shape and look professional. The method focuses on pan prep, staged mixing, and safe cooling so your finish stays neat.

Tools and pans
Gear up with two dedicated number tins and wrap each base in heavy foil to form a sturdy support. Grease the interiors with non-stick spray or butter for clean release and crisp edges.
Mixing and baking basics
Preheat the oven to 180 °C (350 °F) and set the rack to the center. Toss part of the melted butter with the dry mix to coat particles—this helps a moist, light crumb.
Beat eggs with the remaining melted butter about 30 seconds on high. Stream in oil, add warmed milk briefly, then stop mixing. Gently fold the flour by hand; do not overmix.
Divide batter between pans, level the tops, and bake about 40 minutes. Use a thin knife to test doneness; cakes should pull slightly from the sides.
Cooling, toppings and assembly
Cool in pans 10 minutes, then turn out onto a rack and wait until fully cold before icing. For optional meringue toppers, whip whites with lemon, add sugar to glossy peaks, pipe, and dry low-and-slow.
Make cream cheese icing by creaming butter, adding cream cheese, a splash of milk, then folding in icing mix. Spread over cooled layers, add garnishes, and keep the numeral shape evident for best photos.
Decorating and serving tips for a picture-perfect number cake
A sturdy base plus tidy finishing moves will keep each numeral intact from kitchen to table. Start with support, then layer in texture and color thoughtfully so the design reads well in photos.

Foil and board support for safe transport
Wrap each number in heavy foil and set them on a rigid board to prevent flexing. This combo makes it simple to slide the assembled piece from workspace to display.
Keep the assembled layers chilled briefly before travel. Use anti-slip mats and a level surface in the vehicle.
Finishing touches: piping, fruit, and candy clusters
Only frost when the layers are fully cool. Spread cream cheese icing smoothly and keep the edges sharp to preserve the number outlines.
- Use tight, consistent piping for border definition.
- Cluster berries, macarons, and crisp meringues in asymmetric bands so the shape stays legible.
- Bake and dry meringues low-and-slow; add them just before serving to keep them crisp.
For serving, slice along wider parts with a thin, sharp knife and wipe between cuts. Do a final wipe of the board and check the main photo angle before the reveal.
Conclusion
Finish strong by turning the plan into a calm, camera-ready centerpiece that reflects personal style.
Focus on structure first: heavy foil, a sturdy board, and chilled layers protect your work during transport and presentation.
Follow the bake basics—center-rack preheat, gentle mixing, clean-knife doneness check, and full cooling—to get tender layers that frost and slice cleanly.
Use cream cheese icing for smoothness and add make-ahead meringue toppers for crunchy contrast without heavy fondant. Keep numeral outlines clear and palettes simple so textures pop in photos.
Save this guide as a blueprint from planning to plating, then adapt colors and garnishes to make every Sweet 16 one-of-a-kind.