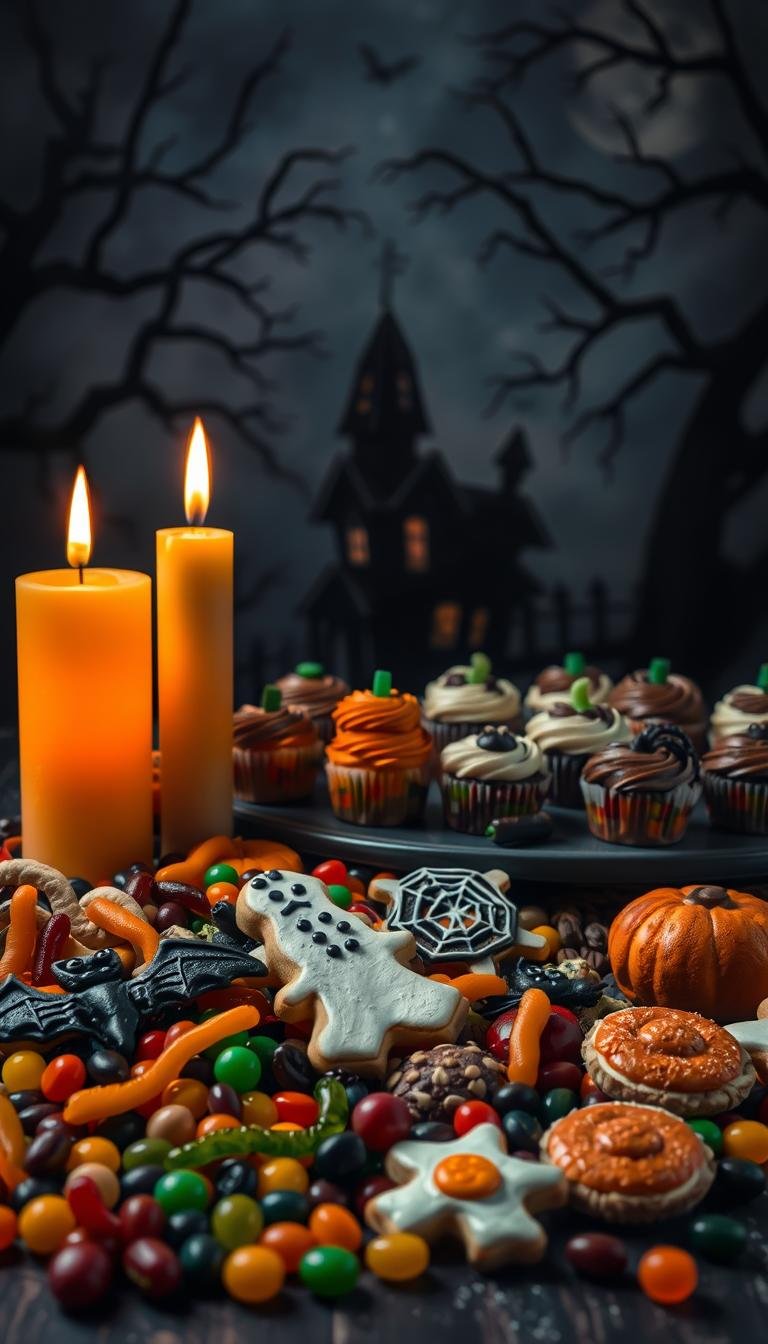
Spooky and Delicious: Halloween Food Ideas
Surprising stat: Nearly 6 in 10 hosts say quick, themed bites make a party feel memorable — even when prep time is under an hour.
This Website contains affiliate links. That means I may earn a small commission if you purchase through my links, at no extra cost to you.
This guide gives practical, future-ready party steps that balance eerie style with easy execution. Expect crowd-pleasers like crescent-wrapped Mummy Hot Dogs, a 7-layer dip with a sour cream spider web, and pizzas with olive “spiders.”
Make it simple: Rely on store-bought dough, candy eyes, and simple garnishes so kids can help with assembly while adults handle the oven. Sweet ideas include dipped Oreos and themed cookies that travel well for make-ahead prep.
What follows: A clear list of savory mains, sweets and cookies, plus plating, timing, and affordable decor tips like glow sticks, plastic spiders, and orange string lights to set the scene without extra stress.
Key Takeaways
- Use store-bought dough and simple garnishes to save time and keep treats kid-friendly.
- Focus on visuals—candy eyes, olive “spiders,” and piped spider webs—to create instant atmosphere.
- Plan make-ahead sweets like dipped Oreos and Rice Krispies so ovens stay free for hot items.
- Offer swaps for diets: turkey for beef, dairy-free chocolate, and gluten-free crackers.
- Scale easily by multiplying batches and using sheet pans, mason jars, and themed utensils.
Kick off your party with halloween food crowd-pleasers
Start the night with easy, crowd-pleasing plates that look spooky but come together fast. These starters mix make-ahead tactics with last-minute assembly so textures stay crisp and flavors pop.
Mummy Hot Dogs
Wrap hot dogs in thin crescent dough strips, leaving a small space for a face. Bake at 375°F for 12–15 minutes until golden, then dot ketchup or mustard for eyes. For parties, halve hot dogs for bite-sized versions and batch-bake on lined sheet pans.
Spider Web Taco Dip
Layer a classic 7-layer dip, then pipe concentric sour cream circles and drag a toothpick outward to form a crisp web. Stage plastic spiders on top just before serving to keep the pattern clean and photo-ready.
Spooky Spider Pizza
Top a round crust with sauce and mozzarella. Use halved black olives for bodies and slivered olives for legs. Place spiders near the end of baking so they hold shape while the cheese bubbles.
| Recipe | Key Step | Make-Ahead Tip |
|---|---|---|
| Mummy Hot Dogs | Use narrow crescent strips for defined bandages | Wrap and refrigerate; bake before guests arrive |
| Spider Web Taco Dip | Pipe sour cream circles, drag toothpick for spokes | Assemble layers ahead; pipe web at service time |
| Pumpkin Deviled Eggs | Fill with smooth yolk mix, dust with paprika | Peel after an ice bath; pipe filling for neat ridges |
Quick notes for other bites
Eyeball Pasta gets string-cheese discs and olive pupils added tableside so the “eyes” keep shape. Monster Tacos use browned turkey or beef with chorizo; let guests add olive eyes and shredded cheese hair. Bone Breadsticks are shaped by snipping ends and served with warm marinara “blood.”
Pro tip: Keep hot items tented at 200°F and assemble delicate pieces last to preserve texture. Place a small bowl of candy eyes and extra olives nearby so guests can customize their plates, and include labeled cards for allergens.
Savory bites and mains that look creepy but taste amazing
Serve up savory dishes that surprise guests with their looks and reliable flavors. These mains focus on bold presentation and simple steps so you can prep ahead and still finish with flair.

Zombie Meatloaf skull
Forming tips: Mix ground beef, onion, breadcrumbs, milk, and egg until just combined to avoid a tough loaf. Shape on a foil-lined sheet pan and carve shallow eye sockets and a gaping mouth.
Glaze mid-bake with ketchup or BBQ sauce for a glossy, bloody finish. Add pitted olive halves for bulging eyes and thin onion strips for jagged teeth.
Check the center with an instant-read thermometer; aim for 160°F. Rest 10 minutes so the skull keeps its details when plated.
Hot Dog “Worms”
Slice hot dogs lengthwise or spiral-cut, then boil 1–2 minutes to curl dramatically. Drain well and toss in warmed BBQ sauce so the sauce clings and creates a slimy sheen.
Serve piled in a small cauldron or over buttered buns as playful sandwiches. Prep extra olives or pickles in ramekins for quick garnish.
Witch Hat Crescents
Use store-bought crescent triangles. Tuck a short stick of string cheese at the base, roll tightly, and top with mini pepperoni cutouts for hat bands.
Bake per package directions, watching closely—these flats bake fast. Serve warm for gooey pull-apart centers.
“Small details—olive eyes, onion teeth, and a mid-bake glaze—turn simple mains into memorable centerpieces.”
| Dish | Key Step | Finish & Serve |
|---|---|---|
| Zombie Meatloaf | Carve sockets, glaze mid-bake | Olive eyes, rest 10 min, slice carefully |
| Hot Dog “Worms” | Spiral cut, 1–2 min boil | Toss in warmed BBQ, cauldron or buns |
| Witch Hat Crescents | String cheese at brim, roll tight | Mini pepperoni decor, bake until golden |
Timing tip: Start the meatloaf first, then prep worms and hats so everything finishes near guest arrival. Use separate racks with staggered timing for even airflow.
Sweet treats and cookies that steal the spotlight
Small decorative tricks make classic sweets instantly show-stopping. These desserts are easy to stage and travel well, so you can prep ahead and finish with playful details.

Ghost Cupcakes
Bake chocolate or vanilla cupcakes and pipe a tall swirl of buttercream with a round tip. Chill the frosting slightly for structure and press candy eyes gently. Pop them in the fridge briefly so faces set cleanly.
Jack Skellington Oreos & Spider Cookies
Dip Oreos in melted white chocolate, chill on parchment, then draw faces with fine-tip black icing. For spider cookies, use Oreos as bodies, affix licorice legs with a dab of white chocolate, and finish with tiny red candies for eyes.
Frankenstein Rice Krispies & Broom Cookies
Make green Rice Krispies, press with a buttered spatula, cut into rectangles, and pipe zigzag black icing for hair plus candy eyes. For broom cookies, wrap dough around pretzel rods, score bristles, trim while warm, then add colored drizzle.
Severed Fingers, Nutter Butter Ghosts & Graveyard Cups
Chill dough for witch finger cookies to reduce spread, score knuckles, and press almond nails with a dab of red jam.
Nutter Butter ghosts are a fast win: dip in almond bark and add mini chips for eyes before the coating firms.
Build pudding cups by layering chocolate pudding and crushed Oreos as “dirt,” tuck gummy worms partly visible, and insert cookie tombstones labeled with icing.
| Treat | Key Step | Make-Ahead Tip |
|---|---|---|
| Ghost Cupcakes | Pipe tall swirl; chill frosting | Freeze piped frosting discs; top same day |
| Jack Skellington Oreos | Dip, chill, draw fine details | Store chilled on parchment in a single layer |
| Frankenstein Rice Krispies | Press evenly; pipe hair and eyes | Cut and store in airtight pan between parchment |
| Severed Witch Fingers | Chill dough; score knuckles; almond nail | Shape and refrigerate; bake day of |
| Graveyard Pudding Cups | Layer pudding and Oreo “dirt” | Assemble and refrigerate up to 24 hrs |
Conclusion
Finish your prep by pairing quick starters with one showstopping main and a spread of easy sweets, so guests can graze and enjoy the scene.
Start the timeline with make-ahead treats like dipped Oreos, Rice Krispies, and shaped cookie dough. Prep garnishes—sliced olives, candy eyes, chives—so assembly is fast.
Stage the table with themed utensils, pumpkin or skull plates, and dim orange or purple string lights for low-effort ambiance. Add a kid-friendly Swamp Juice Punch and optional Bloody Mary syringes for adults.
Plan portions: 2–3 appetizers, one hearty main or two midsize mains, and 2–3 sweets per person. Keep one nut-free tray and a gluten-free cracker option to cover needs.
Snap a photo before the first bite—the plating, webs, and props are the details that make this spread memorable.