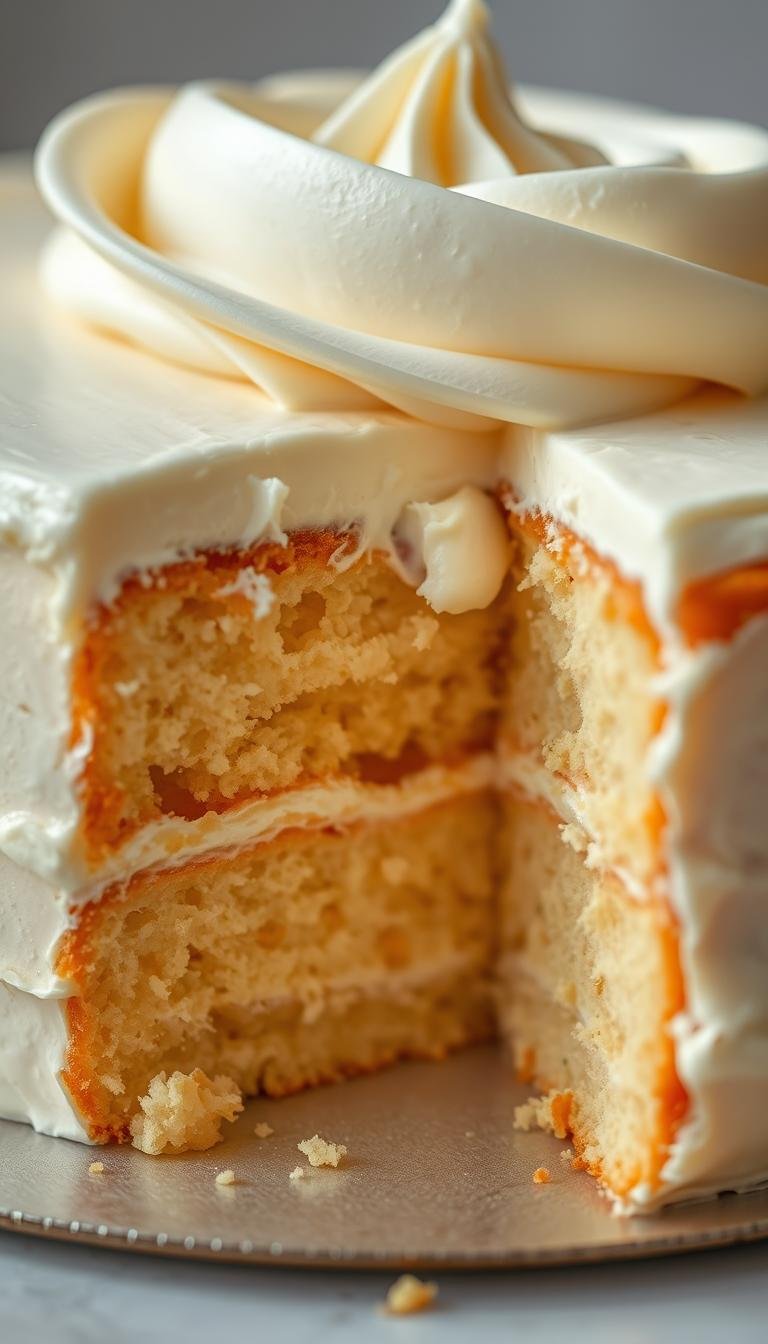
Simple Birthday Cake Recipe: Quick & Delicious
Surprising fact: Americans bake or buy over 200 million celebratory desserts each year, and a large share are the classic vanilla treats people turn to for gatherings.
This Website contains affiliate links. That means I may earn a small commission if you purchase through my links, at no extra cost to you.
This buttery vanilla cake delivers a plush, moist crumb with minimal fuss. It bakes at 350°F for 30–35 minutes in two 9-inch pans or as a 9×13 sheet. Two 8-inch layers take 25–30 minutes. The recipe works for cupcakes, too.
Choose your way: use the classic creaming method or try a whipped-egg approach with hot milk for extra lift. Fold in sprinkles for a rainbow effect or keep it plain and top with a vanilla buttercream or a cream cheese–boosted frosting.
Prep time is about 30 minutes, plus bake and cooling. Simple tools and pantry staples—butter, milk, eggs, flour, sugar—are all you need. Store frosted desserts chilled up to four days; unfrosted layers freeze for three months.
Key Takeaways
- Reliable results: beginner-friendly steps that yield bakery-style texture.
- Versatile pans: works in two 8–9″ pans, a 9×13, or cupcakes.
- Two methods: creaming or whipped-egg with hot milk for lift.
- Frosting options: classic buttercream or cream cheese-boosted vanilla.
- Storage tips: chill frosted desserts 4 days; freeze layers 3 months.
- Quick timeline: ~30 minutes prep and 25–35 minutes baking time.
Why this vanilla birthday cake works every time
The recipe pairs whipped aeration and a balanced formula to produce even, soft layers every time.
Double lift comes from whipping eggs and sugar to increase volume, then supporting that rise with a measured amount of baking powder. This creates a velvety crumb that stays soft up to four days.
Hot milk with melted butter improves aeration and flavor. The warm liquid helps fat blend smoothly into the batter so you get plush texture without a greasy mouthfeel.
Alternatively, the creaming method—beating butter and sugar until very light—also yields a tender crumb. Alternate dry ingredients with the milk-and-egg mix to keep the batter stable and uniform.
- All-purpose flour, milk, and butter: a balanced formula that highlights vanilla and holds moisture for days.
- Room temperature eggs and milk: better emulsification prevents curdling and avoids tunnels or dense spots.
- Versatile results: both methods produce level layers or a flat sheet, which makes trimming and frosting easier.
| Technique | Key benefit | Best use |
|---|---|---|
| Whipped eggs + baking powder | High, even lift; fine crumb | Layer cakes and light loafs |
| Creaming (butter + sugar) | Tender, stable batter | Heavier frostings and multi-tier cakes |
| Hot milk + melted butter | Improved aeration; no greasiness | Sheet pans and moist slices |
Reliable foundation: this method supports a range of frostings—from classic vanilla buttercream to cream cheese–boosted versions—without weeping or collapse. It adapts well to different pans and decorations, making it a dependable birthday cake base.
Ingredients for a tender vanilla cake and buttercream frosting
Gather the right ingredients to build a tender, evenly textured vanilla layer every time. Accurate measuring and room-temperature elements make the difference between a dry slice and a soft, even crumb.
- Dry ingredients: all-purpose flour for structure, baking powder for lift, a pinch of salt, and granulated sugar for sweetness and browning.
- Wet ingredients: whole milk for moisture, eggs for richness and structure, vanilla extract for aroma, and a dash of almond extract if desired.
- Fats: use room-temp unsalted butter for flavor control and add 1 tablespoon neutral oil for extra moistness if you plan to bake ahead.
- Buttercream essentials: softened butter, confectioners’ sugar, a splash of milk or cream, and vanilla extract to taste.
Typical shopping quantities for a two-layer version: about 2 to 2¼ cups flour, 1½ cups sugar, 3 teaspoons baking powder, 1½ cups milk, and 3 eggs. For buttercream, start with 2 sticks butter and ~6 cups confectioners’ sugar, adding 4–8 tablespoons milk to reach spreadable consistency.
Softened unsalted butter creams more easily and blends smoothly into hot milk for the whipped-egg method. Use a large mixing bowl to cut dust when sifting flour and sugar. Spoon and level flour, and crack eggs into a small bowl before adding them to the batter to avoid shells and ensure the best result for this recipe.
Essential tools and cake pans for best results
The right mixer, pans, and spatulas help your layers bake evenly every time.
Start with a stand mixer (whisk and paddle) or a reliable hand mixer and at least two sturdy mixing bowls. Flexible spatulas and an offset spatula make scraping and frosting easier. Parchment rounds cut release problems and save time.
Pan choices and prep
Use two 8-inch pans for about 25–30 minutes at 350°F, two 9-inch pans for 30–35 minutes, or a 9×13 pan for a sheet version. Cupcakes take roughly 18–20 minutes at the same temperature.
- Prevent sticking: line bottoms with parchment and spray sides. If pans stick, grease with shortening and flour or use a flour-added baking spray.
- Even bake: light-colored aluminum pans reduce over-browning and help cakes bake more uniformly.
- Cooling: cool on racks and flip layers upside down for flatter tops that stack without heavy trimming.
- Oven tips: place a rack in the middle and preheat so rise and finish time stay consistent; adjust minutes if your oven runs cool.
| Pan type | Best use | Bake guide |
|---|---|---|
| Two 8-inch rounds | Classic layer cakes | 350°F — 25–30 minutes |
| Two 9-inch rounds | Deeper layers, larger slices | 350°F — 30–35 minutes |
| 9×13 pan / cupcakes | Sheet cakes or portions | 350°F — 9×13: similar time; cupcakes: 18–20 minutes |
Birthday cake simple: step-by-step batter method
How you aerate the batter—by creaming or whipping eggs—shapes rise and crumb texture.
Creaming vs whipped-eggs: choose your approach
Creaming method: Beat butter and sugar about five minutes until pale and fluffy to trap air. Add vanilla, then alternate the dry and wet additions on low speed.
Whipped-egg method: Beat eggs and sugar on high until thick and tripled in volume (about seven minutes). Fold in sifted flour and other dry ingredients in three additions with minimal strokes to preserve aeration.
Bringing ingredients to room temperature
Bring milk, eggs, and butter to room temperature before mixing. This helps emulsify the batter and avoids curdling or grainy texture.
Alternating dry and wet for a smooth batter
Whisk dry ingredients in one bowl and mix milk, eggs, and vanilla in another. Add about one-quarter to one-third dry, then one-third wet, repeating and scraping the bowl to avoid pockets.
For the whipped-egg route, temper hot milk and melted butter by stirring a ladle of batter into the hot mix, then fold back gently. Aim for a pourable, silky batter with no dry streaks. Prepare pans first so you can get the batter into the oven within minutes and preserve the trapped air for best rise.
Make the buttercream frosting (classic and less-sweet options)
A glossy, stable buttercream transforms cooled layers into a silky, spreadable finish.
Old-fashioned vanilla buttercream: Beat softened butter in a bowl until pale and airy. Add confectioners’ sugar gradually to avoid clumps. Stir in vanilla extract and a teaspoon of milk at a time until spreadable.
Classic buttercream
After the sugar is incorporated, beat on medium-high for several minutes to aerate. This yields a light, creamy buttercream that smooths easily.
Cream cheese–boosted option
Beat butter and cream cheese together, add confectioners’ sugar slowly, then a pinch of salt and vanilla. Thin with milk or cream as needed. This version tastes less sweet but still holds up for piping and swirls.
Coloring and consistency adjustments
Use gel food color sparingly for vibrant hues without thinning the frosting. Adjust texture with a teaspoon of milk at a time; chilled frosting can be revived by re-whipping for a few minutes.
“Make slightly more frosting than you think you need — it’s easier to remove excess than to stretch too little.”
| Variation | Key steps | Best use |
|---|---|---|
| Old-fashioned vanilla | Beat butter, add sugar gradually, vanilla, milk; whip | Smooth spreads and basic piping |
| Cream cheese-boosted | Beat butter + cream cheese, add sugar, salt, thin with milk | Less sweet finish; holds swirls |
| Chocolate twist | Fold in cooled melted chocolate or cocoa powder | Chocolate fans; paired with fruit fillings |
Tip: Scrape the paddle and bowl frequently to avoid pockets of unblended butter or sugar. Make enough buttercream — a generous supply keeps decorating stress-free.
Pan sizes, oven temperature, and bake times
Choosing the right pan and watching oven minutes will help you get even, tender layers. Match pan size to the timing below and use doneness cues rather than just the clock.

Rounds and layer cake timing at 350°F
Two 8-inch rounds: bake 25–30 minutes at 350°F. Check at the lower end of the range to avoid overbaking.
Two 9-inch rounds: bake 30–35 minutes at 350°F. Heavier pans or crowded racks can add a few more minutes.
Sheet cake and cupcakes: time and doneness cues
9×13 sheet: plan about 30–35 minutes. Metal cake pans heat differently—start checking early to prevent dry edges.
Cupcakes: portion batter 2/3 full and bake 18–20 minutes. Tops should be lightly golden and centers set.
- Reliable cues: a gentle press on the top should spring back, and a toothpick inserted in the center comes clean or with a few moist crumbs.
- Oven tips: keep pans centered on the middle rack and rotate halfway if your oven has hot spots.
- Cooling: let layers rest in pans 5–10 minutes, then unmold to racks. Cooling upside down can flatten small domes for easier stacking.
- Pan choice: use light-colored, heavy-gauge cake pans for even heat. Glass pans may extend bake time—check a few minutes later.
- Peek rule: avoid opening the oven before two-thirds of the expected minutes have passed to prevent collapse.
“Trust doneness cues over the clock: spring-back tops and a toothpick that comes clean are the best signals.”
Assembling and layering like a pro
Assembling your cooled layers correctly makes the difference between a homemade look and a polished finish.
Start with fully cooled layers. Chill them briefly if needed; cold layers are firmer and easier to level. Trim any domes with a serrated knife or leveler for even stacking.
Place the first layer top-side up on a board or turntable. Add a generous amount of filling but keep it about 1/4 inch from the edge to prevent spillover when you add the next layer.
Set the second layer top-side down to create a flat, frostable surface. This reduces extra trimming and gives a neat top for the final coat.
Leveling layers and crumb control
Spread a thin crumb coat over the top and sides and chill briefly to lock in loose crumbs. Use long, even strokes with an offset spatula and avoid dragging the blade into the surface, which lifts crumbs into the frosting.
Frosting order: fill, top, and sides
After the crumb coat firms, apply the final layer of frosting. Smooth the top outward to the edges, then cover the sides. Hold a bench scraper flush against the side while rotating the turntable for clean, even walls.
“Add sprinkles immediately before the icing sets — they’ll stick and create a bright, even finish.”
| Step | Action | Why it matters |
|---|---|---|
| Chill layers | Cool or refrigerate briefly | Makes trimming and handling easier |
| Trim domes | Level with serrated knife | Ensures even stacking and neat sides |
| Crumb coat | Thin layer around top and sides | Seals crumbs before final frosting |
| Final frost | Smooth top, then sides; chill | Delivers sharp edges and clean finish |
- Keep layers aligned by marking the board and rotating as you frost.
- For sharp edges, chill after each smoothing step and use a bench scraper.
- Press sprinkles onto tacky frosting for best adhesion.
Pro tips and troubleshooting for fluffy, moist cake
Consistent room conditions and active leaveners are the unsung heroes of a reliably fluffy bake. Small prep steps prevent common issues like dense crumbs, large tunnels, or sticking.
Room temperature eggs and dairy, and why it matters
Use room temperature eggs and milk so the batter emulsifies evenly. Cold ingredients can cause curdling and reduce volume from whipped eggs.
Warm eggs quickly by placing whole eggs in warm water for five minutes, then dry before cracking. Also avoid icy bowls in cold kitchens — slightly warm bowls help aeration.
Checking baking powder activity
Confirm your baking powder is active before mixing. Even if not expired, humidity or poor storage can weaken leaveners and hurt rise.
Test a teaspoon in hot water — it should fizz briskly. Replace if fizz is weak to restore dependable lift.
Prevent sticking: pan prep and parchment
Prep pans with parchment rounds and a generous nonstick spray. For stubborn pans, grease with shortening then dust with flour.
Avoid overfilling pans; too-deep batter raises the risk of underbake and sticking. If a layer clings, cool a few extra minutes, run a thin knife around the edge, then invert with a firm tap.
Avoiding dense crumbs and large air tunnels
Minimize mixing once flour is added — overworking develops gluten and creates a dense crumb. Fold gently and stop when dry streaks disappear.
Fill pans, tap them lightly on the counter to release big bubbles, and get the batter into the oven promptly. Quick action preserves trapped air and prevents visible tunnels.
- Tip: Track small changes — different brands of butter, sugar, or flour can subtly alter texture.
- Tip: Avoid long delays between mixing and baking; timing matters for reliable rise.
Flavor variations, fillings, and decorations
A few well-chosen extracts or zests refresh the profile of a soft vanilla sponge without changing bake time. Try small tweaks that keep texture intact while adding clear flavor notes.
Vanilla twists: almond, lemon, coconut
Start light: use 1/4–1/2 teaspoon almond, lemon, or coconut extract so the vanilla shines through.
Add a teaspoon of citrus zest for extra lift or fold in 1/3 cup toasted coconut for a subtle tropical note.
Fillings: jam, lemon curd, chocolate ganache
Layer with raspberry jam for brightness, tangy lemon curd for contrast, or a rich chocolate ganache for drama.
For a classic feel, use jam and lightly sweetened whipped cream between layers, Victoria sponge–style.

Decor: sprinkles, fresh fruit, coconut, chocolate shavings
- Decorate sides with sprinkles or a ring of fresh berries on top.
- Try chocolate shavings, toasted coconut, or a ganache drip for texture and sheen.
- Switch to chocolate buttercream, a glossy mirror glaze, or a less-sweet fluffy vanilla frosting for a different finish.
| Variation | Best filling | Best finish |
|---|---|---|
| Almond-vanilla | Raspberry jam | Light buttercream |
| Lemon-vanilla | Lemon curd | Whipped cream |
| Coconut-vanilla | Passionfruit or jam | Toasted coconut or ganache |
| Chocolate twist | Chocolate ganache | Chocolate buttercream or mirror glaze |
Storage, freezing, and make-ahead timeline
A clear make-ahead plan saves time and keeps layers moist until service. Follow a few easy rules and your finished dessert will look and taste fresh.
Fridge storage: Store a frosted cake in an airtight container in the refrigerator for up to 4 days. Slice while chilled for clean portions, then let each piece sit 30–60 minutes before serving so flavors bloom and frosting softens.
Freezing unfrosted layers and thawing
Cool layers completely, then double-wrap tightly in foil or heavy-duty bags. Freeze up to 3 months and label with date and pan size.
Thaw overnight at room temperature while still wrapped to avoid condensation. Unwrap only when fully thawed, then frost as usual.
Quick make-ahead timeline and timing tips
- Bake layers 1–2 days ahead and refrigerate, or freeze for longer planning.
- Allow 20–30 minutes on party day to fill and frost a basic layer cake; allow more minutes for piping and detailed work.
- Chill assembled cakes briefly before transport or heavy toppings to keep layers level and stable.
“Vanilla and butter-based cakes retain moisture well; a cream cheese–boosted frosting chills without weeping.”
Yield, servings, and approximate nutrition
Estimate portions by pan type and serving style to plan food and leftovers. Use the guide below to match guest count and portion size for service or buffet presentation.
Servings by pan type and portioning
- Two 8-inch rounds: about 12–14 servings for moderate wedges.
- Two 9-inch rounds: roughly 14–16 servings with slightly smaller slices.
- 9×13 sheet: serves about 18–24 depending on rectangle size.
- Expect ~24 standard cupcakes from the same batter; fill liners two-thirds full.
Portion tips: weigh or use a measuring cup to divide batter evenly between cake pans for uniform layer height. Parchment-lined cake pans bake more predictably and help with neat unmolding.
Nutrition varies by filling and frosting. A frosted slice from an 8-inch double layer is roughly 571 calories when cut into 12–14 servings. Adding ganache, extra frosting by the cup, or heavy decorations raises calories per piece.
- Use a long serrated knife for clean wedges; wipe between cuts.
- Offer smaller party slices for kids and larger slices for adults to match appetite.
- Adjust pan choice and cut size based on guest count and other desserts being served.
Conclusion
A reliable vanilla sponge gives consistent rise and a soft crumb, whether you make rounds, a sheet, or cupcakes. This birthday cake recipe supports both creaming and the whipped-egg + hot milk way, so you can pick the technique that fits your tools and time.
Most bakes finish at 350°F in about 25–35 minutes; use a clean toothpick and springy top to confirm doneness. Frost with classic vanilla or a cream cheese–boosted frosting, then decorate with sprinkles or fresh fruit.
A strong, reliable base uses fresh leavener, room-temp eggs and dairy, and minimal mixing after aeration to avoid dense crumbs. Store frosted desserts covered in the fridge up to four days; freeze unfrosted layers for three months. Preheat, gather flour, sugar, and butter, and bake now—your next celebration-worthy birthday cake is minutes away.