Retro Birthday Cake Doodle Recipe – A Nostalgic Dessert
Surprising fact: home bakers reveal that a rainbow reveal increases guest delight by over 60% at family gatherings.
This Website contains affiliate links. That means I may earn a small commission if you purchase through my links, at no extra cost to you.
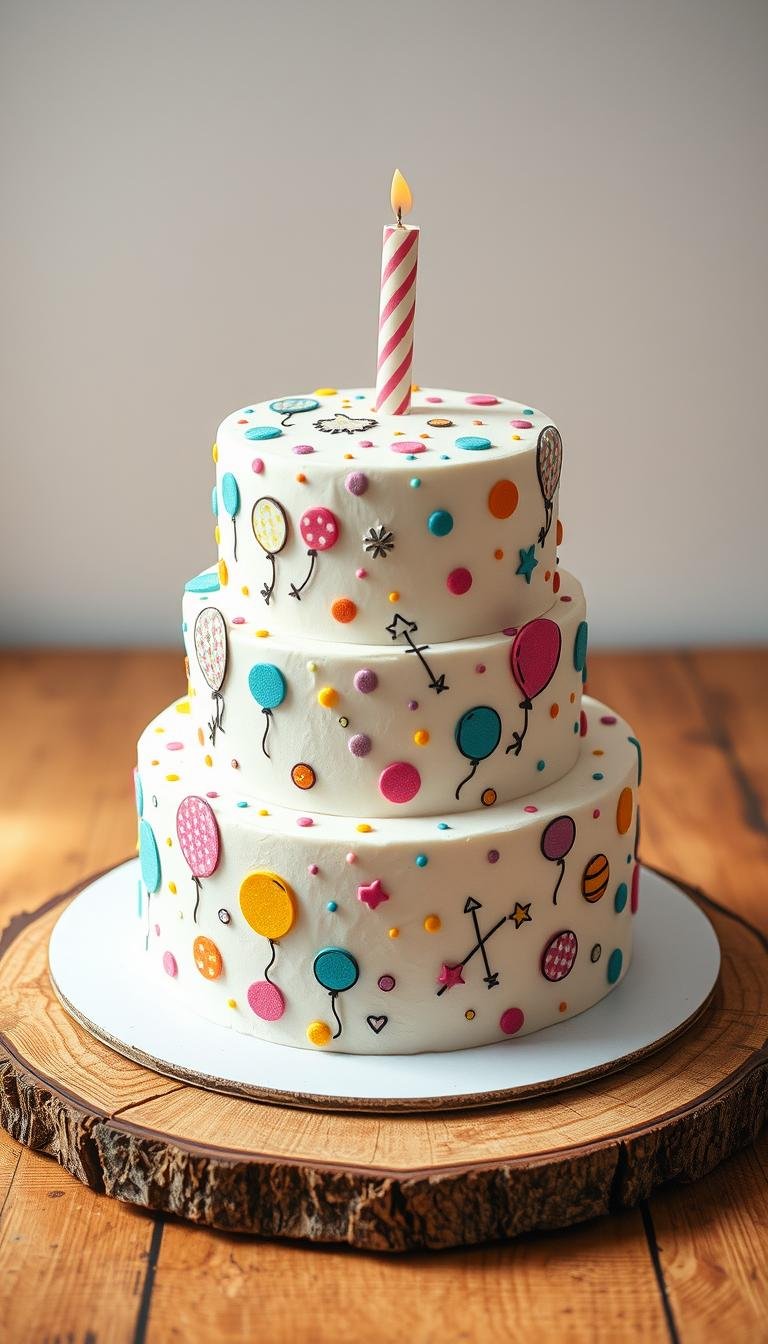
This playful, retro-inspired treat pairs a clean white exterior with hand-drawn art and a hidden rainbow interior. The tutorial shows step-by-step instruction so you can recreate the look and flavor at home with confidence.
Expect clear guidance on ingredients, tools, mixing for even color, baking, cooling, stacking, crumb coating, and covering with fondant for a smooth canvas. Timing is key: chilling gives the right surface feel before adding the outer doodle finish.
The nostalgic rainbow layers recall classic party trends while staying approachable for home bakers of any skill. Kids can help add names, stars, and rainbows with edible markers to make the project a hands-on celebration.
Key Takeaways
- Plan your time: bake, chill, and decorate on a clear schedule.
- Follow precise measurements and temps to reduce guesswork.
- Use crumb coating and fondant for a smooth design surface.
- Mix batter for even color and stable layer thickness.
- Include kids in decorating to make it a shared activity.
- Find easy substitutions and make-ahead tips to save prep time.
Why This Birthday Cake Doodle Wins for Parties and Kids’ Creativity
A minimalist white shell that opens to six vivid layers delivers instant delight and old-school charm.
Playful, vintage-leaning design: A neat white exterior nods to classic party cakes while a hidden rainbow interior creates a dramatic first-slice reveal that delights guests. The clean fondant surface keeps lines sharp and gives a true retro bakery feel.
The rainbow inside taps into shared memories. Six thin layers baked in 9-inch pans for about 15 minutes each yield a tall, tidy profile that cuts cleanly. A lemon Swiss meringue buttercream between layers adds a fresh lift without masking vanilla flavor.
A built-in activity for kids
After chilling and covering, children can use edible markers to add names, ages, suns, or simple sketches. This turns the dessert into a keepsake and heightens excitement before the reveal.
| Step | Detail | Benefit |
|---|---|---|
| Bake layers | 6 thin layers, 9-inch pans, ~15 min | Even color, clean slice |
| Fill | Lemon Swiss meringue buttercream | Bright, balanced flavor |
| Cover & decorate | Vanilla fondant + edible markers | Smooth surface, interactive finish |
Planning tip: Position the dessert where everyone can see the first cut to maximize the gasp-worthy reveal. This format scales well for small family gatherings or larger celebrations and keeps both flavor and structure intact during display.
Birthday Cake Doodle: Ingredients, Tools, and Step‑by‑Step Recipe
Start by organizing ingredients and pans so each layer bakes evenly and stacks true.
Ingredients for vanilla rainbow cake layers
Core mix: 2 sticks (226 g) butter, 2 1/3 cups (466 g) sugar, 5 egg whites, 2 tsp vanilla, 3 cups (375 g) all-purpose flour, 4 tsp baking powder, 1/2 tsp salt, 1 1/2 cups (355 g) milk. Use gel food colors (red, orange, yellow, green, blue, purple). Preheat to 350°F.
Lemony Swiss meringue buttercream (fill, crumb, final)
Fill/crumb: 9 egg whites, 1 3/4 cups (350 g) sugar, 4 sticks (454 g) butter, 2 tsp lemon extract.
Final frost: 5 egg whites, 1 cup (200 g) sugar, 2 sticks (227 g) butter, 1 tsp lemon extract. Heat whites and sugar over medium until sugar dissolves, whip to room temp, add butter slowly, then extract. If soupy, chill 5–7 minutes and re-whip.

Tools checklist and mixing/coloring
Use multiple 9-inch pans (reuse as needed), stand mixer, whisk and paddle, gel color set, offset spatula, bench scraper, turntable, 9-inch 1/4-inch cake board, plastic wrap, rolling pin.
Divide batter by weight into six equal bowls for balanced layers. Tint with gel colors for saturation and bake each layer ~15 minutes.
| Task | Details | Benefit |
|---|---|---|
| Bake | 350°F, 9-inch pans, ~15 min, rest 10 min in pan | Even rise, minimal doming |
| Chill | Flip, cover, rapid chill until firm | Clean stacking and easy trimming |
| Buttercream | Two batches: fill/crumb + final; emulsify slowly | Stable, silky texture for fondant |
| Fondant | ~2 lbs 3 oz for 9″×5″ cake; roll, drape, smooth | Blank white canvas for markers |
Assembly, crumb coat, and serving timeline
Stack six layers to reach ~4.5 inches tall. Apply a thin crumb coat, chill until firm, then final frost. Cover with fondant and refrigerate overnight before drawing.
Bring to room temperature about 6 hours before serving so flavors bloom and buttercream softens. For a twist, swap one layer for chocolate or bake a few matching cupcakes for quick tastings while you work.
Decorating the Doodle Cake: Designs, Kids’ Involvement, and Pro Tips
Finish the covered layers with playful line work and simple motifs to turn a smooth white surface into a lively showpiece.

Let kids add simple sketches
Invite kids to write a name, draw a rainbow, or add a bright sun. Offer small prompts so they feel confident. Use hearts, stars, and smiley faces to fill gaps.
Marker choices and avoiding dents
Use fine- and medium-tip edible markers for crisp lines and gel-based tones for strong color. Test a tiny patch first so colors read well on fondant.
Chill the fondant-covered layers overnight. While decorating, return the cake to the refrigerator every 15 minutes if the fondant softens. Hold the cake by the board edges to avoid dents.
Design ideas and shop trends
Browse bakery collections and shop galleries for minimalist motifs like monoline lettering or repeated icons. Map your layout from top to bottom and wrap elements over the edge for flow.
Serving, storage, and timing
Serve at room temperature—remove the fondant-covered cake about 6 hours before slicing so buttercream softens and flavors bloom. Store leftovers airtight in the fridge and bring to room temperature before enjoying.
| Topic | Tip | Why it helps |
|---|---|---|
| Kids’ prompts | Name, age, rainbow, sun | Easy entry points for participation |
| Markers | Fine & medium edible, gel tones | Better line control and vibrancy |
| Chill routine | Overnight chill; fridge breaks every 15 min | Prevents dents, keeps fondant firm |
| Serving | Remove 6 hours before serving | Buttercream softens; best flavor |
Conclusion
Finish with clear steps: bake six evenly colored layers, stack them with lemon Swiss meringue buttercream, cover in smooth white fondant, and add hand-drawn art for a polished, personal centerpiece.
Follow the timeline: bake and chill layers, apply a crumb coat and chill, drape fondant and chill overnight, decorate with short fridge breaks, then allow enough time at room temperature before serving so texture and flavor shine.
Keep motifs flexible. Simple line work or a full collage of icons suits any age or party style and lets guests enjoy a playful reveal. Use gel colors, precise weights, and gentle handling to get consistent results.
Make it your own: apply this approach to other celebration cakes and use the doodle concept to craft a true love cake for the guest of honor that feels memorable and special.