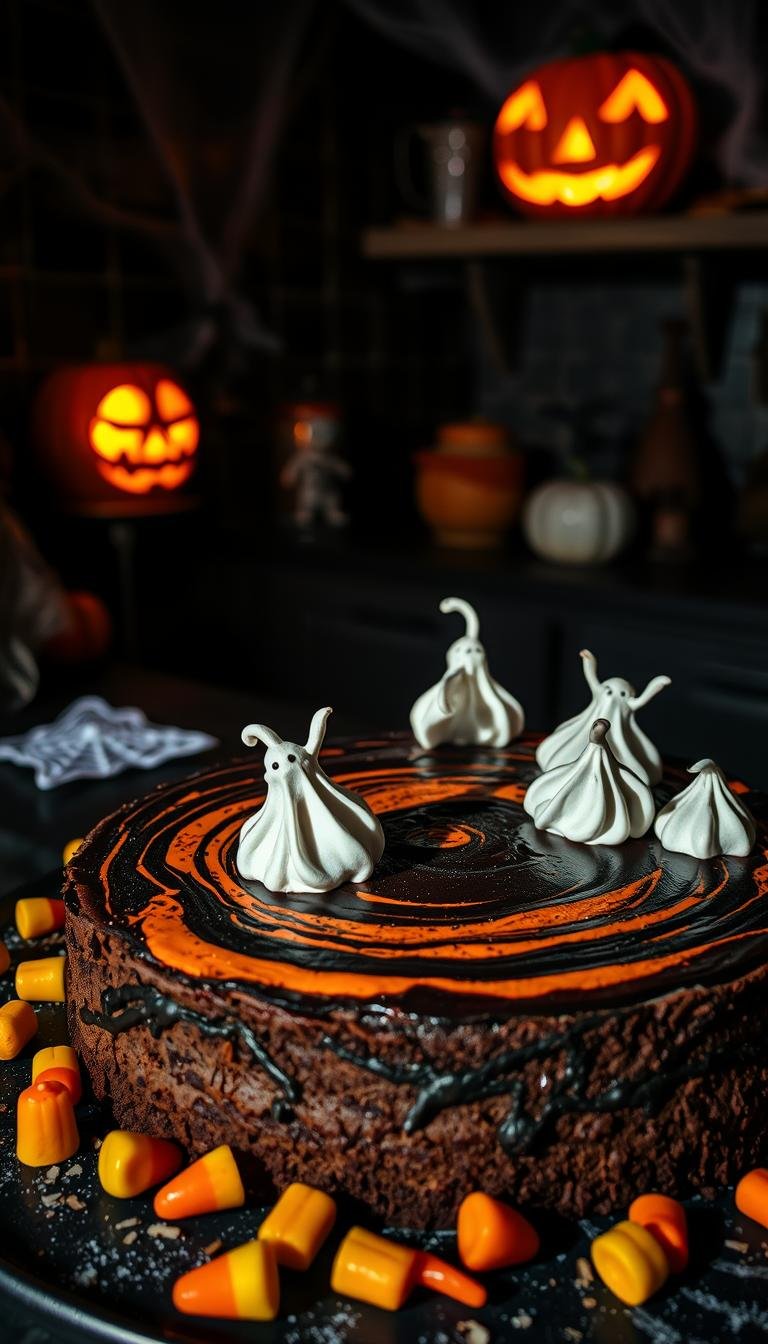
Red Velvet Cake Design Birthdays: 10 Stunning Ideas
Did you know that desserts with high visual contrast are shared 3x more on social platforms than neutral options? This guide explores ten standout ideas that help you create show-stopping birthday centrepieces with reliable structure and lasting flavor.
This Website contains affiliate links. That means I may earn a small commission if you purchase through my links, at no extra cost to you.
We focus on balance: bold deep red layers paired with cream-based frostings for sharp photos and clean slices. Each concept pairs practical tips on stability and transport with styling choices like gold leaf, ganache drips, and sugar flowers.
Expect quick-scannable sections, clear styling notes, and guidance on when to use fondant versus buttercream based on climate and theme. Every idea respects flavour integrity — plush crumb, mild cocoa, and tangy frosting — so the taste matches the look.
Whether you’re planning a kids’ theme, a romantic silhouette, or a minimalist table, this list gives practical finishing touches and personalization tips for toppers, messages, and same-day reveals from local bakers.
Key Takeaways
- High contrast layers photograph well and hold up for events.
- Choose buttercream or fondant based on weather and transport needs.
- Balance flavour first: subtle cocoa and tangy frosting are essential.
- Stability tips help with chilling, slicing, and décor durability.
- Designs cover kids, romantic, minimalist, and rustic styles.
- Simple personalization options make each cake feel custom.
Why red velvet cake designs are trending for birthdays right now
Across social feeds, a dramatic hue paired with pale frosting creates images that stop the scroll. The deep red crumb next to white or cream frosting gives instant visual drama that matches current party aesthetics.
Taste and appeal: The mild cocoa notes, gentle tang, and balanced sweetness make this velvet cake a crowd-pleaser. Guests find the flavour approachable compared with more polarizing options.
Versatility: A red velvet base supports minimalist finishes, metallic accents, romantic shapes, or playful motifs while keeping its signature look.
- Seasonless color works for cozy winter or bright summer tables when paired with berries or gold.
- Stable layers and smooth finishes photograph sharply under event lighting, helping hosts capture great images without pro gear.
- Bakers can swap cream cheese for buttercream to match venue rules or climate concerns.
- Popular techniques—ombré, drips, sugar flowers—map naturally onto this base.
Practical note: Match finish type to display time. Fresh fruit needs short shows; fondant holds up longer for long events.
red velvet cake design birthdays
What makes a show-stopper is consistent layering, a tender crumb, and a finish that survives transport.
What to expect from a standout velvet cake design
Look for even, thin layers with a fine, moist crumb. Clean edges and a smooth exterior signal careful technique and pro-level assembly.
Texture should be tender with a gentle spring. Moisture needs balance so the structure holds under heavier toppers like ganache or sugar flowers.
“Ask for a cross-section photo before pickup — it reveals true layer consistency and crumb color.”
How to choose the right style for your party theme
Pick frosting by venue: cream cheese gives tangy authenticity, while American or Swiss meringue buttercream offers more heat resistance.
Match finishes to mood: metallic leaf and ombré for glam, soft gradients for romance, character emblems for kids, and rustic textures for outdoor events.
Topper strategy, scale, and logistics matter. Use numbers or initials for personalization. Single-tier 6–8 inch serves small groups; two tiers add height and servings.
| Frosting | Stability | Best for | Notes |
|---|---|---|---|
| Cream cheese | Moderate | Authentic flavor, indoor events | Tangy finish; limit display time in heat |
| American buttercream | High | Warm venues, transport | Sweet, very stable; easy to texture |
| Swiss meringue | High | Silky finish, professional look | Smoother and less sweet; more work but elegant |
Final tip: make sure flavor choices match the look. Request cut photos to confirm layers, then approve fillings so taste and presentation align.
Classic red velvet with cream cheese frosting: timeless party pleaser
This classic pairing layers plush crumb with a tangy finish for a warm, familiar presentation. Expect gentle cocoa notes and a bright cream that balances sweetness and highlights texture.
Velvety layers, tangy cream cheese, and smooth swirls
Use a thin crumb-coat to trap stray crumbs, then add smooth swirls or rustic swooshes for a cozy look. Reserve a small amount of strained crumbs to press around the sides or top. That signature halo adds nostalgic texture without masking taste.
Serving & stability
- Chill to set frosting, then bring to room temperature before slicing for best mouthfeel.
- Cream cheese needs refrigeration; for long displays request a hybrid buttercream shell.
- Build 3–4 layers in a single tier for dramatic cross-sections that keep frosting balanced.
Keep accents minimal: piped rosettes, chocolate curls, or a few sprinkles keep the flavour front and center. For even, deep colour, measure cocoa and dye carefully and avoid overmixing during baking.
Gold-leaf ombré red velvet: glamorous milestone birthday centerpiece
A gold-leaf ombré centerpiece pairs dramatic color gradation with metallic accents to mark milestone years in style.
Gradient approach: Start with a deep red base that fades to lighter tones at the top. This vertical fade adds perceived height and reads beautifully in event lighting and photos.
Metallic finish: Apply edible gold leaf as asymmetrical bands or scattered flecks for a luxe look suitable for 30th–50th anniversaries and birthday celebrations.
Practical tips and styling
- Use smooth buttercream or a fondant base for crisp edges and clean gold adhesion; chill lightly to prevent tearing.
- Keep toppers minimal—small sugar florals or a numeral on the top preserves metallic focus.
- Two tiers cover roughly 30–50 servings while keeping a slender silhouette for formal tables.
- Try rose gold or mixed metallics to match flatware and candlelight.
“Gold leaf is delicate; place it with soft brushes and dry tools, then burnish gently for a seamless finish.”
| Feature | Best choice | Why it matters |
|---|---|---|
| Base finish | Buttercream or fondant | Ensures smooth surface and reliable gold adhesion |
| Gradient style | Vertical or horizontal | Vertical adds height; horizontal creates motion across tiers |
| Serving plan | Two tiers for 30–50 | Balances visual impact with portion needs |
Flavor note: Stick to classic fillings so every slice holds structure and lets the gold ombré be the visual star.
Fondant hearts and romantic gradients: a sweet birthday love note
A soft blush ombré and scattered fondant hearts make an intimate statement without heavy ornamentation.
Start with a pale white or blush buttercream base and blend a gentle red-to-pink gradient up the sides. This sets a romantic tone for date-night parties or a valentine day table and keeps the look modern and photo-ready.
Cut fondant hearts in multiple sizes and shades for layered depth. Arrange them in a directional cascade from the base toward a top corner to guide the eye and keep balance.
Use embossing tools or texture mats on a few hearts to catch light and add subtle pattern. Attach pieces with small dots of buttercream so you can reposition them during styling.
- Pair with a scripted topper—initials or the word love—for a clean silhouette.
- Keep fillings classic so the visual romance is backed by familiar taste.
- Limit the palette to blush, cream, and muted tones so the gradient carries the look.
Handling tip: Keep fondant pieces covered until use to prevent drying. Thoughtful spacing and varied heart sizes create a dynamic, editorial-style finish that transitions easily for special occasions.
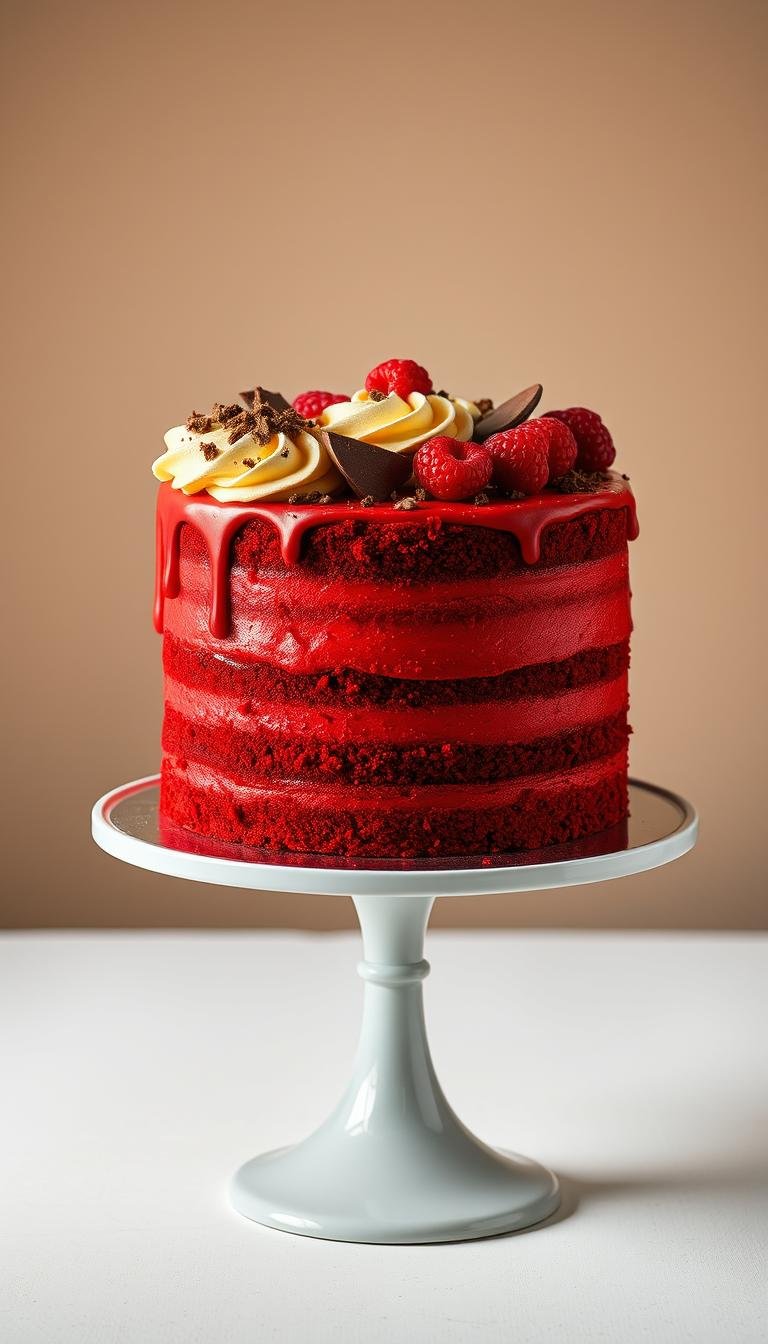
Chocolate drip red velvet with strawberries: decadent dessert drama
Glossy ganache drips turn a classic layer into an instant showpiece while fresh berries add a bright counterpoint.
Ganache drip basics: Use a 1:1 weight ratio of semi-sweet chocolate to cream for controlled, semi-fluid drips. Warm the ganache until slightly fluid; it should move but not run off the board.
Application and tools
Chill the frosted cake first so the rim holds the drip. A turntable and a squeeze bottle help make even lengths and spacing.
Edible toppers and slicing tips
Top with chocolate-dipped strawberries for glossy contrast. Alternatives include mixed berries, truffles, or chocolate shards to add texture for larger parties.
“Score the top lightly to mark portions—this guides the knife and protects the drip edge.”
| Element | Ratio / Temp | Best use | Notes |
|---|---|---|---|
| Drip ganache | 1:1 chocolate:cream, slightly warm | Even runs, reflective top | Thin top layer highlights toppers and candles |
| Frosting prep | Well-chilled surface | Prevents melting | Creates clean drip stops |
| Stability | Dowels for tall builds | Transport & display | Keep chilled until reveal |
| Filling | Crumb dam recommended | Prevents bleed from jam or fruit | Maintains tidy layers and flavour |
Slicing: Score the top before cutting to keep plates clean. Keep the base sweetness moderate so the chocolate and fruit balance the overall dessert.
Bouquet-style sugar flowers cascading over red velvet tiers
A diagonal cascade of handmade sugar blooms can turn a tiered centerpiece into a romantic focal point.
Arrange handcrafted roses, peonies, and small buds along a soft diagonal from the base up to the top tier. This line guides the eye and makes the layers read taller in photos.
Use a restrained palette of soft reds, blush pinks, and ivory to echo the interior crumb and keep the look cohesive. Mix wired sugar flowers with a few fondant leaves for depth and natural overlap.
Secure wired stems with food-safe supports and reinforce each tier with internal dowels. Sturdy internal support keeps the cascade from weighing down slices and preserves sliceability.
If clients prefer fully edible finishes, consider buttercream florals instead. A smooth buttercream or fondant canvas helps pieces adhere and sit flush to curved sides.
Apply subtle luster dust on petal edges for a life-like sheen without heavy sparkle. Match bouquet style to the venue—garden parties, vintage rooms, or banquet halls—to keep the mood consistent.
Serving tip: Remove wired florals before cutting to protect guests and keep slices clean. Scale the cascade for one- or two-tier builds to match guest count and presentation needs.
| Element | Recommendation | Why it matters |
|---|---|---|
| Flower types | Sugar roses, peonies, buds, fondant leaves | Layered shapes add depth and realism |
| Palette | Soft reds, blush, ivory | Echoes interior crumb; keeps look romantic |
| Support | Wired stems + internal dowels | Prevents sagging and preserves sliceability |
| Surface | Smooth buttercream or fondant | Helps flowers sit flush and secure |
| Finish option | Buttercream florals (edible) or wired sugar blooms | Choice between softer finish and sculpted realism |
Superhero emblem red velvet cake for kids’ birthdays
Center the celebration with a bold emblem that reads clearly from across a classroom. Use a large fondant emblem or a neat buttercream transfer on the top for instant recognition. Keep the rest of the surface simple so the hero mark becomes the visual focus.
Size and structure: A single-tier 7–8-inch cake works best for small parties and school events. Sturdy, chilled edges help the slice stay clean while kids reach for pieces.
Match emblem colors to a thin banded base to keep the look playful but tidy. Offer matching cupcakes or cookie favors with mini emblems for easy sharing and portion control.
Safety & serving notes: Label common allergens (nuts, dairy, eggs) clearly when serving groups of children. Coordinate candle colors and add a small name banner for a personal touch without crowding the surface.
Transport tip: Use a snug box with a non-slip mat and a cool environment to preserve sharp edges. Choose modular toppers if you need flexibility for last-minute character swaps.
“A single, well-placed emblem reads better than many small decorations in a busy kids’ setting.”
| Element | Recommendation | Why it matters |
|---|---|---|
| Tier size | 7–8 inch single tier | Easy to portion for classrooms; serves ~12–16 kids |
| Emblem type | Fondant or buttercream transfer | Bold look; fondant holds shape, buttercream tastes lighter |
| Finish | Chilled, sturdy edges | Withstands handling during lively moments |
| Extras | Matching cupcakes/cookies | Simple sharing and reduced slicing at the party |
Rustic log red velvet with bark-texture frosting
Turn a round tier into a woodland stump for a cozy, outdoorsy centrepiece.
Build the silhouette by carving a single round layer with slightly irregular edges to mimic natural timber. Keep the top flat and add a shallow growth-ring sketch to guide slices.
Bark effects come from spatula strokes, palette-knife ridges, or a woodgrain comb worked into a chocolate buttercream. Dry-brush cocoa powder and a touch of black gel into crevices to deepen the relief.
Add small fondant accents—an axe, a carved initials heart, or tiny mushrooms—to give personality. For lightweight balance, use a lighter interior filling so the exterior’s chocolate-forward finish does not overwhelm the flavour.
Set the textured frost in the fridge before transport to protect the bark look. Present the stump on a wood-slice board or with moss-green décor and forest-floor accents like mushroom meringues or chocolate curls.
Serving tip: Score the top growth rings lightly to guide even cuts. This rustic design suits fall gatherings and intimate rustic venues.
Heart-shaped red velvet with glossy ganache and fresh raspberries
A heart-shaped silhouette glazed in mirror-like chocolate reads modern and romantic on any intimate table.
Finish: Use a smooth, mirror ganache to cover a 6–8-inch heart for a sleek top that reflects candlelight.
Arrange fresh raspberries along the rim or as a central cluster to add bright acidity. Spread a thin ganache layer under the fruit to stop seepage and keep the shine.
For a crisp message, pipe a scripted note in tempered white chocolate. Pre-cut a small guide notch at the top to protect the heart shape during the first slice for photos.
Layering a light raspberry compote between tiers keeps flavour continuity without overpowering the base. Chill until set, then allow a short tempering rest before serving for clean, soft slices.
Styling tip: Keep decor minimal — a narrow ribbon at the base is all you need to polish the presentation without competing with the glossy surface.
| Element | Recommendation | Why it matters |
|---|---|---|
| Pan size | 6–8 inch heart | Best for intimate Valentine Day dinners; serves 6–10 |
| Fruit placement | Rim or central cluster | Adds acidity and visual contrast; simple to remove when slicing |
| Pre-serve chill | Chill 30–60 minutes | Sets ganache and stabilizes fruit |
| Serving prep | Temper 10 minutes at room temp | Ensures neat cuts and soft interior |
Minimalist white fondant with bold red flower cascade
A crisp white fondant finish creates a gallery-ready backdrop for a dramatic floral sweep that reads clean and modern.
Clean lines and couture trims: Smooth, razor-sharp edges in white fondant let a single element carry the visual weight. Place thin red ribbon bands at the base of each tier to define structure and add a couture finish without clutter.
Use sugar or wafer-paper blooms for the cascade. These materials give lightweight volume and refined petals with subtle veining that read well in photos. Arrange flowers in a measured diagonal to preserve symmetry and generous negative space.
Practical and styling tips
- Install internal supports for multi-tier builds to protect the sharp edges during transport and service.
- Keep toppers minimal or omit them so the floral cascade remains the focal point.
- Stage photos with strong side lighting to enhance the high-contrast palette for editorial-quality images.
Flavour and finishing notes: Stick to classic fillings so the visual statement stays central. Match table linens, chargers, and menus to the white-and-red scheme for a cohesive presentation that moves easily from casual parties to formal soirées.
Naked red velvet cake with fresh berries and a snowy sugar dusting
A semi-naked finish lets the crumb and frosting peek through for an honest, farmhouse look.
Showcasing rich layers and cream cheese frosting
Expose neat, even layers with thin bands of cream cheese frosting between tiers to keep the profile rustic yet tidy.
That restrained coverage highlights a deep red crumb and keeps sweetness balanced for guests who prefer less icing.

Seasonal berry pairings for color and flavor
Top with strawberries in summer and switch to blackberries or blueberries later in the year for bright acidity and contrast.
Finish with a light dusting of icing sugar for a “snowy” effect that lifts the visual pop against the deep red interior.
- Moisture control: build a thin crumb dam and chill before adding fruit to prevent bleed and keep clean lines.
- Timing: assemble fruit toppings close to service for best freshness; highly perishable berries must be chilled until reveal.
- Styling: tuck simple greenery or tiny blossoms around the fruit to enhance the farm-to-table feel.
“A semi-naked finish is about flavour-first baking and honest presentation.”
Slicing tips: score serving portions on top and use a hot, clean knife between cuts to avoid dragging berries along exposed sides.
This style suits daylight events and garden venues where natural textures and flavour-forward simplicity read best.
Red velvet cupcake bouquet: a playful, shareable twist
Build a floral-style gift that serves and dazzles at once. Start by piping buttercream rosettes on individual cupcakes in a few shades of red and blush. Arrange them on a round board or in a shallow box so the piped swirls read as a bouquet instead of separate treats.
Arranging buttercream rose swirls into a gift-worthy “bouquet”
Mix larger blooms with smaller buds for a natural composition and visual depth. Use leaf tips to add tiny green accents that complete the floral illusion without adding weight.
Why this works: Cupcake bouquets offer effortless portion control, easier transport, and a fast setup at the venue. They make a charming alternative when a full centerpiece cake isn’t necessary.
- Wrap the board edge with ribbon or tissue paper to finish as a gift.
- Keep a consistent buttercream recipe so piped details match across all cupcakes.
- Tuck mini toppers or numbers among the “flowers” to personalize the arrangement.
- Include neutral or white rosettes sparingly to spotlight the stronger tones.
Storage & serving tip: Chill lightly to set swirls, then bring to room temperature before serving for ideal texture and flavor. This keeps the frosting defined while making the cupcakes easy to eat and share.
Cream cheese frosting, flavor, and texture: what makes red velvet special
A balanced bite comes from careful ingredient ratios and simple technique.
Key ingredients:
Key ingredients: cocoa, buttermilk, vinegar, and cream cheese
Use a modest amount of cocoa for a subtle chocolate note. Buttermilk and a dash of vinegar tenderize the crumb and add gentle tang.
Room-temperature eggs and dairy give even emulsification and reliable rise. Natural or gel food colour keeps batter viscosity steady for consistent layers.
Balancing mild cocoa, tang, and sweetness for the perfect bite
A smooth cheese frosting brings lactic acidity that lifts sweetness without overpowering the base. Thin, even layers keep the frosting-to-cake ratio pleasant in every slice.
Avoid overmixing to prevent gluten development; scrape bowls to remove streaks. Adjust salt and vanilla to sharpen flavour and clean the finish on the palate.
| Element | Tip | Why it matters |
|---|---|---|
| Cocoa | Use a small percentage, sifted | Subtle chocolate notes without drying the crumb |
| Acids | Buttermilk + vinegar | Tender crumb and gentle tang |
| Temperatures | Room-temp dairy & eggs | Even rise and smooth batter |
| Frosting options | Stabilized cream cheese or Swiss/American | Better hold for warm venues while keeping character |
“Test bakes for new ovens or pan sizes to confirm timing and crumb before the event.”
Decorations and toppings that elevate birthday red velvet cakes
Simple toppings can lift a party centerpiece without adding fuss or extra prep time.
Icing sugar dusting and confetti sprinkles for instant charm
Icing sugar offers a quick, elegant finish for naked styles and can be made at home from granulated sugar and cornflour.
Confetti sprinkles add celebratory texture and should be applied minutes before serving to keep crunch and color bright.
Chocolates and candies as layers, toppers, or full coverage
Use ganache drips, shards, truffles, or a candy wall for maximal impact. These options photograph well and work on a single tier or multi-tier build.
Reserve denser chocolate elements for the base or as removable toppers to protect sliceability and flavour balance.
Coconut flakes and fresh fruit for lighter, textured finishes
Coconut flakes create a soft, snowy envelope over whipped or cream-based frostings without heaviness.
Fresh berries add brightness and a seasonal lift; keep fruit chilled until display and add close to service.
| Finish | Best use | Timing | Storage |
|---|---|---|---|
| Icing sugar | Naked or semi-naked cakes | Apply just before serving | Keep dry; avoid humidity |
| Confetti sprinkles | Kids and festive tables | Add near service time | Store airtight |
| Chocolate elements | Photo-forward, buffet displays | Place on chilled surface; remove if very warm | Keep cool; pack separately for transport |
| Fruit & coconut | Summer parties, lighter flavour | Add last; serve chilled | Refrigerate until reveal |
“Balance decorations with the base flavour so each slice stays enjoyable and not overly sweet.”
Personalization and delivery: make the birthday surprise seamless
Good planning ensures an emotional reveal and a stress-free setup. Many bakeries let you order online with photo customization, themed décor, and written messages. Prices vary by size and finish, from budget options to premium, tiered service.

Same-day and midnight delivery windows
Same-day or midnight delivery can time the surprise to the exact moment. Choose delivery windows that match guest arrival or candle time. If you pick a late drop-off, make sure you provide access notes and a backup contact.
Personalization options and approvals
Options include custom messages, photo prints, age numerals, and themed toppers. Ask for mockups or reference photos so the final product matches expectations.
- Order early for complex builds and confirm servings, allergens, and inscription wording.
- Confirm packaging: non-slip bases, chill packs, and sturdy boxes protect edges and toppers.
- Verify ingredients and request labels when serving large groups or an anniversary with varied diets.
- Schedule a short chill after delivery so slices cut clean at candle time.
“Timing is everything — the reveal is the memory.”
Conclusion
These ten ideas move you from concept to slice with confidence. Pick a single favourite or combine elements to suit the honoree. For a clear reference, request a cross-section photo before pickup.
Balance flavour and finish. Protect the mild cocoa, tang, and sweetness so every taste matches the look. Small accents — edible gold, precise drips, well-placed flowers, or one bold topper — turn a simple build into a showpiece.
Match style to logistics: display time, venue climate, and transport affect the final result. Good planning and a trusted bakery partner make execution smooth whether ordering or baking at home.
Shortlist a red velvet cake concept, gather references, and book a tasting or timeline. When flavour and form meet, the dessert becomes the memory long after the candles fade.