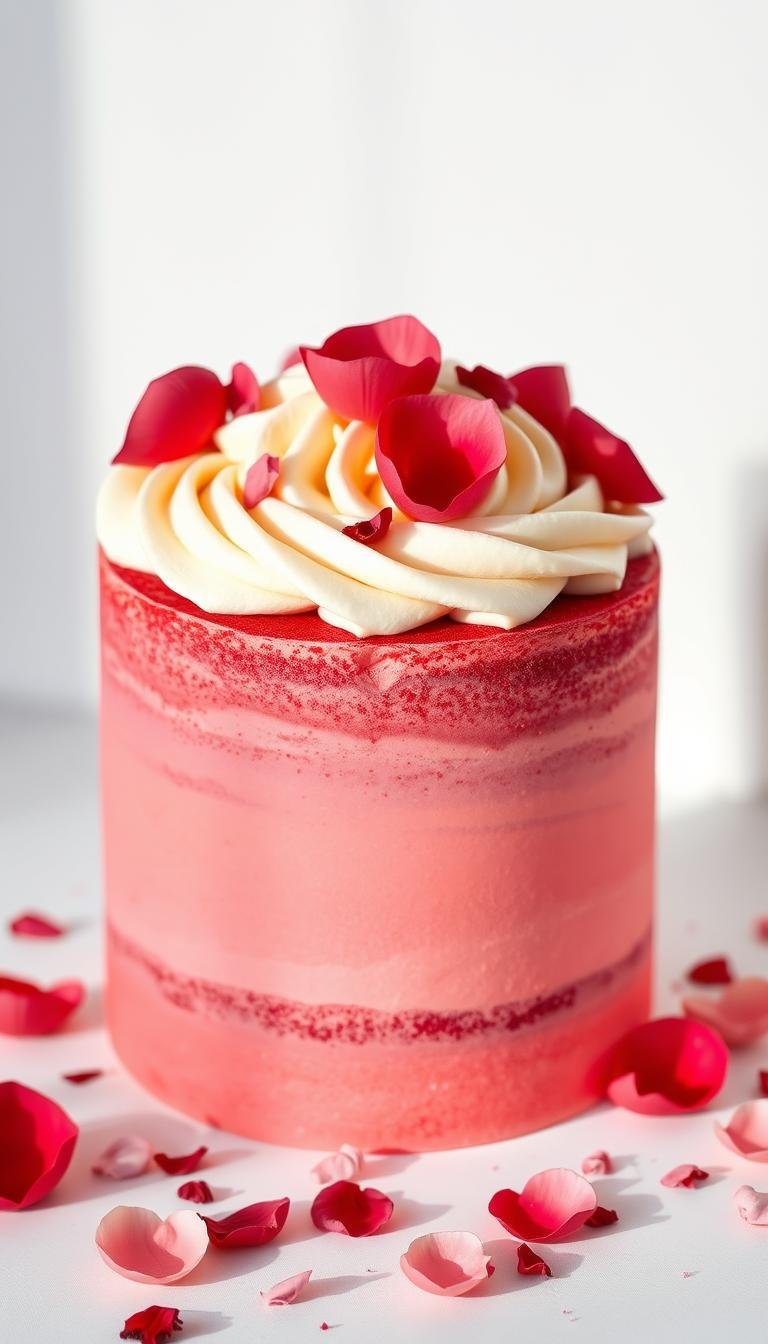
Red Velvet Cake Decoration: Simple and Elegant Designs
Surprising fact: more than 60% of home bakers say a clean, smooth finish makes their dessert look professionally made, even if the recipe is basic.
This Website contains affiliate links. That means I may earn a small commission if you purchase through my links, at no extra cost to you.
This guide shows how to highlight a plush crumb and sharp edges with minimal fuss. A classic red velvet cake pairs tender layers with stable full‑fat cream cheese frosting. Use oil in the batter for moist texture and gel food coloring for vivid hue without thinning the batter.
We’ll explain why ingredients matter, when to chill for crisp sides, and which tools—offset spatula, bench scraper, and a 1M tip—save time. Follow a crumb coat, chill, and final coat routine to trap crumbs and get a satin finish.
Adapt techniques for a 6‑inch, three‑layer cake baked about 27–30 minutes at 350°F or scaled to cupcakes. The goal is simple, elegant results that let texture do the heavy lifting.
Key Takeaways
- Prioritize a velvety crumb to make smoothing and layering easier.
- Use full‑fat cream cheese frosting whipped to a pipeable consistency.
- Gel food coloring gives deep color without loosening batter.
- Crumb coat, chill, then finish for clean sides and sharp edges.
- Simple tools and a clear process deliver pro-looking results at home.
What Makes Red Velvet Irresistible Right Now
The appeal comes from a subtle cocoa backbone paired with bright buttermilk tang and a forgiving, sliceable crumb.
Flavor-wise, this red velvet balances vanilla and a mild chocolate note. Buttermilk and a splash of white vinegar add a gentle tang that lifts sweetness. A dab of food coloring or the best red choice deepens the visual impact.
Texture matters. Fine crumb and tender structure let the cake hold smooth finishes and clean slices. That plush bite makes frosting look and taste silkier.
Modern and traditional methods coexist. Historic cocoa powder and acid reactions gave mahogany hues. Today, gel red food coloring produces vivid tones without watering the batter.
- Pair with full‑fat cream cheese frosting for silky richness and pipeable structure.
- Staple ingredients—flour, sugar, butter, baking soda, vanilla extract, and buttermilk—are easy to find.
- Simple steps like a crumb coat and chill deliver bakery looks in minutes.
Essential Ingredients and Texture Tips for a Picture-Perfect Velvet Cake
Small choices in the pantry shape big results. Use precise measurements and gentle technique to build a tender crumb that supports smooth frosting.
Balancing cocoa powder, buttermilk, and white vinegar for that signature “velvet” crumb
Choose non‑dutched cocoa powder so it reacts with buttermilk and a splash of white vinegar. That acid‑cocoa reaction helps the baking soda lift the batter and keeps the crumb fine.
“Measure carefully and keep mixing light — the crumb will reward you.”
Too much leavening or dark cocoa alters rise and texture. Keep the amounts modest and tested for reliable results.
Room temperature ingredients, properly measured dry ingredients, and tender cake batter
Bring eggs, buttermilk, and fats to room temperature for better emulsification. This gives an even, cohesive batter that bakes level.
Weigh flour and other dry ingredients when possible. If you use cups, spoon and level to avoid a dense loaf. After adding dry ingredients, stir only until combined to prevent toughness.
- Fat choice: oil like use yields a plush, moist crumb; blend with unsalted butter if you want extra flavor.
- Vanilla & salt: a little vanilla smooths bitterness and a pinch of salt amplifies overall flavor.
Intentional ingredients and careful handling make a stable, smooth canvas for any recipe finish and coloring approach.
Classic red velvet cake decoration
Begin by taming loose crumbs with a skim coat, then build a smooth outer layer and a neat top border.
Crumb-coated sides with reserved cake layer scraps
Level cooled layers and save the trimmed scraps. Crumble those offcuts to create red-on-red crumb accents that signal the recipe’s identity.
Apply a thin crumb coat of cream cheese to seal loose bits. Smooth with a bench scraper and chill 10–30 minutes until firm.
Clean, smooth finish with cream cheese frosting and a piped border
After chilling, add a thicker coat of frosting. Use an offset spatula and rotate the turntable for sleek sides.
Press reserved crumbs gently into the base or up the sides for subtle texture. Fit a piping bag with a 1M tip and pipe rosettes or shells for a classic frame.
When to chill between coats for sharp edges and fewer crumbs
Chill 30 minutes in the fridge or freeze 10 minutes to set the seal. A firm coat prevents smearing and makes piping neater when transporting the cake.
| Step | Tool | Timing |
|---|---|---|
| Crumb coat | Offset spatula, bench scraper | 10–30 minutes chill |
| Final smooth | Turntable, bench scraper | 5–10 minutes |
| Pipe border | Piping bag, 1M tip | 5–15 minutes |
Piped Elegance: Rosettes, Ruffles, and Borders with Cream Cheese Frosting
With the right tip and a steady hand, swirls and rosettes become easy to master.

Using a 1M tip for rosettes and dreamy swirls
Use the 1M tip. Its open star shape makes defined rosettes, ruffles, and borders that hold on a chilled base. Practice on parchment to build rhythm.
Frosting structure: cream cheese, unsalted butter, and powdered sugar ratios
A stable base matters. Combine full‑fat brick cream cheese with room temperature unsalted butter. Slowly add powdered sugar until thick and smooth.
“A common ratio for a three‑layer 6‑inch cake is 1/2 cup cream cheese : 1.5 cups unsalted butter : 7 cups powdered sugar, plus 1 tbsp heavy cream.”
How much frosting to make for all-over piping vs. a simple finish
Plan one standard batch for a smooth finish and border. For heavy decorative piping, make 1.5x the recipe.
| Use | Batch | Notes |
|---|---|---|
| Smooth finish + border | Standard | 1/2 cup cream cheese, 1.5 cups unsalted butter, 7 cups powdered sugar |
| Full rosettes coverage | 1.5x | Scale ingredients; chill if too soft |
| Adjusting texture | Per tsp/cup | Add 1 tsp cream at a time to loosen; chill to firm |
Pipe rosettes from center outward, overlap slightly, and stop pressure before lifting the tip to avoid tails. Keep frosting cool, and let the sponge provide most of the color contrast.
Minimalist Toppings That Elevate: Berries, Edible Flowers, and Chocolate Accents
A small cluster of fruit or a handful of crumbs can change a simple finish into a refined centerpiece.
Keep toppings deliberate. Choose either a tonal treatment with reserved crumbs or a high-contrast flourish with fresh berries and blooms.
Practical pairing: tart raspberries or strawberries cut through the richness of cream cheese and lift each slice. Pat fruit dry and add it just before serving to avoid stains and soggy spots.
Edible flowers must be untreated and food-safe. Use a few sprigs for height and a light, asymmetric cluster to keep the look modern.
For subtle sheen, scatter tiny molded chocolate accents sparingly. Match shapes across the top for cohesion and to echo any piped border.
“A chilled base helps toppings stay put and keeps edges sharp.”
| Topping | Effect | Placement |
|---|---|---|
| Reserved crumbs | Tonal, textured | Sides or small base clusters |
| Fresh berries | High contrast, tang | Asymmetric cluster or ring |
| Edible flowers | Height, elegance | Small group off-center |
| Chocolate accents | Sophisticated note | Sparingly, consistent shapes |
Color Confidence: Gel vs. Liquid Red Food Coloring
Choosing the right pigment makes a vivid finish possible without harming texture. Gel options deliver concentrated color with almost no extra liquid. That preserves rise and keeps a smooth crumb.

Achieving deep hue without thinning your batter
Use gel food coloring. A small squeeze or a toothpick of gel goes a long way. Start with a tiny amount and add in 1/8‑tsp increments until you reach the tone you want.
Liquid food coloring may need a full small bottle to reach the same depth. That extra liquid can loosen batter and affect bake time and crumb.
Natural tones and the cocoa-acid reaction
For a subtler mahogany, rely on non‑dutched cocoa powder reacting with buttermilk and white vinegar. This method gives a classic shade without extra additives.
“Aim for a raw batter shade slightly deeper than your target — color darkens during baking.”
- Practical tip: if swapping gel into a recipe written for liquid, add 1–2 tsp water or milk only if the batter feels too thick.
- Prep: test a cupcake first and wear gloves to prevent staining.
- Brands: Americolor and Chefmaster are reliable for consistent results and are often the best red options for home bakers.
Tools and Timing: From Wire Rack to Final Reveal
A steady routine—cooling, chilling, and tidy tools—clears the path to crisp edges.
Start with cooling: turn layers out onto a wire rack to stop carryover baking and avoid soggy bottoms. Cool completely before stacking so frosting holds and layers stay even.
Base setup: secure your first layer to a greaseproof board like use with a small dab of frosting to prevent sliding during assembly.
Key tools and quick timing
- Use an offset spatula to spread and a bench scraper like use for straight sides and crisp edges.
- Fit a small piping bag like use with a 1M tip for rosettes; double-bag if the cream is very firm.
- Chill 10–30 minutes between coats to lock crumbs without over-firming the cake.
- Bring the finished cake back to room temperature before serving so crumb and flavors shine.
| Task | Tool | Timing |
|---|---|---|
| Cooling layers | Wire rack | Until fully cool |
| Crumb coat | Offset spatula, bench scraper | Chill 10–30 minutes |
| Piping and final touches | Piping bag (1M), greaseproof board | 5–15 minutes |
Keep tools clean and a warm water bowl nearby to rewarm spatulas. Weigh batter into pans for even height and predictable bake minutes. Prep frosting, measure butter, sugar, and flour, and have toppings ready for a calm finish and a stable reveal.
Step‑by‑Step Assembly for Simple, Elegant Results
Divide, chill, and finish with intent to keep layers even and edges crisp.
Divide about 1300 g of cake batter into three 6‑inch pans (≈440 g each). Bake 27–30 minutes at 350°F. Cool 15 minutes in the pans, then transfer to a wire rack to cool completely.
Level, stack, and fill
Weigh batter for uniform rise. Level fully cooled cake layers with a serrated knife so the stack sits flat. Add a thin, even layer of frosting between each layer to avoid bulges.
Crumb coat, chill, and finish
Apply a thin crumb coat to seal stray crumbs. Chill 10–30 minutes until firm to the touch. Smooth the final coat with long, steady strokes using a bench scraper and a rotating board.
Serving time
Press reserved crumbs gently into tacky sides if you want a tonal edge. Pipe a 1M border once the surface has set slightly. Chill to set the design, then return the cake to room temperature 45–60 minutes before slicing for the best texture.
- Slice with a warm, clean knife, wiping between cuts.
- Store leftovers covered; seal cut surfaces with a thin coat of frosting to lock moisture.
Scale and Store: Sizes, Cupcakes, and Make‑Ahead Strategy
Scaling a single batch is simple when you control batter weight and bake minutes. One batch yields about 1300 g (≈6 cups): divide into three 6‑inch layers (~440 g each) or two 8‑inch layers. Expect a few extra minutes for the larger pans at 350°F.
Pan sizes and cupcake conversions
For cupcakes, portion batter into liners and bake 18–21 minutes at 350°F. One batch makes roughly two dozen. Weigh batter into pans for even heights and predictable minutes across sizes.
Make‑ahead and storage tips
Cool layers completely on a wire rack, wrap tightly, and freeze if you need extra time. Thaw wrapped to avoid condensation before decorating.
- Frosting prep: cream cheese frosting refrigerates up to 2 weeks or freezes up to 1 month; rebeat briefly after thawing.
- Assemble: slightly chilled layers stack and smooth with fewer crumbs.
- Storage time: a fully frosted cake keeps in the fridge up to 1 week; freeze up to 1 month for longer storage.
| Item | Timing | Notes |
|---|---|---|
| 6‑inch layers | ≈27–30 minutes | Use weighed portions (~440 g each) |
| 8‑inch layers | + a few minutes | Watch center with toothpick |
| Cupcakes | 18–21 minutes | One batch ≈ 24 cupcakes |
Freshness trick: smear a thin coat of frosting over cut surfaces before refrigerating. For transport, chill fully, box securely, and keep cool to protect piping detail. Scale frosting to 1.5x for heavy piping on larger or taller projects.
Conclusion
Close with confidence: correct ingredients, careful mixing, and timed steps give reliable, elegant results every time. A fine, velvety crumb comes from balanced cocoa powder, buttermilk, and a touch of vinegar. This base makes smoothing and slicing simple.
For color, choose gel food coloring or lean on the cocoa‑acid reaction for a natural hue. Use full‑fat brick cream cheese with butter for stable, pipeable frosting.
Process wins: crumb coat, chill, and finish for sharp edges in minutes. Scale the recipe for 6‑inch, 8‑inch, or cupcakes, prep layers ahead, and bring to room temperature a few minutes before serving. Pick a classic or minimalist finish and follow the steps—anyone can make beautiful red velvet cake decoration with the right tools and care.