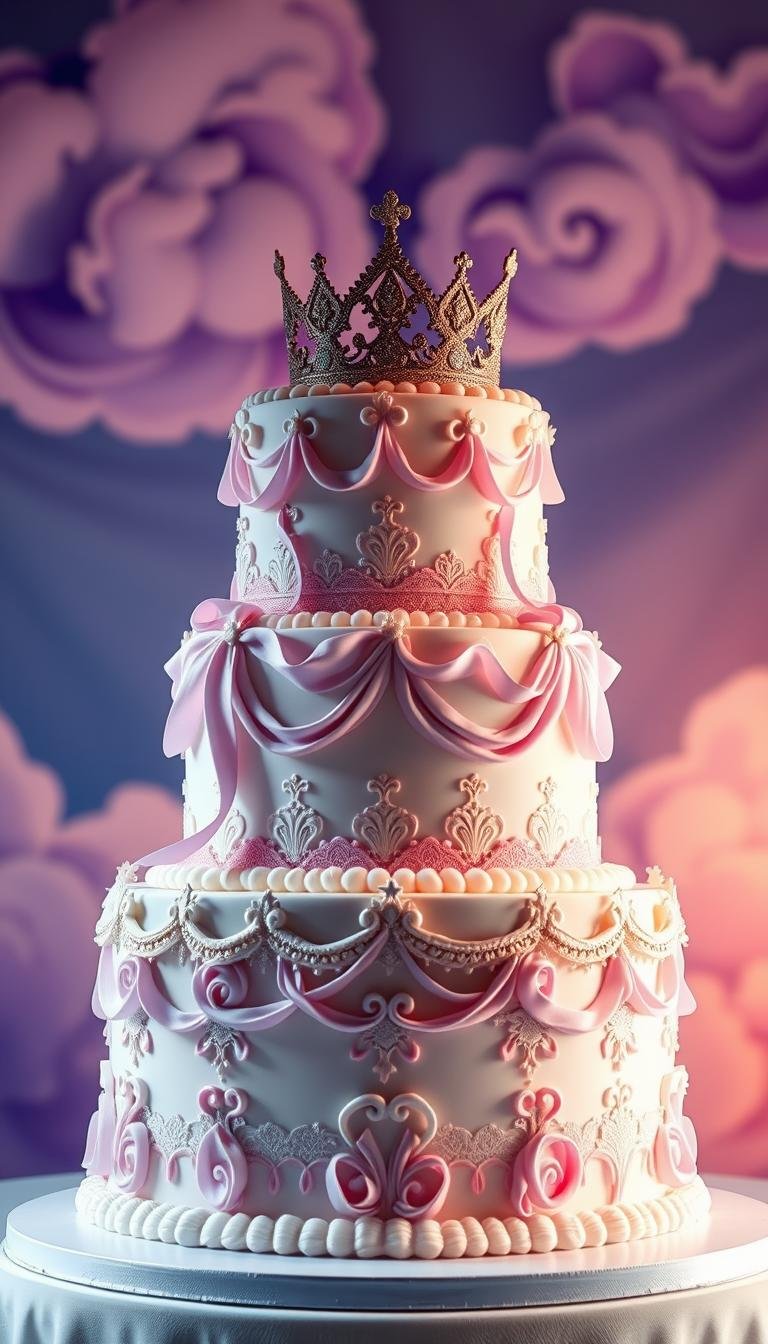
Princess Birthday Cake: Easy Recipe and Decorating Tips
Nearly half of store-bought doll-style desserts cost $40–$75, yet you can make a stunning version at home that serves 10–12 for much less.
This Website contains affiliate links. That means I may earn a small commission if you purchase through my links, at no extra cost to you.
Start with two box mixes or your favorite recipe, grease and flour pans, and bake layers at 325°F until set. Cool 10 minutes, flip to avoid sweating, then freeze layers briefly to firm them for frosting.
Stack an 8-inch round with a domed layer baked in a glass or ceramic bowl to form the skirt, wrap the doll’s legs in plastic, and insert after a solid crumb coat for strength. Use about 6–7 cups of buttercream if you plan to pipe, and prefer gel food colors for bright tints.
Simple tricks—the double-bag ombré method with a star tip, fondant draping with a center-cut circle, and edible pearls or sugar roses—lift the look without complex skills. Finish with storage and transport tips so the dessert arrives intact and party-ready.
Key Takeaways
- Use two mixes or a reliable recipe and freeze layers before frosting for cleaner edges.
- Build the skirt with an 8-inch round plus a domed bowl layer; wrap the doll’s legs in plastic first.
- Apply a crumb coat, then plan for 6–7 cups of buttercream if piping detailed designs.
- Gel colors and larger tips make brighter results with less effort.
- Save extra batter for cupcakes and use edible pearls, sugar roses, or shimmer to finish.
What You’ll Make and Who This How‑To Is For
This project results in a charming dress-shaped dessert that serves about 10–12 and fits a standard doll. It’s a whimsical skirt-style treat you can color and style to echo any Disney princess or favorite theme.
“Professional-looking results are possible at home with simple tools, a bit of patience, and clear instructions.”
The guide suits parents, caregivers, and beginner-to-intermediate decorators. Step-by-step instructions explain how to build height, shape the skirt, and safely insert the doll so the process feels approachable on a first try.
Expect a practical schedule: short bursts of hands-on work (baking, stacking, crumb coating, piping) with passive chilling or freezing between stages to keep finishes neat. Use excess batter for cupcakes to extend servings and match the main design.
- Size and tool guidance helps you pick pans and bowls that fit the doll silhouette.
- Design tips let you adapt colors and piping for different looks, from frosty pastels to floral motifs.
- Clear portion advice ensures every guest gets a generous slice without overbaking.
Tools, Pans, and Ingredients You’ll Need
Prepare your workspace with the right gear so baking and decorating go smoothly. Gather two 8-inch pans and an oven-safe mixing bowl—ceramic, stoneware, or tempered glass work well for a domed skirt layer.
Essential tools:
- Stand or hand mixer, offset spatula, serrated knife or leveler, and a lazy Susan for easy rotation.
- Large piping tips and sturdy piping bags to make stars, rosettes, and ruffles fast.
- Turn out pans and bowl greased and floured; bake at 325°F for even rise.

Base ingredients and icing: Use box mix or a homemade batter with flour, butter, eggs, and vanilla. Plan on about 6–7 cups of buttercream so you have plenty of icing to crumb coat, tint, and pipe details.
| Item | Purpose | Notes |
|---|---|---|
| Two 8-inch pans | Base layers | Grease and flour; fill ¾ full |
| Oven-safe bowl (glass or ceramic) | Domed skirt layer | Confirm oven-safe labeling |
| Piping bags & tips | Decorating | Keep extra bags ready in different colors |
| Gel food coloring | Color matching | Cover tinted icing to prevent crusting |
| Plastic film | Protect doll legs | Wrap legs and clip hair before inserting |
Stock simple decorations like sprinkles or sugar pearls, and practice piping on wax paper before you work on the final surface.
Bake the Base Cake Layers
Heat the oven to 325°F, then grease and lightly flour an 8-inch pan and an oven-safe bowl. This prep gives a clean release and helps form a tall, stable skirt profile.
Prep pans and bowls
Mix batter according to the package or your recipe, and fill each vessel slightly over ¾ full. Place both on a baking sheet for easy handling and even heat.
Timing and doneness
Start checking the round at 20–30 minutes and the bowl at about 45–60 minutes. The center should feel set and spring back lightly when touched.
After removing, rest cakes for about 10 minutes, then invert onto a rack or wax paper to avoid moisture at the bottom. Level any high domes with a serrated knife.
“Freeze cooled layers for a few hours or overnight — it makes frosting cleaner and reduces crumbs.”
Label and wrap cooled layers before freezing to lock in moisture. Use leftover batter for cupcakes and arrange them around the base for extra servings.

| Step | Action | Timing |
|---|---|---|
| Prep | Grease & flour pan and oven-safe bowl | Before baking |
| Bake | Place on sheet, check for set center | Round: 20–30 min; Bowl: 45–60 min |
| Cool & freeze | Invert after 10 min, level, wrap, freeze | Few hours or overnight |
Assemble the princess birthday cake
Place the widest dome on top of an 8-inch round to begin shaping a flowing skirt silhouette.
Stack and shape the skirt
Arrange your base cake by placing the 8-inch round on a board, then set the bowl-baked dome on top so the skirt flares naturally. Trim the dome lightly to blend into the round and create smooth skirt lines.
If you want more height, split one or both layers and add a thin layer of buttercream between them. Keep the profile balanced so the skirt looks even from the top and all sides.
Insert the doll and build the bodice
Use a small round cutter or knife to cut a center channel through the stacked layers for the doll. Wrap the doll’s legs in plastic film to keep them clean and protected, then insert until the cake reaches about the doll’s hip.
Smooth a bodice on the torso using buttercream or wrap a fondant strip around the top of the skirt. Blend the seam where the bodice meets the skirt so the transition looks seamless and polished.
Crumb coat for strength and finish
Trim any rough edges at the base or transition lines to keep the skirt tidy. Apply a thin crumb coat over the entire structure to lock in stray crumbs and stabilize the layers for decorating.
Chill the crumb-coated cake until firm. A cold surface makes piping and fondant draping much easier. Finally, double-check that the doll is centered and vertical so the final dress lines read true from every angle.
- Arrange base: 8-inch round, then bowl dome for skirt flare.
- Split layers for height if desired; add buttercream between layers.
- Cut center channel; wrap legs in plastic before inserting the doll.
- Form bodice with buttercream or fondant; blend seams into skirt top.
- Apply thin crumb coat and chill until firm before final decorating.
Decorating Tips & Design Ideas for a Disney Princess Cake
Try big, open tips and quick buttercream moves to get a plush, even skirt fast.
Buttercream piping basics
Cover the skirt with buttercream using large, open piping tips to speed coverage. Alternate star-tip swirls and rosettes for texture and depth.
Work in bands, change pressure and direction, and cluster rosettes at the front for a couture look.
Two-color ombré with the double-bag trick
Fill two small bags with coordinating hues, place them inside a third bag fitted with a star tip, and pipe. The colors swirl without muddying, giving a soft ombré effect.
Fondant drape and frill
For a sleek finish, roll a large fondant circle, cut a center hole, remove a slim wedge, and drape over the butter-iced form. Push up at intervals to swag folds and frill edges with a teaspoon or ball tool.
Bodice color and finishing touches
Match the bodice tone using gel food coloring; test shades on parchment before applying. Add sugar pearls, fondant roses, and a tiny butterfly for polish.
| Technique | Tool | Purpose |
|---|---|---|
| Bulk coverage | Large star tip | Fast, plush icing texture |
| Ombré swirl | Double bags + star tip | Two-tone, blended look |
| Fondant drape | Rolling pin & ball tool | Smooth, elegant skirt finish |
| Final accents | Small piping tip & sugar pearls | Define bodice and add shine |
Tip: Chill briefly if buttercream softens, then resume piping so edges stay defined and decorations remain crisp.
Timing, Servings, and Budget at a Glance
Plan your work in clear blocks so active steps happen in short bursts and chilling happens in the background. This reduces stress and lets the butter set before detailed piping.
Active time includes mixing, baking, stacking, crumb coating, and piping. Passive time is freezing or chilling between stages. Use the downtime to prep tips, colors, and cupcakes.
Active time vs. chilling time for stress-free decorating
Mixing and oven work happen early, then freeze layers to firm them for clean frosting. Crumb coat the day before and save final piping for the morning of the event.
Serves about 10–12; use extra batter for cupcakes at the base
One assembled doll cake serves roughly 10–12. Any leftover mix makes matching cupcakes to ring the base. This adds portions and a polished display.
DIY cost vs. store-bought
Ingredient shopping is budget-friendly: flour, sugar, butter, and a box mix or two cost far less than many bakery options. Many bakeries list doll cake offerings from about $40–$75; a home bake is usually cheaper, especially with reusable tools.
“Break the project into segments: bake and cool on day one; level, freeze, and crumb coat later; then decorate when you have focused time.”
- Work in segments: bake & cool, freeze, crumb coat, then final decorate.
- Oven time varies by vessel; check doneness rather than relying solely on the clock.
- For larger parties, add cupcakes or a sheet cake to expand servings affordably.
| Item | Estimated time | Notes |
|---|---|---|
| Bake base layers | 45–60 minutes active | Oven and vessel affect timing; check center for doneness |
| Chill / freeze layers | 2–6 hours passive | Firm layers make frosting easier and reduce crumbs |
| Crumb coat & chill | 15–30 minutes active + 30–60 min passive | Do this the day before when possible |
| Final piping & accents | 30–90 minutes active | Depends on complexity; use simple pearls and sprinkles to save time |
Conclusion
Close with a quick stability check, a neat crumb coat touch-up, and targeted piping to make the skirt read couture.
, For a smooth finish, remember the basics: bake at 325°F in greased, floured pans and an oven-safe bowl, cool briefly, then freeze layers so icing goes on clean.
Wrap the doll’s legs, cut a neat center, and seat the figure so the bodice meets the hip. Use large tips, gel colors, or fondant drapes and add sugar pearls for polish.
Home-made versions serve about 10–12 and often cost far less than store options. With these steps you can recreate Disney princess looks and repeat the method for other doll cake designs.