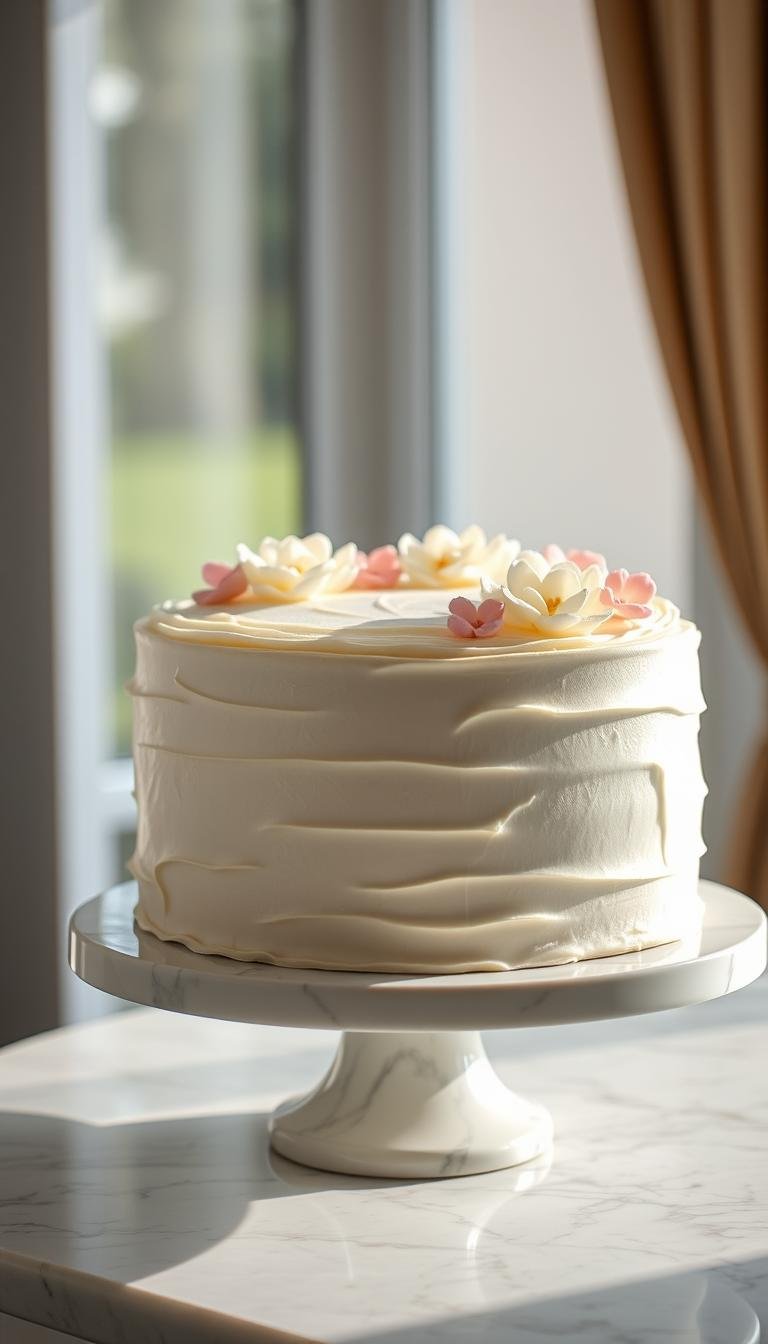
Moist Strawberry Chocolate Cake Recipe – Simple & Delicious
Did you know that a simple change—blooming cocoa in hot water—can boost a homemade layer dessert’s flavor by up to 30% in taste tests?
This Website contains affiliate links. That means I may earn a small commission if you purchase through my links, at no extra cost to you.
This guide shows an easy, bakery-worthy method for a moist, deeply flavored treat that balances rich cocoa and bright berry layers. You’ll get clear steps for pan prep, mixing, and timing so each layer bakes flat and stacks cleanly.
We’ll cover practical tips like greasing and lining three 9″ pans, blooming cocoa and espresso, combining oil with buttermilk for plush texture, and dividing batter for even baking.
The recipe also offers two filling choices and two frosting routes—one buttercream boosted with freeze-dried fruit and a tangy cream cheese option—plus a ganache drip trick that uses a small splash of oil for perfect flow.
Key Takeaways
- Bloom cocoa in hot water to deepen flavor and loosen batter structure.
- Prep three 9″ pans: grease, parchment, grease, then dust for even layers.
- Use oil + buttermilk for ultra-moist crumb and easy stacking.
- Pick quick jam or roasted berries for filling depending on time and intensity.
- Finish with a ganache drip (4 oz chocolate + 4 oz hot cream) and a touch of oil for flow.
Why you’ll love this strawberry chocolate cake right now
Rich, fudgy layers meet bright berry filling to give you a dessert that feels special without fuss. The contrast keeps each bite lively, so the overall treat never tastes too heavy. Fresh strawberries on top add seasonal fragrance and a simple, organic look.
The method is approachable. You’ll use pantry ingredients, a single bowl for many steps, and a reliable timetable so weekend baking or a weeknight bake fits your schedule. Use an electric hand mixer to speed frosting, and a turntable plus a scraper to get smooth sides fast.
Texture wins: blooming cocoa and an oil-plus-dairy combo create a plush, moist crumb that holds up in multi-layer builds. A quick homemade jam between layers adds concentrated fruit flavor and helps each slice cut cleanly.
- Balanced flavor: deep chocolate notes with fresh berry brightness.
- Simple tools: mixer, turntable, and a bowl get you professional results.
- Make-ahead friendly: jam and frosting can be prepped to save time on assembly.
Ingredients at a glance: chocolate, strawberries, and pantry staples
Gather the right pantry staples and fresh fruit so you can build layers confidently.
Chocolate cake essentials
- All-purpose flour — weigh for best results (3 cups for three 9″ layers).
- Cocoa powder (natural or Dutch) bloomed in hot water or coffee to deepen flavor.
- Granulated and brown sugar, baking soda, baking powder, salt, eggs, neutral oil, buttermilk, and vanilla extract.
Berry elements
- Fresh strawberries, 1½ lb for stovetop filling or 8 oz for roasting.
- ½ cup sugar, 1 tbsp cornstarch mixed with 1 tbsp water, plus 1 tsp vanilla or lemon for brightness.
Frosting choices
- Strawberry buttercream: butter, powdered sugar, freeze-dried berry powder, and a spoon of filling.
- Strawberry cream cheese frosting: cream cheese base for tang and spreadability.
Pro tip: Measure in a bowl, bring eggs and dairy to room temp, and set aside ingredients so mixing is seamless.
Tools that make baking easier: cake pans, wire rack, and more
A few reliable tools make layering, frosting, and finishing far easier than you expect. With the right gear, you’ll avoid common slips and get clean, even results for every cake you build.
https://www.youtube.com/watch?v=g7n6yshR9E8
Must-haves and why they matter
Start with quality cake pans. Use two 6″ pans for tall, bakery-style layers or three 9″ pans for thinner, even layers. Cut parchment rounds so centers release cleanly.
- Wire rack: Cool layers here to prevent soggy bottoms and keep crumbs intact.
- Offset spatulas: Small one for filling, large one to smooth the top and sides of the cake.
- Turntable and scraper: Make crumb coats and straight sides cake simple and fast.
- Bowl, whisk, and mixer: Use a large mixing bowl to bloom cocoa or powder and mix batter without spills. An electric hand mixer speeds frosting to silky texture.
- Piping bags: Create a frosting dam and add neat borders before stacking.
Pro tip: Grease, line, then dust pans with cocoa powder for dark layers so no pale flour marks appear.
Room temperature matters: how ingredient temperature affects rise and texture
Getting the temperature right for key ingredients is one of the fastest ways to improve your bake. Bring eggs, butter, cream cheese, and dairy to room temperature so they emulsify and trap tiny air bubbles.
Why it helps:
- Room-temperature eggs, dairy, and fat whip smoother and give the batter lift that yields a lighter cake layer.
- Cold dairy can make batter seize or split, causing dense spots and uneven rise.
- Softened cream cheese and butter make frosting silky with no lumps or streaks.
Take ingredients out 60–90 minutes ahead. If you’re short on time, set eggs in warm water for 10 minutes. Avoid microwaving; it can partially cook and ruin structure.
Temperature consistency also steadies how cocoa powder and leaveners perform, so your oven spring is predictable. If crumbs persist, chill or briefly freeze layers before the crumb coat — it stabilizes the top and sides for clean frosting.
Make the strawberry filling two ways: jammy stovetop or roasted strawberries
Two simple filling methods give you full berry flavor whether you want hands-on or hands-off prep. Both yield a spreadable layer that tops and holds between layers without sliding.
Quick jammy stovetop
In a saucepan, combine 1½ lb chopped strawberries with ½ cup granulated sugar. Simmer until the fruit breaks down and the juices reduce, about 23–28 minutes.
Mix 1 tbsp cornstarch with 1 tbsp water and stir into bubbling fruit. Cook 30–60 seconds until glossy. Remove from heat, stir in 1 tsp vanilla, then cool in a shallow pan before transfer.
Roasted, hands-off method
Toss 8 oz berries with 2 tbsp sugar, 2 tsp lemon juice and a pinch of salt. Roast at 375°F for 15–20 minutes, flipping once, until soft and syrupy. Roasting concentrates flavor with minimal fuss.
Cooling and storing
Cool fillings quickly in a shallow bowl to protect layer texture. Transfer to an airtight container and refrigerate up to 2 days. Use fresh strawberries for the brightest top garnish when assembling the cake.
Whisk together a fudgy chocolate cake batter
A smooth, pourable batter starts with proper blooming and careful mixing in a single bowl. Follow the steps below to unlock deeper flavor and a moist crumb without overworking the mix.
Bloom cocoa with hot water or espresso
Whisk cocoa and instant espresso into 1½ cups hot water until dissolved. Let this mix cool to lukewarm before adding oil, buttermilk, and vanilla extract.
Cooling prevents cooking the eggs and preserves a tender crumb. This bloom deepens the chocolate notes for a richer final slice.
Order for lump-free batter
In a large bowl, whisk flour, sugar, baking soda, baking powder, and salt until even. Lightly beat the eggs to break them up.
Pour the cooled cocoa mixture and eggs over the dry mix and gently whisk together until smooth. Aim for a pourable cake batter and scrape the bottom to remove dry pockets.
“Let the batter rest briefly so surface bubbles settle — it gives a finer, even crumb.”
| Step | Why it matters | Quick tip |
|---|---|---|
| Bloom cocoa in hot water | Intensifies flavor and loosens structure | Use 1½ cups hot water; cool to lukewarm |
| Whisk dry in a bowl | Disperses leaveners for even rise | Whisk until uniform, no clumps |
| Combine gently | Prevents tough crumb | Stop when smooth and pourable; set aside 10 minutes |

Pro tip: If using Dutch-process cocoa, boost baking powder slightly to match the less acidic profile. Once mixed, set aside the batter while you prep pans so bubbles rise and pop for a finer crumb.
Bake flawless cake layers and cool like a pro
Nail the pan prep and timing, and you’ll end up with uniform layers that stack without fuss. Proper prep and steady checks matter more than perfect technique. Follow simple cues and your bake will reward you.
Prep pans and portion the batter
Grease each pan, cut parchment rounds, grease again, then dust with cocoa for dark layers to avoid white edges.
Weigh batter so each pan gets about 735 g. Even portions give identical layer height and make assembly faster.
Timing cues and doneness
Bake at 350°F for 24–28 minutes. Start checking at the early end of the window.
Use a toothpick: it should show moist crumbs, not wet batter. The top should spring back gently.
Cool on a wire rack
Cool in pans on a rack for about 10 minutes so they set. Run a thin knife around the edge, invert onto a wire rack, and peel the parchment.
Let layers cool completely before frosting. Set aside any domed tops to trim for flat, professional-looking layers.
- Rotate pans if your oven has hot spots to ensure even color and rise.
- Avoid overbaking: one or two minutes too long dries the crumb.
- Chill briefly wrapped layers to reduce crumbs before the crumb coat.
Choose your pink: strawberry buttercream vs. strawberry cream cheese frosting
Pick a topping that fits your taste and the event. One option gives pillowy sweetness and decorator-friendly texture. The other adds a tangy lift that pairs well with rich layers.
Buttercream with freeze-dried fruit and jam
Pulse freeze-dried berries into a fine powder in a small bowl. This adds color and real fruit flavor without extra moisture.
Beat room-temp butter until creamy. Add 7–8 cups powdered sugar in batches, splashing 2–3 tbsp cream to reach spreadable consistency.
Fold in ½ cup strawberry filling, 1 tbsp vanilla extract, a pinch of salt, and the berry powder. Taste and adjust sugar if needed.
Cream cheese variation: tangy, spreadable, and pipeable
Whip softened butter and cream cheese until silky. Add powdered sugar, a spoon of jam, and vanilla.
Use a piping bag to create a frosting dam that keeps filling in the center when you stack. Both frostings pair beautifully with a chocolate drip and fresh garnish.
- Tip: Keep all key ingredients at room temp to avoid lumps.
- Tip: If you want a tangier finish, choose the cream cheese route; for decorator-friendly peaks, pick buttercream.
Assemble like a bakery: layers, filling, and a clean crumb coat
A steady hand and a few simple rests make it easy to stack neat cake layers that hold their shape. Anchor the first layer with a small dollop of frosting on the board so it won’t slide on the turntable.
Build stable layers:
- Spread about 1¼ cup of frosting on the first layer. Pipe a sturdy dam around the edge, then spoon in ~½ cup cooled strawberry filling so it stays centered.
- Place the next layer gently and press just enough to adhere. Scrape any overhang to seal the seam cleanly so the sides cake looks tidy.
- Trim domes before stacking; flat layers stack sturdier and cut cleaner slices.
Chill for 5–10 minutes between stacks to set structure and reduce sliding. If filling starts to migrate, add more frosting to the dam and re-chill before continuing.
Crumb coat and finish: Apply a thin crumb coat over the top and sides to trap crumbs. Chill 20–30 minutes until the coat firms, then add the final frosting layer and smooth with a scraper for sharp edges.
| Step | Action | Why it helps |
|---|---|---|
| Anchor first layer | Small swipe of frosting on board | Keeps base steady while you work |
| Fill and dam | 1¼ cup frosting; ½ cup filling inside dam | Prevents seepage and balances sugar and batter |
| Chill between steps | 5–10 minutes between layers; 20–30 minutes after crumb coat | Sets structure for clean top and sides |
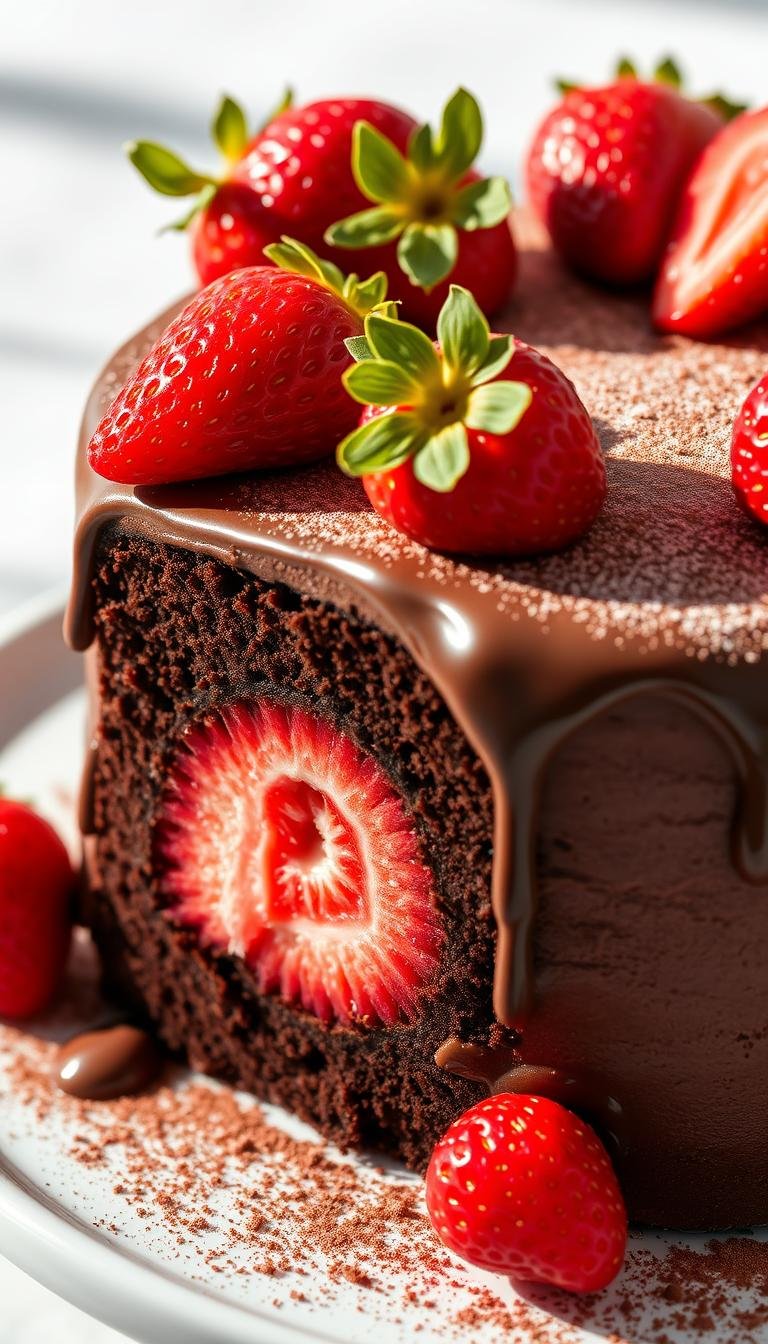
Silky chocolate drip and simple strawberry topping
An easy warm-cream technique gives you a silky, controlled drip for a polished top. Follow a simple ratio and a few handling rules to get glossy runs that set cleanly and slice well.
Ganache consistency: hot cream over chocolate, oil for a smooth pour
Chop 4 oz finely and place in a small bowl. Heat 4 oz simmering heavy cream and pour it over the chopped pieces. Let rest 4 minutes, then stir gently from the center out until smooth.
Add 1–3 tsp vegetable oil to reach a glossy, pourable texture. Test by letting the ganache fall off a spoon — you want a continuous ribbon that is not too thick or too runny.
Create even drips and finish with strawberries on top
Work on a chilled, crumb-coated layer so the ganache sets fast. Pour the mixture into the center, then nudge it toward the rim with an offset spatula while slowly spinning the turntable for even coverage.
- Chop chocolate finely so it melts evenly; let the cream sit before stirring to preserve shine.
- Keep the drip balanced — less is more; thin, even runs look polished and cut cleanly.
- If the ganache thickens, warm briefly a few seconds until fluid again; avoid overheating.
- Chill 20–30 minutes to set, then optionally pipe a buttercream border and top with fresh strawberries for color and freshness.
Tip: The right fat balance in ganache gives a silky mouthfeel that complements the fudgy layers and creamy frosting. Work steadily, chill between steps, and your top will look professional in minutes.
Serving, storage, and freezing: keep your cake fresh longer
Smart storage steps keep slices moist and ready for guests across several days. After decorating, chill the finished dessert for about 20 minutes so frosting and ganache set before moving or covering.
Bring slices to room temperature before serving
For the best flavor and texture, remove slices from the fridge and let them sit at room temperature for about 1–2 hours. This restores a plush crumb and makes the frosting creamy again.
Avoid leaving the whole cake in a humid room to reduce condensation on the surface.
How to store: airtight container, plastic wrap over cut sides
Store leftovers in the refrigerator in an airtight container or cake carrier to preserve moisture and prevent fridge odors. Press plastic wrap tightly against any cut sides to stop drying.
The cake keeps well for 5–6 days when stored this way. If you used cream cheese frosting, refrigeration is essential; let slices warm slightly before serving for a smooth texture.
- Freeze well-wrapped slices for up to 1 month (and up to 3 months for similar layered desserts). Wrap each piece in foil and place in an airtight container.
- Thaw gently in the fridge overnight or at room for 1–2 hours. Add fresh strawberries to the top just before serving for the best look and bite.
Tip: When you have time, plate slices from a chilled recipe straight from the fridge and let them rest in a bowl at room for a short time so flavors open up.
Sizing, swaps, and pro tips for cake layers
Small changes to pan diameter and ingredient weight can change bake time and crumb — here’s how to adapt with confidence.
Choose the right pans and scale confidently
For an 8″ bake, multiply ingredients by 1.78x for accuracy, or 2x for easier math. Expect slightly longer bake times and use doneness cues: moist crumbs and gentle spring-back.
Two 6″ pans need longer bake time per pan. For three 9″ pans, divide batter by weight so each cake layer is even and thin.
Why weigh ingredients and when to use cups
Weighing in grams gives the best consistency, especially when scaling. Keep teaspoons and tablespoons for small amounts like salt or powder.
Use cups for quick swaps, but prefer grams for repeatable results in other cake recipes.
Troubleshooting common layer problems
- Prevent soggy filling: cool completely and thicken before spreading.
- If layers slide, pipe a taller dam, use less filling, and chill 5–10 minutes between stacks.
- Dry crumb? Stop baking early; check with a toothpick for moist crumbs not a clean pull.
- Trim domes and wrap layers in plastic wrap then chill to reduce crumbs before frosting.

| Issue | Fix | Quick tip |
|---|---|---|
| Soggy layers | Thicken filling; cool fully | Use less water in filling; add cornstarch |
| Sliding layers | Pipe dam; chill between builds | Make dam taller and firmer |
| Dry crumb | Reduce bake time; check early | Watch temperature and test for moist crumbs |
Conclusion
A dependable finale ties every step together so your layers look and taste like they belong in a bakery. Bloomed cocoa, buttermilk, and oil give a plush crumb while jammy or roasted filling adds bright balance.
Quick wins: respect ingredient temperature, weigh in a bowl when needed, and use grams for consistent scaling. A simple ganache drip and fresh fruits on the top add polish with little effort.
This chocolate strawberry recipe joins your go-to cake recipes for celebrations. Keep leftovers chilled, then bring slices to room temp before serving for the best flavor.