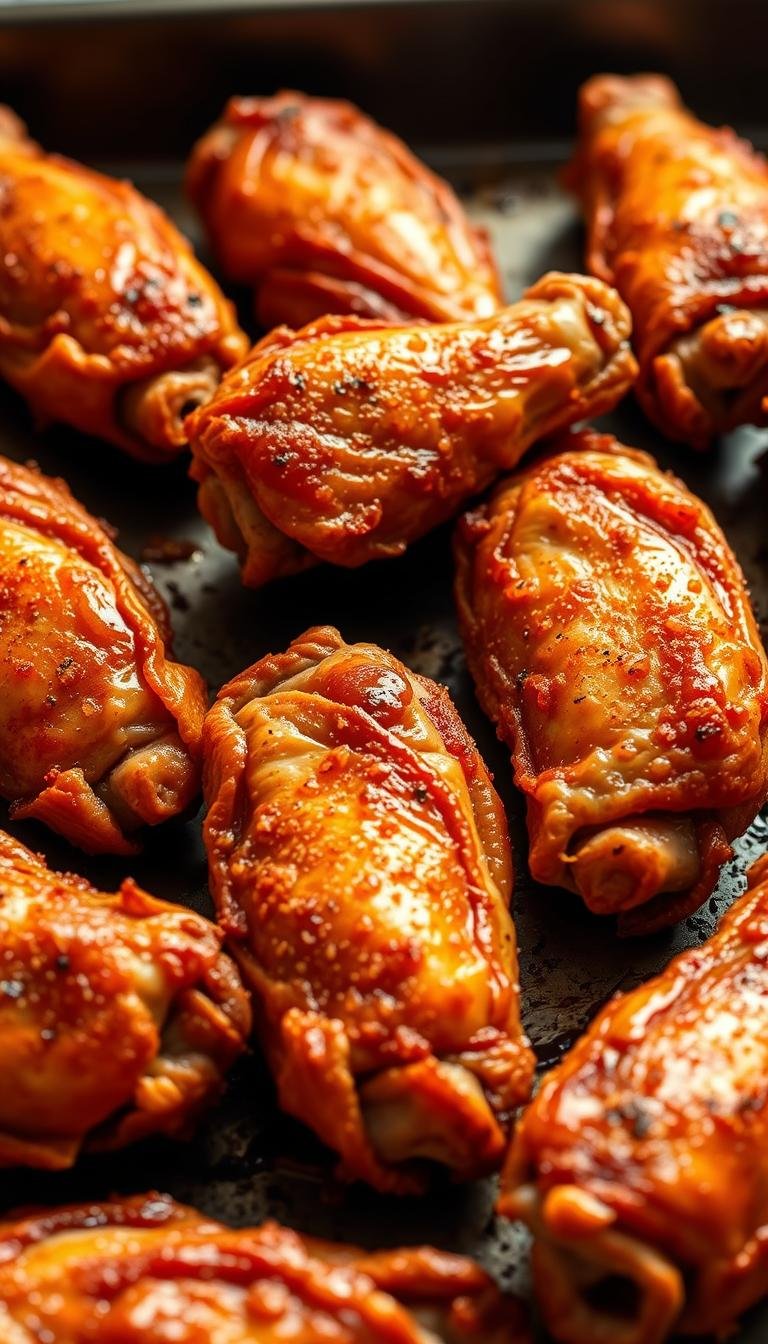
How to Make Chicken Wings in the Oven Crispy
Surprising fact: 7 out of 10 home cooks report that a high-heat bake matched fried texture when skin was fully dried and placed on a rack.
This Website contains affiliate links. That means I may earn a small commission if you purchase through my links, at no extra cost to you.
This short guide shows step-by-step, science-backed methods that render fat low then finish hot for shatteringly crisp skin.
You will learn simple levers: dry skin, a light coating of baking powder, good airflow, and a clear oven sequence that manages rendered fat without excess mess.
Options covered include a two-temperature render-then-crisp approach, a straight high-heat bake, and a warm-hold finish to boost crunch. Exact minutes, flip tips, and quick troubleshooting make this recipe repeatable for any cook.
Key Takeaways
- Dry skin and a rack are crucial to crisp results.
- Render fat low, then finish hot for that fried-like texture.
- Use baking powder sparingly to aid surface browning.
- Follow timing guidance for minutes at each temperature.
- Warm-hold can add extra crunch without overcooking meat.
Why Oven-Baked Wings Deliver Crispy Skin Without Frying
Rendering fat under the skin first, then increasing temperature, is how home ovens match fried texture. Start by baking at 250°F for about 30 minutes on a lower rack. This low stage melts fat and shrinks each piece so the surface tightens and dries.
After that, move the tray up and blast at 425°F for 40–50 minutes. That hot finish browns and firms the skin without steaming it. Using a rack keeps air flowing all around each portion and stops trapped steam from making the surface soggy.
Baking powder helps here by drawing moisture out and raising surface pH, which speeds browning and improves texture. Because you never submerge the meat in oil, this method cuts mess and keeps the interior juicy while producing a satisfying snap.
Tip: Add sauce or finishing seasoning after baking so the skin stays taut and the flavors stay bright.
Key Ingredients and Tools for Crispy Baked Chicken Wings
Good texture begins long before heat hits the tray. Gather party-ready parts, a neutral powder, and tidy tools so each piece browns evenly. Prep is fast when you have the right gear at hand.
Wingettes and drumettes
Use pre-cut flats and drumettes for even heat exposure and easier turning on a rack. They cook uniformly and fit neatly on a sheet pan.
Aluminum-free baking powder and dry rub
Choose aluminum-free baking powder to avoid off-flavors. Mix it with a simple dry rub: salt, black pepper, garlic powder, and paprika. Measure seasonings by the teaspoon so results repeat batch to batch.
Tools for airflow and prep
Pat each piece very dry using paper towels. Toss in a large bowl to coat evenly with powder and spices.
- Line a sheet pan with foil or parchment and set a greased rack.
- Use light oil spray on the rack to prevent sticking.
- Keep measuring spoons, towels, and a sturdy pan within reach for smooth prep.
“Prep that removes moisture and promotes airflow is the single most consistent lever for a snap-like finish.”
| Item | Why it matters | Quick tip |
|---|---|---|
| Wingettes & Drumettes | Even cooking, easy handling | Buy party-cut or ask butcher |
| Aluminum-free baking powder | Speeds browning, dries skin | Use 1 tsp per pound, max 2 tsp |
| Paper towels & Rack | Removes moisture; boosts airflow | Pat dry, then arrange single layer |
Step-by-Step: From Prep to Perfectly Crispy Skin
Good results begin with rack placement and a clear oven sequence that separates rendering from browning. Preheat oven and set one shelf low and one high to support a two-stage method that first melts fat, then crisps the surface.
Pat dry thoroughly with paper towels; if time allows, leave pieces uncovered on a rack in the fridge overnight to evaporate extra moisture. This extra dry time makes a big difference for final texture.
In a large bowl, combine baking powder, salt, and spices. Sprinkle evenly and toss wings until coated without clumps of powder. Line a sheet pan with foil or parchment and lightly oil the rack.
Place wings skin-side up with space for air to circulate. For the render-then-crisp approach: bake 30 minutes at 250°F on the lower rack, then move the tray to the upper rack and increase to 425°F for 40–50 minutes, rotating once halfway through.
Alternate paths: bake at 425°F for about an hour, flipping every 20 minutes, then finish 5 minutes at 450°F. Or bake 40 minutes at 400°F, then hold at 170°F for 30–60 minutes to dry further without overcooking.
- Use minutes rather than color alone to stay consistent.
- Rotate trays halfway through higher-heat stages.
- After baking, rest a few minutes so juices settle while skin stays taut.
“Keep oven doors closed during critical stages to maintain steady air and temperature.”
The Science Behind Crispy Baked Wings
Understanding how heat, time, and moisture interact explains why some bakes reach a shatter-like finish while others stay soft.
Rendering fat under the skin for shatteringly crisp results
Start low so fat can liquefy. A gentle 250°F stage lets subcutaneous fat melt and migrate away from the surface without overcooking meat.
Once excess fat is gone, a higher temperature crisps the surface quickly. That two-stage approach gives consistent results across many recipes.
How baking powder raises pH and dries the skin
Baking powder nudges surface chemistry. It increases pH and draws moisture outward, speeding browning and encouraging tiny blisters that read as crunch.
Use a light dusting so powder helps texture without tasting metallic. Two small pinches per pound is a common guideline.
Why airflow from a rack beats pan-crowding
A raised rack lets hot air circulate 360 degrees. That flow stops steam from softening skin and helps rendered fat drip away instead of pooling.
- Do not crowd pieces; leave space for air.
- For extra dryness, leave items uncovered in the fridge overnight.
- Use an oven thermometer to keep temperature steady.

“Managing moisture, fat, and airflow is the reliable path to a snap-like finish.”
Chicken wings in the oven crispy
Pick a baking path and follow it: a low render then high blast, a steady high heat with a quick finish, or a mid bake with a warm hold to dry the surface.
Use wingettes and drumettes for even coating and simpler handling. Keep skin very dry and elevate pieces on a rack so hot air circulates all around each piece.
- Two-stage: 250°F to render fat, then 425°F to brown—no flipping.
- High-heat: 425°F for about an hour, finish briefly at 450°F for extra snap.
- Dry-hold: 400°F for ~40 minutes, then a 170°F hold to remove moisture slowly.
| Method | Time/Temp | Best for |
|---|---|---|
| Render then crisp | 250°F 30m → 425°F 40–50m | Reliable texture, no flips |
| Steady high heat | 425°F ~60m, finish 450°F 5m | Simple, fast for parties |
| Warm hold | 400°F ~40m, then 170°F hold 30–60m | Extra dry skin without overcooking |
Season with salt, pepper, garlic powder, and paprika or swap smoked paprika and herbs. Avoid saucing until after baking so the crust stays intact.
“Sauce after baking and serve with ranch or blue cheese on the side to preserve maximum snap.”
Seasonings and Sauces: From Dry Rub to Buffalo
A smart sauce or rub turns well-baked pieces into a party-ready snack without masking crunch. Use bright or smoky finishes that complement the rendered fat and blistered skin.
Classic Buffalo—mix 4 tbsp melted butter, 1/2 cup Frank’s Original Red Hot, 1 tbsp brown sugar, and a pinch of salt. Warm gently so the sauce coats evenly in a bowl during a quick toss.
Smoky and savory rubs
Keep a basic dry rub of salt, pepper, garlic powder, and paprika for reliable results.
- Add onion powder, smoked paprika, and minced rosemary for deeper aroma.
- Scale by teaspoon to keep ratios steady when you make larger batches for a party.
Creamy and bright variations
Try garlic‑Parmesan: melted butter, grated Parm, and minced garlic spooned over hot pieces for immediate flavor.
Lemon‑pepper brings citrus lift; chipotle adds smoky heat that pairs well with a crisp exterior.
Dips and serving
Blue cheese dip blends blue cheese, sour cream, mayo, a touch of milk, lemon juice, minced garlic, salt, and pepper. Ranch can be made with Greek yogurt, mayo, sour cream, buttermilk, dill, parsley, garlic powder, onion powder, lemon juice, salt, and pepper.
“Keep sauces warm and toss for just a couple of minutes so coating sticks without softening the surface.”
| Finish | Best use | Tip |
|---|---|---|
| Dry rub | Max texture | Serve sauced on a side bowl |
| Buffalo | Classic party flavor | Warm sauce, toss briefly |
| Garlic‑Parm | Creamy, savory | Brush on hot, serve immediately |
Serve options: Offer both dry‑rubbed trays and sauced batches so guests can choose texture. For maximum snap, put sauce on the side as a dipping option.
Timing and Temperature Options That Work
Pick a timing profile that fits your schedule and oven, then stick to the minutes listed for consistent results.
400°F straight bake vs. 250°F then 425°F method
Two-stage render then crisp: Preheat oven and start at 250°F for 30 minutes on the lower rack to melt fat gently. Then move the tray up and increase to 425°F for 40–50 minutes. No flipping is needed; this protects surface texture and yields a firm finish.
Direct high-heat route: Preheat oven to 425°F and bake about 1 hour, flipping every 20 minutes for even color. Finish with a 5-minute blast at 450°F to deepen browning and add extra crunch.
Finishing hotter (450°F) or holding warm for extra crisp
Straight 400°F option: Bake roughly 40 minutes for a reliable crust. For extra drying, lower heat to 170°F and hold for 30–60 minutes; this reduces surface moisture without overcooking meat.
Keep an eye on minutes at each stage so the exterior is firm while the interior remains juicy. Place wings on a rack for airflow; a light oil mist helps color without undoing dryness.
“Use minutes and measured temps rather than color alone to hit repeatable results every time.”
| Method | Temperature | Minutes / Notes |
|---|---|---|
| Render then crisp | 250°F → 425°F | 30 min → 40–50 min; lower then upper rack; no flip |
| Direct high-heat | 425°F → 450°F | ~60 min with flips every 20 min; finish 5 min at 450°F |
| Straight 400°F + hold | 400°F → 170°F hold | ~40 min, then 30–60 min hold to dry exterior |
- Season with measured teaspoon amounts of salt, garlic, and paprika for repeatable flavor.
- Fridge-dry overnight to reduce surface moisture before baking time.
- Toss wings in sauce just before serving or offer sauce on the side to protect texture.
Make-Ahead, Storage, and Reheating Without Losing Crunch
A short make-ahead routine keeps surface moisture low and helps results stay crisp when reheated. Plan for storage the same way you plan for baking: a dry surface, a rack, and minimal handling.

Overnight fridge-dry for next-level crispiness
For best texture, place pieces on a rack uncovered in the fridge overnight. This pulls moisture from the skin and firms the surface so later reheats are more effective.
Reheat at 390–400°F to re-crisp wrinkled skin
Reheat un-sauced items in a hot oven for short bursts—about 5–8 minutes at 390–400°F. That quick heat puffs and firms the surface without drying meat.
If you use 350°F, keep them uncovered and allow a few extra minutes. Use paper towels to blot excess moisture before reheating and adjust salt lightly; flavors concentrate after chilling.
Freezing cooked or marinated portions: best practices
Marinate up to 3 days before cooking; freeze marinated portions up to 3 months. Freeze cooked leftovers in airtight bags, thaw in the fridge, then re-crisp in short oven bursts.
- Store cooked batches refrigerated for 3–4 days; keep sauce separate to avoid softening the crust.
- Light baking on a rack during reheat helps airflow and protects the crust.
- Watch the minutes on the clock—short bursts are better than long reheats.
“Short, high heat revives texture. Sauce only at service to preserve that finish.”
| Step | Time / Temp | Notes |
|---|---|---|
| Fridge-dry | Overnight | Uncovered on rack; uses empty shelf space |
| Reheat | 390–400°F for 5–8 minutes | Un-sauced; blot with paper towels first |
| Freeze | Up to 3 months (marinated) | Thaw in fridge before baking for even seasoning |
Serving Ideas, Sides, and Nutrition Notes
Tiny serving details—dips, garnishes, and timing—keep texture intact and flavors bright. Plan a platter that balances crunch, cooling sides, and easy portioning for a party crowd.
Game-day platters: celery, carrots, and plenty of napkins
Build a simple spread with celery and carrot sticks, small cups of ranch or blue cheese dip, and sturdy napkins. Offer lemon wedges, parsley, or chives as fresh garnishes that do not soften the crust.
Calories per serving and protein payoff
Plan portions around nutrition: expect roughly 397–476 calories per serving depending on sauce choice. Protein ranges from about 25–63g per serving based on portion size.
- Keep sauce on the side for guests who want peak texture.
- A light sprinkle of garlic or finishing salt brightens flavor without ruining crunch.
- Use a teaspoon measure to scale dips and dressings for larger groups.
- Warm plates or a low-heat oven can hold finished batches briefly while assembling sides.
“Present dry-rubbed and sauced options so guests choose texture and heat.”
| Item | Purpose | Quick tip |
|---|---|---|
| Celery & carrots | Cooling side | Slice into sticks for easy dipping |
| Ranch / Blue cheese | Dip choices | Serve in small cups to avoid pooled sauce |
| Naps & trays | Comfort & pacing | Stagger batches so hottest pieces reach guests first |
Mistakes That Stop Wings From Getting Crispy
Small mistakes at prep or toss time undo even a well-timed bake. Fixing these keeps skin dry and lets rendered fat leave the surface so a final high-heat stage can do its work.
Common swap: Do not use baking soda instead of baking powder. Baking soda tastes harsh and won’t raise surface pH the same way. Stick to baking powder and sprinkle lightly.
Placement, coating, and saucing slip-ups
Toss pieces so the powder spreads thin and even. Thick patches of powder clump and burn.
Do not crowd the pan. Overcrowding traps steam and ruins browning. Elevate items on a rack set over foil or parchment so air circulates around every piece.
Timing, salt, and finishing
- Watch your minutes and avoid opening the oven; lost heat extends cook time.
- Too much salt draws moisture early—season with control.
- Do your render step first; melting fat before flare-ups gives a dry surface that will crisp.
- Do not add sauce before baking. Sauce saturates the crust and prevents proper browning; toss just before serving.
- Use garlic as powder or finely minced to avoid burning during high-heat stages.
- Lightly oil the rack to prevent sticking while keeping the crust intact.
- If needed, reheat at 390–400°F for 5–8 minutes to revive texture.
| Mistake | Why it fails | Quick fix |
|---|---|---|
| Using baking soda | Off taste; poor browning | Use baking powder, light dusting |
| Overcrowded pan | Steam softens skin | Space pieces; use a rack |
| Saucing too early | Crust becomes soggy | Sauce after bake; toss quickly |
| Chunky garlic/herbs | Burn at high heat | Use powder or fine mince |
“Dry, coat, bake, then sauce — keep that flow to protect texture.”
Conclusion
Follow a simple flow—dry thoroughly, dust lightly with powder, bake on a rack, then finish hot—and you will get repeatable results. Use the 250°F→425°F render‑then‑crisp method, the 425°F straight bake with a 450°F blast, or 400°F then a 170°F hold to match your schedule.
Rendering fat first lets heat brown skin rather than steam it. Save sauce for service so that crisp texture stays intact. For leftovers, a short reheat at 390–400°F restores snap without overcooking.
With measured minutes, good airflow, and light powder use, this recipe proves a home oven can deliver fried‑like texture that guests love.