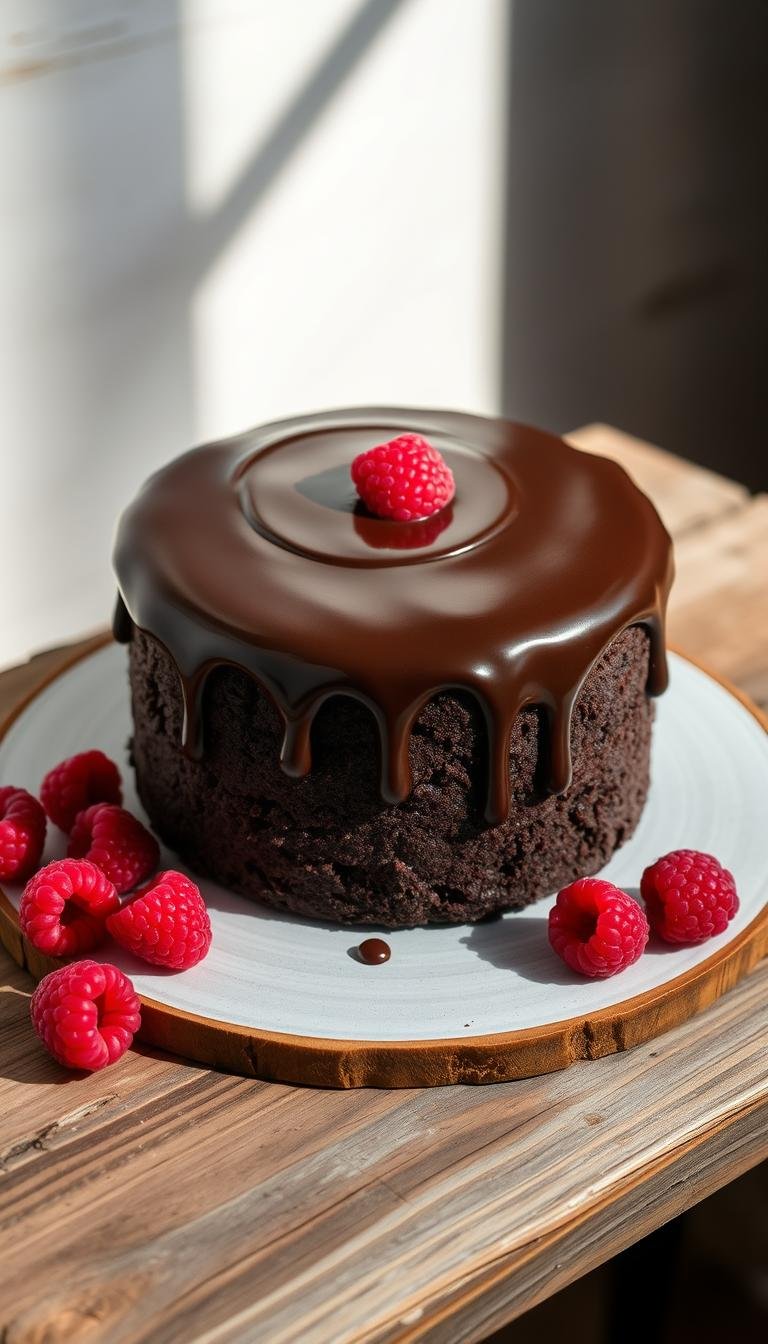
How to Make an Aesthetic Chocolate Cake at Home
Surprising fact: home bakers report a 45% jump in confidence after mastering a single framed layer recipe that looks like it came from a bakery.
This Website contains affiliate links. That means I may earn a small commission if you purchase through my links, at no extra cost to you.
This guide gives a simple, reliable method to bake a bakery-level dessert that still tastes homemade. You’ll get clear steps from ingredients to smoothing buttercream so your layers stack evenly and slice cleanly.
The approach keeps the batter ultra-moist and tender, with one final trick that deepens flavor and creates a silky crumb. Expect practical timing tips for prepping pans, chilling, and slicing so the result fits your schedule and photographs beautifully for a birthday or other celebration.
Ready to learn a repeatable recipe and a clean, modern design style? Read on for step-by-step directions and pro tips that remove guesswork and boost your confidence.
Key Takeaways
- Follow a simple method that delivers bakery-level results at home.
- Learn steps for even layers, smooth buttercream, and sharp edges.
- Timing and chilling tips help the layers cut cleanly.
- One final flavor trick keeps the crumb tender and rich.
- Design ideas focus on color and texture without advanced piping.
Before You Start: A Friendly How-To Guide for Baking a Stunning Chocolate Cake
Before you preheat the oven, let’s map out the simple skills you’ll learn so every step feels doable.
What you’ll walk away with: mixing a smooth batter, baking evenly risen layers, stacking a stable layer structure, and finishing with a clean, modern buttercream look.
You’ll learn how to read a cake recipe like a pro. Knowing why wet and dry ingredients are combined separately helps you avoid overmixing and keeps the crumb tender.
We’ll set realistic expectations about prep and cool-down time. That way your birthday or weeknight bake fits into life without stress.
Small habits make big differences: measure ahead, line pans, and keep a calm, organized station so baking feels fun.
- Quick overview of assembly: why a crumb coat matters and when to chill for stability.
- Preview of a simple abstract decorating approach to pick a color palette for your event.
- Reusable method: once you master this cake, you can adapt recipes and flavors with ease.
Why this method stands out: it balances rich chocolate flavor with an unfussy process, so you get bakery-level results without specialty tools or a long learning curve.
Ingredients and Tools for a Moist Chocolate Layer Cake and Buttercream
Start by lining up ingredients and gear so mixing and assembly feel smooth and confident.
Chocolate cake batter essentials
Dry and wet staples: 1 1/2 cups sugar, 1 3/4 cups all-purpose flour, 1 cup cocoa powder, 1 1/2 tsp salt, 1 1/2 tsp baking powder, 1 1/2 tsp baking soda.
For liquids: 2 eggs, 1 cup buttermilk, 1 tsp vanilla, 1/2 cup vegetable oil, and 3/4 cup boiling water for a pourable, silky batter.

Silky buttercream basics
Use 4 sticks softened unsalted butter and 4 cups powdered sugar. Add 1/2 tsp salt, 1 tsp vanilla, and 3 tbsp milk to reach spreadable stiffness.
Tip: gel food coloring gives vivid tones without thinning the buttercream.
Smart swaps and the right tools
If you lack buttermilk, stir 1 cup milk with 1 tbsp white vinegar and let it rest 5 minutes to thicken.
- Prep two or three round pans with parchment rounds.
- Have mixing bowls, a whisk, a stand or hand mixer, rubber spatulas, and an offset spatula for smoothing.
- Keep a clean bowl for mixing accent buttercream colors and a bench scraper for sharp sides.
Organize ingredients before you start so the batter and frosting come together without pauses. Small steps make big differences in flavor and finish.
Step-by-Step: Mix, Bake, Cool, and Level Your Chocolate Cake Layers
Heat the oven to 350°F and prep each pan—this simple step sets you up for even rise and clean edges.
Grease each pan and press a snug parchment round into the bottom so the cake releases easily. Place racks in the center of the oven while it warms.
Whisk dry ingredients in a large bowl to disperse cocoa and leaveners. In a medium bowl, whisk eggs, buttermilk, vanilla, and oil until smooth.

Fold the wet into the dry just until combined, then stir in 3/4 cup boiling water. The batter will be glossy and pourable—a good sign for tender crumb.
- Divide batter evenly among pans and tap each pan on the counter to coax out air bubbles.
- Bake 28–30 minutes on the center rack. Use a toothpick: look for a few moist crumbs, not wet batter.
- Cool in pans 10 minutes, then turn layers out onto a wire rack to finish cooling.
Turn layers upside down on the rack to help flatten tops for neat stacking. Let them cool completely before trimming or frosting.
“Cool, level, and chill when needed—cooler layers are easier to handle and give cleaner edges.”
- Use a serrated knife or a turntable to gently level any domes.
- Brush away loose crumbs and chill briefly to firm layers for frosting.
Decorating an aesthetic chocolate cake with smooth buttercream and modern style
With layers cooled and trimmed, it’s time to build the buttercream base and a striking final look. Start by whipping softened unsalted butter on medium for two minutes until pale and airy. Reduce speed and add powdered sugar gradually, then beat in salt, vanilla, and milk until fluffy.
Make a fluffy buttercream, crumb coat, chill, then smooth the final layer
Place a blob of buttercream on the board to glue the first layer. Add filling, repeat for remaining layers to keep straight sides.
Frost a thin crumb coat, freeze or chill 15 minutes, then apply the final coat in steady passes for a satin finish.
Choose a color palette and create an abstract painted finish
Reserve about one quarter of the buttercream for tinting. Mix 2–3 harmonious shades and one bold contrast for modern impact.
For the painted look, dab small amounts of tinted buttercream and smear with an offset spatula in varied strokes until you like the texture.
Birthday-worthy details and quick troubleshooting
Add a minimal ring of sprinkles, a few small edible flowers, and sharpen the top edge with a scraper for a polished birthday cake ready for photos.
“If buttercream gets soft, chill briefly; if you see air bubbles, stir gently with a spatula.”
- Extra: If you need more frosting, add one stick of butter and 1 cup powdered sugar.
- Keep a cup of hot water and a towel to warm your spatula between passes for ultra-smooth sides.
Conclusion
You now have a clear roadmap to turn simple pantry staples into a show-stopping layered dessert. This recipe covers ingredients, mixing, baking, cooling, stacking, and decorating so you can bake with confidence.
Key reminders: measure carefully, respect mixing order, and bake until a toothpick shows moist crumbs. Small steps—parchment, chill time, and clean tools—make a big difference in the final look and flavor.
Remember that buttermilk keeps the crumb tender and the right balance of sugar, cocoa, and butter builds deep chocolate flavor. Whip your buttercream until fluffy and chill between coats for sharp edges and a stable finish.
Use these layering and smoothing techniques across other recipes. Save this guide, practice at your pace, and enjoy sharing slices—good baking makes life sweeter and more fun.