Halloween Sugar Cookies Decorated: Easy Recipe for Spooky Treats
Surprising fact: more than 60% of home bakers say shaped cutout treats are the first thing guests notice at a party.
This Website contains affiliate links. That means I may earn a small commission if you purchase through my links, at no extra cost to you.
If you want crisp edges, a soft bite, and a glossy finish, this straightforward plan gets you there. Cream butter and sugar until very light, add egg and vanilla, then mix in flour and baking powder. Roll to about 1/4-inch for sharp shapes; up to 1/2-inch for large cutouts.
Freeze rolled dough 10–15 minutes or chill sheets 30 minutes. Freeze shaped cookie dough 7–10 minutes before baking. Bake at 350°F until tops stop looking glossy and cookies puff slightly—usually 7–14 minutes depending on size.
Use royal icing made from powdered sugar, meringue powder, and water for a firm finish that ships well. Let flood layers crust 10–15 minutes and dry fully 8+ hours before adding details. Store airtight up to 5 days or freeze up to 3 months; thaw in the closed container.
Key Takeaways
- Follow a simple mix, roll, chill, bake, and ice workflow for reliable results.
- Chilling or quick-freezing prevents spread and keeps clean edges.
- Royal icing dries hard—plan at least 8 hours for full cure before stacking.
- Small texture tweaks fix wet or dry dough: 1 tsp water or 1 tsp flour at a time.
- Cookies store well airtight or frozen for make-ahead convenience.
Spooktacular intro: simple halloween sugar cookies for parties, gifts, and fun
This post gives an approachable recipe and a clear decorating plan to yield party-worthy treats with clean outlines and vibrant icing details. The goal is simple: a reliable base that holds its shape, then layerable royal icing for crisp designs.
Royal icing dries hard, floods smoothly, and sets firm so tiny eyes, stitches, and outlines stay put during transport. With a short chill or quick-freeze and easy-to-read icing consistencies, beginners get great results on the first bake.
These cookies shine at classroom parties, neighbor gifts, and dessert tables. Gel colors—white, orange, black, purple, green, and yellow—give bold hues without excess dye.
- Adaptable cutters: use pumpkins, ghosts, bats, or simple circles to make most designs.
- Simple pantry list: sugar, butter, flour, egg, vanilla, and a basic icing formula.
- Plan for dry time so decorated treats can be packaged the same or next day without smudges.
| Feature | Why it matters | Tip |
|---|---|---|
| Royal icing | Sets hard for transport and layering | Mix flood and detail consistencies separately |
| Non-rise dough | Keeps sharp edges for clean shapes | Chill or quick-freeze before baking |
| Cutter options | Versatile looks from one shape | Start with a circle for pumpkins, ghosts, and faces |
| Color palette | Bright, themed accents | Use gel colors for intense shades |
Skip ahead to the techniques you need now, then return later to level up with step-by-step designs and more advanced icing work.
Ingredients you’ll need for soft sugar cookies and glossy royal icing
A short list of reliable ingredients keeps the dough consistent and the icing glossy.
For the sugar cookies
Base: 1 cup butter, 1 cup sugar, 1 egg, 1 teaspoon vanilla, 3 cups all-purpose flour, 1 teaspoon baking powder, and a pinch of salt. Add a splash of heavy cream if the dough is too dry.
For the royal icing
Use 4–5 cups powdered sugar with about 2–3 tablespoons meringue powder and water to reach flood or detail consistency. Optional corn syrup adds shine and a slightly softer bite.
Gel colors and smart swaps
Stock white, orange, black, purple, green, and yellow gels for vibrant results. White gel keeps white icing bright for photos.
| Item | Why | Quick tip |
|---|---|---|
| Butter | Flavor and tenderness | Unsalted preferred; adjust salt |
| Powdered sugar | Base for royal icing | Keep extra to tune consistency |
| Meringue powder | Food-safe, stable icing | Use egg whites only if you follow storage rules |
| Gel colors | High saturation with less dye | Add black sparingly to avoid bitterness |
Essential tools and cutters for clean shapes and easy decorating
The right gear keeps edges sharp and icing neat, even for first-time bakers.
Start compact: a small set of cookie cutters — pumpkin, bat, ghost, and a circle — covers nearly every shape in this guide. A basic circle alone opens many design options.
Rolling tools and bake surfaces
Use a rolling pin with thickness guides or dough sticks to hit a steady 1/4-inch thickness. Even dough means even baking and fewer thin edges where icing pools.
Silicone mats and parchment paper both stop sticking. Silicone spreads heat for consistent bottoms; parchment paper is tidy and disposable for quick cleanup.
Mixing and prep gear
A stand mixer or hand mixer makes dough and icing consistent. Keep a sturdy bowl, flexible spatula, and accurate measures on hand.
Decorating essentials
Tipless piping bags save time — trim for different line widths. A scribe or toothpick smooths floods and pops air bubbles. Edible markers add tiny features once icing is dry.
| Tool | Use | Quick tip |
|---|---|---|
| cookie cutters | Create consistent shapes | Keep one circle plus pumpkin, bat, ghost |
| Rolling pin with guides | Level dough to 1/4-inch | Use dough sticks for repeatable thickness |
| Silicone mat / parchment paper | Prevent sticking, even bake | Mat for heat; parchment for easy cleanup |
| Stand mixer & bowl | Mix dough and icing smoothly | Measure carefully to avoid overwork |
| Piping bags & scribe | Outlines, floods, detail work | Tipless bags and a toothpick speed decorating |
Prep your sheet pans, label paper bags for colors, and line trays before you bake. An organized station speeds production for party batches and keeps the holiday fun.
Mix, roll, and bake: the no-spread cookie dough method that holds its shape
Cream the butter with sugar until fluffy—this simple move controls texture and helps cutouts hold their shape.
Creaming and mixing for a light base
Cream butter and sugar 30–120 seconds in a bowl until very pale and airy. Beat in the egg and vanilla, scraping the sides so the mixture is even.
Add flour and baking powder on low with a mixer, mixing just until the dough comes together. If the dough looks dry, add a teaspoon of cream or water at a time. If sticky, dust in a teaspoon of flour until smooth and pliable.
Rolling and chilling for crisp edges
Roll the dough to an even 1/4-inch using guides so every cut holds the same profile. For ultra-sharp shapes, place rolled sheets on a sheet and freeze 10–15 minutes before cutting.
Alternatively, cut and place shapes on the baking sheet, then freeze cut shapes 7–10 minutes to reduce spread during baking.
Baking at 350°F: timing and cooling
Preheat the oven to 350°F. Bake most standard sizes about 7–14 minutes; small shapes finish sooner, thicker pieces take longer.
Watch visual cues: pull when tops lose gloss and edges look set. Let cookies rest on the sheet a couple of minutes, then transfer to a rack to cool completely. Icing adheres best at room temperature.
- Re-chill scraps before rerolling to keep shapes crisp.
- Group baked cookies by design for faster icing and assembly-line decorating.

| Step | Why it matters | Quick tip |
|---|---|---|
| Cream butter & sugar | Builds lift without spread | 30–120 seconds until pale |
| Chill or freeze | Keeps edges sharp | Roll to 1/4″ then freeze 10–15 minutes |
| Bake at 350°F | Even bake, minimal browning | 7–14 minutes; watch for matte tops |
| Cool on rack | Prevents icing slip | Move off sheet after a few minutes |
Royal icing 101: consistencies, coloring, and dry times for success
Mastering royal icing starts with getting two consistencies right: flood for smooth fills and detail for crisp outlines.
Make a base by combining powdered sugar and meringue powder with water in a bowl. Use a mixer 2–3 minutes until the mix is smooth. Split the batch into cups for flood and detail.
Flood vs. detail: how to adjust
Flood should run and self-level in about 10–15 seconds. Detail should hold a line for outlines and tiny features.
- Thin: add water, drops at a time, until flow is right.
- Thicken: beat in powdered sugar a teaspoon at a time for firm lines.
Coloring, layering, and dry time
Use gel colors for bold hues. Start light and deepen slowly; add white gel for a bright white. Build depth in stages for black and purple to avoid bitter notes and staining.
Let flooded sections crust 10–15 minutes before adding adjacent colors to prevent bleeding. Allow at least 8 hours at room temperature for a full dry; extend time in high humidity. Label bags and test a spare cookie before a full run for faster, cleaner results.
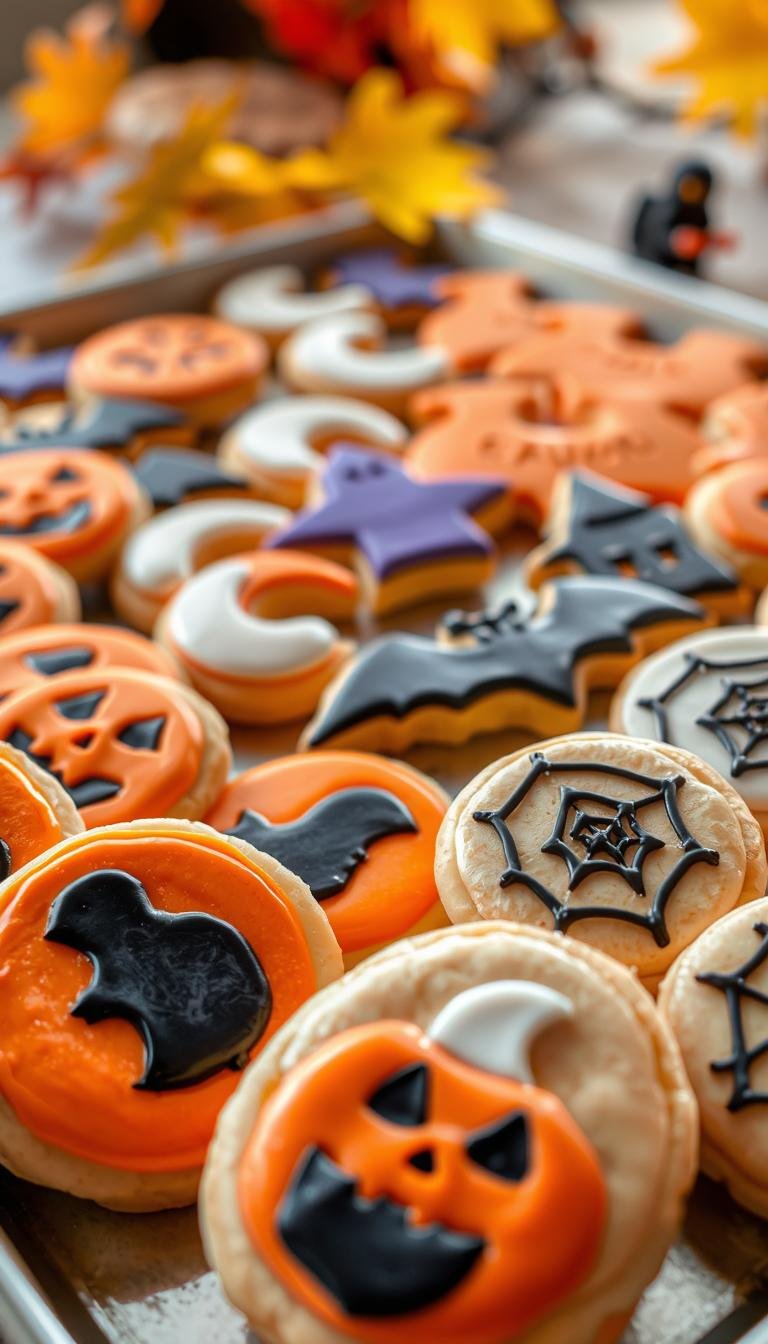
halloween sugar cookies decorated step-by-step: pumpkins, ghosts, bats, and more
Set up an assembly line: outline all cookies first, then flood sections in stages for clean results. Working in batches keeps icing consistencies steady and speeds the process.
Jack-o’-lantern pumpkin
Pipe an outline and center seams, then flood the middle panel first. Wait 10–15 minutes for a light crust, then flood the side panels for a rounded look.
Add a thick black stem, and after a full dry (8+ hours) use an edible marker for the face. Mix pink luster dust with a drop of vodka for tiny cheek blushes.
Ghosts and mummies
Outline and flood in white for a smooth base. Let dry completely, then add eyes, a “boo!” message, or bandage squiggles with detail icing or an edible pen.
Press candy eyes into tacky icing if you prefer instant character.
Bats, spiders, candy corn, and Frankenstein
For bats, flood the body first, let it crust, then fill wings. After drying, add marker eyes and wing accents.
Spiders work well with a gray flood, piped black legs, and pressed candy eyes before full set.
Use a circle cutter for candy corn: flood yellow at the top, wait briefly, add white, then orange to prevent bleeding.
Frankenstein: flood green, paint hair, stitches, and a smile; candy eyes are optional for instant charm.
| Design | Order | Crust time | Final detail |
|---|---|---|---|
| Pumpkin | Outline → center flood → side floods | 10–15 minutes | Black stem + marker face after 8+ hours |
| Ghost | Outline → white flood | Full dry before marker | Eyes/mouth or candy eyes |
| Bat / Spider | Body flood → wings/legs → details | Let crust between sections | Marker accents and candy eyes |
| Candy corn / Frankenstein | Top → middle → base / flood green then details | Short waits between bands | Stitches, hair, and candy eyes |
Make-ahead, storage, and transport for the holiday rush
Plan freezer time and airtight packing so holiday baking stays stress-free.
Freeze for flexibility: Freeze baked or raw cookie dough up to 3 months. Stack pieces on a sheet with parchment paper between layers and place in a sealed container. Label the date and recipe on the container for easy inventory.
Thawing and short-term storage
Thaw frozen cookie or dough inside the closed container at room temperature to avoid condensation. Wait until the contents reach room temperature before opening so icing shine and texture stay intact.
Decorated goods and icing care
Keep finished treats airtight up to 5 days; tuck a sheet of paper between layers to prevent scuffs. Heat sealing or vacuum packing can extend perceived freshness to 2–3 weeks for gifts or shipping.
Royal icing storage: Icing made with meringue powder sits at room temperature up to a week, refrigerated up to 2 weeks, or frozen up to 6 months. Thaw, bring to room temperature, and remix or knead in the bag before use.
| Item | Storage | Tip |
|---|---|---|
| Cookie dough | Freeze 3 months | Use parchment between discs |
| Finished cookie | Airtight 5 days | Insert paper between layers |
| Royal icing | Fridge 2 weeks / Freezer 6 months | Thaw, bring to temperature, remix |
Pro tips and troubleshooting: no spread, sharp lines, and vibrant colors
A quick chill or brief freeze just before baking prevents spread and preserves crisp outlines. This small step gives the edges time to set so shapes stay true in the oven.

Watch the dough temperature: if the dough softens while you work, pop it back in the fridge. If it cracks when rolling, knead briefly to smooth before rerolling.
Key fixes in minutes
- Prevent spread: freeze rolled sheets 10–15 minutes or cut shapes 7–10 minutes before baking.
- Stop icing bleed: flood in sections and wait 10–15 minutes for a crust before adjacent colors.
- Drying and humidity: extend full dry time in high humidity and keep treats in a cool room; avoid blowing fans directly over icing.
- Sharp outlines: pipe a slightly thicker border first, then flood inside to make a dam.
Other practical cues: bake at 350°F and pull cookies when tops go matte. Let them rest on the sheet a few minutes, then move to a rack. For icing, use a stand mixer at low speed to cut down air and prevent pinholes.
Conclusion
A simple recipe, steady mixing cues, and short crusting pauses let home bakers craft polished shapes fast.
We recommend weighing flour, creaming butter and sugar well, and baking just until the tops set for a tender crumb that accepts royal icing smoothly.
Freeze extra dough for quick batches later and store finished treats airtight up to 5 days, or freeze up to 3 months. Thaw in a sealed container to room temperature before opening to keep the surface glossy.
Swap colors, try new faces, and share photos of your results. This post is your go-to plan for repeatable, party-ready sugar cookies and steady baking success.