Halloween Party Foods: 20+ Spooky Snack Ideas
Surprising fact: nearly 70% of hosts say the menu makes or breaks the vibe—so the right spread matters more than a flashy costume.
This Website contains affiliate links. That means I may earn a small commission if you purchase through my links, at no extra cost to you.
Quick wins turn a simple get-together into a night guests remember. This list packs easy-to-follow recipes and low-effort tricks that level up appetizers, mains, and desserts.
You’ll find clever ideas like mummy-wrapped bites, jack-o’-lantern empanadas, and eyeball-shaped sweets alongside keeper recipes that use store-bought dough or pantry staples.
Plan with balance: cheesy savories, veggie options, handhelds for kids, and a few show-stopping centerpieces. Stagger hot dishes, set a grazing board near the entrance, and save dramatic sweets for the finale.
These tips save prep time, cut cleanup, and keep the table Instagram-ready. Read on for tested recipes and simple styling tricks that add flavor and fun.
Key Takeaways
- Mix quick bites, savory mains, and show-stopping sweets for variety.
- Use store-bought ingredients to save time without losing impact.
- Organize flow: grazing boards up front, hot items spread through the evening.
- Include kid-friendly and vegetarian options, and label allergens.
- Pick 2–3 anchor recipes, then fill gaps with low-effort snacks.
Quick, cute, and kid-approved Halloween bites
Simple, spooky-ish snacks can keep kids excited without adding hours of prep. These ideas are fast to assemble and great for hands-on helpers. Each mini recipe uses pantry staples so you can pace prep and still serve warm plates during the party.
Mummy pigs in a blanket with ketchup or mustard eyes
Wrap mini or halved hot dogs in thin crescent dough strips and bake per package. Cut in half for bite-size pieces and dot ketchup or mustard for eyes. Pre-bake then rewarm to keep timing easy.
String cheese witch fingers with almond “nails”
Halve string cheese, score knuckle marks, and secure slivered almonds with a dab of cream cheese. These are low-mess bites kids can grab between games.
Frankenstein guacamole with blue corn chip “hair”
Shape guac into a rectangle, pipe refried beans for a mouth and scar, add sour cream and sliced olives for eyes, and top with blue corn chip hair for crunch.
Jack-o’-lantern empanadas using refrigerated pie crust
Stamp pumpkin faces from refrigerated pie crust, fill with seasoned meat or veggies, egg-wash, and bake. Expect about 1 hour total and roughly 2½ dozen servings.
| Snack | Time | Servings | Tip |
|---|---|---|---|
| Mummy pigs | 20–25 min | 24 bites | Leave space for ketchup/mustard eyes |
| Witch fingers | 10 min | 12–16 | Use cream cheese to attach nails |
| Franken guac | 15 min | 8–10 | Add lemon to stop browning |
| Jack-o’-lantern empanadas | 60 min | 24–30 | Light egg wash for shine |
These easy recipes scale well—double dough for a larger crowd and let kids help assemble eyes and nails to boost the fun.
halloween party foods that look scary but taste amazing
Turn familiar comfort food into cinematic showpieces that look wild but taste comforting. These ideas use simple dough tricks and bold plating to deliver monster-level impact without complex techniques.
Stuffed pizza skulls bake in skull molds filled with sauce, mozzarella, and pepperoni or veggies. Brush the bread exterior for a crisp sheen that holds detail. For a centerpiece, shape a stuffed pizza brain and glaze with warm pizza sauce for a glossy, “bloody” effect that slices cleanly.
Lung calzone uses a Madeira mushroom filling under flaky dough and scored vein-like lines. Parcook fillings to avoid sogginess and vent calzones to prevent bursting.
Hand burgers and snake loafs are playful crowd-pleasers. Make finger fries from potato flakes with a distinct nail and twist pigs-in-a-blanket into a coiled snake loaf with olive eyes and scored scales.
- Prep dough shapes a day ahead; bake just before serving.
- Offer marinara, queso, and herbed butter for dipping.
| Recipe | Key Technique | Serve |
|---|---|---|
| Stuffed pizza skulls/brain | Skull molds, brush egg wash, warm sauce glaze | Slices for 8–12 |
| Lung calzone | Parcook mushrooms, score veins, vent dough | 6–8 hand portions |
| Hand burgers & finger fries | Shape buns, form potato-finger fries with nails | 6–10 sliders |
| Snake pigs-in-a-blanket loaf | Twist dough, score scales, add olive eyes | Slices for 10–14 |
CharBOOterie boards, dips, and savory crowd-pleasers
A great grazing board pairs showy warm bites with crisp dippers and layered cold spreads. Build around one baked centerpiece and add contrasting textures so guests can taste a little of everything.
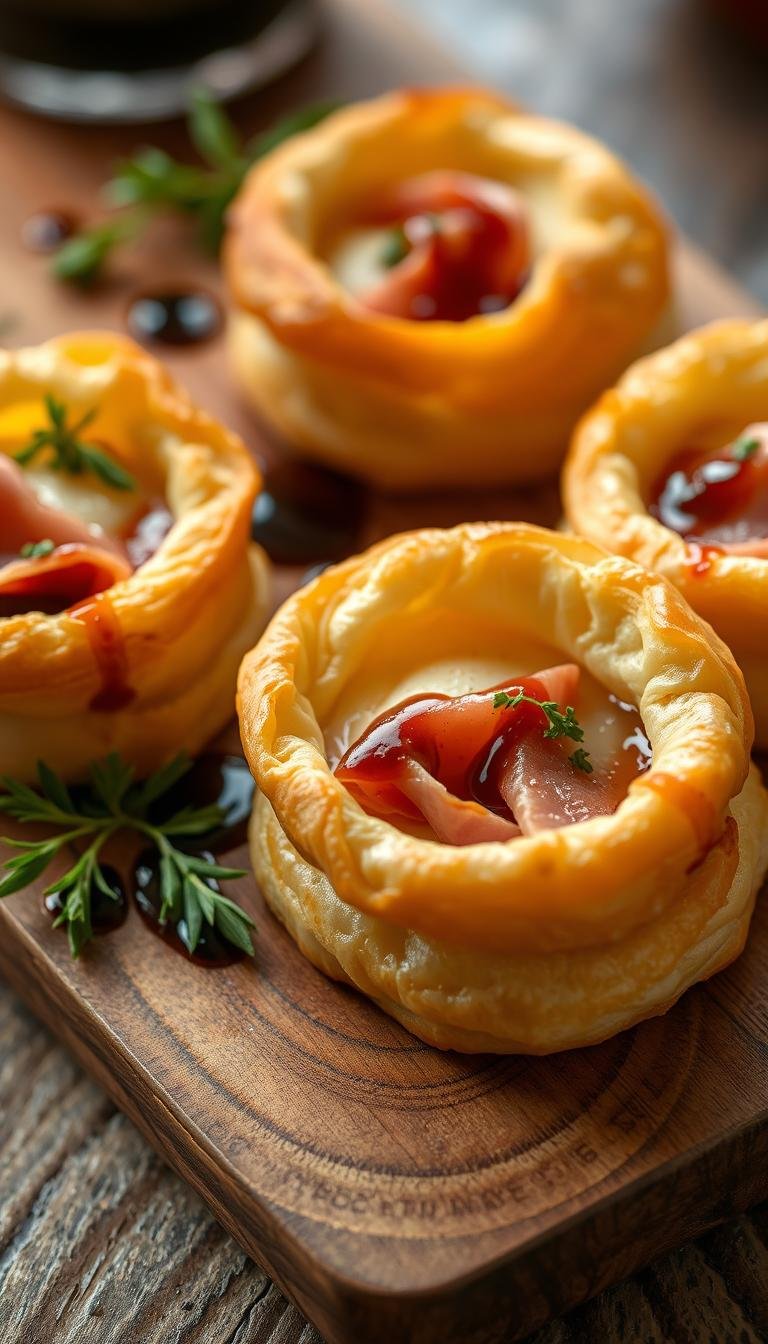
Mummy-wrapped Brie with apple slice “eyes”
Wrap a wheel of Brie in puff pastry strips to make a mummy shape. Assemble ahead and bake right before guests arrive so the center is perfectly gooey.
Top with apple-slice and dried-cranberry eyes just before plating for a crisp, tart contrast to the melted cheese.
Spiderweb taco dip with bat-shaped tortilla chips
Layer refried beans, seasoned beef or beans, salsa, cheese, and lettuce for a 7-layer base. Pipe sour cream in a web pattern right on top.
Cut tortillas into bat silhouettes and bake until crisp for a fun, homemade chip to scoop the dip.
Pretzel “bones” with beer cheese or marinara “blood”
Form breadstick dough into bone shapes by snipping ends and rolling knobs. Brush with a baking-soda wash for that classic pretzel chew.
Serve warm with a trio of dips—beer cheese, marinara “blood,” and a cool ranch or avocado crema—to cover varied tastes.
- Round out boards with cured meats, cubed cheddar and Colby, olives, grapes, and nuts for easy grazing.
- Use dark slate and small pumpkin bowls for condiments to boost contrast and theme without extra prep.
- Offer gluten-free chips and rotate platters to keep the spread fresh through the event.
Simple savory mains to anchor your spread
Fill the center of your buffet with easy, hearty mains that let snacks and sweets shine. These dishes are quick to scale, keep guests full, and work well for a halloween get-together without adding long prep.
Ghost-shaped stuffed pizza (boo pizza)
Shape a large dough round into a ghost silhouette and stuff it with sauce, mozzarella, and your favorite toppings. Crimp the edges tightly so cheese stays inside while baking.
Pro tip: slice into wide strips so the ghost shape remains recognizable on the platter.
Spooky sliders with sweet potato fry “legs”
Use soft Hawaiian rolls for quick assembly. Stack mini patties, a small slice of cheese, and pickles. Arrange baked sweet potato fries as “legs” under each slider for a playful presentation.
Chili, soups, and grilled cheese “crouton” toasts
Set up a chili bar with shredded cheese, scallions, and sour cream so guests can customize bowls. For tomato soup, cut grilled cheese into crouton-sized toasts and float them on top for a crunchy twist.
- Sheet-pan methods save oven time—bake multiple pizzas and fries together.
- Hold chili and soup in slow cookers set to warm; replenish grilled toast in small batches.
- Place mains near the drinks station as a simple way to keep traffic flowing.
Fun with store-bought dough: hats, bones, and more
Store-bought dough unlocks simple, showy bites that look custom-made with almost no effort. Use crescent triangles and breadstick strips to make handheld treats that bake in minutes.
Crescent witch hats with string cheese and pepperoni
Unroll crescent dough into triangles, place a strip of string cheese at the base, and roll toward the point to form little hats. Trim pepperoni into circles for hat bands and press into the dough.
Brush with melted butter and sprinkle Parmesan for a bakery aroma. Bake per package instructions—flats bake in minutes for an easy make and warm serving.
Breadstick bone bread with garlicky Parmesan
Cut breadstick dough into strips, snip the ends, and roll or curl to form bone shapes. Dust with garlic and Parmesan and bake until lightly golden.
Serve with warm marinara “blood” and a cheesy dip so guests can choose. Keep dough chilled until shaping and use parchment for quick cleanup.
| Item | Prep Time | Serves |
|---|---|---|
| Crescent witch hats | 15–20 min | 12–18 |
| Breadstick bones | 20–25 min | 10–14 |
| Make-ahead tip | Chill shaped dough | Bake before guests arrive |
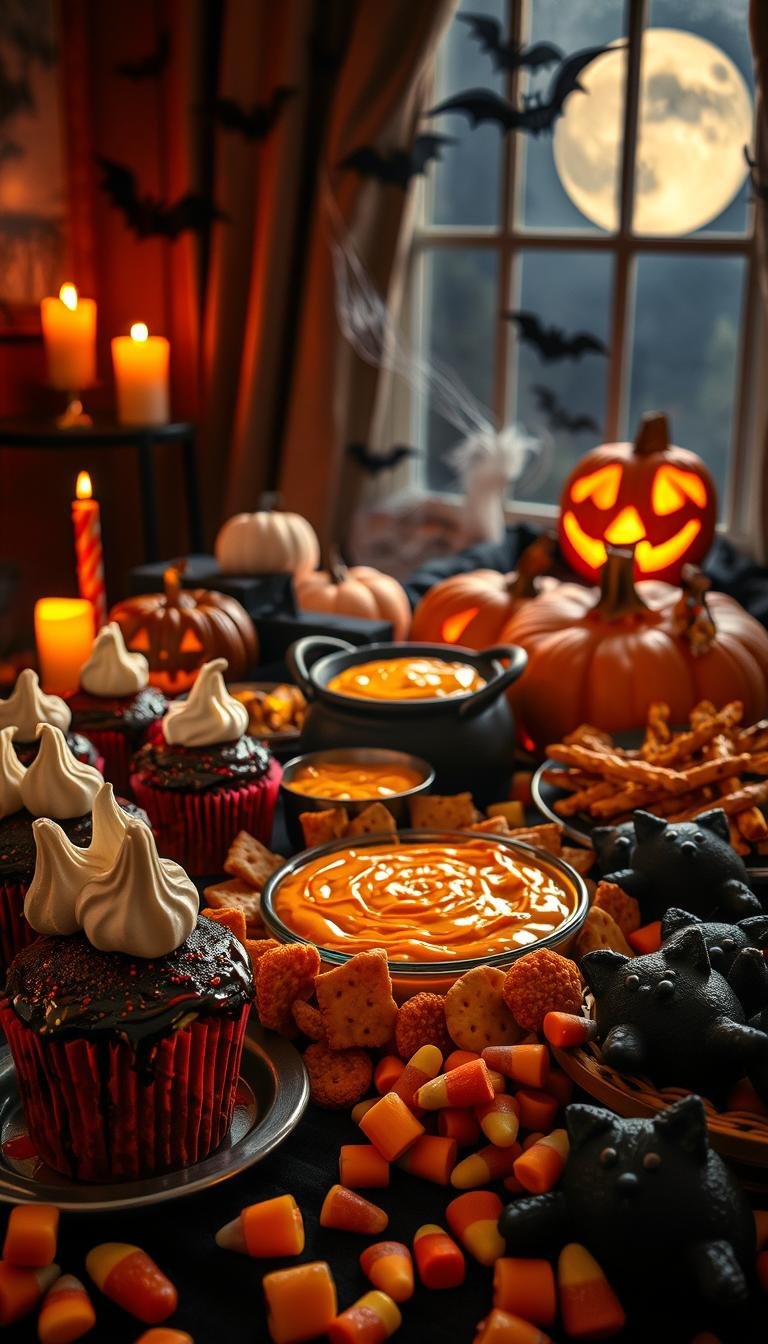
Sweet-and-salty snacks with candy, chocolate, and crunch
Mix chocolate, crunchy pretzels, and melty cheese to craft snacks that hit every craving. These simple recipes scale well and travel easily for potlucks or a living-room spread.
Dipped pretzel “witches’ wands”
Dip pretzel rods in melted chocolate or candy melts and add sprinkles while tacky. Stand finished rods upright in a bowl filled with candy corn for an eye-catching display.
Candy corn pizza
Form a ring of shredded cheddar at the outer edge of a baked crust, then top the center with shredded mozzarella. Slice into wedges so each piece shows the signature tricolor look.
Maraschino cherry mice
Pat cherries dry before dipping in almond or chocolate bark. While coatings are semi-set, press on a chocolate chip for a nose, slivered almond ears, and tiny candies for eyes.
- Tip: Drizzle a thin peanut butter ribbon over a few wands for a nutty variation that stays within the base technique.
- Batch-dip on parchment, chill briefly to set, and offer a small bowl of crushed nuts or cookie crumbs for guests to customize texture.
- Pair pretzels with a small fruit platter to balance sweet-and-salty treats and refresh the palate.
Classic Halloween desserts made spookier
Turn classic desserts into spooky showstoppers with easy decorating tricks anyone can master.
Ghost cupcakes start by piping white frosting into tall swirls, then add two tiny sprinkle dots for faces. Top alternate cupcakes with fudge-striped cookies and a chocolate kiss to form little bat silhouettes.
Ghost cupcakes, boo meringues, and bat-topped cupcakes
Whisk egg whites for feather-light boo meringues; a drop of orange tint keeps them festive and still about 15 calories each. Use a piping bag for clean kisses and bake on low heat for crisp shells.
Halloween brownies with chow mein “spider” legs
Bake fudgy brownies, glaze with glossy chocolate, and press candy eyes on top. Add broken chow mein noodles for spooky, crunchy spider legs that hold shape.
Graveyard Rice Krispies-cookie mashups
Press sugar cookie tombstones into a slab of Rice Krispies treats, pipe punny epitaphs, and sprinkle crushed chocolate cookie “dirt” around bases. Stage on tiered stands and offer a dairy-free frosting option for broader appeal.
- Pro tips: use a small offset spatula for neat cupcake swirls and prep eyes and inscriptions ahead; finish close to serving for best texture.
Eyeball and monster treats that watch you back
Create edible eyeballs and tiny monsters that look detailed but come together fast. These bites mix simple techniques and bright colors so a dessert tray feels playful and a little eerie.

Cake eyeballs and cake pop monsters
Roll cake crumbs into firm balls, chill, then dip in a glossy coating. Paint irises, pupils, and veins with food color gels for realistic detail.
For monsters, use varied sizes, candy horns, and sprinkles. The contrast of colors makes the tray lively and fun.
Peanut butter eyeball candies
Mix peanut butter and powdered sugar, form into balls, and coat in white chocolate. Pipe thin red veins with gel icing for a quick, no-bake treat.
This recipe is a kids’ favorite and stores well chilled for a day ahead.
Eyeball pies and pizzas with olives and red peppers
Turn a mini pizza or a pumpkin pie into one giant eye. Use sliced olives for pupils and roasted red pepper strips as veins over a mozzarella or whipped top.
Vary eye color with tinted frosting or fruit leather for irises to keep the spread interesting.
| Treat | Main Ingredient | Finish | Prep Time |
|---|---|---|---|
| Cake eyeballs | Cake crumbs + frosting | Painted irises & glossy dip | 30–45 min |
| Cake pop monsters | Mini cake balls | Colored coating, candy horns | 30–45 min |
| Peanut butter eyeballs | Peanut butter | White chocolate & gel veins | 20–30 min (no-bake) |
| Eyeball pie/pizza | Pie or pizza base | Olive pupils, pepper veins | 25–40 min |
Quick tips: use toothpicks when dipping, tap off excess for smooth coatings, and chill trays to set details fast.
Gross-out goodies for brave guests
Finish the meal with shock-value desserts that double as live demos and conversation starters. These showy sweets pair familiar flavors with eerie presentation so guests are intrigued before they taste.
Crème brûlée eyeball pie with torched sugar
Make a smooth custard base and top with an even layer of sugar. Torch the sugar live to caramelize and draw slice lines with the tip of the torch.
The spectacle gives a glossy, glass-like finish that cracks with a satisfying sound at serving.
PB&J white chocolate brains with “blood” filling
Mold brains from tempered white chocolate shells. Fill with peanut butter fudge and a cherry-based “blood” that oozes when cracked.
Chill to set details, then plate on dark platters to heighten the effect.
Hot chocolate bomb brains that turn milk red
Use silicone brain molds for consistent shapes. Drop into hot milk and watch the shell melt to release colored cocoa mix or hidden red candy.
This recipe is an easy way to add a theatrical drink that still tastes like classic cocoa.
| Treat | Prep Time | Serve Tip |
|---|---|---|
| Crème brûlée eyeball pie | 40–50 min (torch at service) | Torch table-side; pre-slice for fast plating |
| PB&J white chocolate brains | 30–45 min (plus chill) | Keep chilled; serve with small forks and napkins |
| Hot chocolate bomb brains | 20–30 min (plus melt time) | Offer warm milk in thermal carafes |
Cookies with creepy-crawly vibes
Simple cookie bases become eerie showstoppers with a few melted-chocolate details and a steady hand. These bites look startling but rest on classic, reliable recipes you likely already trust.
Spider chocolate chip cookies
Bake your favorite chocolate chip cookie base as usual. While warm chips settle, use melted chocolate to draw eight thin legs around selected chips so they read as tiny spiders.
Finish each critter with a dot of white icing and a mini chocolate pupil for eyes that pop.
Spider-infested oatmeal cookies
Make a chewy oatmeal dough and spread it on a sheet for bar-style baking or drop round scoops. Pipe small chocolate spiders across the surface so the tray looks delightfully infested.
Chill the dough briefly to prevent excess spread and preserve the spider shapes during baking.
- Tools: a fine tip or parchment cone keeps legs delicate and neat.
- Balance: a hint of salt in the oat base tempers rich chocolate details.
- Serving: alternate rounds and slab-style bars for visual variety on a web-patterned platter.
- Notes: label allergens if nuts or extracts are used and package a few cookies in clear bags as favors.
“A few careful strokes of melted chocolate turn an ordinary batch into a memorable surprise.”
Tip: these cookie designs travel well and make a fun addition to any halloween spread without extra fuss.
Fall-forward flavors: pumpkin, caramel, and apple
Bring fall to the table with three easy sweets that highlight pumpkin, caramel, and apple flavors.
Pumpkin custard “ghosts”
Pumpkin custard ghosts taste like pumpkin pie without the crust and take minutes to prep. Whisk canned pumpkin, eggs, brown sugar, a splash of heavy cream, and warm spices, then bake in small jars.
Chill, then pipe whipped cream ghosts on top and add tiny chocolate eyes for charm. Stack jars on a tiered stand for an easy, self-serve dessert display.
Caramel apples with cinnamon “hair”
Dip crisp apples in homemade caramel made from brown sugar and heavy cream for a smooth, glossy coat.
Press on cinnamon-coated chow mein noodles as playful “hair.” Add flaky salt to balance sweetness, or offer coatings like chopped peanuts and dark-chocolate drizzle.
Stovetop caramel corn for bowls
Pop plain kernels, then toss in a quick stovetop caramel—butter, brown sugar, and a pinch of salt—until glossy. Stir in a dash of pumpkin spice to tie the snack to the larger seasonal theme.
Make party-sized batches in a large pot and fill bowls around the room; the crunchy corn carries well all night.
- Quick tips: pre-slice apples for kids, keep napkins at the apple station, and set pumpkin custards chilled until serving.
- These fall-forward recipes bring warm aromas and classic pumpkin pie notes without long prep.
No-bake, make-ahead, and time-saver ideas
No-bake classics save time and keep the dessert table flowing when oven space is tight.
These easy make ideas assemble fast, store well, and are perfect for helping hands—especially kids.

Dirt cups with gummy worms
Layer chocolate pudding and crushed Oreos in clear cups so the layers show. Tuck gummy worms between layers for surprise bites that delight children and adults.
Nutter Butter ghosts dipped in white chocolate
Dip Nutter Butter cookies in almond bark or white chocolate. Add two mini chocolate chip eyes while the coating sets for a five-minute treat that looks custom.
Witch hat cookies with fudge stripes and Kisses
Pipe a dollop of frosting onto a Keebler Fudge Stripes cookie and press a Hershey’s Kiss into the center. Add a frosting band for a neat finish—no baking required.
- Batch ahead: assemble and cover to free your oven for hot mains.
- Set up a kids-help station for eyes, worms, and candy corn accents.
- Label trays for allergens and make a dairy-free pudding option.
- Store cups on sheet pans in the fridge for easy transport and quick service.
| Snack | Prep time | Make-ahead |
|---|---|---|
| Dirt cups | 10 min | 24 hours |
| Nutter Butter ghosts | 5–10 min | Same day |
| Witch hat cookies | 5 min | 24 hours |
Vegetarian and kid-friendly picks everyone can enjoy
Veg-forward snacks can be playful and sturdy enough to sit out during mingling. These recipes focus on easy assembly, familiar flavors, and clear labels so kids and adults can choose without guessing.
Frankensushi veggie rolls
Roll veggie sushi using avocado, cucumber, carrot, and tamago or tofu. Arrange nori and toppings to form a Frankenstein face—seaweed strips for hair and cucumber slices for eyes.
This keeps well at room temp and avoids raw fish, so it’s safe for little ones and ideal for a buffet.
Chicken or veggie “boo-ritos” with ghost cutters
Cut tortillas or thin pizza crust with a ghost-shaped cookie cutter. Fill with rice, beans, and cheese or shredded chicken.
Bake briefly until edges are crisp. Use cookie cutters for consistent shapes and toast leftover scraps into chips to reduce waste.
Spinach tortilla “monster” burritos
Use spinach tortillas for an instant green “monster” wrap. Fill with rice, black beans, grilled chicken or roasted veggies, and a sprinkle of cheese.
Add olive “eyes” on top and lightly press before baking so they stick. Offer mild salsa and a yogurt-lime dip so kids can dunk without heat.
- Offer both veg and chicken options so every guest finds something they love.
- Prep fillings in advance and set up an assembly station to speed production.
- Label trays—“veg,” “mild,” and “spicy”—and sprinkle a little shredded cheese before baking to seal seams and add color.
Decor-forward party tricks that double as favors
Turn tabletop styling into edible giveaways with a few fast, child-friendly crafts. These DIY touches look great on display and pack up easily into take-home treats so guests leave with a sweet memory.
Monster marshmallow pops rolled in colored sugar
Skewer marshmallows, dip them in tinted coating or water, and roll in colored sugar. Add candy eyes and let kids decorate faces for a hands-on activity.
Tip: stand pops in a tray of candy corn to dry and create a playful display that doubles as a snack base.
Licorice broomsticks for take-home treats
Bundle licorice strands around pretzel rods and secure with a thin licorice band to form broomsticks. They take about 30 minutes to assemble and travel well.
Mason jar lanterns to set the spooky mood
Set up a simple craft table with markers, tissue, and battery tealights so guests can personalize mason jar lanterns. These jars add ambiance and work as a sturdy favor container.
- Package marshmallow pops in cellophane with twist ties for grab-and-go candy.
- Label favors for allergens and place baskets near exits so people don’t miss them.
- Keep ribbon, tags, and scissors handy to assemble extras if attendance increases.
- Print a small card with storage notes, e.g., “best within 2 days,” so guests enjoy each recipe at peak freshness.
Build-your-own Halloween snack stations
Set up modular snack stations so guests build bold plates without waiting in one long line. A focused layout speeds service and keeps food fresh while people customize flavors.
DIY nacho cauldron
DIY nacho cauldron with webbed sour cream
Build a nacho “cauldron” station with warm queso, seasoned beef or beans, and layered dip bases. Pipe a sour cream web across the top for spooky flair.
Keep corn tortilla chips warm in a chafing dish and add a bowl of bat-shaped chips for extra theme points. Offer a cheese duo—queso and shredded cheddar—so guests pick melty dip or sprinkle-on topping.
Apple “monster mouth” bar with nut butters and almonds
Set out quartered apples, a bowl of lemon water to stop browning, and jars of nut butters to act as “gums.”
Have slivered almonds ready for teeth; press them into the nut butter and attach pretzel stick “tongues.” Add candy eyes for personality and provide wipes—this station gets sticky.
- Organize stations in a U-shape and label dips mild, medium, and spicy to keep lines moving.
- Use slow cookers for hot dips and ice packs for cold toppings to maintain quality.
- Provide compostable boats and small tongs so guests assemble without crowding.
- Rotate seasonal salsas like roasted corn or pumpkin seed for fresh ideas.
| Station | Hot element | Extras |
|---|---|---|
| Nacho cauldron | Queso (slow cooker) | Bat chips, sour cream web, shredded cheddar |
| Apple bar | Nut butters (room temp) | Slivered almonds, pretzel tongues, candy eyes |
| Logistics | Warm & cold holding | Compostable boats, labels, wipes |
Conclusion
Wrap up your menu with a balance of bold centerpieces and fast-to-assemble bites that free up your time. Choose two or three anchor recipes, then add no-bake and make-ahead options to fill gaps.
The best way to keep guests happy is variety: creamy dips, crunchy snacks, cheesy bakes, and fruit-forward plates. Lean on seasonal pumpkin accents and a touch of peanut butter, caramel, or chocolate for familiar hits that please both kids and adults.
Map oven use and cold storage the day before, label trays, and assign helpers one station each. Snap a few photos early, then enjoy the night—your energy makes the spread memorable and the recipes worth the effort.