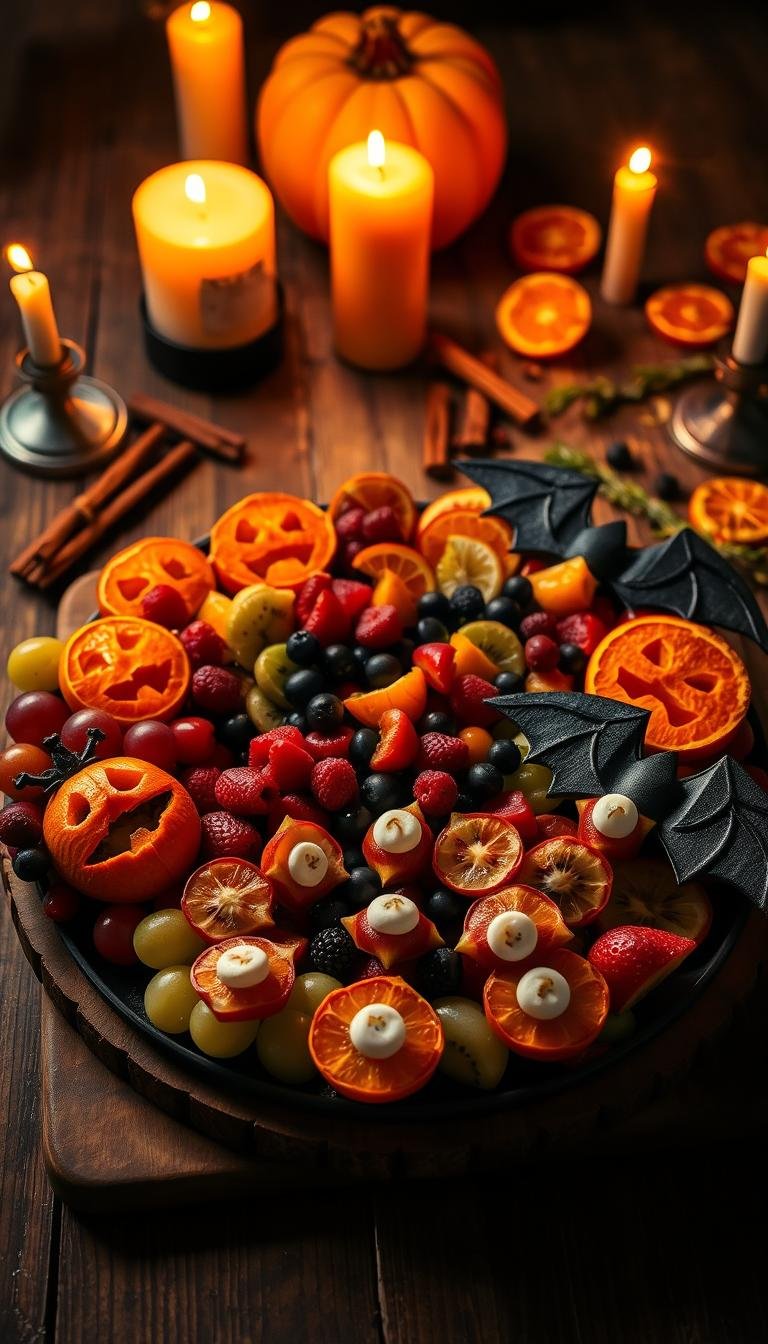
Halloween Fruit Platter Ideas for a Healthy Party Snack
Surprising fact: nearly 70% of parents prefer healthier treats, yet most party snacks are high in sugar — this simple board flips that trend while keeping the fun.
This Website contains affiliate links. That means I may earn a small commission if you purchase through my links, at no extra cost to you.
This no-bake recipe turns apples, bananas, and berries into playful characters that thrill kids and adults.
Expect apple monsters with nut or seed butter mouths, banana ghosts with chocolate eyes, and strawberry mummies drizzled in white chocolate.
Quick tips: brush apples with lemon to stop browning, heat chocolate in short bursts and thin with a touch of coconut oil, and pipe or buy candy eyes ahead of time.
The big benefit: you can assemble this healthy halloween snack in under an hour with minimal tools, use it as a centerpiece, and keep leftovers fresh for 1–2 days.
Key Takeaways
- Easy, no-bake recipe that keeps sugar lower while feeling like a treat.
- Simple characters: apple monsters, banana ghosts, and strawberry mummies.
- Prep tips: lemon for apples, coconut oil for smooth chocolate, and make eyes ahead.
- Assembles fast and doubles as a party centerpiece or after-school snack.
- Swap fruits to suit season or taste and keep a cup of extra eyes for touch-ups.
Why this halloween fruit platter belongs at your spooky bash
This themed snack turns everyday produce into crowd-pleasing characters with very little fuss.
Low sugar, high impact: A Halloween fruit platter offers the spooky vibe without a sugar overload, making it a smart choice for kids and adults who want healthier halloween treats.
Most elements—apple monsters, banana ghosts, and strawberry mummies—can be prepped quickly and stored covered in the fridge for a few hours. Candy eyes stick best to slightly damp surfaces with a dab of nut butter or melted chocolate.
Homemade eyes take 1–2 days to set and are more delicate than store-bought options, so plan accordingly. Bright apples, strawberries, and mango add built-in color, so one or two character pieces make the whole tray look designed.
- Kids love placing the eyes — it’s fun and gets them involved.
- Scales easily for a large party or a family movie night.
- Cost-effective: uses pantry staples and common produce.
| Item | Prep time | Storage (covered) | Best adhesive |
|---|---|---|---|
| Apple monsters | 10–15 min | 2–4 hrs (brush with lemon) | Nut/seed butter |
| Banana ghosts | 5–10 min | 1–2 hrs (best fresh) | Melted chocolate |
| Strawberry mummies | 10 min | 2–4 hrs | White chocolate drizzle |
Ingredients and tools you’ll need for a healthy halloween treat
Gathering the right ingredients and a few small tools makes assembly fast and fun for every guest. Start by stocking crisp apples and ripe bananas, plus strawberries, blueberries, grapes, pineapple, mango cheeks, and mandarins with celery stems for a playful look.
Core fruits to buy and prepare
Essentials: two apples (mix red and green), two bananas, 5–8 strawberries, about 1/2 cup blueberries, 1/2 cup seedless grapes (halved), pineapple slices or chunks, 2–4 mango cheeks, and 2–4 mandarins. Plan a cup or two of mixed berries in bite-size slices and chunks so guests can grab without dripping.
Decor accents and flavor helpers
Keep candy eyes, chocolate chips, melted white chocolate, and melted chocolate on hand. Pack about 1/4 cup nut or seed butter, mini marshmallows, and a 1/4 cup mix of nuts or pumpkin seeds. For DIY eyes, pipe a paste of 2/3 cup powdered sugar with 2–3 tsp aquafaba or milk and add tiny pupils; let set 1–2 days.
Platter gear and useful tools
Use a large tray or board, small bowls to corral eyes and nuts, parchment for tidy drizzles, a piping bag, cookie cutters, a melon baller, and a small knife for details. Keep lemon juice nearby to brush apple slices and a pinch of coconut oil to thin chocolate for smooth drizzles.
| Item | Qty or note | Tip |
|---|---|---|
| Apples | 2 | Brush with lemon to prevent browning |
| Blueberries & grapes | ~1/2 cup each | Add eyes right before serving |
| Melted chocolate / white chocolate | ~1 tbsp each | Add 1/8 tsp coconut oil for thin drizzles |
Step-by-step halloween fruit platter recipe
With simple techniques you can craft expressive apple monsters, banana ghosts, and berry mummies in minutes. Follow these clear steps to assemble each character and then arrange them for the best visual impact.
Apple monsters with nut-butter mouths, strawberry tongues, and crunchy teeth
Core and quarter apples, then cut a shallow wedge to form a mouth. Spread 1–2 tsp peanut or seed butter inside the wedge.
Press pine nuts or pumpkin seeds for jagged teeth and add a thin strawberry slice as a tongue. Glue candy eyes to the skin with a dab of nut butter or melted chocolate.
Banana ghosts with chocolate chip eyes and spooky mouths
Peel and halve bananas, then cut a zig‑zag at the base for a ghostly edge. Attach candy eyes using a dot of melted chocolate.
Draw a long oval mouth with thinned chocolate (add 1/8 tsp coconut oil) and finish with a few chocolate chips if desired.
Strawberry mummies drizzled in white chocolate with googly eyes
Drizzle melted white chocolate over whole strawberries in back-and-forth strokes to mimic bandages.
Place candy eyes while the drizzle is tacky, or re-glue with a tiny dot of melted chocolate.
Other spooky picks and final assembly
Turn halved grapes and blueberries into tiny eyeballs by adding single eyes to cut surfaces. Cross-hatch mango cheeks to hold small faces. Insert short celery stems into peeled mandarins for mini pumpkins.
- Cluster colors and alternate dark and bright pieces.
- Anchor corners with apple monsters and banana ghosts for balance.
- Add delicate details in the last few minutes so juicy items keep shape.
Watermelon jack-o-lantern fruit salad option
A carved watermelon makes a playful jack-o-lantern bowl that doubles as a colorful party centerpiece. It’s a fun way to serve chilled mixes and ties in with other spooky snacks without extra fuss.

Carving tips for a stable, expressive “mouth” and red-rimmed eyes
Slice a thin piece off the watermelon base so it sits flat. Sketch the face first, then carve with a paring knife.
Keep a rim of red flesh behind eye cutouts so the eyes look red-rimmed instead of white rind. This adds dramatic color and depth.
Filling ideas: pineapple, honeydew, blueberries, blackberries, and more
Spoon out the interior and cut into one-inch chunks. Combine the melon with pineapple, honeydew, blueberries, grapes, and clementine segments.
Add blackberries last so they don’t smash. Aim for consistent slices or chunks so guests can grab pieces with tongs.
Staging and serving: spill-from-the-mouth effect on your tray
Mound the mixed bowl so fruit spills from the mouth onto a large tray or platter. Drain cut pieces briefly to reduce pooled juice.
- Stabilize the base so the pumpkin won’t wobble during transport.
- Carve and prep the same day; assembly takes just minutes once fruit is ready.
- Dot a few candy eyes on melon or berries right before serving for cohesion with the main board.
Make ahead, storage, and how to prevent browning
A little planning makes sure slices stay bright and eyes stay put until guests arrive. Follow a few simple rules for slicing, chilling, and finishing so your tray looks fresh through the whole party.
Keep apples and bananas fresh: lemon juice, timing, and cutting tips
To prevent browning, brush apple cuts with a little lemon juice and keep them chilled. Core and quarter apple pieces earlier in the day if you need extra prep ahead time.
Peel and cut bananas as close to serving time as possible. That keeps texture and color at their best.
Working with eyes on juicy pieces
Candy eyes can soften on juicy items like cut grapes and mango. Add those decorations right before serving so pupils don’t slide.
For drier surfaces—apple skin, strawberries, and blueberries—you can attach eyes a bit earlier. Use a tiny dab of melted chocolate to secure them if needed.
Fridge guidelines and leftover storage
Cover assembled boards and chill in the fridge for a couple of hours before guests arrive. Most trays hold well for 1–3 hours on display when kept covered and cold.
Store leftovers in an airtight container in the fridge. Cut pieces stay best for 1–2 days, while carved watermelon salad keeps 2–3 days after removal from the rind.
“Brush slices with lemon and pat juicy pieces dry—small steps make a big difference.”
- Prep order: sturdier items first; apples and bananas last.
- Condensation tip: pat fruit dry and layer parchment under juicy sections.
- Refresher: re-attach loose eyes with a dot of warm chocolate right before serving.
| Task | Best Ahead time | Chill / Display time |
|---|---|---|
| Strawberries, blueberries, mandarins | 2–4 hrs | 2–3 hrs covered |
| Apples (brushed with lemon) | Up to 6 hrs | 1–3 hrs covered |
| Bananas (peeled & cut) | Last-minute (0–15 min) | Best fresh; 30–60 min |
| Candy eyes on juicy pieces (grapes, mango) | Right before serving | N/A — add at serving |
Variations and substitutions for every crowd
With a few smart swaps you can adapt the whole spread to dietary needs and seasonal picks. These adjustments keep the look fun while fitting allergies, preferences, and the size of your event.

Dietary swaps: make vegan candy eyes by piping a paste of powdered sugar and aquafaba; let them set 1–2 days before assembly. Replace nut butter with sunflower or pumpkin seed butter for nut-free mouths. Use pumpkin seeds or sunflower kernels as crunchy “teeth.”
Swap dairy-based chocolate for dairy-free chocolate or white chocolate alternatives. Scatter chocolate chips sparingly for familiar sweetness that kids enjoy.
Seasonal and theme ideas: add kiwi, lychees, pears, honeydew, or extra pineapple for color and tang. For a pumpkin motif, top peeled mandarins with short celery stems and dot with pumpkin seeds. Use cookie cutters on melon to punch out bats or ghosts around your platter anchors.
- Create a mini version with apples, grapes, and a simple chocolate drizzle for small groups.
- Collect favorite recipes each year to refine your go-to treats playbook.
Serving ideas for a halloween party
Set up a serving plan that saves time and invites guests to personalize their snacks. Place a large board or tray in the center and corral small bowls nearby for dips and accents.
Pairings: creamy fruit dips, cocoa drizzle, and healthy halloween drinks
Offer simple dips: a creamy yogurt-honey dip and a light cocoa drizzle work well with berries and apples. Keep a small cup of melted chocolate warmed and thin with a touch of coconut oil for smooth glues and drizzles.
Serve drinks like spiced apple cider or sparkling water with orange slices to complement the board without adding heavy sugar.
Kid-friendly stations: decorate-and-pin eyes, quick recipes in under minutes
Create a decorate-and-pin eyes station with cups of candy eyes and small tongs. Let kids stick eyes on grapes, blueberries, mango bites, and bananas in the final minutes for freshness and fun.
Place a simple how-to card near the station showing three steps: pick, stick, and drizzle. This keeps lines moving and encourages participation.
- Present the platter with bowls of creamy dip and cocoa drizzle so guests can customize sweetness.
- Rotate colors and shapes across the tray; anchor corners with character pieces and fill gaps with berries and pineapple tidbits.
- Pre-portion extra apples, bananas, and grapes for quick refills — restock in a few minutes.
- Keep a small cup of melted chocolate to re-glue displaced eyes and repair details during party time.
| Service item | Why it helps | Quick tip |
|---|---|---|
| Small bowls of dip | Let guests control sweetness | Place near high-traffic edge of board |
| Decorate-and-pin station | Interactive and kid-friendly | Use cups of eyes and small spoons for hygiene |
| Fresh refill tray | Keeps the display full and neat | Chill pre-cut apples and grapes until needed |
Conclusion
A few smart steps make it easy to serve a playful, better-for-you centerpiece. Bring apple monsters, banana ghosts, and strawberries with candy eyes together for a lively halloween fruit platter that both kids and adults will enjoy.
Prep sturdy items early, brush apples with lemon, and add eyes to juicy grapes and mango last. Keep a small cup of extra accents—seeds, chips, or eyes—to refresh the board as guests dig in.
Tip: a light drizzle of chocolate or white chocolate ties looks together without hiding natural flavor. Use a carved mouth or a pumpkin-inspired mandarin to scale this fruit platter for any crowd, then pin this guide to recreate the look and make halloween memorable.