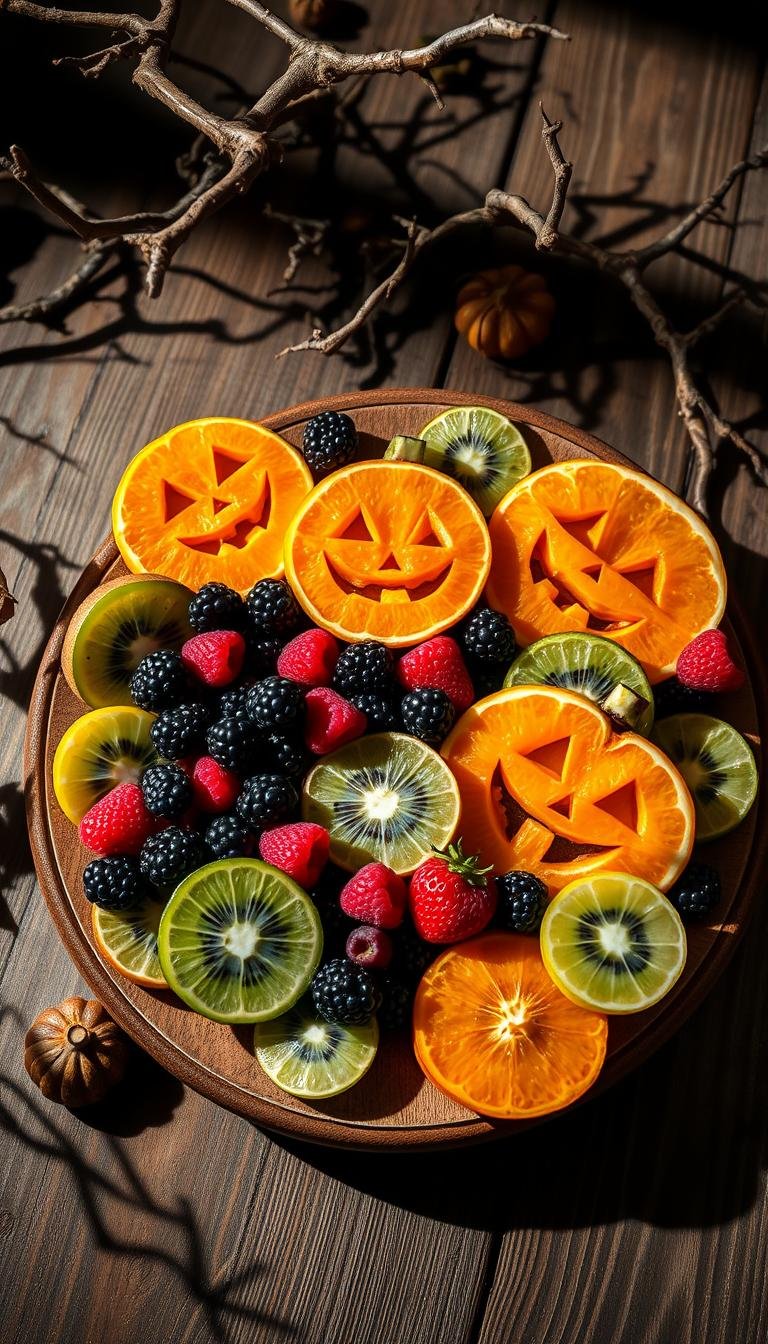
Halloween Fruit Ideas: A Step-by-Step Guide
Surprising fact: nearly 40% of hosts now choose healthier party centerpieces—so a spooky-themed platter can beat heavy desserts and still thrill guests.
This Website contains affiliate links. That means I may earn a small commission if you purchase through my links, at no extra cost to you.
This guide shows how a colorful halloween fruit platter turns basic produce into playful characters. You’ll meet apple monsters with nut-butter teeth, banana ghosts with chocolate faces, and strawberry mummies drizzled in white chocolate.
At a glance you’ll see what ’ll need: core ingredients and simple tools to make apple quarters into a smiling mouth, attach store-bought or homemade eyes, and arrange a show-stopping tray for a halloween party.
Quick prep tips: brush apple slices with lemon to stop browning, chill the tray, and add eyes to juicy pieces last. These small steps keep looks and flavor top-notch for kids and adults alike.
Key Takeaways
- Easy, healthy centerpiece that wins over kids and adults.
- Simple ingredients and tools let you make apple monsters, banana ghosts, and strawberry mummies.
- Prep some components ahead; assemble delicate parts right before serving.
- Use lemon to prevent browning and chill the tray for best results.
- Mix textures and a touch of chocolate for flavor and fun.
Why Halloween Fruit Makes the Perfect Healthy Halloween Treat
Turning common produce into silly characters is an easy way to make healthy snacks exciting. A colorful tray of apples, bananas, strawberries, grapes, mandarins, and mangoes delivers natural sweetness, fiber, and hydration without the sugar crash of candy.
Kids respond to play: apple monster mouths, banana ghosts, and berry mummies invite hands-on assembly. Letting children place candy eyes or add nut “teeth” turns eating into a creative activity.
Parents and schools welcome this option because it meets many guidelines for better-for-you party food. Kits with an apple, a set of eyes, and seed-based teeth also work well for take-home activities.
This approach scales easily—from a single plate for an after-school snack to a full halloween party spread. Small touches of chocolate or nut butter add flavor while keeping added sugar modest.
“Fun shapes and simple toppings make wholesome choices feel like a treat to kids.”
- Versatile for classroom, home, or a neighborhood snack table.
- Budget-friendly and season-flexible—choose what’s ripe and priced right.
- Adaptable for allergies: nut-free teeth, dairy-free chocolate, or seed butters.
Tools and Ingredients You’ll Need for a Spooky Fruit Tray
Start by laying out simple tools and fresh ingredients so decorating flows. A short setup saves time and keeps little helpers safe while you build characters.
Core produce to prep:
- Apples (cut into quarters), bananas, strawberries, grapes, blueberries, mandarins, mangoes, kiwis, and pears. Choose ripe pieces for clean cuts and bright color.
Glue and decorations:
- Peanut butter or alternative nut butter for sticking. Keep candy eyes, white chocolate or melted white chocolate, and small chocolate chips on hand for faces and details.
Helpful tools:
- Sharp knife, peeler (kid-friendly for kiwi “hair”), melon baller for eyeballs, piping bags for dots, parchment for drying, and trays or parchment-lined sheet pans for staging.
Quick tips: Brush cut apple pieces with lemon or pineapple juice to slow browning. Thin thick chocolate with a few drops of coconut oil for piping. Keep a spoon or tweezers nearby to place eyes without smudging.
Prep Essentials: Freshness, Safety, and No-Browning Tricks
A little planning keeps snacks bright, safe, and stress-free for a party. Start with a clear workspace, a stable cutting board, and towels for sticky hands. This saves time and reduces slips while you work.
Why browning happens: cut surfaces oxidize when exposed to air. A quick brush or dip in lemon or pineapple juice creates an acidic barrier that slows that process and keeps slices looking fresh.
Prep strategy: treat apples ahead with acid and chill them in the fridge. Make boo-nanas just before serving so they stay white and firm. Add candy eyes to juicy surfaces right at the last minute.
- Adults should do slicing and carving; let kids drizzle, stick eyes, or add simple toppings.
- Use a peeler for kiwi “hair” so kids can help without sharp knives.
- Pat pieces dry before attaching nut butter or melted chocolate so decorations stick.
- Keep trays covered and refrigerated until guests arrive to lock in crisp texture.
Keep peelings and cores off the floor and clear often to avoid clutter. A little oxidation is normal—use garnishes or strategic placement to hide minor browning. Also, check allergies and offer nut-free glue alternatives for mixed groups enjoying these halloween treats.
DIY vs. Store-Bought Eyes: How to Make and Use Candy Eyes
A few quick tricks make attaching candy eyes fast and foolproof for any platter. Choose store-bought candy eyes for speed, or use simple alternatives when you need last-minute fixes.
Quick options for speedy decorating
Store-bought candy eyes are ready to place and hold up well. Chocolate chips or small buttercream dots work as a fast backup when decorating with kids.
How to make homemade eyes
Mix powdered sugar with 2–3 tsp aquafaba or milk to make a thick, pipeable paste. Pipe 8 mm circles on parchment, add a tiny black dot with edible color, and let them air-dry uncovered for 1–2 days until firm.
Where and when to place them
Eyes stick best to drier surfaces such as whole strawberries or blueberries. Apply to juicy, cut pieces right before serving to avoid slippage.
- Consistency tip: icing should hold its shape for a few seconds off the spoon; add liquid one drop at a time.
- Use parchment: it prevents sticking better than silicone during drying.
- Adhesive helpers: a dab of melted white or chocolate behind each eye gives extra grip on slick cuts.
- Make-ahead: prepare a large batch and store fully set eyes in an airtight container to save time on party day.
Apple Monster Mouths Step by Step
Start with crisp apple quarters so each piece has enough room to show a bold, bite-ready mouth. Work on a clean board and keep a towel close for quick wipes.
Quartering, coring, and carving the mouth
Core each apple, then cut into quarters so slices stay sturdy. Carve a small wedge on the skin side to shape the mouth while leaving the back intact for support.
Adding peanut butter, strawberry tongues, and nut or seed “teeth”
Spread 1–2 tsp peanut butter in the cavity to form gums and act as adhesive. Slip a thin strawberry slice in as a tongue so it peeks out for a playful look.
- Press pine nuts, slivered almonds, or seeds into the upper edge for realistic teeth.
- Pre-poke tiny indents with a toothpick to anchor the teeth securely.
Attaching candy eyes with nut butter or melted chocolate
Use a dot of nut butter or a small dab of melted chocolate as glue, then place candy eyes or chocolate chips on the skin. If prepping ahead, brush cut areas with lemon and add eyes just before serving.
Banana Ghosts with Chocolate Chips Eyes
Turn plain bananas into quick ghosts with just a knife and a few chips. These little treats are playful, easy to make, and perfect for a halloween platter that keeps things light and fun.

Peel, halve, and add zig-zag bottoms for ghostly shapes
Peel bananas and cut each into a neat half. Carve a gentle zig-zag along the flat base so each ghost has a tattered hem.
Pro tip: brush cut surfaces lightly with lemon or pineapple juice if you must hold the pieces a short time. Browning will slow, but assemble close to serving for the best look.
Use melted chocolate or chips for eyes and mouth; thinning tips
Press two small chocolate chips into each banana for eyes and use a larger chip or a dab of melted chocolate to make a long oval mouth. Gently press so the soft fruit keeps its shape.
- If chocolate is too thick to pipe, stir in a drop of coconut oil to thin it for smooth piping.
- Handle pieces lightly; over-pressing can tear the banana and distort the face.
- Stage finished ghosts on parchment-lined trays and prop them against grapes or apple monsters so they appear to float.
- For nut-free settings, rely on chocolate as the glue; in warm rooms, add eyes at the last minute so chips don’t slide.
Strawberry Mummies and Other Halloween Fruit Characters
Tiny twists to familiar produce let you build playful characters in minutes. Start by drying your strawberries thoroughly so toppings stick. Arrange a staging tray so decorating stays tidy.
Drizzling melted white chocolate for mummy wraps
Drizzle melted white chocolate in overlapping lines across dried strawberries to mimic bandages.
Leave a small gap for the eyes. If the drizzle firms before you add candy eyes, dot a bit of warm chocolate as glue to secure them.
Frankenstein kiwis with pretzel bolts
Peel kiwis halfway down to create a jagged hairline. Insert pretzel sticks as neck bolts.
Press mini chocolate chips or chocolate chips eyes into the face and add a tiny pretzel piece for a crooked smile.
Spooky grapes, blueberries, and mango cheeks
Use drier spots on grapes and blueberries for better adhesion. For mango cheeks, score the surface and place eyes just before serving.
- Arrange characters in clusters to fill gaps around apple monsters and banana ghosts.
- Offer nut-free glue alternatives—melted chocolate works well for allergy-friendly sticking.
- Invite kids to drizzle and press on bits; these designs are forgiving and fun.
How to Assemble a Show-Stopping Halloween Fruit Platter (aka Halloween Fruit Tray)
Start by anchoring the display with a few bold characters so everything else falls into place.
Platter layout: anchoring monsters, filling gaps, and color contrast
Place apple monsters at the center or the corners to set scale and height. Surround them with banana ghosts and clusters of grapes, blueberries, and mango cheeks for balance.
Dot strawberry mummies around the edges for bright contrast that makes faces pop.

Using small bowls, cookie cutters, and melon balls for visual interest
Use small bowls to hold dips and seed butters so the tray stays tidy. Cut shapes with cookie cutters and add melon-baller “eyeballs” to create motion across the platter.
Serving dips and nut/seed butter without sogging the fruit
Place bowls where they won’t tip or crowd characters. Offer spoons or small tongs to keep faces intact and label nut-containing bowls for safety.
Keeping it chilled: fridge timing and last-minute eye placement
Store the finished halloween fruit tray covered in the fridge for a couple of hours before guests arrive. Add candy eyes to juicier cut pieces just minutes before serving for clean detail.
- Transport tip: stage components on parchment and assemble quickly on-site.
- Leftovers keep 1–2 days if refrigerated and covered.
Make-Ahead Tips, Storage, and Troubleshooting
Smart staging in the hours before guests arrive saves time and preserves looks. Plan which pieces you can prepare early and which need last-minute attention so the platter stays crisp and charming.
What to prep early vs. right before serving
Make candy eyes 1–2 days ahead so they fully set and stay firm. Store them dry in an airtight container until decorating.
Wash, dry, and cut most fruit a few hours before the event. Cover trays and place them in the fridge to keep textures fresh.
Refrigeration, covering, and 1-2 day leftovers
Keep assembled trays chilled on flat shelves so pieces don’t slide. Leftovers hold well for 1–2 days in airtight containers; separate any chocolate-dipped items to avoid smears.
Fixing seized candy melts and runny chocolate
Microwave chocolate in short bursts and stir between each. For thick, pasty candy melts gently add tiny amounts of coconut oil to smooth them.
Avoid water or steam near the bowls. If a drizzle runs too thin, let it cool briefly and test on parchment before continuing.
halloween fruit for Parties, School, and Family Fun
Plan a hands-on snack station that invites guests to build silly characters and grab a quick bite.
Healthy party spreads work well for a halloween party and family nights. Set out pre-cut pieces, safe glues like melted chocolate or seed butter, and clear signs for allergens. Kids can place eyes and teeth while an adult handles any slicing.
Healthy Halloween party spreads and kid activity stations
Offer small bowls of toppings and rotate stations so lines move fast. Keep components bite-size so the display doubles as both an activity and a quick snack.
School-friendly ideas and take-home kits
Check classroom rules and bring nut-free glues for groups that restrict certain food. For a simple take-home kit include an apple, a mini pack of candy eyes, safe “teeth,” and a short note with a recipe and what ’ll need to finish the monster at home.
- Balance this option with other food so all ages find something they like.
- Encourage guests to pin or share photos—a saved idea makes it easy to repeat next year.
Conclusion
Wrap-up: Start your final layout with a couple of bold characters, then add smaller pieces to fill gaps and boost color.
In a few simple steps, assemble apple monsters with nut or seed “teeth,” banana ghosts with chocolate faces, and strawberry mummies drizzled in white chocolate. Add supporting grapes and mango cheeks to round out the tray so the whole halloween fruit platter reads as one playful scene.
Keep the display chilled, place eyes on juicy cuts at the last minute, and store leftovers 1–2 days. If you make homemade candy eyes, allow 1–2 days to set. Thin thick chocolate with a drop of coconut oil for easy piping.
Tip: Pin this guide and pick a few favorite characters to build outward—scale up for parties or down for after-school snacks. It’s an approachable, creative way to turn seasonal produce into smiles.