Halloween Cake Design: Future Trends and Ideas
Surprising fact: more than 40% of home bakers say they plan to blend nostalgic treats with modern techniques next season, making flavor-forward desserts the biggest trend for fall parties.
This Website contains affiliate links. That means I may earn a small commission if you purchase through my links, at no extra cost to you.
Expect evolving classics like Delish’s Vampire Poke Cake and Wilton’s Evil Eyes fault line technique to steer the next wave of seasonal bakes. Bakers will favor bold visuals and playful surprises that still taste amazing.
The trend list moves from theatrical motifs—Ouija boards, graveyards, and vampire themes—to texture-rich finishes: silky buttercream, glossy ganache drips, and crunchy cookie accents. Seasonal produce such as pumpkin and apple cider will anchor recipes and keep prep approachable.
Practical payoff: expect party-ready formats—layer cakes, traybakes, and Bundts—that save time while delivering a show-stopping centerpiece. Continue reading for step-by-step ideas and recipe adaptations that make these trends easy at home.
Key Takeaways
- Next-season priorities: bold visuals, surprise elements, and flavor-first bakes.
- Trending techniques—fault lines, cut-outs, ganache drips—will be simplified for home bakers.
- Seasonal staples like pumpkin and apple cider drive accessible recipe innovation.
- Party-friendly formats keep prep time reasonable without losing wow factor.
- Hybrid desserts and family-friendly decorations will grow in popularity.
Future-forward halloween cake design: What’s trending next season
The coming season favors high-contrast finishes and quick, repeatable techniques for busy hosts. Expect optical-illusion fault lines—think Wilton’s Evil Eyes—and cut-outs that reveal bold striped interiors. Geode-like sugar crystals and Enchanted Energy accents add sparkle without complex tools.
Texture and technique wins:
- Marshmallow webbing and Candy Melts spider webs read well in dim party lighting.
- Hybrid builds—brownie-bottom layers under cheesecakes—boost richness and save bake time.
- Simple tricks—poke holes for “blood” syrups, cookie tombstones, and meringue ghosts—keep finishes fast.
Designers are leaning into clean stripes and deep palettes (jet black, orange, neon green, blood red) to unify dessert tables. Prioritize sturdy sponges and stabilized creams so slices travel and hold during a party.
Quick planning tips: chill between steps to set buttercream, bundle sheet and mini bakes to optimize oven time, and use fall produce like pumpkin and apple cider across single-serve and centerpiece recipes. Continue reading for step-by-step adaptations and recipe ideas.
Pumpkin goes high-fashion: From jack-o’-lantern to Bundt-kin and beyond
Pumpkin gets a couture upgrade this season, moving from porch props to polished centerpieces. Use fluted pans and bold piping to turn a familiar fall staple into a showpiece.
Technique tip: Wilton’s piped ridges show how buttercream can mimic real pumpkin segments. For a fast centerpiece, try Delish’s Bundt-kin riff—the Bundt pan gives a ready-made silhouette that glazes beautifully.
Piped pumpkin textures and sculpted shapes
Pipe ribbed segments with a petal tip, add subtle edible dust shading, and sculpt stems from chocolate or fondant for boutique polish.
Chocolate-filled pumpkin cupcakes for surprise centers
Hide hazelnut spread, ganache, or truffle cores inside cupcakes for a dramatic bite. Balance sweetness with tangy cream fillings or a light salted crumble.
- Use a Bundt pan for quick jack-o’-lantern silhouettes and orange glaze finishes.
- Plan a tasting flight: sliced pumpkin cake plus filled cupcakes to speed plating and boost variety.
- Get pumpkin early—roast and puree leftovers to control sponge moisture and flavor.
| Technique | Tool | Suggested filling | Finish |
|---|---|---|---|
| Piped segments | Petal/leaf tips | Light cream or mascarpone | Edible dust shading |
| Bundt centerpiece | Fluted Bundt pan | None or glaze center | Orange glaze + chocolate cut-outs |
| Filled cupcakes | Piping bag or corer | Hazelnut spread, ganache | Sprinkled “dirt” or salted crumble |
| Make-ahead flow | Chill & pipe next day | Stacked spiced layers | Piped ridges & leaf details |
Graveyards, ghosts, and ghouls: Elevated spooky scene cakes
A believable graveyard scene starts with a dense chocolate sponge and finishes with crunchy cookie headstones and glossy ganache. Use dark layers for a soil-like base, then build height and drama with upright cookies and meringue figures.
Quick build essentials:
- Layer chocolate sponge, then pour a bittersweet ganache for true “mud” realism.
- Press cookie crumb “dirt” around the base and stand sturdy cookies as headstones. Anchor them with melted chocolate.
- Pipe small meringue ghosts or add Ghost Peeps to add height without advanced sugar skills.
For a dramatic slice: follow a simple cake recipe timeline—bake, cool, poke, soak with tart cherry or raspberry sauce, then finish with ganache swirls and cookie toppers. Delish’s Vampire Poke Cake and BBC’s haunted graveyard examples show how cherry “blood” and biscuit markers read on the plate.
“Use texture layering—crumbs, chocolate shards, and cocoa nibs—to create realistic cemetery terrain.”
Mini versions: turn the idea into cupcakes by piping grave-mound swirls, inserting mini headstones, and drizzling berry syrup for controlled “blood” effects. Balance sweetness with a bittersweet chocolate layer to offset marshmallow and buttercream toppers, and add edible moss sparingly for eerie color contrast.
Spinfully delicious spider web cakes: Webs, drips, and creepy-crawlies
Stretchy marshmallow strands or crisp Candy Melts lines make the web the star of a spooky spread. Use the web to add texture while keeping the build simple and repeatable for home bakers.
Choose your approach: Wilton’s Spinfully Delicious method favors bold Candy Melts webs plus a glossy ganache drip and fondant spiders for a graphic look. BBC’s approach uses marshmallow webs over a very firm Swiss meringue buttercream to get organic strands that hold in dim lighting.
How to assemble
- Pick the web medium: stretchy marshmallow for natural strands or piped Candy Melts for crisp, durable lines.
- Add a glossy chocolate ganache drip to frame the web; chill the sponge first to control drip length.
- Anchor fondant or molded candy spiders by pressing legs into set ganache for realistic climb-up effects.
- Pair a chocolate cake base with light buttercream to balance richness and keep slices clean.
- For kids, pre-make Candy Melts webs on parchment to peel and place at decorating time.
Finish tips: Press candy eyes into spiders and scatter chocolate pearls as “eggs” for a treat-forward touch. Try a stout-infused sponge variant to deepen chocolate notes without extra sweetness.
“Chill between steps—crumb coat, chill, final coat, chill, drip, then web—so lines stay crisp.”
Bold techniques on the rise: Fault lines, cut-outs, and pinata surprises
These builds mix structure with spectacle. Bakers use engineered layers and controlled breaks to create dramatic reveals. Wilton’s Evil Eyes fault line and the Enchanted Energy geode are leading examples.
Fault line eyeball illusions and golden geode energy accents
Create 3D reveals by embedding candy eyeballs and black jimmies between buttercream layers so the slice exposes a hidden peek. Add golden geode accents with rock candy and luster dust around cracked veins for a luxe finish.
Cut-out bats, striped effects, and trick-or-treat pinata cores
Carve bat-shaped windows from chilled sponges to let bold stripes show through. For pinata cores, stack ring-cut layers, fill with mixed candy, then cap with a solid layer to hide the surprise.
- Use sturdy, chilled sponges for carving and hollowing to prevent collapse.
- Leverage get chocolate drips to frame cut-outs and signal flavor like cocoa or caramel.
- For travel, pack candy fills in tempered chocolate shells to avoid settling.
- Contrast deep purples or black with metallics so details read across the room.
“Multiple chill steps and parchment smoothers keep edges sharp and crumbs under control.”
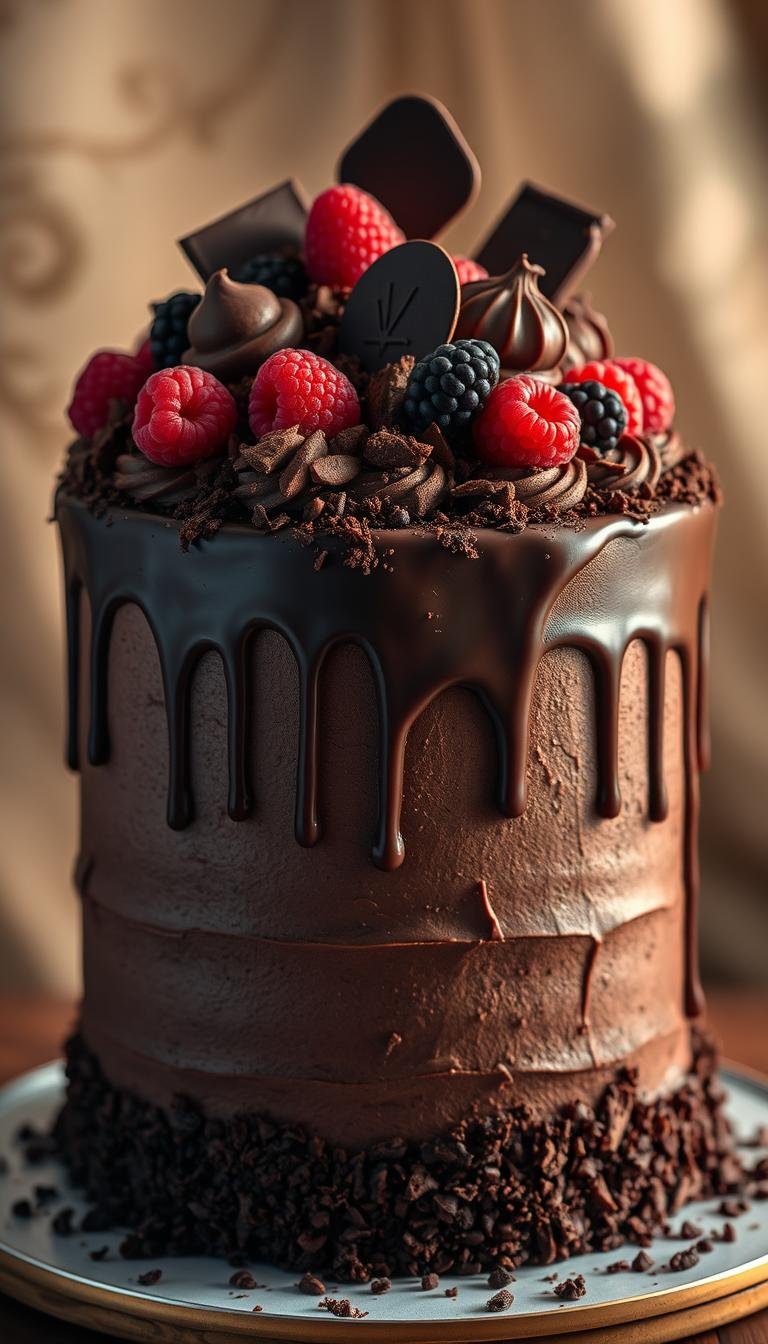
Flavor-first fall desserts: Chocolate cake, apple cider donut, and pumpkin spice
This fall focuses on bold, balanced flavors—think rich chocolate, tangy apple, and warm pumpkin spice in every slice.
Lead with a moist chocolate cake as the universal crowd-pleaser. Pair it with tangy creams or a lightly salted caramel drip to keep sweetness in check. A chocolate base also supports stout or espresso notes for depth.
Translate apple cider donut nostalgia into a sliceable dessert by baking sponges rolled in cinnamon sugar. Use a pound-cake crumb or a thin layer of baked donut-style sponge, then stack with apple pie filling and a buttery crumble for texture.
Use pumpkin spice in measured ratios; pair it with cream fillings to preserve spice clarity and structure. For a simple multi-layer recipe framework, build: spice sponge, apple filling, crumble cortex, and a caramel veil. Keep sponges tender with buttermilk or sour cream so slices hold at room temperature.
Continue reading for more ideas, but try dessert flights—thin slices of chocolate, apple-cider layers, and pumpkin loaf—to cover varied palates. Pre-bake and wrap layers to speed party-day assembly and tune spices by starting light with clove and allspice, then push cinnamon and ginger as needed.
Cheesecake takes center stage: Pumpkin cheesecake to candy corn creations
A velvety cheesecake can steal the show this season with bold flavors and playful toppers. Put pumpkin cheesecake up front with a thick, crunchy crust and an ultra-smooth filling that highlights warm spice notes.
No-bake pumpkin cheesecake offers a fast, reliable set for hosts who want clean slices. Top with toasted marshmallow ghosts or small meringues for height and a playful finish.
No-bake pumpkin cheesecake and marshmallow ghost toppings
Choose roasted pumpkin puree or a high-quality canned option to control moisture and flavor. Press the crust firmly for tidy edges, then chill overnight for the best texture.
Brownie-bottom crusts, dulce de leche swirls, and checkerboard candy corn
For drama, bake a brownie-bottom base so fudgy chew meets tangy cream. Swirl dulce de leche into the batter for caramel ribbons and flat tops that slice neatly.
- Try a checkerboard method with tinted batters to mimic candy corn in slices for a high-contrast look.
- Finish edges with a thin cream cheese frosting collar or pipe light whip borders to anchor toppers.
- Plan ahead: chill fully and slice with a hot, dry knife for clean portions.
“Thick crusts and stabilized cream layers make presentation easy and slicing reliable.”
Buttercream and cream cheese frosting trends: From Swiss meringue to cocoa-rich swirls
Choosing the right finish—silky or tangy—sets the tone for every bite.

Swiss meringue buttercream earns praise for ultra-smooth sides, crisp stripes, and clean drip control. BBC’s spider web examples lean on Swiss meringue to get glossy, photo-ready surfaces with minimal grain.
American buttercream is faster and more forgiving when time is tight or temps dip. It whips up quickly and holds piped borders well for bold textures.
Cream cheese frosting is ideal for pumpkin- and spice-forward bakes. Its tang cuts sweetness and pairs well with cinnamon or pumpkin pie spice, as Delish recommends.
- Use gel colors for bold, even tinted stripes; rest the frosting to reduce air bubbles before smoothing.
- Chill cream cheese frostings and tweak butter-to-cream ratios to prevent slippage on taller layers.
- Pre-pipe decorative elements on parchment for mess-free placement on the day of service.
“Test small swatches under party lighting and phones to confirm color payoff.”
| Frosting | Best use | Texture/finish |
|---|---|---|
| Swiss meringue buttercream | Sleek sides, crisp stripes | Silky, low-sugar feel; great for drips |
| American buttercream | Quick piping, bold borders | Stable, sweeter, holds shape |
| Cream cheese frosting | Pumpkin & spice recipes | Tangy, softer; needs chilling for tall cakes |
Storage tip: wrap chilled, avoid rapid temp shifts to prevent condensation that blurs finishes. For more technique notes, continue reading.
Cupcakes that steal the party: Hocus Pocus, zombies, and classic vampires
Mini sponges get theatrical this season with gooey centers and bold toppers that read well on a party table. Delish’s Vampire Cupcakes use strawberry “blood” and marshmallow frosting to great effect, while Wilton’s Zombie Brain Cupcakes and Reynolds’ Hocus Pocus versions lean on shaped white chocolate wigs and sculpted swirls.
Quick build moves:
- Fill cupcakes with berry gels for dramatic “blood” reveals that cut through rich chocolate bases.
- Pipe Dracula hairlines and brain swirls with small round tips; sprinkle cocoa cookie crumbs for grit and texture.
- Add get chocolate drizzle or shards as a dimensional garnish to highlight cocoa sponges.
Make-ahead and service tips
Batch-bake chocolate and vanilla bases, then fill and freeze layers for fast assembly. Frost close to serving so marshmallowy toppers stay lofty.
Pack treat boxes with secure inserts for classroom drop-offs. Use gel colors sparingly and test under phone flash to keep reds vivid instead of washed out.
“Offer an assortment—vampires, zombies, and witch wigs—to appeal to all ages and keep guests reaching for more.”
Black cats, bats, and skulls: Iconic silhouettes made simple
Silhouettes like prowling black cats and flying bats are an easy way to add striking visuals without complex sculpting.
Start simple: use Wilton’s black cat cutter or stencil over tinted buttercream and fill outlines with sprinkles for instant texture. BBC’s black cat examples and pumpkin traybake ideas show how child-friendly sweets make decorating a group activity.
Demold skulls from tube pans and finish with bold white-and-black icing for high contrast. Attach cookie ears, whiskers, or wings with a dab of melted chocolate as “glue” so toppers survive transport.
Keep edges crisp by chilling flat-top cakes before dusting or stenciling. Batch silhouettes on parchment to transfer without smudging, especially on softer icings.
- Plan color blocking: orange, black, and white so shapes pop under dim lights.
- Offer small cakes next to larger centerpieces to build visual height.
- Make family-friendly kits: pre-cut fondant and simple cookie toppers for kids to assemble.
“Crumb coat, chill, final coat, stencil, then secure details.”
For quick party coverage, use pumpkin traybake canvases to feed a crowd with minimal slicing. If you want more step-by-step tips, continue reading for extra finishing checklists and transport-safe tricks.
Cookie, candy, and treat toppers: Turn trick-or-treat loot into décor
Turn leftover sweets into instant toppers that read bold on a party table. Press chocolates, caramels, and sprinkles into tacky buttercream for a quick, colorful finish.
Build a shiny base: spread a ganache layer to lock pieces in place and add mirror-like shine under lights. Use a chilled crumb coat, then decorate on slightly tacky frosting so treats stick without sliding.
- Follow a simple recipe outline: crumb coat → chill → final frost → ganache → place candies.
- Balance sweet with crunch: add pretzels, cookies, or crisped cereal for texture contrast.
- Set up a kid-friendly treats bar so guests personalize cupcakes or mini cakes during the event.
Practical tips: sort candies by type to speed decorating, use small pieces near edges to prevent chipping, and save wrappers in clear jars as table accents. Store finished desserts in a cool spot to avoid bloom or slide before serving. Continue reading for party-perfect showstoppers.
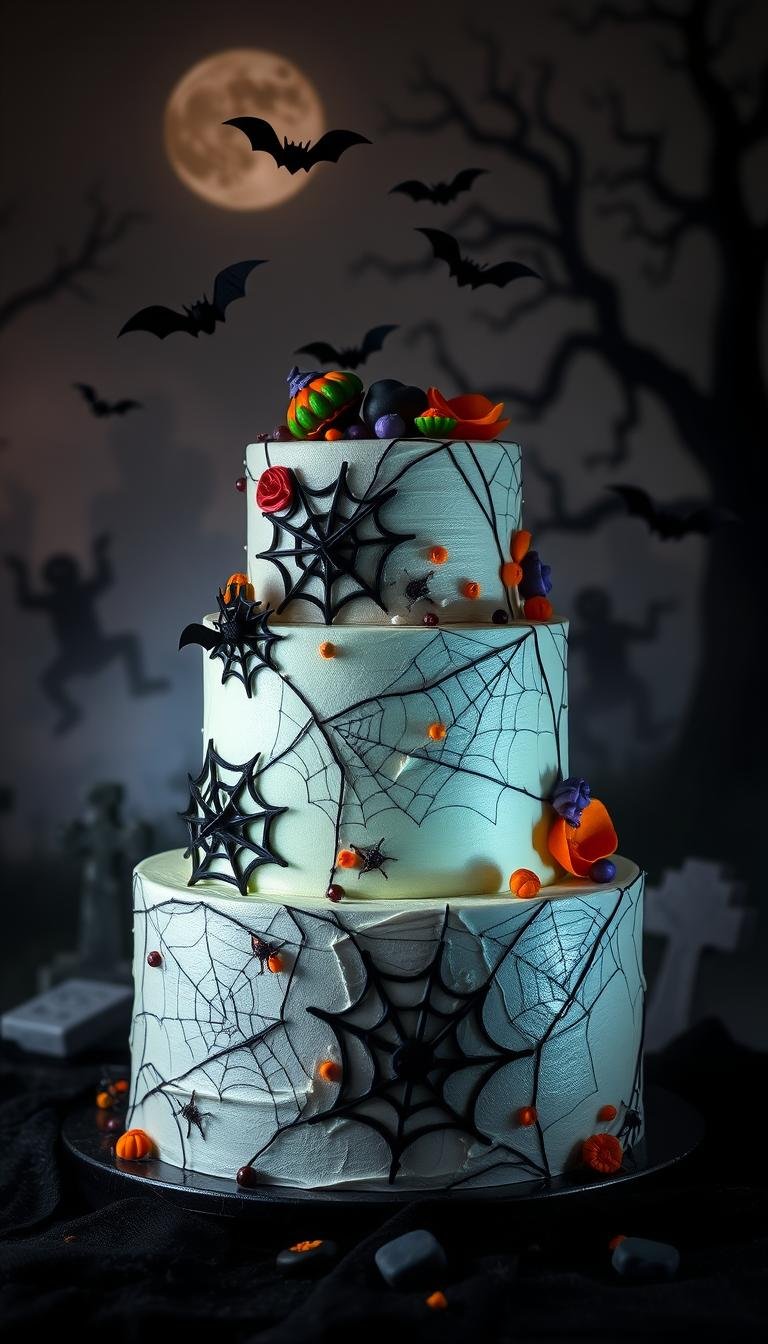
Party-perfect showstoppers: Layer cakes that anchor a Halloween party
Choose a towering showpiece that balances dramatic finishes with practical assembly. Tall layers with bold stripes, ganache drips, or a fault-line reveal will command the dessert table and photograph well.

Add playful toppers like Ghost Peeps, Milano “RIP” cookies, or marshmallow ghosts so guests can interact with the centerpiece. A Salted Caramel Apple Crumble stack pairs a crunchy base with silky sponges for contrast.
- Follow a simple cake recipe schedule: bake layers, make fillings and toppers, assemble and chill, finish décor day-of.
- Use a split-tier plan—apple crumble on the bottom, chocolate tops—to serve varied tastes without extra baking.
- Place the showstopper on a sturdy board with a skid mat for safe transport to the party venue.
| Feature | Why it works | Quick tip |
|---|---|---|
| Boo-tiful stripes | High-contrast visuals read across the table | Chill between layers for clean lines |
| Salted caramel apple fill | Offers texture and seasonal flavor | Use warmed knife for tidy slices |
| Companion cupcakes | Speeds service at peak times | Match toppers to main showstopper |
Lighting matters: add small LEDs to make ganache shine and metallics pop in low light. For serving, warm and wipe the knife between cuts to keep slices neat. If you want more step-by-step timing and variations, continue reading.
Quick wins for busy hosts: Traybakes, rolls, and easy spook cakes
Busy hosts can win the dessert table with speedy traybakes, rolled sponges, and simple spooky toppers.
Traybakes are the fastest route: bake in a pan, cool, spread thin cream cheese frosting, then stencil a bold motif. They travel well and slice clean when lined with parchment.
Rolls (think Delish’s Pumpkin Cheesecake Roll) give dramatic swirls without long bake time. Keep fillings light and well-chilled to avoid cracking and oozing when you unroll.
Use store-bought assists—mini meringues, cookies, or candy—to add instant character. BBC’s pumpkin traybake shows how leftover puree and a simple frosting lift flavor with minimal effort.
- Shortcuts: stabilized whipped fillings or thin cream cheese layers for structure.
- Speed tips: bake day-before, decorate day-of; batch two traybakes with different frostings for variety.
- Kid helpers: place toppers or sprinkle crumbs to speed finishing touches.
| Format | Why it works | Quick tip |
|---|---|---|
| Traybake | Fast bake, easy transport | Line pan with parchment, stencil on final day |
| Roll/Roulade | Eye-catching swirl, short bake time | Use a damp towel to roll warm, fill chilled |
| Easy spook bars | Decorates fast with store toppings | Top with mini meringues and berry “blood” |
No-bake and low-fuss treats: Tarts, minis, and refrigerator-friendly desserts
Refrigerator-friendly sweets let hosts layer flavor and texture without long bake times or complex technique.
Build a glossy centerpiece with a cookie crust filled with dark ganache, topped with seasonal candy like Wilton’s Candy Ganache Tart. This requires zero oven time and slices clean when chilled.
Offer a chilled cheesecake route using gelatin or a stabilized whip so slices hold. Delish’s no-bake pumpkin cheesecake recipe is a fast-set option that pairs well with a thin caramel layer.
Favor minis and bars to speed chilling and service. Decorate simply with meringue ghosts, piped chocolate bats, or candy shards for playful, low-fuss finishes.
- Use cream-based fillings to keep textures silky and spice flavors bright.
- Finish with cold-set glazes or ganache to lock toppings before transport.
- Label allergen cards and reuse leftover candy as mosaic toppers to reduce waste.
| Format | Why it works | Quick tip |
|---|---|---|
| Tart | Zero-bake, glossy finish | Chill 4 hrs before slicing |
| Mini cheesecakes | Fast chill, easy portioning | Stabilize with gelatin |
| Bars | Serve many, quick prep | Layer thin gel between fills |
“Cold-set desserts simplify day-of logistics while still delivering layered flavor and strong visuals.”
Sustainable and budget-savvy: Use leftover pumpkin and pantry candy
A pantry-first plan turns odds-and-ends candy and leftover pumpkin into cohesive, crowd-pleasing treats.
Save time and money by straining carved-pumpkin leftovers into a smooth puree for muffins, frostings, or folded into sponges. Chill and taste before use to control moisture and spice balance.
Reuse pantry candy as instant décor: press pieces into buttercream, embed chunks in ganache, or chop for crunchy fillings. Upcycle cookies into crumb crusts, “dirt” effects, or layered trifles for easy texture.
- Plan fall recipes that share core ingredients—pumpkin puree, warm spices, and chocolate—to cut waste.
- Add peanut butter swirls to brownies or frostings for a salty counterpoint to sweet halloween cakes.
- Simple swaps: oats for crumble toppers, pretzels for salty crunch, cereal for bulk texture.
| Item | Use | Storage tip |
|---|---|---|
| Gummies | Place on final-day toppings | Keep airtight, cool spot |
| Chocolate | Embed in ganache or fillings | Store separately to avoid bloom |
| Cookies | Crumbs for crusts or dirt | Crush before assembling |
Quick idea: build a budget dessert board with mini bars, cookie slices, and topped layers using only pantry finds. It reduces last-minute shopping and streamlines party prep while keeping flavor front and center.
Pro decorating tips for the season: Coloring, chilling, and finishing touches
Finishing well starts with a simple plan: set clear chill windows, test textures, and finish when the surface is stable. These steps save prep time and improve slice quality for home bakers and hosts.
Chill times for firm buttercream and clean stripes
Set firm layers. BBC recommends chilling until buttercream is very firm before adding a marshmallow spider web or heavy drip. Do a short chill after the crumb coat, then final chill after smoothing.
Keep a thermometer nearby and allow extra time for tall stacks. This avoids slippage and gives you crisp edges for bold stripes.
High-contrast palettes, edible toppers, and safe food gels
Use gel colors tinted a day ahead so tones deepen without over-dyeing. Wilton’s Candy Melts and fondant spiders hold shape well over ganache drips, and Ghost Peeps make reliable edible ghosts for kid-friendly service.
Temper chocolate for glossy accents that resist fingerprints and travel better. Test your web and drip on a spoon to dial viscosity before committing to the final run.
- Schedule chill windows: crumb coat → chill → final coat → chill → drip → set → décor → final chill.
- Keep frosting tools warm and wipe often to prevent drag marks on dark finishes.
- Use a quick test plate to check web stretch and drip flow before decorating the main cake.
| Step | Why | Quick tip |
|---|---|---|
| Crumb coat & chill | Locks crumbs | 15–30 minutes in fridge |
| Final coat & chill | Firm surface | 30–60 minutes for tall layers |
| Drip & décor | Controlled finish | Warm ganache slightly; test first |
“Chill until buttercream is very firm before adding marshmallow webs.” — BBC
Conclusion
Wrap-up
Close the season with a simple plan: one striking centerpiece, several quick traybakes or rolls, and a handful of no-bake minis to cover pacing and preferences.
Prioritize pumpkin across formats—pumpkin cake centerpieces, smooth pumpkin cheesecake finishes, and quick no-bake riffs—while seasoning lightly with pumpkin spice for balance.
Keep chocolate in the mix for glossy ganache drips and rich layered chocolate cake builds, and add tart fruit gels or peanut butter swirls to break sweetness and add interest.
Practical checklist: confirm cheesecake recipe chill times, finalize chocolate accents, stage tools and chill windows, and repurpose pantry candy into toppers so hosting stays efficient and photogenic.