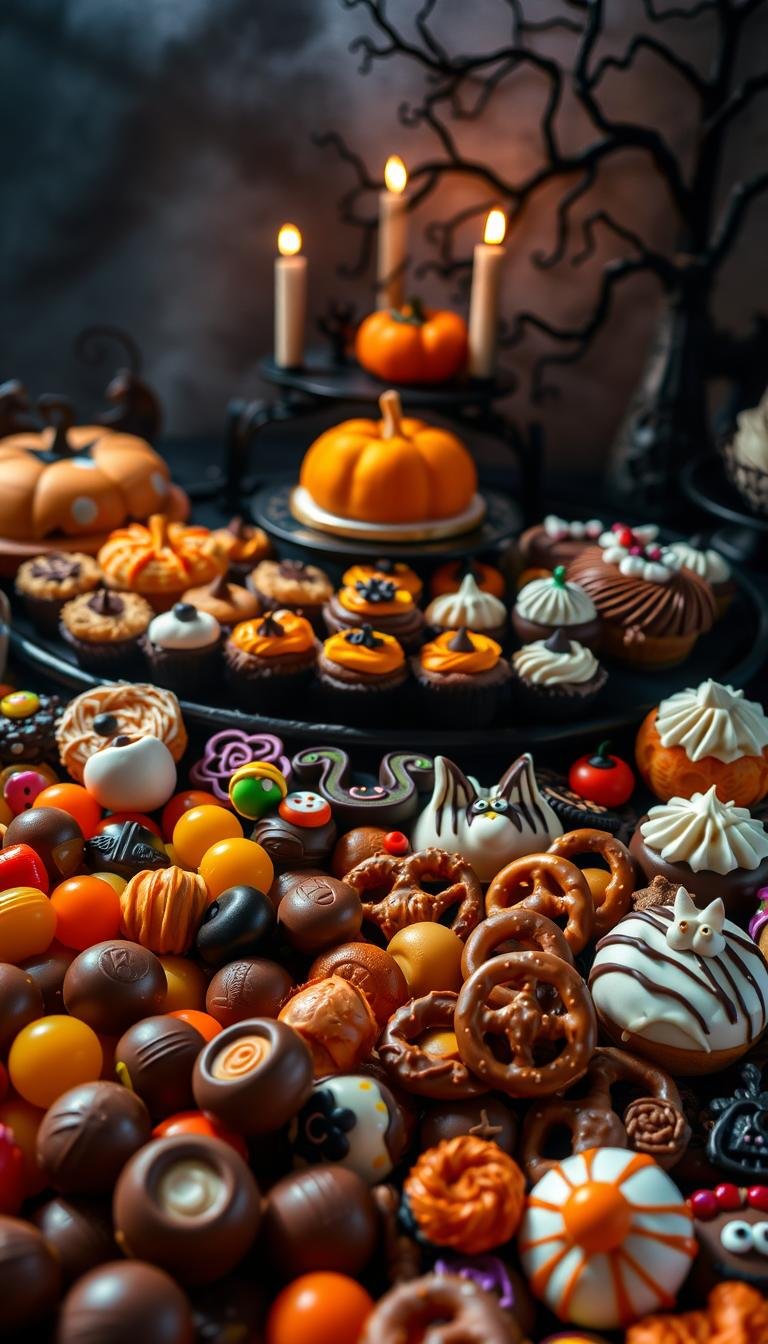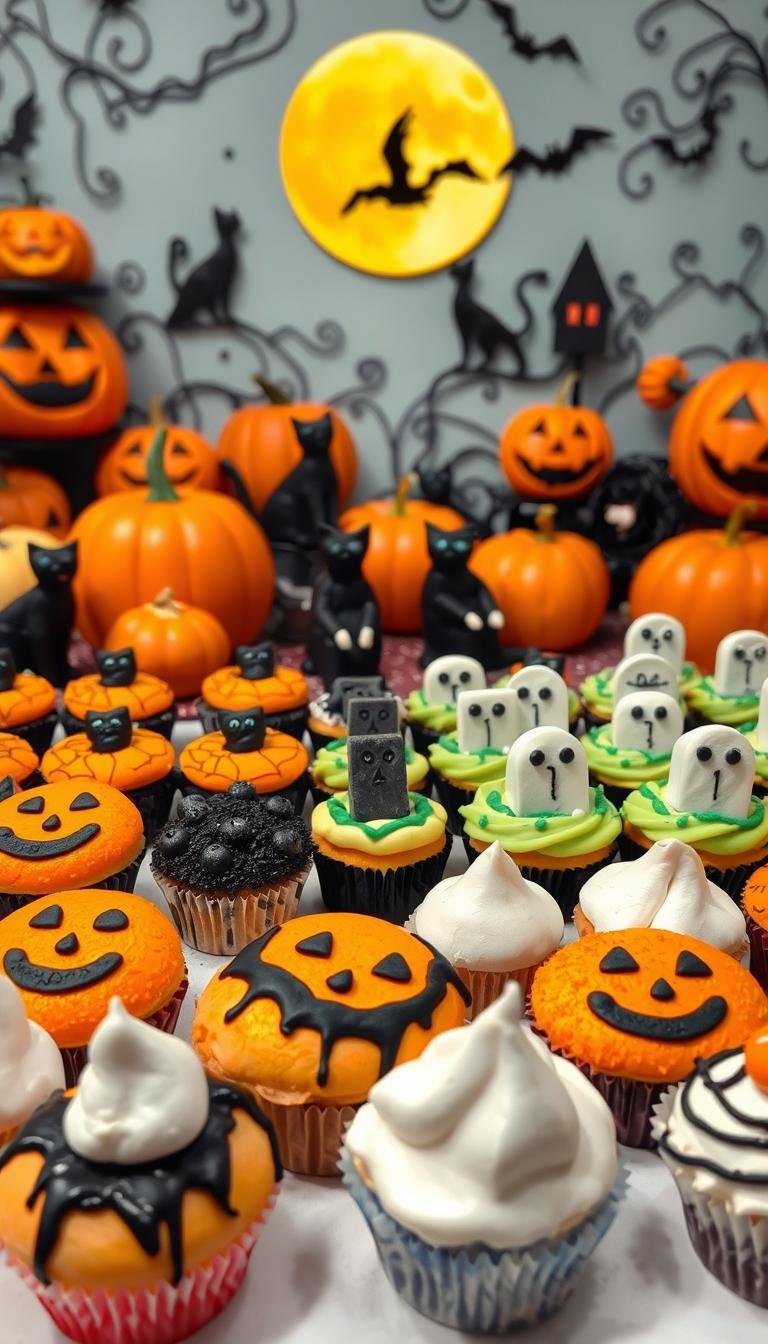
Future Trends: Best Pasteles de Halloween Designs
Surprising fact: nearly 42% of home bakers say themed cakes make their seasonal parties feel more memorable, and that appetite is shaping next-season trends.
This Website contains affiliate links. That means I may earn a small commission if you purchase through my links, at no extra cost to you.
The next wave of spooky baking favors bold aesthetics and flavor-first builds that still read instantly eerie. Expect sleeker spiderweb ganache, cemetery slabs with edible soil, and minimalist Jack Skellington faces that pack a visual punch without heavy fuss.
Designs scale easily from a small fiesta to a big party table: tall brownie-and-vanilla stacks, molded pumpkin tarta, and quick “eyes” toppers for hosts short on tiempo. Bakers in repostería will use liposoluble color for glossy orange calabaza finishes and firming glazes for travel-ready toppers.
The guide ahead pairs crowd-pleasing recetas—like red velvet “bloody” slices and maracuyá or mora fillings—with practical how-tos. You’ll find weeknight-friendly builds and weekend showstoppers, plus tips to use yogur or a touch of mantequilla sal for balanced flavor.
Key Takeaways
- Trend shift: bolder looks and simpler assemblies for repeatable results.
- Recipes balance seasonal fruit, chocolate, and tangy dairy for depth.
- Scale options from molded pumpkin tartas to layered brownie towers.
- Use liposoluble color and firm glazes for pro finishes and travel.
- Clear workflow: quick toppers for weeknights, full builds for weekends.
Why pasteles de halloween are evolving: future-forward flavors, textures, and eerie aesthetics
Bakers are shifting toward contrasts that pair tender crumbs with glossy, sculpted finishes. Layered builds now favor a soft interior under a shiny shell, airy toppers against dense centers, and razor-clean edges that support precise decoración.
Ingredient choices modernize texture. Swap or blend aceite and mantequilla to tune moisture. Use leche or suero de leche plus leavening polvo for lift without collapse.
Flavor strategy for next season balances tart fruit with enough azúcar and fat. Temper bitter cocoa with dairy to round the sabor. Test sal and sweetness across batters and frostings so decorations never taste cloying.
One flexible base can become many looks. A single chocolate sponge supports spiderwebs, cemetery slabs, or bat toppers—modular builds save time and simplify repeatable recetas.
Stable fillings matter. Emulsified frostings and jam layers set with pectin stop weeping in transport. Keep notes: document any receta changes so texture and structure remain consistent.
“Use classic pantry staples—harina, huevos, and azúcar—as the backbone, then add emulsifiers and modern techniques to future-proof results.”
Color, glaseado, and ganache: the future palette for spooky shine and saturated hues
Shiny finishes and punchy hues are the fastest way to make a spooky cake feel modern and photo-ready. Pick a finish that fits your build: sculptable butter-based glaseado or a pourable ganache for high shine.
From buttercream to glossy ganache: choosing the right finish
Buttercream gives structure and holds sculpted details. It is best for carved shapes and piped araña legs.
Ganache provides a mirror-like sheen that suits webbed designs and smooth slabs. Mirror glazes read ultra-modern but need chill time.
Liposoluble color for chocolate and white chocolate drips
For neon calabaza coverage, use chocolate blanco with a colorante alimentario liposoluble. Liposoluble dyes prevent seizing and keep drips glossy.
Balancing azúcar, sal, and vainilla for photogenic glazes
Flavor matters. Add a pinch of sal and a touch of vainilla to cut sweetness and brighten notes.
Chill your cake so drips hold shape. Warm ganache will run; too-cold ganache cracks.
- Ganache fail-safe: heat nata until it bubbles, pour over chocolate chips, rest 2 minutes, then emulsify for a smooth pour.
- Buttercream tweak: add extra mantequilla for humidity or more powdered sugar for hotter sets.
- Palette: saturated black (cocoa), bone white, calabaza orange, and crimson via gel or liposoluble tints.
| Finish | Shine | Best use | Set cue |
|---|---|---|---|
| Butter-based glaseado | Soft sheen | Sculpting, piping details | Room temp for carving; chill briefly for piping |
| Ganache | High gloss | Webbed araña, smooth drips | Pour at warm-pour temp; chill to set |
| Mirror glaze | Ultra reflective | Polished slabs and marbled palettes | Pour on cold cake; set in fridge |
| White chocolate drips | Bright, saturated | Neon calabaza and pastels | Use liposoluble color; pour at lukewarm temp |
“Heat the cream, rest, and emulsify—simple steps make a gleam that photographs like a pro.”
Ghostly graveyard cake design: marshmallow spirits and Oreo “tierra”
Start with a bright vanilla bizcocho and turn it into an eerie cementerio with simple, edible props.
Assemble a two- to three-layer vanilla sponge, filled and masked with orange glaseado tinted to read like pumpkin. Add optional calabaza spice in the buttercream for warmth and color.
Build: vanilla sponge, orange buttercream, chocolate drip
Make a ganache with chocolate chips and hot nata; cool until it reaches a pourable viscosity. Apply a chilled crumb coat and chill 20-30 minutos before the final coat and controlled drip.
Decor: marshmallow ghosts, Milano tombstones, Oreo dirt
Create ghosts by skewering small malvaviscos on toothpicks. Break Milano galletas into tomb shapes and press into the top.
- Ring the base and graves with crushed galletas oreo for edible “tierra.”
- Use darker glaseado smudges to texture paths and anchor decorations.
- Choose a slightly bittersweet chocolate ganache to balance the azúcar in the buttercream.
| Step | Timing | Tip |
|---|---|---|
| Bake bizcocho layers | Day ahead | Wrap cooled sponges to stay moist |
| Prepare ganache & crush cookies | Day ahead | Reheat ganache gently before use |
| Crumb coat + chill | 20–30 minutos | Chill before final glaseado and drip |
| Assemble decorations | Morning of event | Dowels for tall builds; place tombstones after transport |
“A controlled pour and simple props turn a classic tarta into a spooky scene.”
Spiderweb chocolate cake: sleek ganache with web piping
A sleek spiderweb chocolate cake pairs a glossy finish with a soft, marshmallow-centered bite. This build is photo-ready and straightforward for home bakers. Keep steps timed and temperatures tight for a clean result.
Creamy center: marshmallow cream frosting with mantequilla
Para el relleno se bate mantequilla with powdered azúcar, marshmallow crema, extracto de vainilla, and a pinch of sal until light and fluffy. Work gently so the filling stays airy and spreadable.
Build a moist chocolate base using balanced harina, huevos, polvo leudante, and a touch of aceite. Add a cacao-forward note or simple syrup to deepen flavor beneath the sweet center.
- Make ganache by heating nata until it bubbles, pouring over chocolate chips, then emulsifying for shine.
- Chill the cake 10–15 minutos before pouring ganache; let it thicken slightly, then pipe a tight spiral.
- Drag outward with a toothpick at equal intervals to form a symmetrical web that reads well in photos.
- For max contrast, consider chocolate negro for the base ganache and a white glaze for the web.
“A short chill between layers prevents weeping and keeps the mirror finish glossy.”
Finish with a concise receta timeline so decorators can layer, chill, glaze, and pipe efficiently on event day.
Red Velvet “bloody” layers with queso crema frosting
Make each layer pop by pairing a hint of cacao with a concentrated colorante alimentario. A touch of cacao deepens flavor and keeps the red from looking flat, while the dye creates that saturated crumb that photographs well in clean capas.
Deep red crumb: cacao and colorante alimentario for dramatic slices
Sift harina and polvo together, then fold in cacao to preserve structure. Mix just until combined to avoid tunneling; overmixing thins the crumb and dulls color.
Jam and drip ideas: mermelada de fresas or frutos rojos
Loosen thick mermelada with a splash of water or warmed syrup to make a believable red drip. Apply the drip after the frosting has chilled so it sits on the edge without running.
- Stabilize queso crema: use a 3:2 ratio of queso to mantequilla and chill between coats for slices that hold.
- Balance azúcar: reduce sugar in frosting slightly if you add a sweet jam drip.
- Flavor note: add a teaspoon of vainilla to round the tang without masking cacao.
| Task | Timing | Tip |
|---|---|---|
| Bake and cool capas | Day ahead | Wrap layers to retain moisture |
| Crumb coat + chill | 30 minutes | Chill until firm before final glaseado |
| Final frost and chill | 1 hour | Chill well before applying mermelada drip |
“A vivid red slice relies on restraint in mixing and smart chilling—color and structure must work together.”
Cemetery chocolate slab: cookies-and-cream soil and skulls
A chocolate slab styled as a cemetery gives bakers a wide, transport-friendly canvas for spooky storytelling.
Choose a slab-style base on a rimmed sheet pan or tray to keep straight edges and even cooling. This tipo of pan helps the tarta travel without shifting.
For realistic soil, crumble galletas oreo into a fine powder and press it lightly into the frosting. The matte crumb hides shine and reads like real dirt.
- Add molded skulls or uniform candies for quick visual impact.
- Use plain galletas as tombstones and barquillos or chocolate sticks for a tidy border.
- Keep toppers low so slices cut cleanly for buffet-style postre service.
Personalize with a simple piping alphabet for names on tombstones. Write short inscriptions so lines stay legible.
“Pack decorations separately and add them after a short chill to prevent shifting during transport.”
Storage tip: chill the slab on a flat tray, secure with a box, and avoid stacking heavy items on top during Halloween outings.
Jack Skellington face cake: clean cream-cheese contours
A Jack Skellington face cake reads best when the white field is flawless and the lines are decisive. Start by smoothing a cream-cheese base so the silhouette stands out.
La crema de queso defines the face outline: blend queso with a touch of neutral crema for a bright, spreadable finish. Chill the assembly so the surface firms before any piping.
Black-and-white contrast: chocolate negro lines over smooth crema
Break the face into simple shapes: a circle, two eye sockets, nasal slits, and a stitched smile. That schematic gives immediate recognition without clutter.
- Pipe features with melted chocolate negro or thin ganache for crisp, smudge-resistant contours.
- Use a small round tip for the mouth stitching to avoid pooling and keep the smile tight.
- Work on chilled capas so lines set fast and edges remain razor clean.
Keep decoration pared back. Let the stark character silhouette carry the design rather than adding many toppers.
| Step | Timing | Tip |
|---|---|---|
| Base spread and chill | 30–45 minutes | Chill until firm but not frozen |
| Detail piping | 5–10 minutes | Pipe with steady pressure and a small tip |
| Final set | 10–15 minutes | Return to fridge briefly for stabilization |
“A smooth white canvas and confident black lines make Jack Skellington instantly iconic.”
Quick receta cue: chill the crumb coat, smooth the cream-cheese finish, then pipe details while the cake is cool. This sequence keeps a clean, photo-ready pastel with neat slices and defined features.
Merengue ghost topping: airy, fast, and adorable scares
A cloud of crisp meringue spirits is one of the fastest ways to top a spooky cake at home. Use a quick French meringue method: whisk room-temperature huevos whites until foamy, add azúcar gradually, and whip to glossy, stiff peaks. This whips up in a few minutos.
Pipe ghosts in varying heights and tilt peaks for personality. Bake low and slow (90–100°C / 200–210°F) until dry. Check doneness by tapping: they should sound hollow and lift clean from the parchment.
Use tiny dots of glaseado or melted chocolate to attach chips for eyes. To nest ghosts on buttercream without sinkage, chill the cake first so the surface supports the toppers.
- At-casa shortcut: buy ready-made meringues and add eyes with melted chocolate for a last-minute postre.
- Storage: keep finished meringues in a low-humidity container at room temp until service to stay crisp.
- Receta ratio: 2 egg whites : 1 cup powdered sugar. Bake until dry; avoid browning.
| Step | Timing | Tip |
|---|---|---|
| Whip whites and sugar | 5–7 minutos | Use clean, dry bowl for stable peaks |
| Pipe ghosts | 5 minutos | Vary sizes for visual interest |
| Bake low & slow | 60–90 minutos (depends on size) | Cool inside oven with door ajar to avoid cracks |
| Attach eyes & place | 2–5 minutos | Use micro dots of glaseado to secure chips |
Black cat chocolate tarta with peanut-butter accents
Design a feline silhouette using deep cocoa and pared-back accents for a modern spooky look. Use an ultra-dark crumb so the face reads clearly in photos and at a distance.
Texture play: ultra-dark cacao crumb, silky glaseado
Build a deep, ultra-dark crumb with robust cocoa and a touch of oil for moistness. Finish the surface with a silky glaseado that reflects light but keeps a matte-black feel.
Minimalist shapes: ears, whiskers, and eyes that pop
Cut simple paper templates for ears and whiskers, then recreate them using mantequilla de cacahuete piped or set into thin chocolate plaques. A black stand will intensify the palette and keep the composition modern.
- Balance sweetness: add a pinch of salt to the peanut accents to complement the chocolate negro.
- Quick receta plan: assemble and crumb-coat, chill, then add details in a few minutos.
- Optional contrast: white chocolate dots for eyes to add a subtle shimmer.
- Keep geometric cuts so each slice of the pastel holds the cat face.
“Simple shapes and confident finishes deliver a chic cat cake that travels well and photographs like a pro.”
This receta works for small tartas or larger party cakes. Focus on clean lines and restrained decoración for a striking result that fits any halloween table.
Yogurt tarta with bright orange cobertura
A light yogur base gives this tarta a moist, tangy profile that balances a glossy, sweet coat. The yogurt keeps the crumb tender and adds a fresh tang so the dessert reads less cloying and more refined as a postre.
Make the cobertura by gently melting quality chocolate blanco and stirring in a liposoluble colorante alimentario orange until smooth. Work at low heat so the chocolate stays glossy and pourable.
Keep the finish thin and glassy for sharp reflections and easy slicing. A thin layer sets faster and avoids sticky, uneven edges that hide the yogurt tang.
- Boost sabor with a teaspoon of vanilla or a teaspoon of citrus zest folded into the batter.
- Cool and level the cake, then pour the glaze within minutos for a clean coat.
- For quick theming, add black sprinkles or simple jack-o’-lantern faces after the glaze sets.
“A yogurt base plus a thin white-chocolate glaze dyed orange gives striking contrast and balanced sweetness.”
Storage tip: Refrigerate on a flat tray and avoid sealing while warm. To prevent condensation on the chocolate coating, chill uncovered until set, then cover loosely for transport.
Shattered “glass” cake: crystal shards and witchy fingers
Translucent sugar shards give a cake an arresting, crystalline look that feels otherworldly. This version pairs clear shards with a dark base so contrasts read on camera and at distance.
Safety-first sugar work and placement
Make shards: boil sugar syrup to hard‑crack (300–310°F), pour thin on a silicone mat, and cool until brittle. Tint a few pieces with a drop of colorante for “bloody” cracks and leave most clear for realism.
Secure shards by inserting them into a firm, chilled glaseado or thickened ganache so they don’t wobble. Blunt very sharp tips slightly with scissors and place shards away from high-traffic cut zones.
- Use streaks of chocolate blanco as adhesive points and contrast.
- Add witchy fingers along the base for weight and story; keep them low so slicing stays simple.
- Stir a pinch of sal into the syrup to balance sweetness on high-sugar elements.
| Step | Timing | Tip |
|---|---|---|
| Boil sugar to hard‑crack | 15–20 minutes | Use candy thermometer for accuracy |
| Pour & cool shards | 30–40 minutes | Break into pieces while fully cooled |
| Chill cake + set glaseado | 20–30 minutes | Firm surface prevents wobble |
| Place shards & fingers | 10–15 minutes | Position away from slicing paths |
“Work quickly and cool thoroughly—secure shards in a firm glaze so the display stays dramatic and safe.”
Quick receta note: plan shards a day ahead, chill the cake the morning of service, and attach shards last for a clean, stable result.
Pumpkin-shaped bizcocho de chocolate using a mold
A molded pumpkin cake gives instant shape and photo-ready edges with minimal fuss. Use a sturdy theme mold so the ridges read clearly when you unmold the cake.

Make a forgiving batter: sift harina, polvo, and cocoa, then mix with huevos, azúcar, and leche for a smooth, pourable mix. Add aceite and a knob of mantequilla to lock moisture and help the cake release cleanly.
Grease and flour the mold well. Bake, then let the bizcocho cool fully on a rack. Chill a few minutos in the fridge so the shape firms before you invert it.
- Choose a defined mold for crisp calabaza lines.
- Use oil plus butter for easier unmolding and tender crumb.
- Finish simply—a light dusting or thin glaze keeps the silhouette sharp.
- Add a small green fondant stem or a chocolate-dipped pretzel for a quick stem detail.
| Step | Timing | Tip |
|---|---|---|
| Prep mold & batter | 15–20 minutos | Sift dry ingredients; warm liquids for smooth mix |
| Bake | 30–45 minutos | Test with a skewer; avoid overbaking |
| Cool & chill | 20 minutos | Chill briefly before unmolding for crisp lines |
| Finish | 10 minutos | Thin glaze or dust to keep the pumpkin silhouette clear |
“A themed mold makes a simple receta look like a showstopper with very little extra work.”
Tall brownie-and-vanilla layers: towering tiers for party drama
Build a dramatic centerpiece by alternating fudgy brownie slabs with light vanilla sponge. This contrast gives height, texture, and a showy cross-section when sliced.
Use a reliable receta plan so the assembly stays tidy. Level each layer, press a thin milk soak into the vanilla tiers to keep them moist next to dense brownie, and map your knife cuts before serving.
Frosting between capas for stability and clean cuts
Make a butter-based frosting using mantequilla and powdered azúcar, then stabilize with a splash of nata. This gives strength and a smooth spread that holds tall tartas together.
- Stack fudgy brownie slabs with soft vainilla sponge for contrast and visual height.
- Level every tier and chill for minutos between coats to lock structure.
- Insert dowels and use boards for any tier above two layers for safe transport.
- Follow a streamlined receta: bake day one, cool and wrap; assemble and finish day two.
| Step | Timing | Tip |
|---|---|---|
| Bake brownie and vanilla layers | Day 1 | Use sifted harina for even crumb |
| Cool & wrap | Overnight | Chill wrapped to firm the crumb |
| Assemble & chill between coats | 10–30 minutos per coat | Chill until frosting sets before next tier |
| Final toppers & transport | Event morning | Keep minimal: garland and mini pumpkins |
“A clear knife plan and short chills make slicing mixed textures reliable and photo-ready.”
Serving math: map slices by tier height—cut taller tiers into narrower slices to keep portions consistent. Minimal toppers keep edges clean and make every slice practical for the table.
Vampire vibes: bat toppers and crimson glaze
A glossy crimson coat and fluttering bat toppers make for a dramatic vampire-style cake. Create a quick crimson glaze by gently warming mermelada de fresas or mixed berries, straining seeds, and thinning with a teaspoon of warm water until pourable.
Test color with a drop of colorante on a spoon before adding to the whole batch. That lets you deepen the red without overshooting the hue.
Make bats by cutting black cardstock templates and tracing onto tempered chocolate, or by piping melted chocolate into bat shapes on parchment. Space toppers asymmetrically so they suggest motion across the pastel.
For controlled drips, chill the tarta until the surface firms, then pour the warm glaze and nudge short runs with the back of a spoon. Add tiny chocolate blanco dots for eyes or fang highlights.
- Compact receta: warm and strain mermelada (5 minutos), test color (1–2 minutos), chill cake (10 minutos), pour and add bats (5 minutos).
- Styling tip: use a dark matte board and low light to make the red pop in photos.
| Element | Why it works | Timing | Tip |
|---|---|---|---|
| Crimson glaze | Fast, flavorful sheen | 5–10 minutos | Strain seeds; thin gradually |
| Chocolate bats | Clean silhouette, easy to cast | 10–20 minutos plus set time | Temper or chill on parchment |
| Color testing | Prevents over-coloring | 1–2 minutos | Test on spoon then adjust |
| White pops | Adds contrast and detail | 2–3 minutos | Use tiny dots of chocolate blanco |
“A quick mermelada glaze and a few well-placed bats are all you need for a moody, photo-ready vampire tarta.”
All eyes on you: quick “googly eyes” cake for last-minute hosts
When tiempo is tight, a single-pass glaseado and candy eyes turn an easy at-casa base into a showstopper. Start with a store-bought or simple homemade tarta, smooth a thin coat of glaze to hide flaws, and place assorted eyes at varied angles for instant personality.
Use small batches of candy eyes, cake sprinkles, or a single giant eye for impact. Chill briefly so the glaseado sets and the eyes anchor. This approach helps hosts who want to celebrar halloween without a full build.
- Fast upgrade: unwrap, frost thinly, arrange eyes, chill.
- Styling: neon sprinkles, a black drip, or one oversized eye create distinct looks.
- At-casa tip: vary eye sizes and tilt them to add motion and humor.
| Step | Time | Tip |
|---|---|---|
| Unwrap base & level | 5 minutos | Use a serrated knife for a clean top |
| Thin glaseado pass | 5–8 minutos | Work quickly; smooth with an offset spatula |
| Place eyes & chill | 10–15 minutos | Chill until set for transport |
Travel tip: secure the cake in a flat box and place a non-slip mat under the board so eyes don’t shift. If driving, keep the box level and avoid stacking items on top.
“A tarta con ojos is the easiest way to get a big reaction in minimal tiempo.”
This receta is ideal for hosts who need a quick centerpiece. In 20–30 minutos you can go from plain to playful and still have time to greet guests.
pasteles de halloween ideas roundup: chocolate, calabaza, mora, arequipe, maracuyá
Here are compact ideas that pair striking visuals with confident flavor. Use these pairings to plan tartas that taste as good as they look and travel well to parties.

Flavor-forward picks: from dulce de leche to passionfruit tang
Pastel ideas to celebrar halloween should balance fat, acid, and texture.
Try a blackberry (mora) cake with a glossy red glaze for a “bloody” slice. Pair maracuyá with a light chocolate layer to add bright, tangy contrast.
Use arequipe (dulce de leche) as a stable relleno; it cuts clean and supports heavy decor like tombstones or skulls.
Relleno and mermelada pairings that hold up under décor
Map jams and creams so toppings don’t slide. Pair fresas or mixed-berry mermelada with a spoonful of nata in the filling to stabilize and enrich sabor.
For cacao-rich bases, add a thin layer of neutral buttercream then the jam. That sandwich prevents seepage and keeps slices neat.
- Quick tips: use eggs, azúcar, and a touch of bicarbonato for structure.
- Choose milk or leche fat for mouthfeel; heavier options hold toppers better.
- Stabilize ganache with a bit of cream so it sets firm but glossy.
| Idea | Best filling | Receta reminder |
|---|---|---|
| Chocolate web cake | Dark ganache + berry jam | Bake layers day ahead; chill before pour |
| Arequipe cemetery | Arequipe + stabilized buttercream | Use chilled layers and low-moisture toppers |
| Maracuyá tang | Passion curd + white chocolate | Cook curd, cool, then fold into cream |
“Choose fillings that add flavor but also lock structure—sweetness is great only when slices hold.”
Conclusion
A strong visual plan plus a tested base makes any spooky table sing.
Choose builds by your available tiempo and skill: quick candy-eye passes for a last-minute postre, or a multi-step ganache and sculpting day for a showstopper. Plan tasks in short, timed minutos so each step chills and sets properly.
Rely on flexible bases like chocolate, yogur, or vanilla—they support designs from a cemetery slab to a shattered-glass centerpiece. Start with one small project at casa, then scale up to a full fiesta table next season.
Experiment in repostería, document what works, and you’ll be ready to celebrar halloween with confident flavor and pro finishes year after year.