Easy Halloween Brownies Recipe: Spooky & Delicious
Surprising fact: nearly half of home bakers plan a themed dessert for October gatherings, so a simple, make-ahead sweet can feed a crowd and calm the holiday rush.
This Website contains affiliate links. That means I may earn a small commission if you purchase through my links, at no extra cost to you.
Make this from scratch: a straightforward recipe yields fudgy centers, a shiny, slightly cracked top, and festive touches without tricky techniques. Line an 8×8 or 9×13 pan with parchment paper to lift out neat squares and clean edges.
We’ll aim for a moist, chewy bite—not cake. Chill the tray for clean slicing and extra crunch if you add Oreos or chips. Watch for set edges and a glossy top; avoid overbaking for true fudginess.
After cooling completely, you can slice, pack, or freeze these bars for up to three months. Below you’ll find ingredient swaps, three easy variations, and clear timing tips to make the dessert a reliable party winner.
Key Takeaways
- Parchment paper in the pan ensures clean release and tidy edges.
- Use 8×8 or 9×13 pans; scale the bake time and chill for easier slices.
- Stop baking at set edges and a shiny, cracked top for fudgy texture.
- Try cream cheese swirls, mummy frosting, or Oreo “Boo” tops for quick ideas.
- Cool fully before cutting; packs travel well for potlucks when snug.
- Store refrigerated for days or freeze up to three months for make-ahead ease.
Why these halloween brownies are the perfect spooky treat for the upcoming holiday
These fudgy bars pair deep chocolate flavor with playful decor to make a standout spooky treat that feels special without fancy skills.
Fudgy texture beats overcooked crumbs. Check doneness a few minutes early so centers stay moist and edges set with a shiny top. This simple timing makes the recipe forgiving for home baking.
Quick decorations—candy eyes, orange cream cheese swirls, or seasonal Oreos—turn a basic square into a centerpiece. They are kid-friendly ideas that keep prep time short and fun.
Practical benefits: brownies travel well, slice into uniform bars, and stack neatly for a busy party buffet. Bake a day ahead to save time, then decorate just before serving for fresh looks.
| Advantage | Why it helps | Quick tip | Result |
|---|---|---|---|
| Fudgy texture | Prevents dryness | Check a few minutes early | Moist centers |
| Simple décor | Fast, festive finish | Use candy eyes or Oreos | Eye-catching squares |
| Make-ahead | Less stress day of | Bake day before | More hosting time |
| Inclusive swaps | Dietary flexibility | Gluten-free or dairy-free options | Everyone enjoys a square |
Store in an airtight container for several days to keep texture and flavor—perfect when your week is full of school events and neighborhood gatherings.
Ingredients you’ll need for rich, fudgy brownies and festive add-ins
Start with quality chocolate and a few pantry staples to build deep flavor fast.
Base components: unsweetened cocoa for intensity, melted butter or oil, one cup granulated sugar for sweetness and that crinkle top, eggs for structure, vanilla extract for warmth, fine salt to balance, and all-purpose flour for body.
Optional add-ins and simple swaps
- Chocolate chips for melty pockets and a little crunch.
- Cream cheese swirl: one 8-ounce brick of cream cheese, sugar, an egg, and vanilla; tint with food coloring for vivid orange.
- Gluten-free: use a reliable gf flour blend or a dedicated gluten-free base and confirm decorations are gluten-free.
- Dairy-free: swap plant butter or vegetable oil and use a non-dairy cream alternative for the swirl.
- Boxed mix works for an 8×8 pan when time is tight—add swirls or toppings to keep it festive.
“A pinch of fine salt and measured vanilla can lift chocolate depth and keep sweetness balanced.”
| Component | Why it matters | Quick tip |
|---|---|---|
| Cocoa / chocolate | Intensity and dark crumb | Use dark cocoa for nearly black color |
| Sugar & eggs | Sweetness and structure | Measure the cup granulated precisely |
| Cream cheese swirl | Bright contrast and creamy top | Room-temperature cheese for smooth swirls |
| Swaps | Dietary flexibility | Choose gf blend or plant-based fats |
Tools and prep: parchment paper, pan choices, and knife tips
Line up the right gear before you start so every step flows smoothly. Prep saves time and keeps edges tidy when you lift and slice the bars.
Parchment setup and pan selection
Fully line the pan with parchment paper, leaving overhang “handles” so you can lift the slab cleanly after cooling. Make sure the paper sits flush in corners to avoid uneven batter depth.
Use an 8×8 pan for thicker cream-cheese swirls and a 9×13 pan when you need more pieces or tidy rectangles for mummy designs. Metal pans heat fast for crisp edges; glass pans may bake a few extra minutes but help avoid overcooking.
- Prep tools—whisk, spatula, and a lined pan—and set aside before mixing to speed the process.
- Check doneness about 5 minutes early; place the pan on the center rack for even baking.
- Support the cooled slab underneath when lifting, then cut on a flat board with a large, sharp knife for straight bars.
| Item | Best for | Tip |
|---|---|---|
| 8×8 pan | Thicker squares, swirls | Use for richer, denser bars |
| 9×13 pan | Large batches, mummy rows | Gives uniform rectangles for decorating |
| Metal vs. glass | Faster edges vs. gentler heat | Adjust minutes and rack position accordingly |
Step-by-step recipe: mix the batter, bake, and let cool completely
Follow a clear, step-by-step plan to mix, bake, and cool for reliably fudgy results. This keeps texture consistent and makes decorating easier.

Make the batter
Whisk dry ingredients in one bowl and beat wet ingredients in another. Combine them and fold just until incorporated.
Overmixing creates a cakier crumb, so stop when streaks disappear. Spread the brownie batter evenly in the prepared pan and smooth the top for uniform baking.
Oven time and doneness cues
Start checking at about 25–30 minutes. Aim for set edges and a center that’s barely cooked for a fudgy bite.
Look for a glossy, slightly cracked top—this signals proper sugar dissolution and classic sheen. Be cautious: melty chips can make the center appear wetter than it is.
Cooling at room temperature
Let the pan cool on a rack until it is cool to the touch. Then allow the slab to cool completely before lifting with the parchment overhang.
Lift the slab onto a cutting board and use a large, sharp knife. Press straight down and wipe the blade between cuts for clean edges. Serve at room temperature for maximum fudginess, or chill briefly for tighter, neater slices.
| Step | Key cue | Quick tip |
|---|---|---|
| Mix | Just combined | Fold gently to avoid overworking |
| Bake | 25–30 minutes | Check early; aim for glossy top |
| Cool | Pan cool to touch | Lift on parchment, slice with wiped knife |
Variation one: Cream Cheese Swirl Brownies with orange food coloring
A bright cream-cheese swirl turns a classic square into a showy, bakery-style treat. This version pairs a tangy top with deep chocolate for a balanced, not-too-sweet finish.
Cream layer prep
Use 8 oz cream cheese beaten with sugar, one egg, and a splash of vanilla extract. Start with the cheese at room temperature so the mix is silky and lump-free.
Swirling technique
Tint the cream with a few drops of food coloring until evenly orange for clear contrast. Spread the brownie base, add dollops, then place reserved batter prepared in small spoonfuls on top.
Creating patterns
Drag a knife or skewer lightly through the top to make spidery swirls. Keep strokes simple to keep the layers distinct; overworking blurs the ribbons.
“A vivid orange swirl reads beautifully against a dark base and holds its shape if cooled fully.”
- Bake until the center is set but still fudgy beneath the cream layer.
- Cool completely for sharp slices and neat presentation.
- Store covered in the fridge 3–4 days or wrap squares and freeze up to 3 months.
| Amount | Use | Tip |
|---|---|---|
| 8 oz | cream cheese | room temperature for silkiness |
| Food coloring | coloring the cream | add a drop at a time for vivid orange |
| Reserved batter | swirl accents | use spoonfuls for best contrast |
| Scale | 9×13 option | double the recipe for larger trays |
Variation two: Mummy Brownies with frosting bandages and candy eyes
Turn plain squares into playful mummy treats by baking a full sheet in a 9×13 pan, cooling completely, and lifting the slab with parchment before decorating. These make-ahead bars are a fun dessert for a party and easy to hand out.

Simple frosting mix
Whip room-temperature butter, then add vanilla and a pinch of salt. Beat in confectioners’ sugar alternately with a splash of milk until the frosting holds crisp lines but still pipes smoothly.
Piping setup
Fit a pastry bag with a coupler and a narrow basketweave tip (Wilton #44–48 works well). A flat, narrow tip mimics layered gauze and creates clean bandage lines.
Decorating flow
Make sure the slab is fully cool before decorating. Lift it onto a cutting board, trim straight edges with a sharp knife if you want bakery-style rectangles, then cut into pieces.
- Pipe random, slightly overlapping stripes across each piece, leaving a gap near the top for candy eyes.
- Attach candy eyeballs while the frosting is soft so they stick easily.
- Store airtight for several days; refrigerate if using dairy-based frosting.
- For gluten-free or dairy-free versions, choose a suitable base and plant-based fats so everyone can enjoy a mummy square.
“A narrow basketweave tip gives bandage texture and lets you pipe quickly across many pieces.”
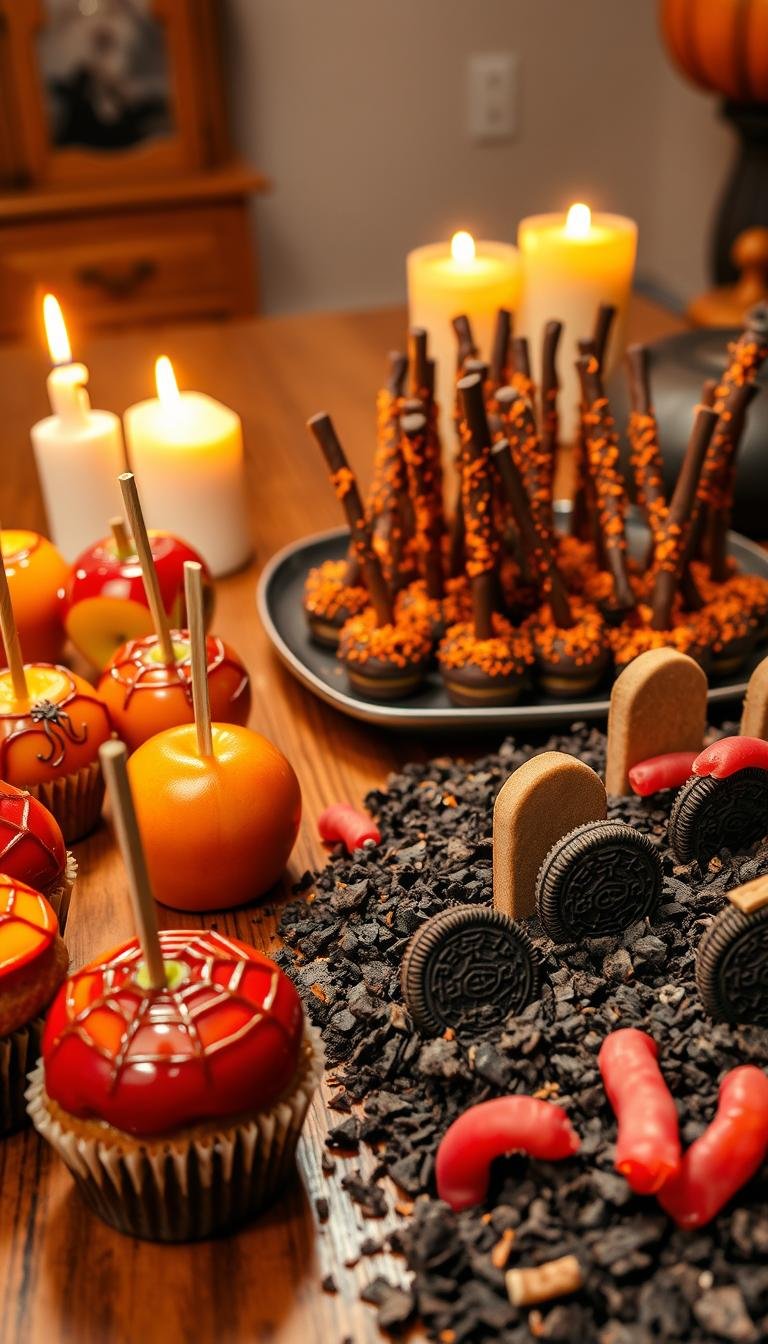
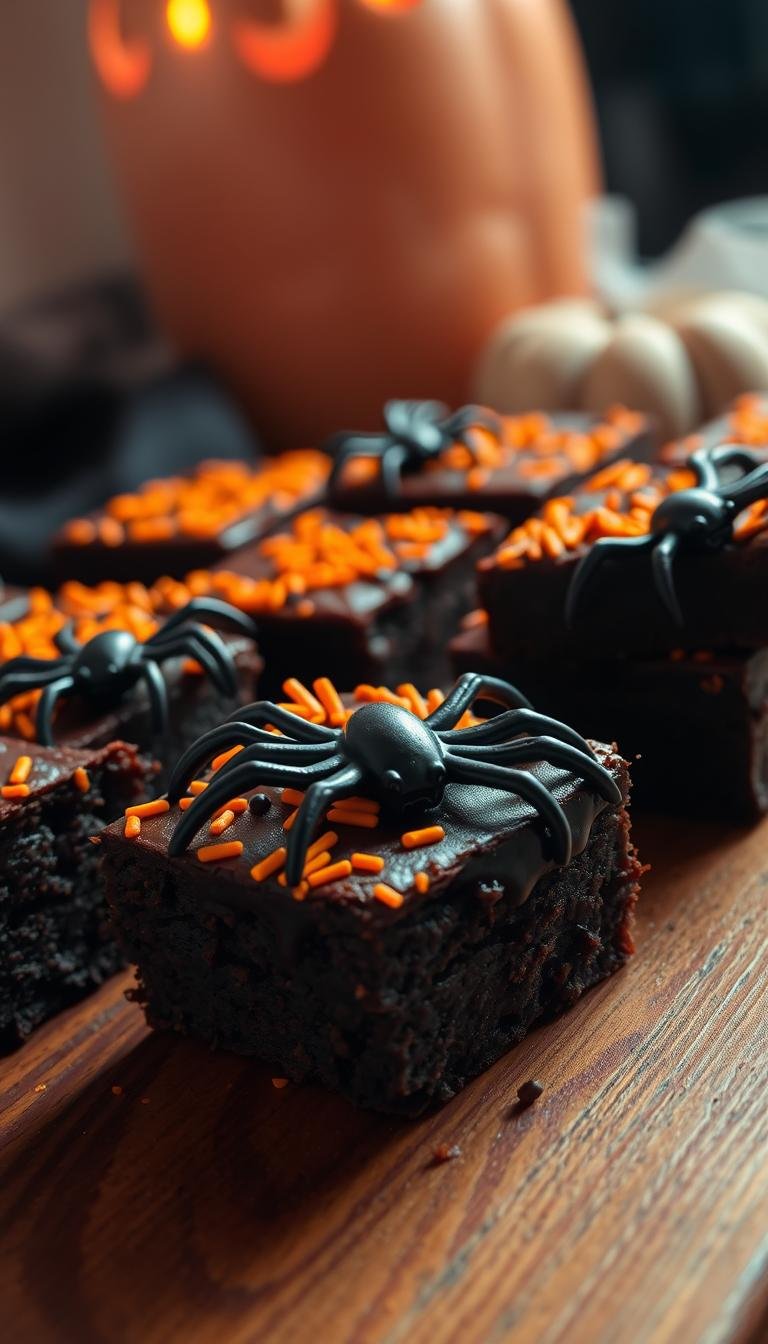
Variation three: Oreo Boo Brownies topped with Halloween cookies
Give your chocolate tray a playful twist: press whole themed sandwich cookies into the batter so their printed designs stay visible after slicing. This simple swap turns one pan into instant, grab-and-go desserts that look festive without extra piping.
Oreo placement
Line the pan with parchment paper and smooth the batter before placing whole cookies on the surface. Position a few whole cookies so each final square shows a clear design when cut.
Texture boosters
Stir chopped cookies and chocolate chips into the batter for contrast: fudgy crumb plus crunchy cookie bits. Chill the cooled slab to amplify crunch and make slicing neater.
Cutting clean slices
For tidy bars, press straight down with a large chef’s knife, lift, and wipe the blade between cuts. This prevents cookie shards from dragging and keeps edges sharp.
- Bake cue: stop when the top is shiny with set edges—avoid overbaking to retain moisture.
- Arrange bars so a whole cookie tops several pieces for a showy platter.
- These are easy gift ideas—nestle squares in parchment-lined tins to protect the tops.
| Feature | Why it helps | Quick tip |
|---|---|---|
| Whole cookies on top | Instant decoration | Place before baking for clear images |
| Chocolate chips | Texture contrast | Fold in for pockets of melty flavor |
| Chill before cutting | Tighter slices | Refrigerate 30–60 minutes for clean cuts |
“A few whole cookies on each piece makes these bars look like bakery desserts with almost no extra work.”
Storage, freezing, and make-ahead timeline for parties and gifting
Plan storage before you bake so your treats stay fresh for guests. A short timeline keeps texture crisp and flavors bright when you serve at a party or give as gifts.
Counter vs. fridge: how long to keep treats
Unfrosted bars can sit on the counter for about one day in a cool room.
For longer freshness, store squares in an airtight container in the fridge for 3–4 days. This protects cream-based toppings and keeps the crumb moist.
Freezer tips and thawing
Wrap individual pieces tightly, then place them in a freezer bag or airtight box. They freeze well for up to 3 months without losing fudgy texture.
Thaw wrapped bars at room temperature to avoid condensation ruining decorations. Unwrap only when they reach room temp.
Party planning and transport ideas
Bake a day or two ahead, then do final decorating the day of the event. This keeps piped bandages and candy eyes crisp.
Lift the slab using the parchment overhang and support it on a flat board for travel. Pack single layers with parchment between pieces for a neat halloween party buffet or gifts.
“Keep a few chilled at home—many people prefer the flavor after one or two days when the crumb sets.”
| Storage method | How long | Tip |
|---|---|---|
| Counter (unfrosted) | 1 day | Keep covered in a cool spot |
| Fridge (airtight) | 3–4 days | Protect cream toppings |
| Freezer (wrapped) | Up to 3 months | Thaw at room temp, then unwrap |
Conclusion
A neat lift from the pan starts with parchment, precise cups, and watching visual cues as the timer counts down.
The same reliable recipe gives you three fun results: a cream-cheese swirl made with an 8‑ounce brick at room temperature, mummy strips piped from a simple butter‑sugar frosting with candy eyes, or cookie-topped bars with whole cookies pressed onto the batter.
Trust the glossy top and set edges more than the clock. Let the slab cool completely, then use a large chef’s knife with a press‑and‑lift motion, wiping the blade between cuts for clean bars.
Measure cups and level teaspoons, add a pinch of salt, chill if needed, and pack squares snugly for a halloween party. Plan baking and decorating time so you arrive with tidy, crowd‑pleasing treats.