Delightful Spring Dessert Ideas to Savor
Spring is the perfect time to satisfy your sweet tooth with some fresh, light desserts that celebrate the season’s flavors. From fruity delights to creamy treats, these dessert ideas will add a touch of sweetness to your spring gatherings. Get ready to whip up something delicious and seasonal!
This Website contains affiliate links. That means I may earn a small commission if you purchase through my links, at no extra cost to you.
Delightful Spring Berry Pavlova To Celebrate The Season

Spring is the perfect time to enjoy fresh berries, and what better way to celebrate than with a stunning berry pavlova? This dessert features a light and airy meringue base topped with whipped cream and a colorful array of seasonal fruits. The combination of textures and flavors makes it a delightful treat for any spring gathering.
The pavlova’s crisp exterior and soft, marshmallow-like interior create a wonderful contrast. When you add a mix of strawberries, blueberries, raspberries, and blackberries, it becomes a feast for the eyes and the taste buds. The vibrant colors of the berries pop against the white meringue, making it a showstopper on any dessert table.
This dessert is not only beautiful but also simple to make. With just a few ingredients, you can create a masterpiece that will impress your guests. Serve it at a spring picnic, a garden party, or even for a cozy family dinner. Everyone will love digging into this sweet, fruity delight!
Ingredients
- 4 large egg whites
- 1 cup granulated sugar
- 1 teaspoon vanilla extract
- 1 teaspoon white vinegar
- 1 cup heavy cream
- 2 tablespoons powdered sugar
- 1 teaspoon vanilla extract (for the cream)
- 2 cups mixed berries (strawberries, blueberries, raspberries, blackberries)
- Fresh mint leaves for garnish
Instructions
- Preheat your oven to 250°F (120°C). Line a baking sheet with parchment paper.
- In a clean bowl, beat the egg whites until soft peaks form. Gradually add the granulated sugar, continuing to beat until stiff peaks form. Mix in the vanilla extract and vinegar.
- Spoon the meringue onto the prepared baking sheet, shaping it into a round disk with a slight indentation in the center.
- Bake for 1 hour, then turn off the oven and let the meringue cool completely inside.
- Once cooled, whip the heavy cream with powdered sugar and vanilla extract until soft peaks form.
- Top the meringue with whipped cream and arrange the mixed berries on top. Garnish with fresh mint leaves.
- Slice and serve immediately for the best texture!
Refreshing Lemon Tart With A Zesty Twist

Spring is the perfect time to enjoy light and refreshing desserts, and a lemon tart fits the bill beautifully. This tart is not just a treat for the taste buds; it also brightens up any table with its vibrant yellow color. The combination of zesty lemon flavor and a buttery crust makes it a delightful choice for any spring gathering.
The tart is topped with a light dusting of powdered sugar, adding a touch of sweetness that balances the tartness of the lemon. Fresh mint leaves and lemon slices around the tart enhance its visual appeal and hint at the refreshing flavors within. It’s a dessert that invites you to take a slice and savor the taste of spring.
Making a lemon tart is easier than you might think. With just a few simple ingredients, you can create a dessert that’s sure to impress your friends and family. Let’s get into the recipe!
Ingredients
- 1 1/4 cups all-purpose flour
- 1/2 cup unsalted butter, softened
- 1/4 cup granulated sugar
- 1/4 teaspoon salt
- 1 large egg yolk
- 1/4 cup fresh lemon juice
- 1 cup granulated sugar (for filling)
- 3 large eggs
- 1 tablespoon lemon zest
- 1/4 cup heavy cream
- Powdered sugar for dusting
Instructions
- Make the Crust: In a bowl, mix flour, sugar, and salt. Add softened butter and egg yolk, then blend until crumbly. Press the mixture into a tart pan and chill for 30 minutes.
- Preheat the Oven: Set your oven to 350°F (175°C). Bake the crust for about 15 minutes until lightly golden. Let it cool.
- Prepare the Filling: In another bowl, whisk together granulated sugar, eggs, lemon juice, lemon zest, and heavy cream until smooth.
- Fill the Crust: Pour the lemon filling into the cooled crust. Bake for 20-25 minutes until set but slightly jiggly in the center.
- Cool and Serve: Allow the tart to cool completely before dusting with powdered sugar. Garnish with fresh mint leaves and lemon slices before serving.
Classic Strawberry Shortcake For A Sweet Spring Treat
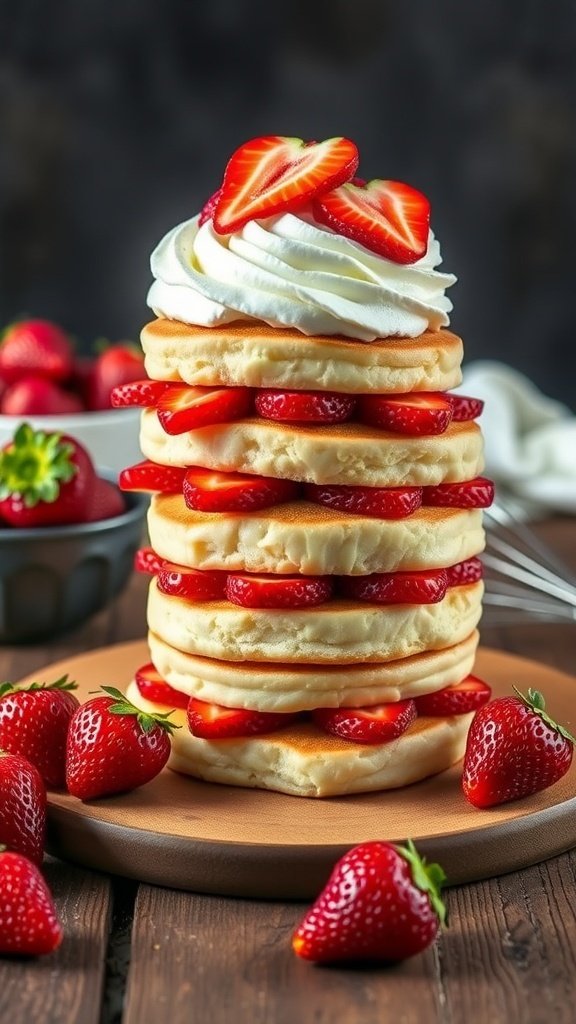
Spring is the perfect time to enjoy fresh strawberries, and nothing says spring quite like a classic strawberry shortcake. This delightful dessert features layers of fluffy cake, sweet strawberries, and whipped cream, making it a favorite for gatherings and celebrations.
The image showcases a beautifully stacked strawberry shortcake. Each layer is filled with juicy strawberries and topped with a generous dollop of whipped cream. The vibrant red of the strawberries contrasts beautifully with the light-colored cake, creating an inviting and delicious treat.
To make this classic dessert, you’ll need simple ingredients that come together quickly. The combination of sweet strawberries, soft cake, and airy whipped cream is sure to impress everyone at your spring gathering.
Ingredients
- 2 cups all-purpose flour
- 1/4 cup granulated sugar
- 1 tablespoon baking powder
- 1/2 teaspoon salt
- 1/2 cup unsalted butter, softened
- 1 cup milk
- 2 large eggs
- 1 teaspoon vanilla extract
- 4 cups fresh strawberries, sliced
- 1/4 cup sugar (for strawberries)
- 1 cup heavy whipping cream
- 1/4 cup powdered sugar
Instructions
- Preheat the oven to 350°F (175°C). Grease and flour two 9-inch round cake pans.
- In a large bowl, combine flour, granulated sugar, baking powder, and salt. Add softened butter, milk, eggs, and vanilla extract. Mix until smooth.
- Divide the batter evenly between the prepared pans. Bake for 25-30 minutes, or until a toothpick inserted in the center comes out clean. Let the cakes cool in the pans for 10 minutes, then transfer to wire racks to cool completely.
- While the cakes cool, prepare the strawberries. In a bowl, mix sliced strawberries with 1/4 cup sugar. Let them sit for about 15 minutes to release their juices.
- In another bowl, whip the heavy cream with powdered sugar until soft peaks form.
- Once the cakes are cool, slice each cake in half horizontally. Layer the bottom half of one cake with strawberries and whipped cream. Place the second half on top and repeat the process until all layers are stacked.
- Top with remaining whipped cream and garnish with additional strawberries. Serve immediately and enjoy your sweet spring treat!
Decadent Chocolate Mousse With A Spring Flair
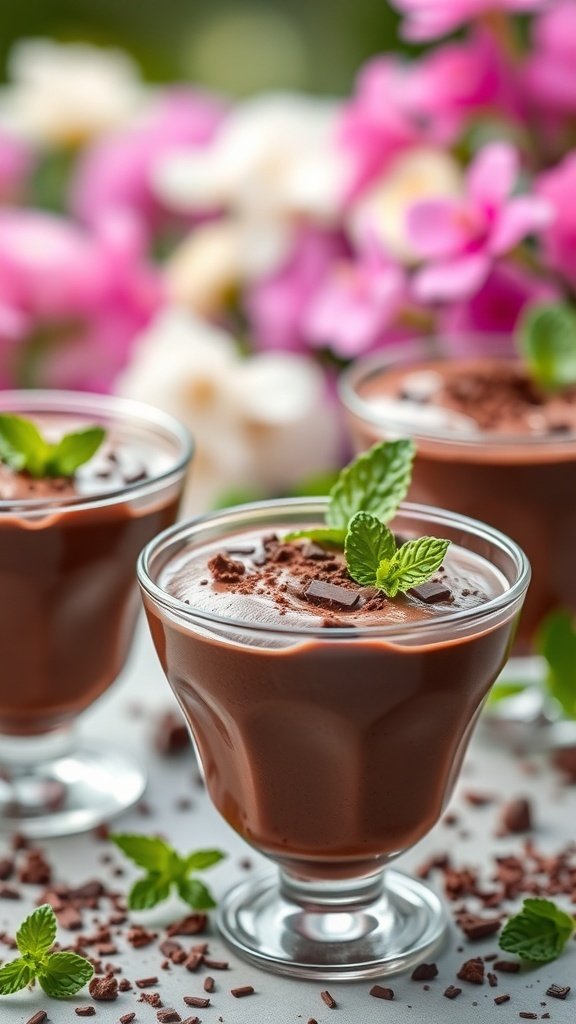
Spring is the perfect time to enjoy light and airy desserts, and chocolate mousse fits the bill beautifully. This rich treat is elevated with a touch of freshness, making it ideal for any spring gathering. The mousse is served in elegant cups, topped with fresh mint leaves and chocolate shavings, adding a pop of color against the soft, creamy chocolate.
The vibrant backdrop of blooming flowers hints at the season’s charm, making this dessert not just a treat for the taste buds but also a feast for the eyes. The combination of chocolate and mint is refreshing, evoking the essence of spring with every spoonful.
Making chocolate mousse is easier than you might think. With just a few simple ingredients, you can whip up a delightful dessert that will impress your guests. Let’s get started!
Ingredients
- 6 ounces bittersweet chocolate, chopped
- 3 tablespoons unsalted butter
- 3 large eggs, separated
- 1/4 cup granulated sugar
- 1 teaspoon vanilla extract
- 1 cup heavy cream
- Fresh mint leaves for garnish
- Chocolate shavings for garnish
Instructions
- Melt the Chocolate: In a heatproof bowl, combine the chopped chocolate and butter. Set over a pot of simmering water and stir until melted and smooth. Remove from heat and let cool slightly.
- Whip the Egg Yolks: In a separate bowl, whisk the egg yolks with the sugar and vanilla until pale and thick. Gradually mix in the melted chocolate until well combined.
- Beat the Egg Whites: In another bowl, beat the egg whites until stiff peaks form. Gently fold the egg whites into the chocolate mixture in three additions.
- Whip the Cream: In a separate bowl, whip the heavy cream until soft peaks form. Fold the whipped cream into the chocolate mixture until fully incorporated.
- Chill: Spoon the mousse into serving cups and refrigerate for at least 2 hours, or until set.
- Serve: Before serving, garnish with fresh mint leaves and chocolate shavings for a beautiful finish.
Light And Fluffy Coconut Cream Pie To Brighten Your Table

Spring is the perfect time for light and refreshing desserts, and a coconut cream pie fits the bill beautifully. This pie is not just a treat for the taste buds; it’s a feast for the eyes too. With its creamy filling, fluffy whipped topping, and a sprinkle of toasted coconut, it brings a touch of sunshine to any table.
The crust is golden and flaky, providing a delightful contrast to the smooth, rich filling. Fresh coconut adds a tropical flair, making each bite feel like a mini-vacation. The vibrant colors of the pie, paired with the floral backdrop, create a cheerful atmosphere that’s perfect for spring gatherings.
Whether you’re hosting a brunch or enjoying a quiet afternoon, this coconut cream pie is sure to impress. It’s light enough to enjoy after a hearty meal, yet satisfying enough to be the star of the dessert table.
Ingredients
- 1 pre-made pie crust
- 1 cup coconut milk
- 1 cup heavy cream
- 1/2 cup granulated sugar
- 1/4 cup cornstarch
- 1/4 teaspoon salt
- 3 large egg yolks
- 1 teaspoon vanilla extract
- 1 cup shredded coconut (toasted)
- Whipped cream for topping
Instructions
- Prepare the Crust: Preheat your oven to 350°F (175°C). Bake the pie crust according to package instructions until golden brown. Let it cool completely.
- Make the Filling: In a saucepan, combine coconut milk, heavy cream, sugar, cornstarch, and salt. Whisk until smooth. Cook over medium heat, stirring constantly, until the mixture thickens and bubbles.
- Add Egg Yolks: In a separate bowl, whisk the egg yolks. Gradually add a bit of the hot mixture to the yolks, stirring constantly. Then pour the yolk mixture back into the saucepan. Cook for another 2-3 minutes, stirring continuously.
- Flavor It: Remove from heat and stir in vanilla extract and half of the toasted coconut. Pour the filling into the cooled pie crust and smooth the top.
- Chill: Cover the pie with plastic wrap and refrigerate for at least 4 hours or until set.
- Serve: Top with whipped cream and the remaining toasted coconut before serving. Enjoy your delightful coconut cream pie!
Vibrant Rhubarb Crisp: A Tangy Spring Favorite

Spring is the perfect time to enjoy fresh, tangy flavors, and rhubarb crisp is a delightful way to celebrate the season. This dessert features tender rhubarb, which adds a unique tartness, balanced perfectly by a sweet, crunchy topping. The image shows a warm, golden-brown crisp topped with a scoop of creamy vanilla ice cream, making it an inviting treat for any gathering.
The bright pink stalks of rhubarb, visible in the background, hint at the freshness and vibrancy of the dish. This dessert not only tastes amazing but also looks stunning on the table, making it a great centerpiece for spring celebrations.
Making rhubarb crisp is simple and rewarding. You can whip it up quickly, allowing you to spend more time enjoying the company of friends and family. Serve it warm with a scoop of ice cream or a dollop of whipped cream for the ultimate spring dessert experience.
Ingredients
- 4 cups fresh rhubarb, chopped
- 1 cup granulated sugar
- 1 tablespoon cornstarch
- 1 teaspoon vanilla extract
- 1 cup rolled oats
- 1 cup all-purpose flour
- 1/2 cup brown sugar, packed
- 1/2 teaspoon cinnamon
- 1/2 cup unsalted butter, melted
Instructions
- Preheat the oven to 350°F (175°C).
- In a large bowl, combine the chopped rhubarb, granulated sugar, cornstarch, and vanilla extract. Mix well and pour into a greased baking dish.
- In another bowl, mix the oats, flour, brown sugar, and cinnamon. Pour in the melted butter and stir until crumbly.
- Spread the oat mixture over the rhubarb filling evenly.
- Bake for 30-35 minutes, or until the topping is golden brown and the rhubarb is bubbling.
- Let it cool slightly before serving with ice cream or whipped cream.
Fruity Key Lime Pie With A Zing
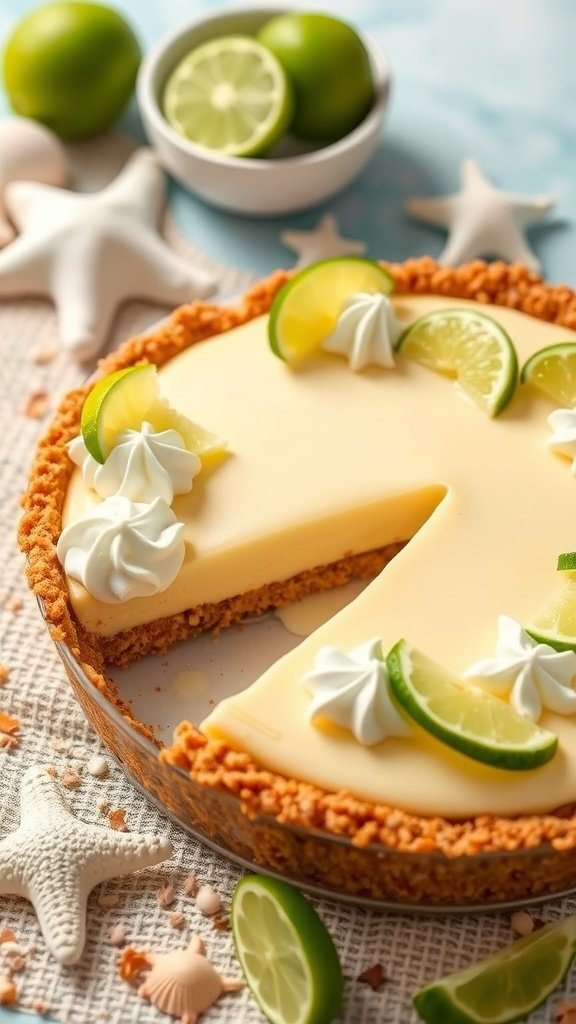
Spring is the perfect time to enjoy refreshing desserts, and nothing says spring quite like a fruity key lime pie. This delightful treat is not only tangy and sweet but also incredibly easy to make. The bright yellow filling contrasts beautifully with the golden crust and garnishes of lime slices and whipped cream.
The crust is typically made from crushed graham crackers, giving it a nice crunch that pairs perfectly with the smooth filling. The key lime juice adds that signature zing, making each bite a burst of flavor. This pie is perfect for gatherings, picnics, or just a sunny day at home.
To make your own fruity key lime pie, gather these ingredients:
Ingredients
- 1 ½ cups graham cracker crumbs
- ⅓ cup granulated sugar
- ½ cup unsalted butter, melted
- 1 can (14 oz) sweetened condensed milk
- ½ cup key lime juice
- 3 large egg yolks
- Whipped cream, for topping
- Lime slices, for garnish
Instructions
- Preheat your oven to 350°F (175°C).
- In a bowl, mix graham cracker crumbs, sugar, and melted butter until combined. Press the mixture into the bottom and up the sides of a pie dish.
- Bake the crust for about 8-10 minutes until golden brown. Let it cool.
- In another bowl, whisk together sweetened condensed milk, key lime juice, and egg yolks until smooth.
- Pour the filling into the cooled crust and bake for an additional 15 minutes.
- Remove from the oven and let it cool to room temperature. Chill in the refrigerator for at least 3 hours.
- Before serving, top with whipped cream and garnish with lime slices.
This fruity key lime pie is sure to impress your friends and family. Enjoy the refreshing taste of spring with every slice!
Elegant Vanilla Bean Panna Cotta With Fresh Fruit

Spring is the perfect time to enjoy light and refreshing desserts. One delightful option is vanilla bean panna cotta, a creamy treat that pairs beautifully with fresh fruit. This dessert is not only tasty but also visually appealing, making it a great choice for gatherings or a simple family dinner.
The panna cotta is smooth and rich, with a hint of vanilla that shines through. Topped with vibrant fruits like strawberries, blueberries, and mango, it creates a colorful contrast that’s hard to resist. The combination of textures and flavors makes each bite a joy.
Making panna cotta is easier than it sounds. With just a few ingredients, you can whip up this elegant dessert in no time. Here’s how to make it:
Ingredients
- 2 cups heavy cream
- 1/2 cup granulated sugar
- 1 teaspoon vanilla bean paste
- 1 packet (2 1/4 teaspoons) unflavored gelatin
- 3 tablespoons cold water
- Fresh fruit for topping (strawberries, blueberries, mango, kiwi)
Instructions
- Prepare the Gelatin: In a small bowl, sprinkle gelatin over cold water. Let it sit for about 5 minutes until it blooms.
- Heat the Cream: In a saucepan, combine heavy cream and sugar. Heat over medium until the sugar dissolves and the mixture is warm, but not boiling.
- Add Vanilla: Stir in the vanilla bean paste and the bloomed gelatin until fully dissolved.
- Pour and Chill: Pour the mixture into serving glasses or molds. Refrigerate for at least 4 hours, or until set.
- Serve: Once set, top with fresh fruit before serving. Enjoy your delicious panna cotta!
Charming Peach Cobbler: A Southern Spring Staple
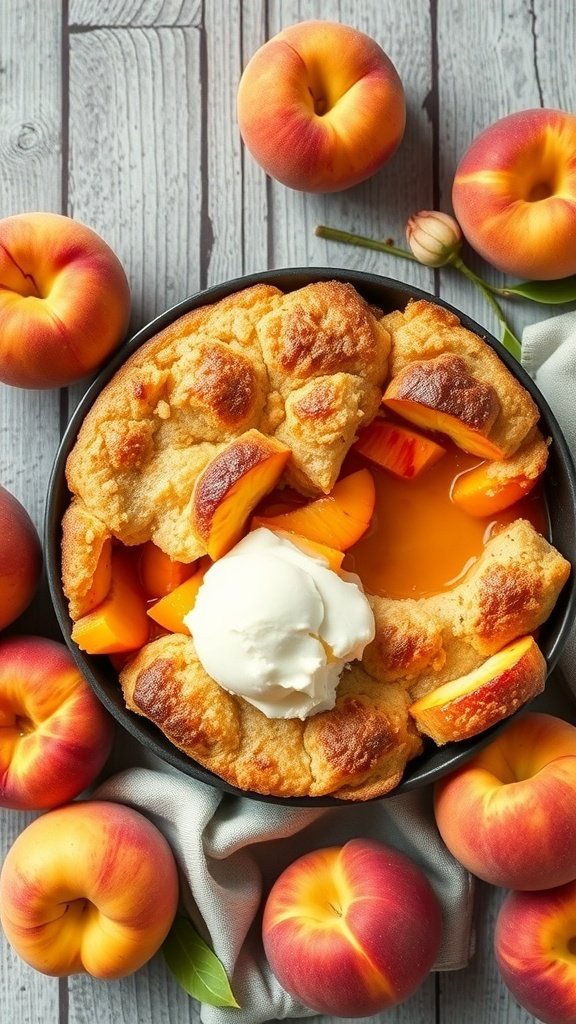
Peach cobbler is a delightful dessert that perfectly captures the essence of spring. With its warm, buttery crust and sweet, juicy peaches, it’s a classic that brings comfort and joy. The image showcases a beautifully baked peach cobbler, golden brown on top and oozing with syrupy peach goodness. A scoop of creamy vanilla ice cream on top adds a touch of indulgence, making it a must-have for any spring gathering.
This dessert is not just about taste; it’s about the experience of sharing it with loved ones. The aroma of peaches baking fills the air, inviting everyone to the table. Whether it’s a family dinner or a picnic in the park, peach cobbler is sure to be a hit.
Making peach cobbler is simple and requires just a few ingredients. Fresh peaches are the star of the show, but you can also use canned or frozen ones if needed. The combination of sugar, flour, and butter creates a delightful crust that complements the fruit perfectly.
Ingredients
- 4 cups fresh peaches, sliced
- 1 cup granulated sugar
- 1 teaspoon cinnamon
- 1 tablespoon lemon juice
- 1 cup all-purpose flour
- 1 cup milk
- 1/2 cup unsalted butter, melted
- 1 tablespoon baking powder
- 1/4 teaspoon salt
Instructions
- Preheat your oven to 350°F (175°C).
- In a mixing bowl, combine sliced peaches, 1/2 cup sugar, cinnamon, and lemon juice. Stir well and set aside.
- In another bowl, mix flour, remaining sugar, baking powder, salt, milk, and melted butter until smooth.
- Pour the batter into a greased baking dish. Spoon the peach mixture over the batter, but do not stir.
- Bake for 40-45 minutes or until the top is golden brown and the peaches are bubbly.
- Let it cool slightly before serving. Top with vanilla ice cream for that extra special touch!
Creamy Cheesecake With A Spring Berry Topping

Spring is the perfect time to enjoy fresh berries, and what better way to showcase them than on a creamy cheesecake? This dessert is not only visually appealing but also a delight for the taste buds. The smooth, rich cheesecake pairs beautifully with a vibrant topping of strawberries, blueberries, and raspberries, making it a seasonal favorite.
The cheesecake sits on a buttery graham cracker crust, providing a satisfying crunch. The berry topping adds a burst of color and flavor, making it a showstopper for any spring gathering. Whether it’s a picnic or a family dinner, this dessert will surely impress.
Let’s get into the recipe so you can whip up this delicious treat!
Ingredients
- 1 1/2 cups graham cracker crumbs
- 1/4 cup granulated sugar
- 1/2 cup unsalted butter, melted
- 4 (8-ounce) packages cream cheese, softened
- 1 cup granulated sugar
- 1 teaspoon vanilla extract
- 4 large eggs
- 1 cup sour cream
- 2 cups mixed fresh berries (strawberries, blueberries, raspberries)
- 1/2 cup berry sauce or jam
Instructions
- Prepare the Crust: Preheat your oven to 325°F (160°C). In a bowl, mix graham cracker crumbs, 1/4 cup sugar, and melted butter until combined. Press the mixture into the bottom of a 9-inch springform pan.
- Bake the Crust: Bake the crust for about 10 minutes, then remove and let it cool.
- Make the Filling: In a large bowl, beat the cream cheese until smooth. Gradually add 1 cup sugar and vanilla, mixing well. Add eggs one at a time, beating well after each addition. Finally, mix in the sour cream until smooth.
- Combine and Bake: Pour the cream cheese mixture over the cooled crust. Bake for 50-60 minutes or until the center is set. Turn off the oven and let the cheesecake cool inside for an hour.
- Chill: Remove the cheesecake from the oven and let it cool to room temperature. Refrigerate for at least 4 hours or overnight.
- Top with Berries: Before serving, arrange the fresh berries on top of the cheesecake. Drizzle with berry sauce or jam for extra sweetness.