Delicious Red Velvet Cheesecake Brownies Dessert Recipe
Surprising fact: a single 8×8 pan of these swirled bars can yield 12 to 16 servings and averages just under 200 kcal per portion, making them easy to share without overindulging.
This Website contains affiliate links. That means I may earn a small commission if you purchase through my links, at no extra cost to you.
This post presents a festive mash-up of fudgy cocoa bars and a tangy cream layer. The result is an eye-catching swirl and a rich, balanced flavor profile that suits holidays or weeknight treats.
Expect a simple process: an 8×8-inch pan, bake at 350°F for 30–35 minutes, and reserve a small bit of batter to dollop on top. Swirl the cream layer with a knife or toothpick to make a dramatic marbled pattern.
Tip: cool the pan completely on a rack before lifting with parchment. This step ensures clean slices and a fudgy texture. The bake is forgiving for beginners and reliable for seasoned bakers.
Key Takeaways
- Fudgy cocoa bars and tangy cream combine for a striking swirl.
- Bake in an 8×8 pan at 350°F for about 30–35 minutes for best texture.
- Reserve a small amount of batter to protect the cream layer and add contrast.
- Let cool fully in the pan for clean slices and set texture.
- Yield is flexible: 12 larger or 16 smaller portions for sharing or gifting.
Why You’ll Love These Red Velvet Cheesecake Brownies
One bite reveals a soft, fudgy interior and a bright, tangy cream ribbon. The base gives a mellow cocoa backbone with gentle vanilla notes, while the cream layer adds a subtle tang that cuts the richness.
Texture and technique matter: these bars are chewy and fudgy, contrasted by a silky swirl for a layered bite in every square. Whisk eggs until slightly foamy to help form a glossy, crackly top. A splash of white vinegar helps the red hue stand out against cocoa.
- Flavor: mellow cocoa, buttery vanilla, and a gentle tang from the cheesecake.
- Visual appeal: vivid base with bright marbling that looks bakery-ready.
- Easy crowd pleaser: familiar comfort elevated by cream richness—great for holidays and potlucks.
- Simple prep: pantry staples and common dairy mean minimal shopping and high payoff.
Ingredients and Equipment for Velvet Brownies and Cheesecake Swirl
Gather the right pantry staples and a few basic tools to start these swirled bars.
Red velvet base (per 8×8 pan):
- Melted unsalted butter for fudginess
- Granulated sugar for structure
- Unsweetened cocoa powder for mild chocolate notes
- Vanilla extract and a pinch of salt
- Gel food coloring (or liquid in a slightly larger amount) plus a splash of white vinegar
- All-purpose flour and eggs to bind and give a chewy crumb
Cheesecake layer: One 8‑ounce brick full‑fat cream cheese, granulated sugar, vanilla, and one egg yolk at room temperature for a silky, lump‑free mixture.
Tools: an 8×8 pan lined with parchment, mixing bowls, whisk or electric mixer, rubber spatula, and a sharp knife or toothpick for marbling.

| Item | Purpose | Notes |
|---|---|---|
| Butter | Fudgy texture | Use unsalted, melted |
| Cocoa powder | Chocolate base | Natural or Dutch; affects flavor |
| Cream cheese | Silky swirl | One 8-oz block at room temp |
| Food coloring | Hue | Gel for saturation; liquid possible |
Step-by-Step: From Brownie Batter to Cheesecake Swirl
Follow these clear steps to move from mixed batter to a glossy, marbled final pan.
Prep and heat
Line an 8×8-inch pan with parchment on all sides. Preheat the oven to 350°F so heat is even when you bake.
Make the cocoa base
In a bowl, stir melted butter with sugar until glossy. Add cocoa, vanilla, salt, and red food coloring, then stir in a splash of white vinegar.
Whisk the eggs in a small bowl, fold them into the mixture, and then gently fold in flour just until no dry streaks remain to keep a fudgy crumb.
Blend the cream layer
Beat room-temperature cream cheese with sugar, vanilla, and one egg yolk until very smooth. A lump-free mixture gives a clean swirl.
Assemble, swirl, and bake
Pour most of the batter into the prepared pan, reserving a few tablespoons to 1/4 cup for the top. Dollop the cheesecake mixture across the surface, then spoon reserved batter on top.
Swirl with a knife or toothpick in a few deliberate passes. Bake for about 30–35 minutes, or until a toothpick near the center comes out mostly clean with a few moist crumbs.

| Step | Action | Timing/Notes |
|---|---|---|
| Prep | Line pan and preheat oven | 350°F for even baking |
| Base | Mix butter, sugar, cocoa, vanilla, red food, vinegar, eggs, flour | Fold flour; avoid overmixing |
| Cheesecake | Beat cream cheese, sugar, vanilla, egg yolk | Must be smooth and lump-free |
| Assemble & Bake | Layer, dollop reserved batter, swirl, bake | 30–35 minutes; cool completely before slicing |
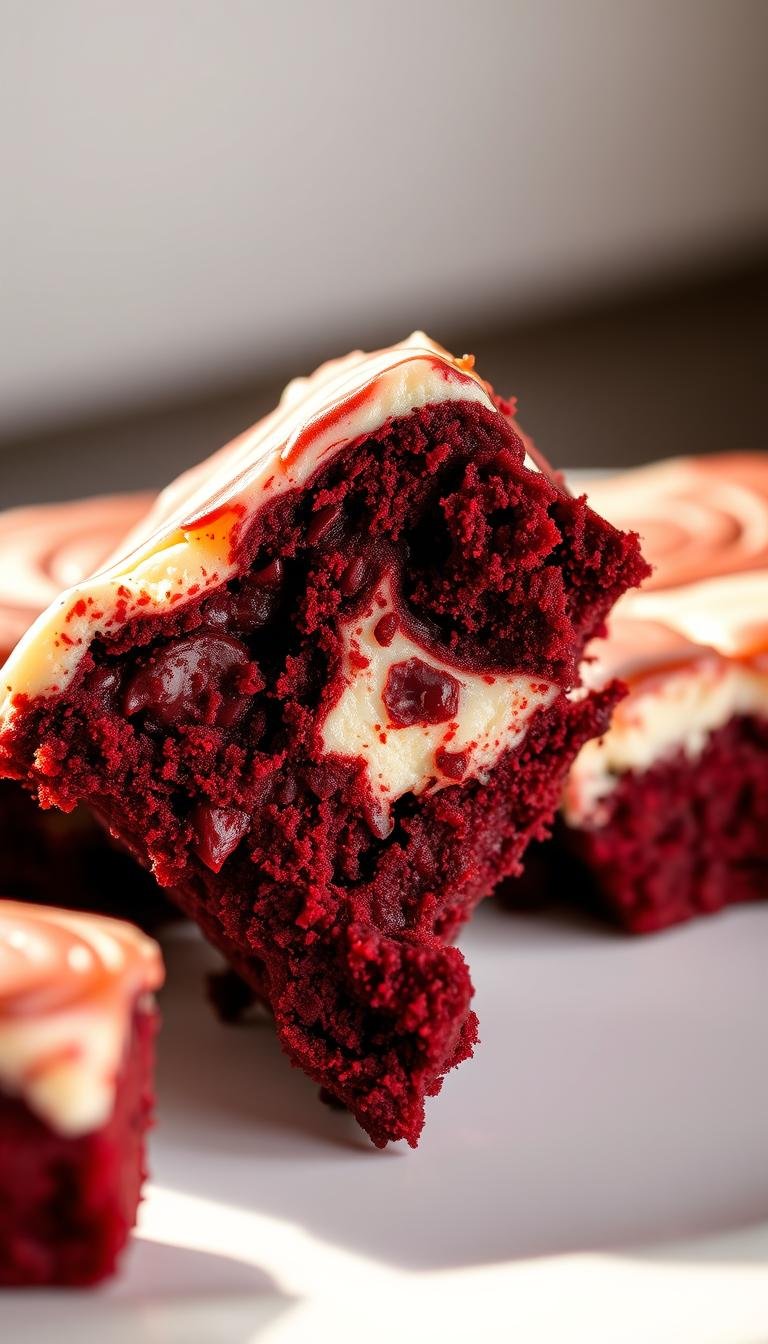
Red Velvet Cheesecake Brownies: Swirl Technique and Visual Cues
A few careful swirls make the difference between a messy bake and a bakery-style marble top.
Start by layering: dollop the smooth cream cheese mixture across the warmed base, then add small spoonfuls of reserved batter on the top. These bits frame the pattern and give the marbling places to flow without sinking.
Create a marbled pattern with a thin tool
Use a thin, sharp paring knife or a toothpick to trace clear lines. A sharp tip minimizes dragging and preserves distinct ribbons of color.
Make just a few figure-eight passes
Work in gentle figure-eight motions across the pan. Stop after a few passes when you see clear white and colored ribbons. Over-swirling blends the two and mutes the contrast.
- Alternate long and short strokes to pull swirl toward corners and edges.
- If the batter is thick, move slower to avoid tearing the underlying layer.
- Leave some negative space on the top so cheese sections stay bright after baking.
- Avoid pushing swirls into parchment corners; that can pull batter away from the edges.
“Aim for bold ribbons, not a single blended sheet—crisp contrast makes each square pop.”
Pro Tips, Substitutions, and Troubleshooting
Simple checks—like softening dairy or choosing the right cocoa—transform good bars into great ones.
Room temperature dairy and eggs
Bring cream cheese and eggs to room temperature before mixing. This prevents lumps and creates a smooth, glossy swirl that bakes evenly.
Cocoa powder choices
Natural cocoa gives a brighter hue and lighter chocolate note. Dutch-process cocoa deepens flavor and darkens the batter. Choose based on taste and color goals.
Food coloring and color tips
Start with gel food coloring for intense color with less liquid. Liquid food coloring works but may need more volume of red food to match saturation.
Texture, crackle, and fudgy center
Whisk the eggs until just foamy to encourage a shiny, crackly top. Fold flour into the batter only until combined to keep the center fudgy. A pinch of salt brightens cocoa and vanilla notes.
Scaling, bake time, and clean cuts
For a double batch, use a 9×13-inch pan and bake about 45 minutes at 350°F, checking for set edges and a toothpick with moist crumbs.
Cool fully, chill briefly, then use a warm knife wiped between slices for neat squares.
- Tip: Keep butter in the recipe for authentic chewy texture; avoid oil swaps.
Storage, Serving, and Nutrition
A quick plan for storage and serving makes these bars the easiest dessert to prep ahead. Cool the pan completely before covering. This step prevents condensation that can blur the swirl and soften the top.
How to store
Refrigerate in an airtight container for 6–7 days. Use a single layer for the cleanest tops.
If you must stack, separate layers with parchment to protect the marbled surface. For longer storage, freeze up to 2 months and thaw overnight in the fridge.
Serving, yield, and portioning
Typical yield from an 8×8 pan is 12–16 squares. Cut 12 for larger portions or 16 for smaller treats suitable for lunches or platters.
Serve slightly chilled for tidy edges, or bring to room temperature for the creamiest bite. Garnish with a light dusting of powdered sugar or a thin drizzle of melted white chocolate.
Nutrition and timing at a glance
Plan for a 30–35 minute bake plus full cooling before slicing. A representative square is about 192 kcal with roughly 26g carbs and 8g fat.
| Item | Storage | Best use |
|---|---|---|
| Short-term | Refrigerate 6–7 days | Weekly snacks, lunchboxes |
| Long-term | Freeze up to 2 months | Thaw overnight in fridge |
| Serving temp | Chilled or room temperature | Chilled = neat slices; RT = creamy center |
“Cool fully before covering—this small habit preserves the swirl and texture better than any frosting trick.”
Conclusion
This recipe wraps a streamlined batter method and a silky cream cheese mixture into an easy, bakery-style square. Use room-temperature dairy, gentle folding, and a reserved bit of batter for clear marbling. Bake in a lined 8×8 pan at 350°F and cool fully for neat slices.
The vivid red velvet color, balanced cocoa and vanilla notes, and a creamy ribbon define the signature bite. Scale to a 9×13 pan for parties (about 45 minutes) and keep swirl moves minimal to preserve contrast.
Refrigerate or freeze leftovers for make-ahead ease. Now preheat the oven, slice with a warm knife, and share these eye-catching brownies as a reliable, crowd-pleasing treat.