Comidas Halloween to Impress: Top Recipes for the Future
One surprising fact: 72% of hosts say visually striking party food makes guests remember an event for years.
This Website contains affiliate links. That means I may earn a small commission if you purchase through my links, at no extra cost to you.
Get ready for a future-ready fiesta that balances flavor and showmanship. This guide collects easy recetas that work for kids and adults alike. Think graveyard dips with tortilla tombstones, mummy sausages, jack-o’-lantern quesadillas, and pan de muerto twists.
Prep smart: shop simple ingredientes like pan, cheese, chocolate, mantequilla, and basic spices to speed cooking. Small steps—like pre-making dough or sauces—cut day-of stress and keep dishes fresh.
Visual details matter. Add expressive ojos and playful boca accents to pizzas and bakes so each plate photographs well and delights guests. For a quick inspiration boost, try a classic cookie technique from this perfect cookie guide adapted with spooky accents.
Key Takeaways
- Plan ingredients to streamline prep and shorten cooking time.
- Balance savory and sweet for a cohesive, abundant spread.
- Make-ahead components save time and preserve quality.
- Kid-friendly tasks double as activities and keep guests engaged.
- Simple decorating tips (eyes, mouths) boost visual impact.
- Safety first: supervise knife and horno work during shaping.
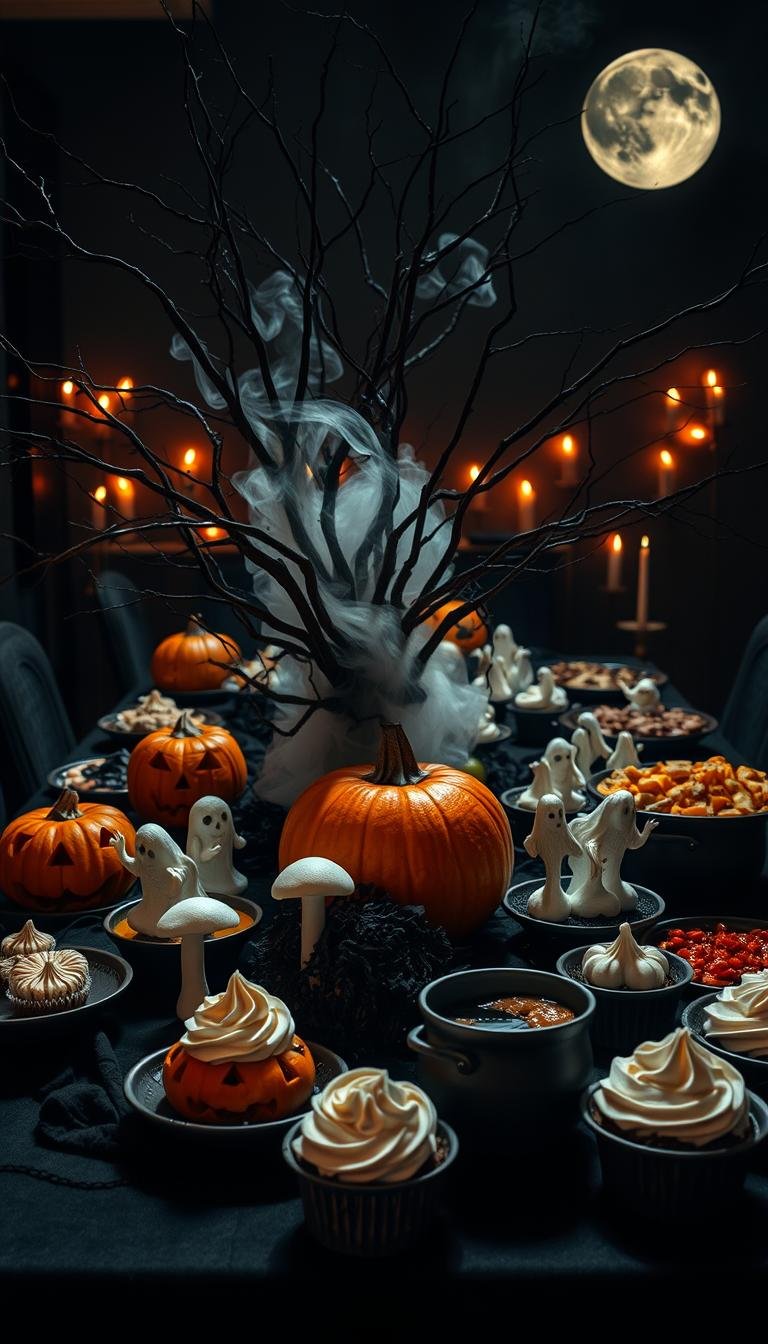
Why “comidas halloween” will wow your guests this future season
A memorable party plate mixes eye-catching shape, contrast, and a little edible shock value. These three design pillars—forma, color contrast, and edible “gore”—are what make recipes stand out on the table and in photos.
What makes a dish impressive: shape, color, and clever “gore”
Use bold silhouettes and high-contrast colors so items read at a glance. Add small details like olive-slice ojos, jam “blood,” or cocoa dust to lift basic bases like masa, queso, and huevos.
Plan for kids and adults: spooky visuals, approachable sabores
Keep niños busy with safe tasks: stirring a mezcla, stamping cookie shapes, or placing olive ojos while an adult handles knives and the oven. A simple tweak—milder spices for kids, extra heat for adults—lets everyone enjoy the same receta.
- Palette: black, orange, green from natural ingredients.
- Repeatable steps: do this first, this next, save garnish for last—same process each vez.
- Quick wins: dip cementerio, guacamonstruos, and salchichas momia deliver big visuals fast.
Comidas halloween
Short on time? These snackable ideas deliver bold looks and big flavor in minutes. Use this quick-hit list to build a balanced spread that scales for crowds or small parties.
Quick hit list: savory, sweet, and sips at a glance
- Savory starters (5 minutes): cheese “ojos,” guacamonstruos — no cook, gluten-free adaptable. Hero plato: graveyard dip (scales well).
- Mains (10–15 minutos): jack-o’-lantern quesadilla with cheddar and salsa, spider pizza on quick masa base — great for groups.
- Sweets (10–15 minutos): Oreo spider treats, mummy galletas, chocolate webs, and white chocolate ghost lollipops. Pair heavy azúcar items with fruit skewers.
- Sips & tips: simple mocktails, repeat a tangy salsa across quesadillas and dips to simplify shopping.
Kid-ready tasks: sprinkling toppings, pressing shapes into masa, and assembling huevos toppers keep niños busy and safe.
Make-ahead: doughs and ganache chill 24–48 hours; dips hold 2 days. Quick plating cues—use stacked trays, labeled stations, and single-bite forks to keep lines moving.
Savory appetizers that steal the show
Start your savory spread with appetizers that deliver crisp texture and bold flavor. These three crowd-pleasers layer simple pasos into dramatic presentation, so you can prep ahead and finish fast.
Graveyard dip with tortilla tombstones
Assemble the five-layer mezcla in a 22×16 cm dish in this order: refried beans; crème fraîche whisked with taco seasoning and Tabasco; mashed avocado blended with mayo and minced garlic; salsa mexicana; and finely shredded iceberg lettuce.
Cut corn tortillas into tombstone shapes with scissors on a bandeja lined with papel. Brush with oil, broil 2–3 minutos until crisp, then letter with edible ink. Adults handle the cuchillo and horno steps; kids can letter tombstones safely.
Pumpkin hummus and black-bean “web” hummus
Roast a small squash at 200°C (400°F) for 30–40 minutos until tender. Scoop flesh, blend with chickpeas, tahini, lemon, and spices; serve in the hollowed pumpkin for effect.
For black-bean hummus, blend canned beans with garlic and olive oil, pipe onto a platter, and draw a sour cream web using a small-tip bag for steady lines.
Guacamonstruos: avocado halves dressed to scare
Stabilize avocado shells on a salt “nest” or shallow dish. Fill with mashed avocado, press nachos for “teeth,” add aceitunas for “eyes,” and tuck cheese or veggie scraps for hair.
“Visually striking party food makes guests remember an event for years.”
- Garnishes: aceitunas for ojos, scallions as “grass,” salsa drips for “gore.”
- Flavor tweaks: lime zest, smoked paprika, and a drizzle of chili oil.
- Optional dippers: masa pizza breadstick “snakes” for a themed crunch.
- Serving temp: dips are best at room temp; consume within 2 hours for peak texture (up to 6 hours if chilled and brought out just before serving).
- Modular toppings let guests dial heat while keeping a cohesive spread.
| Appetizer | Prep time | Key ingredientes | Storage tips |
|---|---|---|---|
| Graveyard dip | 20–30 minutos | Beans, crème fraîche, avocado, salsa, lettuce, tortillas | Keep chips separate on a paper-lined bandeja; dip chilled up to 48 hrs |
| Pumpkin hummus | 40–50 minutos (roast included) | Roasted squash, chickpeas, tahini, lemon, spices | Store in fridge; bring to room temp 30 minutos before serving |
| Guacamonstruos | 10 minutos | Avocados, nachos, aceitunas, cheese, scallions | Assemble just before guests arrive; cover avocado flesh with plastic if prepping early |
Core ingredientes to shop: avocados, canned beans, crème fraîche, squash, tortillas, nachos, aceitunas, scallions, salsa, lime, and basics like salt and olive oil.
Witchy fingers two ways: salty and sweet
Two witchy finger recipes—one savory, one sweet—give your party a clever contrast guests will love. Both use simple masa and pantry staples so shopping stays easy.
Salty witch fingers: frankfurters wrapped in masa
Quick steps:
- Steam frankfurters 2–3 minutos to warm through.
- Mix dough: flour, mantequilla, egg yolks, a pinch of azúcar, and salt into a pliable masa.
- Wrap sausages, score knuckles, press a toasted almond as a nail, brush with egg wash.
- Bake ~10 minutos at 180 °C in the horno until golden. Avoid over-browning almonds.
Serve with ketchup “sangre” in small ramekins placed around a tray to keep platters clean during the rush.
Green witch finger cookies: pistachio galleta with cherry jam
Combine a butter-sugar dough (100g mantequilla, 80g azúcar, 1 egg, 200g flour, almond extract). Tint green, chill 30 minutes for sharp edges.
Shape fingers, add almond nails, press knuckle marks, and bake 7–9 minutos at 190 °C. Finish with cherry jam “blood” at the cut edge.
“Mix salty and sweet fingers on a slate for a surprise moment guests won’t expect.”
| Recipe | Bake time | Key tips |
|---|---|---|
| Salty witch fingers | 10 minutos at 180 °C | Steam sausages first; egg wash for shine; ramekin ketchup to avoid mess |
| Green witch cookies | 7–9 minutos at 190 °C | Chill dough for crisp edges; add jam after cooling slightly |
| Make-ahead & serving | Up to 24 hrs prep | Store dough chilled; re-crisp in oven 3–4 minutes at 160 °C before serving |
Pro tip: Stagger racks to bake both types within 30–40 minutos. Kid-safe jobs: place almond nails and sprinkle pistachios. Swap smoked paprika into the salty masa or orange zest into the sweet dough to tune flavors.
Pizza party: arañas, momias y más with masa de pizza
Turn your pizza night into a spooky centerpiece with a dough spider that steals the table. This idea pairs a showy spider with crisp snake palitos for dipping, giving you a main attraction and edible accents in one bandeja.
Spider pizza centerpiece with marinara “guts” and olive “eyes”
Build the spider from two dough balls: one for the body (about 120g) and a smaller one for the head (50g). Shape eight leg strips ~1.2 cm thick and 10–12 cm long, spaced evenly so heat reaches each piece and they bake uniformly on the bandeja.
Press leg joints into the body, then brush with egg to secure. Sprinkle parmesan on legs for color. Bake 25–30 minutes at 175 °C; tent edges with foil mid-bake to avoid over-browning.
Hollow the body after baking and fill with warm marinara salsa. Add aceitunas negras slices for expressive ojos and small olive wedges for mandibles. Use food-safe color gels sparingly to define the boca without staining hands.
Snake breadsticks (palitos) with semillas and soup caldero dip
Shape tapered dough coils on oiled skewers, brush oil, and sprinkle poppy or sesame seeds. Add tiny olive triangles for eyes before baking 15–18 minutes at 180 °C.
Serve palitos in a cauldron-style pot of tomato soup for dramatic dipping. Bake extra palitos as edible “web strands.” For smaller ovens, rotate trays halfway and shorten sheet spacing to ensure even color.
| Step | Time / Temp | Tip |
|---|---|---|
| Spider bake | 25–30 min @175 °C | Tent edges mid-bake; transfer on cutting board to keep body intact |
| Palitos bake | 15–18 min @180 °C | Use oiled skewers; sprinkle semillas after oil for adhesion |
| Make-ahead | Proof 1–2 hrs; chill dough 24 hrs | Bring to room temp 30–45 min before shaping |
Kid jobs: arranging ojos, sprinkling semillas, and moving cooled legs with a spatula. Substitutions: thin cheeses or fresh herbs added after baking keep the spider silhouette intact. This receta balances showmanship with simple pan techniques so your pizza spread shines.
Pan and bakes with creepy character
Give your bread table a theatrical twist with a Medusa loaf that unfolds into herb-scented serpents.
Make dough by blending spinach with water, then mix with flour, yeast, sugar, salt, oil, and a touch of mantequilla. Proof, then roll the masa to a 30.5 cm circle on papel hornear.
Shaping and baking the Medusa
Use a sharp cuchillo to mark an oval face—score about 3 mm deep so the outline shows but the dough stays attached. Spread pesto around the outer ring, cut strips, then twist each into serpents anchored to the center.
Dot chopped aceitunas and sun-dried tomato for eyes and accents. Proof briefly, brush with melted mantequilla if desired, and bake at 200 °C. Tent with foil if the top darkens too fast.
Serving, variants, and care
Serve with a creamy queso-feta-pesto dip and an optional chili oil drizzle. Make mini palitos using the same masa and pesto technique for easy passing.
| Step | Cue | Tip |
|---|---|---|
| Scoring depth | ~3 mm | Visible outline without tearing |
| Proofing | Until spring-back test passes | Short final proof for shape hold |
| Baking | 200 °C | Tent mid-bake if browning fast |
| Storage & rewarm | 2 days refrigerated | Reheat in oven 6–8 min at 160 °C to crisp crust |
“Let kids place the aceitunas ‘pupils’ while adults handle the cuchillo and hot trays.”
Quick mains so niños leave “cenados”
Set a 30–45 minute kitchen sprint to get warm mains on the table before kids dash out. This oven-forward plan centers on fast, high-impact platos that cool just enough to handle while staying hot inside.
Ghost mozzarella pizza and spooky hamburgers
Cut ghost shapes from thick slices of fresh mozzarella using a small cookie cutter or a paring cuchillo. Place a thin layer of extra queso on the dough first—this gives a base that helps the ghosts keep a sharp silhouette when they melt.
For hamburgers, shape patties slightly larger than buns so they stay juicy. Keep seasoning mild for niños and offer hot sauce on the side for adults.
Mini meatloaf “mummies” with puré vendas and pea ojos
Make a simple meat mezcla: 500g ground beef, 1/2 cup breadcrumbs, 1 egg, 1/4 cup grated onion, salt, and pepper. Pack into muffin tins and bake in the horno.
Pipe mashed potato vendas using a star tip right after baking so they hold shape. Press cooked peas as “ojos” into each mummy while the puré is still warm.
Empanada zombie and empanadillas with ojos
Use pre-made dough to speed assembly. Spoon filling—tuna “worms” or seasoned beef—onto rounds, fold, and seal with a fork or a twisted rope edge. Chill 10 minutos before baking to prevent filling leaks.
Three easy eye-cut patterns: small circle, crescent slit, and stacked dot pair. Cut before baking and press a pea or olive half into each hole after baking for a defined look.
“Serve one hearty plato per child plus a veggie dipper to round out the meal.”
- 30–45 minutos roadmap: preheat oven, prebake crusts 6–8 minutos, bake meatloaves 20–25 minutos, finish pizzas 8–10 minutos.
- Child jobs: press pea or olive ojos; arrange cheese ghosts on cooled pies; sprinkle mild cheese.
- Prebake/reheat tip: par-bake dough and freeze. Reheat at 200 °C for 6–8 minutos to avoid a soggy base.
- Batch & freeze: shape patties and meatloaves ahead; freeze raw on trays, transfer to bags—bake from frozen adding ~8 minutos.
| Plato | Time (min) | Quick tip |
|---|---|---|
| Ghost mozzarella pizza | 8–10 minutos | Extra queso under ghosts for sharper outlines |
| Mini meatloaf mummies | 20–25 minutos | Pipe puré vendas warm so they set |
| Empanadillas | 12–18 minutos | Chill 10 minutos before baking to seal |
Mexican-inspired fiesta: tacos, quesadillas, and enchilada graveyard
A single salsa profile can link limey shrimp tacos, jack-o’-lantern quesadillas, and a bubbling enchilada-skillet “cementerio” into one crowd-pleasing menu.

Tacos with limey shrimp and jalapeño heat
Season shrimp with lime, chopped jalapeño, garlic, and a pinch of cumin. Grill quickly and serve on warmed masa tortillas.
Side ideas: pickled onions, chopped lettuce, and a tangy crema balance heat.
Jack-o’-lantern quesadillas with cheddar and guacamole
Cut faces into top tortillas, layer sharp cheddar on the bottom, then press in a lightly oiled pan. Keep finished quesadillas warm in a low oven on a sheet of papel to avoid sticking.
Enchilada-skillet “cementerio” topped with tortilla tombas
Blend pepper jack, enchilada sauce, rotisserie chicken, cream cheese, green chiles, and taco seasoning. Bake 20–25 minutes at 180 °C until molten.
Cut tombstones from tortillas, bake 5–7 minutes until crisp, then insert upright into the skillet so they stand on the hot surface.
- Timing tip: start the skillet last so it comes out molten as guests arrive.
- Knife safety: use a stable board and small, controlled cuts for faces.
- Core ingredientes: cheddar, enchilada sauce, tortillas, lime, jalapeño—works for tacos, quesadillas, and even a crossover pizza using the same sauce and queso.
- Serving sizes: small-batch for two or bake the enchilada in one large bandeja for a party.
Pasta and platos with staring “eyes”
Turn simple pasta into a spooky showpiece with meatballs that stare up from the sauce.
Use this quick receta for juicy meatballs: mix 500g ground beef, 1/2 cup breadcrumbs, 1 egg, 1 clove minced garlic, 2 tbsp grated onion, 1 tsp salt, 1/2 tsp black pepper, and 1 tbsp chopped parsley. Roll into 16 balls and bake at 200 °C for about 13 minutos until cooked through but still moist.
Top each warm meatball with a slice of ciliegine queso and press an aceitunas negras ring on top to make durable ojos. The cheese holds during a brief reheat if placed just before serving.
Sauce tips: simmer crushed tomatoes with a spoon of tomato paste to thicken so sauce clings and looks “bloody.” Add a splash of pasta water to finish for glossy silkiness.
- Kid assembly line: one person layers cheese, another adds olive rings.
- Spice profile: mild oregano and basil for kids; optional chili flakes for adults.
- Freeze meatballs raw on a tray, then bag; bake from frozen adding 4–5 minutes.
| Item | Batch (serves) | Hold & rewarm |
|---|---|---|
| Meatballs | 16 balls (~4 servings) | Bake, cool, freeze; reheat gently 10 min @150 °C then add eyes |
| Spaghetti & sauce | 400g pasta + 800ml sauce | Toss with 1 tbsp oil to prevent clumping; reheat in skillet with splash water |
| Plating trick | Per plate | Float meatball ojos on surface by ladling sauce under them for drama |
“A quick, staged finish—cheese then olive—keeps the eyes defined and the dish photo-ready.”
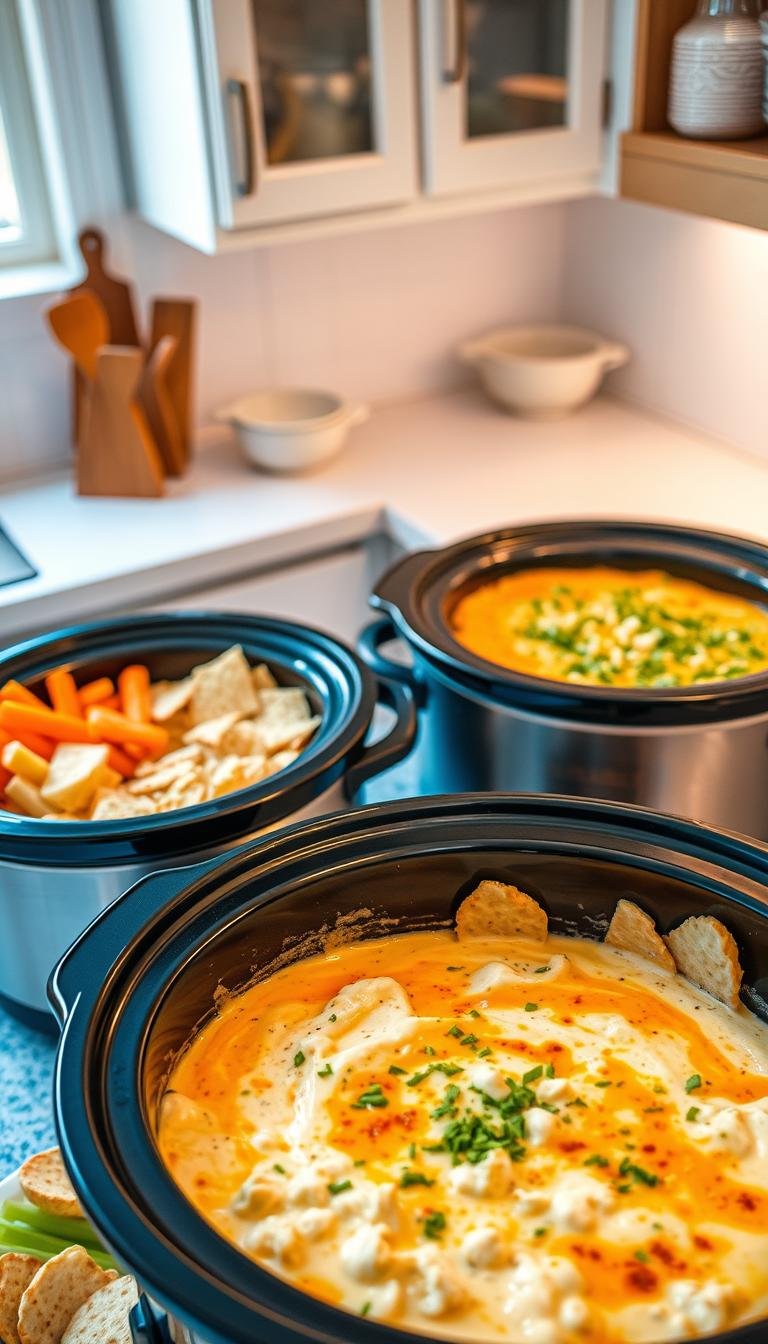
Dips served in edible “calderos” and spooky bowls
Make a focal dip by carving a round rye pan into a sturdy “caldero.” Remove the crumb to form a bowl, leaving a 1–1.5 cm wall so the loaf holds weight. Bake or crisp the reserved inner pieces as handles and breadsticks, pressing them into short slits and sealing with egg wash so the handle stays secure without collapse.
Spinach dip mezcla and chilling window
Combine 1 cup sour cream, 1/2 cup mayonesa, 1 tsp dried basil, 1/2 tsp black pepper, 1/2 tsp garlic powder, 1/2 tsp salt, 1 cup thawed chopped spinach (squeezed dry), 2 tbsp chopped chives, and 1/4 cup grated carrot. Chill 2 hours for flavor bloom and stable texture. For a thicker, cheesier version add 1/4 cup crumbled feta or 2 tbsp grated parmesan—both act as bold queso mix-ins.
Tinting crema and clean cauldron forma
Tint 4 oz cream cheese softened with a few drops of food-grade black gel until smooth; thin slightly with milk to pipe. Use a small round tip to draw a neat rim so the cauldron keeps its dramatic black edge. Pipe sparingly to avoid staining hands when guests dip.
“Piping a black rim turns a humble dip into a proper cauldron centerpiece.”
- Serving tips: use papel under the loaf to catch drips and simplify cleanup.
- Pan ideas: hollow mini pan de muerto or seasonal loaves for individual calderos that double as edible bowls.
- Make-ahead: mix the dip and chill up to 48 hours; carve bread 2–4 hours before service and keep crust crisp by covering the hollow with a tea towel until fill time.
- Kid-safe jobs: sprinkling chives, placing “bubbles” of crème, and arranging pumpkin-shaped dippers—adults handle carving and hot trays.
- Dippers: pumpkin-shaped toasts, crudités, seeded crackers, and sliced baguette for varied texture and color.
- Food safety: keep dips below 70°F on the table; discard after 4 hours, or swap with chilled bowls every 2 hours in warm settings.
| Item | Prep/Timing | Tip |
|---|---|---|
| Spinach dip mezcla | 10 min prep + chill 2 hrs | Chill to thicken and build flavor; add feta/parmesan for extra queso body |
| Rye pan cauldron | 10–15 min carve; handle bake 8–10 min | Leave 1–1.5 cm wall; secure handle with egg wash and short bake |
| Black crema piping | 5–8 min tint & pipe | Use gel color; thin with milk for smooth piping and clean lines |
Kid-help friendly recipes in minutes
Little hands can make big impressions with fast, kid-safe recipes that finish in 20–30 minutes. These ideas let niños help with no heat or sharp tools, so adults can focus on oven steps.
Huevos rellenos: mezcla and two spooky styles
Make the filling by mashing yolks with a spoonful of mayo, a pinch of bonito flakes or smoked tuna, and a dash of tomato. Pipe or spoon the mezcla back into whites.
- Arañas: press one aceitunas negras slice in the center and add thin olive strips for legs.
- Demonios: use small roasted pimiento triangles for horns and a dot of paprika for menace.
Oreo arañas and mummy pops with chocolate blanco
Prep pops by inserting sticks into Oreo halves and chilling 10 minutes for stability. Melt chocolate blanco for dipping and set up parchment and cooling racks.
- Dip each pop, tap off excess, then set on racks to firm.
- For mummy pops, drizzle additional white chocolate in quick back-and-forth lines to make “bandages.”
- Attach candy eyes or press a small dot of melted dark chocolate so the eyes stay put.
- Oreo arañas: sandwich licorice legs between cookies before inserting the stick for tidy legs that hold.
“Set up small bowls, parchment, and cooling racks so kids can decorate without a mess.”
| Item | Finish time | Storage tip |
|---|---|---|
| Huevos rellenos | 15–20 minutes | Cover and chill up to 24 hrs; garnish just before serving |
| Oreo & mummy pops | 20–30 minutes | Keep in a cool place; wrap individually for freshness |
| Setup | 5 minutes | Parchment and small bowls speed cleanup |
Safe task list for ayuda: whisk yolks, spoon and pipe fillings, dip and drizzle, press candy eyes, arrange finished pieces on platters. For lower sugar, use fewer candy eyes or swap to dark chocolate while keeping the same look.
Assembly line tip: group sweet and savory kid creations together for a fun reveal and faster service. Small prep stations, labeled bowls, and wipes make cleanup simple and keep the party moving.
Sweet treats sampler: galletas, brownies, cupcakes
A small sweets table can steal the show when each item shares one adaptable base recipe. Use a single buttery cookie dough and a flexible icing to speed production across galletas, cake pops and magdalenas.

Jack Skellington lollipop cookies and mummy pumpkin cookies
Base dough: mix 250g flour, 100g mantequilla, 80g azúcar, 1 egg, pinch salt. Roll, cut 6 cm circles, insert moistened short palitos, and bake ~10 minutes at 180 °C in the horno.
Decoration: ice with lemon meringue, draw faces with melted chocolate syrup. For mummy pumpkins, tint icing orange and pipe bandages with white icing lines.
Monster-eye cookies, spider-infested galletas, and skeleton chocolate
Use the same dough; top with a dab of icing and press candy ojos or aceitunas halves for monster eyes. For spider webs, temper chocolate, pipe webs on papel, and set at room temperature.
“Secure palitos by moistening the stick tip and inserting before the first 3 minutes of bake for a firm hold.”
Brownies “ataúd,” witch’s tree bark, and Oreo owls
Cut a baked slab into coffin shapes using a simple template. Top with ganache and crumbled bark made from tempered chocolate and toasted nuts on papel.
Cake pops and magdalenas fantasma
Crumble cake, bind with a tablespoon of frosting, shape, insert palitos, chill, then dip. For magdalenas fantasma, drape thin fondant circles over cooled cupcakes and score eyes with melted chocolate.
- Pantry swaps: replace mantequilla with neutral oil (80% weight), use brown sugar or regular azúcar interchangeably, and swap cocoa for 70% chocolate melted.
- Scaling & storage: dough freezes 24–48 hrs; baked goods keep best 24 hrs, up to 48 refrigerated. Re-crisp cookies 3–4 minutes at 150 °C.
- Finishing station: parchment-lined trays, three bowls (icing, sprinkles, tools), an angled spatula, and a small microwave for melting chocolate speeds service and limits mess.
| Item | Horno time/Temp | Quick tip |
|---|---|---|
| Cookie lollipops | 10 min @180 °C | Insert moistened palitos pre-bake for stability |
| Brownie coffins | 20–25 min @175 °C | Cool fully, then cut with cookie cutter template |
| Cake pops | Chill 30 min; dip | Chill well so coating sets cleanly |
Shared ingredientes list: flour, mantequilla, azúcar, eggs, cocoa or chocolate, fondant, palitos, parchment/papel, basic decorations. One shopping pass covers the whole sweets sampler.
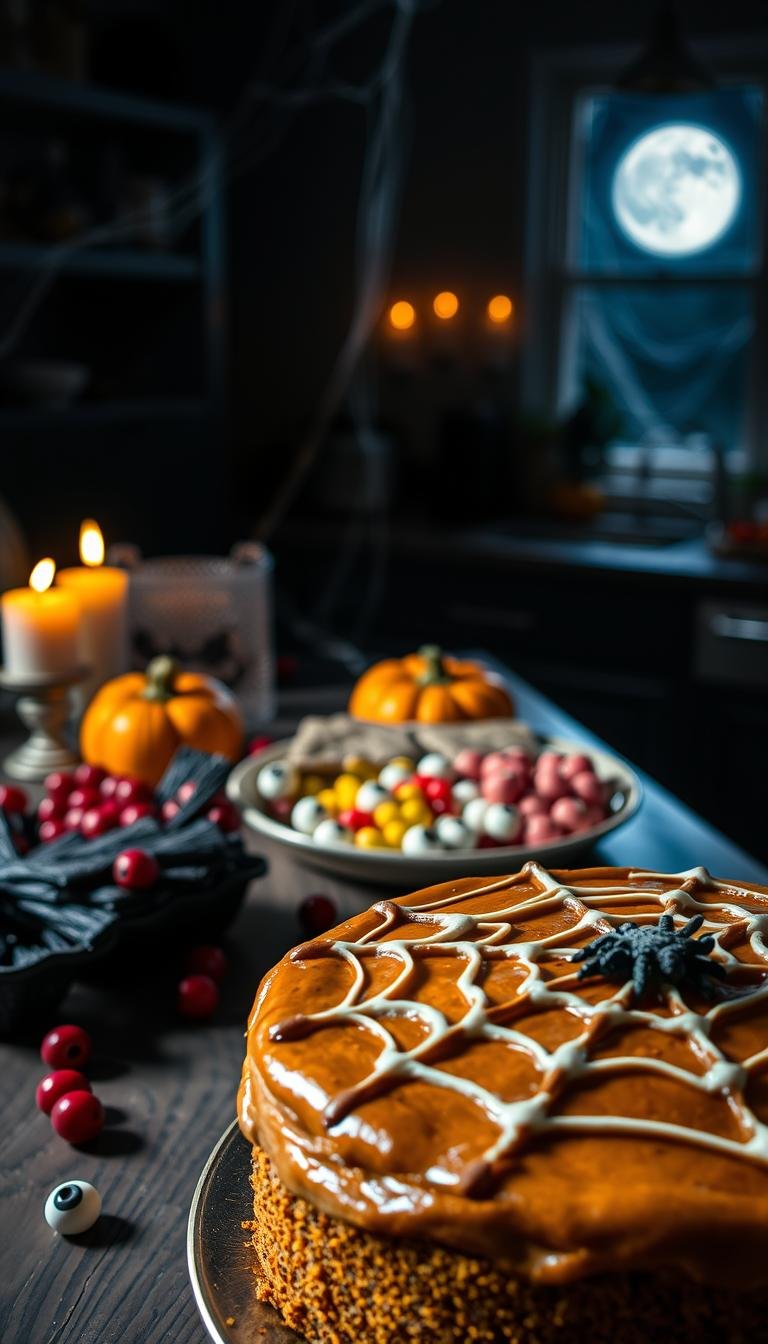
Showstopping cakes and chocolate blanco fantasmas
Transform a standard chocolate sheet into a spooky centerpiece with crumb “soil” and carved tombstones. A stable sheet cake is your best canvas: bake a dense chocolate base, cool fully, then trim level for even carving.
Chocolate cemetery, brain cake, and red velvet bleeding slice
Base chocolate formula (sheet pan ~33×23 cm): 360g flour, 340g sugar, 85g cocoa, 12g baking powder, 8g salt, 3 large eggs, 240ml milk, 180ml oil, 120g melted butter. Bake 25–30 min at 175°C; check with a toothpick—moist crumb but not wet.
For buttercream use 500g powdered sugar to 250g mantequilla with 60–80ml milk; this ratio scales and holds carved edges.
Styling: frost, press crushed galletas for soil, and add cookie tombstones. Pipe grass with a small tip to contrast the dark “earth.”
Brain cake: carve a rounded dome from two sheet layers, score shallow ridges, then pipe a glossy red glaze made from sifted azúcar, warm corn syrup, and food-safe color for controlled “blood” that still resists running in warm rooms.
White chocolate ghost pops with chocolate negro eyes y boca
Melt chocolate blanco gently over a bain-marie. Spoon puddles on parchment, insert sticks while soft, and shape peaks into ghost forms. Chill until firm.
Dot ojos and a boca with melted chocolate negro using a toothpick. Keep pops chilled until service to avoid bloom and softening.
“One-day-ahead baking, day-of decorating keeps texture and keeps designs crisp.”
| Item | Oven / Doneness | Tip |
|---|---|---|
| Chocolate sheet cake | 175°C / 25–30 min | Toothpick shows moist crumb, not wet batter |
| Brain carve & glaze | Use chilled layers | Chill before glazing to control drip |
| White choc pops | Chill until solid | Dot eyes last with chocolate negro; store cold |
- Structure tips: wrap chilled cakes tightly for transport and support with a flat board sized to the cake.
- Tools once-per-vez: offset spatula, bench scraper, small piping tips—these lift finishes fast.
- Timeline: bake one day ahead, assemble crumb coat that evening, finish piping and glaze the party day for peak freshness.
- Plating: slice with a warm, clean knife; use parchment-lined trays to keep drips and preserve the spectacle.
On-theme drinks and lower-sugar options
Drinks can extend the theme while keeping sugar in check and offering adult variations. Below are quick, showy ideas that mix bright color, creamy texture, and simple swaps so everyone—kids and adults—can enjoy a festive sip in minutes.
Frankenstein mocktail with lychee “eyes” and mint crema
Blueprint: make lychee “eyes” by inserting blueberries into drained lychees and painting fine red-vein lines with a tiny brush and diluted red food color. Shake 30–40 seconds: 30 ml crème de menthe (or mint syrup for NA), 15 ml crème de cacao (or cocoa syrup), 45 ml cream or light crema, ice. Strain into tall glass and float two lychee eyes.
Lower-azúcar cue: swap full syrup for soda-lime base and cut the sweet liqueur portion in half. Use a splash of club soda to lift the mint crema texture without added azúcar.
Butterbeer, “sangriento” bar, and savory michelada-style option
Adult Butterbeer: batch 1 L: 500 ml cream soda, 250 ml chilled strong coffee, 250 ml cream; whip a thin crema of cream and a drizzle of butterscotch. Chill and serve in frosted mugs.
“Sangriento” cocktail bar: set a garnish station with safe tools: droppers for faux blood, citrus wedges, salt rims, and eye picks. Offer nonalcoholic bases (ginger beer, soda-lime) so guests mix freely.
Savory salsa michelada-style: prepare a tangy mix: tomato soda, lime, hot sauce, Worcestershire, and a pinch of celery salt. Serve over ice with a salted rim for guests who want savory over sweet.
Fruit-forward bites: Frankenstein kiwi monsters
Make kiwi monsters in minutes: halve peeled kiwis, add small banana slices for teeth and a blueberry for an eye. These fruit bites act as a palate cleanser between sweet items and help reduce total azúcar intake.
“Batch-mix chilled bases and keep garnish stations prepped to avoid last-minute shaking.”
| Drink / Bite | Quick recipe | Service tip |
|---|---|---|
| Frankenstein mocktail | Crème de menthe, crème de cacao, crema, lychee eyes — shake 30–40 segundos | Make lychee eyes 10 minutos ahead; store chilled |
| Butterbeer (adult) | Cream soda + coffee + cream; whipped butterscotch crema | Batch and chill; top with whipped crema on demand |
| Sangriento bar & michelada | Tomato/ginger bases; faux blood droppers; michelada: tomato soda, lime, hot sauce | Use labeled vessels; provide NA bases and soda-lime swaps |
| Kiwi monsters | Kiwi halves, banana teeth, blueberry eye | Assemble up to 30 minutos before serving to avoid soggy banana |
Essential ingredientes & tools: lychees, blueberries, crema or light cream, club soda, butterscotch syrup, small droppers, cocktail shaker, chilled glasses, and clean brushes for food-safe color. Use food-grade color sparingly to avoid staining hands or glassware.
Dietary swaps, baking tools, and make-ahead timing
Plan smart to keep every dish photo-ready and allergy-aware. A few simple swaps and tidy tools save time and reduce stress while preserving the spooky look of your recetas. Below are clear tips for gluten- and lactose-free guests, practical gear choices, and a compact make-ahead schedule that fits a small cocina.
Without gluten or lactose: simple tweaks for masa, queso, and crema
Easy swaps: use a certified gluten-free masa blend for tortillas and doughs. Replace regular cheese with lactose-free or cultured dairy-free queso for melty results.
For crema, choose oat or coconut-based alternatives and whisk in a splash of lemon to mimic tang. For nut-free decorations, swap almond “nails” and pistachios for sunflower seeds or toasted pepitas.
Paper, bandejas, moldes and cuchillo tips for clean shapes
Line your bandeja with papel hornear or a silicone mat for even release. Use standard 23×33 cm and 20×20 cm moldes to fit most hornos and maximize batch output.
Cuchillo care: keep a sharp paring knife for cookie faces and a serrated blade for bread—cut at a slight 30° angle for crisp jack-o’-lantern edges. Wipe the blade between cuts to avoid drag and smearing.
What to bake now vs. party day: horno time and assembly order
Bake dense items (cakes, bread) the day before. Chill and wrap; decorate the morning of. Par-bake crusts and freeze; finish in the horno for 6–8 minutos to re-crisp.
| Item | When to bake | Horno / minutes |
|---|---|---|
| Cakes & breads | Day before | 25–30 min / cool fully |
| Cookies & small bakes | Same day or morning | 8–12 min / cool 15 minutes |
| Dips & filled items | Mix ahead; assemble day-of | Warm 10–15 min before service |
Allow resting minutes after baking—10–20 minutos for cookies and 20–30 for cakes—so icings and chocolate set without sagging.
- Staging: set separate sweet and savory zones in your cocina to avoid cross-contact and speed plating.
- Labeling: mark items with allergen tags so guests pick confidently.
- Re-crisping: use a hot oven (160–170 °C) for 3–5 minutos and finish under a broiler for 30 seconds if needed—watch closely to avoid melting decorations like white chocolate.
- Transport: use flat boards, non-slip liners in carriers, and cool, shaded spots for outdoor setups.
“Small swaps and measured timing keep creative recetas photo-ready and guest-safe.”
Conclusion
Focus your finish: pick one or two showstopping centerpieces, then fill with fast supporting recetas that reuse doughs, sauces, and simple garnishes.
Let kids help with safe jobs—eyes, teeth, and final touches—while adults handle hot steps. Test one new receta once before the party to tune timing and texture.
Capture photos right after you add boca details and chocolate accents so edges look fresh. Keep warm items in a low oven and re-crisp bread or palitos for best texture.
Plan dietary swaps (gluten-free masa, dairy-free queso), stage a short shopping list, and try mixing and matching ideas the next vez you host. For more ideas and latest recipes see latest recipes.
Quick punch list: choose centerpieces, repeat one sauce, prep make-ahead dough, assign kid tasks, and test timing. A calm plan makes a dramatic spread—and your guests will remember it.