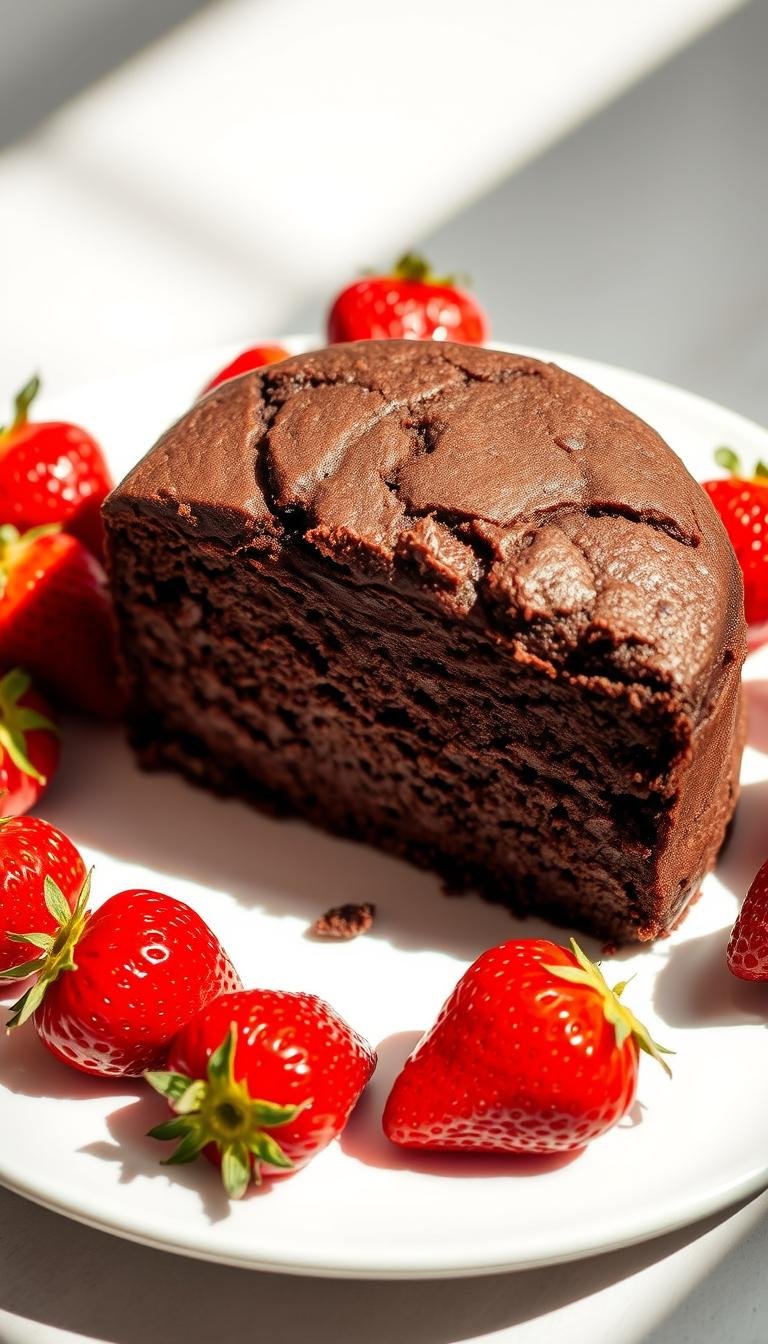
Classic Chocolate Cake with Fresh Strawberries
One surprising fact: home bakers who add a shot of espresso to their batter report richer flavor and fewer leftovers the next day.
This Website contains affiliate links. That means I may earn a small commission if you purchase through my links, at no extra cost to you.
This two-layer, 8-inch dessert blends intense cocoa notes and a roasted fruit filling for bright, jammy pockets. The method is simple: bloom cocoa in very hot water, whisk wet ingredients like oil, buttermilk, and vanilla in a bowl, then fold together into a smooth batter that bakes into level layers.
Expect tender texture thanks to oil and buttermilk, and a silky finish from a ganache-based cream cheese frosting. Chill layers before frosting to cut crumbs, and serve the chilled dessert at room temperature for best mouthfeel. This approachable recipe is built for celebrations and can be made ahead: bake, prep filling, and finish when ready.
Key Takeaways
- Espresso powder deepens cocoa flavor without extra sugar.
- Blooming cocoa in hot water makes a smoother batter.
- Oil plus buttermilk keeps the crumb moist for days.
- Choose roasted filling for depth or quick jam when short on time.
- Chill layers and check drip temperature for clean assembly.
Why this moist chocolate cake with strawberries is a keeper
C home bakers love this version because it keeps layers tender while letting roasted berries shine. The recipe combines targeted chemistry and a few smart tricks so every slice tastes balanced and lasts for days.
Rich chocolate flavor boosted by espresso powder
Espresso powder deepens the cocoa profile without turning the dessert into coffee. Using Dutch-processed cocoa powder pairs well with baking powder, while buttermilk acidity activates baking soda for a steady rise.
Fresh fruit brightness that doesn’t drown the base
Roasting strawberries concentrates flavor and reduces excess liquid, so the berries add brightness without sogging layers. A touch of vanilla extract bridges the fruit and chocolate aromatics.
- Neutral oil plus buttermilk and a spoon of yogurt keeps the crumb moist.
- Bring dairy and eggs to room temperature to trap air and improve structure.
- Whisk dry ingredients in a bowl so leaveners—baking powder and baking soda—distribute evenly.
- Let layers rest a few minutes on a rack before unmolding to protect delicate crumb.
“A little science goes a long way: fat, acid, and proper mixing give consistent, bakery-style results.”
Chocolate cake with strawberries
This straightforward two-layer version gives home bakers a pro-looking finish without extra height or fuss.
Start by preheating the oven to 350°F and readying two 8-inch pans. Whisk dry ingredients—flour, sugar, leaveners—in one bowl, and mix wet components in another. Bloom cocoa in very hot water, then combine to form a pourable cake batter.
What makes this recipe easy for home bakers
Simple workflow: keep dry and wet steps separate, weigh batter for even layers, and use a hand mixer or a whisk. Set tools and bowls aside so nothing slows you on bake day.
How this version compares to taller, bakery builds
The two-layer stack cuts assembly time and risk. Use a frosting dam, apply a crumb coat, then finish. Watch for spring-back and a mostly clean tester to avoid overbaking. Level a small dome only if needed and save trimmings for tasting.
Ingredient notes and substitutions
Choosing the right pantry items makes the difference between a tender, flavorful bake and a flat, dry one.
Cocoa choices and leavening
Dutch-processed cocoa is alkalized and pairs best with baking powder for neutral pH and deeper color. Natural cocoa stays acidic and needs baking soda to react and lift. The flavor and hue will shift depending on which you pick.
Acidity, leavener roles, and dairy
Buttermilk or sour cream adds tang and activates baking soda for an even crumb. That acidity also tenderizes the batter and improves rise.
Fats and moisture
Neutral oil locks in moisture, while a bit of butter or full-fat dairy adds richness and structure. Use oil for softer crumbs; use butter for flavor depth.
| Ingredient | Best use | Substitution | Note |
|---|---|---|---|
| cocoa powder | Dutch for color; natural for tang | Dutch ↔ natural (adjust leavener) | Choose by flavor and pH |
| baking powder / baking soda | Powder for neutral cocoa; soda for acidic mixes | Soda + buttermilk if needed | Balance acidity for proper rise |
| oil / butter | Oil for moist crumb; butter for richness | Swap sour cream for Greek yogurt | Use neutral oil to avoid off-flavors |
| eggs & dairy | Bring to room temperature | None | Improves emulsion and bake |
- Bloom cocoa in very hot water to release aroma and smooth the batter.
- Add a pinch of salt to sharpen flavors against sugar.
- Fresh strawberry works best for topping; frozen suits cooked fillings.
- Measure flour accurately to avoid a dense result.
Tools and prepping for success
Gathering the right gear before you start makes the whole bake smoother and faster. Lay out pans, tools, and measuring gear so each step moves without pause. A few minutes of prep saves time and stress later.
Pan prep and level baking
Line two 8-inch cake pans with parchment, or dust them with cocoa powder for clean edges and easy release. Soak bake-even strips in water and wrap them around pans to reduce doming and get uniform layers.
Mixer choices and small tools
A stand mixer speeds mixing and frosting; a hand mixer gives flexibility. Use a whisk when power isn’t needed. Keep a bowl, measuring cup, and scale ready. Pre-cut parchment rounds and set tools set aside so assembly moves quickly.
Double boiler for ganache
For ganache, place a heatproof bowl over gently simmering water. Add cream and chopped chocolate, and whisk until smooth. This gentle heat prevents scorching and gives a glossy finish.

| Tool | Why it helps | Tip |
|---|---|---|
| 8-inch cake pans | Even, stress-free release | Line with parchment; use bake-even strips |
| Stand or hand mixer | Faster mixing and consistent texture | Hand mixer for small kitchens; whisk in a pinch |
| Offset spatula & bench scraper | Smooth tops and straight sides | Use a turntable for easier finishing |
- Preheat the oven and stage a cooling rack.
- Measure liquids with a cup and use a scale to divide batter per layer.
- Plan a few extra minutes to prep so the recipe flows from mixing to baking to layering.
Make the chocolate cake layers
Plan and stage ingredients before you mix; it keeps the process calm and consistent.
Whisk dry ingredients and set aside
Whisk together flour, sugars, Dutch cocoa powder, baking powder, baking soda, espresso powder, and salt in a large bowl. This evens out leaveners and flavor so each pan bakes the same.
Combine wet ingredients
In a separate bowl, mix oil, buttermilk, Greek yogurt or sour cream, eggs, and vanilla extract until smooth. Use cups only for quick measuring, but weigh ingredients for best consistency.
Bloom the cocoa and finish the batter
Pour very hot water over the dry mix in the dry bowl and whisk to bloom the cocoa. That glossy base blends easily into the wet mix.
Add the wet mixture and stir just until a fluid cake batter forms. Avoid overmixing to keep a tender crumb.
Bake and cool completely
Divide batter evenly—about 515 g per pan—for uniform height. Bake in a preheated oven at 350°F for about 35–40 minutes. Look for gentle spring-back and slightly pulled edges.
Let layers rest 10 minutes in pans, then unmold to a rack and let cakes cool until they cool completely before frosting. Cooling fully preserves structure and prevents melting the frosting.
Strawberry filling two ways
Pick a filling that adds brightness without slipping or watering down layers.
Roasted fruit for concentrated flavor
Roasted strawberries are easy and intense. Toss berries in a bowl with a cup of sugar, a squeeze of lemon juice, and a pinch of salt.
Spread on a metal pan and roast at 375°F for 15–20 minutes, flipping once so berries cook evenly. Let the mixture cool, then chill before assembly so the filling stays put between layers.
Jam-style filling and shortcuts
For a jam-style layer, purée berries and simmer with sugar and a cornstarch slurry until glossy and thick. Cool 2–3 hours for a clean, sliceable layer.
Store-bought jam is a solid shortcut when time is tight. Use fresh strawberry on top and between layers for texture; save frozen fruit for cooked fillings only.
- Adjust lemon and sugar to balance the chocolate base.
- Use a piping dam to contain juicy filling and avoid slipping layers.
- Portion fillings sparingly—too much causes sliding during assembly.

Frosting options: ganache cream cheese or Swiss meringue buttercream
Choose a finishing frosting that balances richness and bright fruit notes for the best results.
Silky cream cheese frosting based on ganache
For a tangy, spreadable finish: gently melt chopped chocolate and a cup of heavy cream over a double boiler. Whisk until smooth.
Beat room temperature cream cheese and a splash of vanilla extract in a mixer. Fold the cooled ganache into the cream cheese, then sift in powdered sugar until the texture is thick and pudding-like.
Swiss meringue buttercream and drip technique
Heat egg whites and sugar over simmering water to 160°F, then whip to medium-stiff peaks. Add softened butter and vanilla, then stir in cooled melted chocolate.
For a drip, melt chocolate and cream, cool 15–20 minutes until fluid but not warm, and apply to a well-chilled cake for clean ribbons.
- Pro tip: room temperature dairy mixes smoothly and avoids lumps.
- Taste and tweak vanilla to balance the fruit and sugar.
Assembling the cake like a pro
Take a calm, steady approach to stacking and finishing so the final look matches the flavor.
Anchor the base and add the filling
Hold the base steady by placing a small frosting dollop on a cake board and seating the first layer on it. This simple anchor keeps the stack from shifting while you work.
Pipe a generous dam around the edge to contain roasted fruit or jam in the center. Spoon the strawberry filling into the ring, keeping the center level so the next layer sits flat.
Crumb coat, chill, and finish the outer layer
Apply a thin crumb coat to trap loose crumbs, then chill the whole assembly for about 15 minutes. A quick rest firms the layers and makes the final smoothing easier.
Use a turntable, spatula, and bench scraper to spread the final coat. Work in short passes for sharp or softly rounded edges and clean lines.
Drip technique and top decoration
Cool ganache until fluid but not warm—about 15–20 minutes—and test a small drip on the back of the pan before the edge. Work slowly to control length and spacing.
Let the drip set, then arrange fresh strawberries on the top for height and balance. Add simple buttercream swirls if you want extra accents, and keep tools clean between passes for a neat finish.
- Secure first layer: frosting dollop on the board.
- Contain filling: pipe a thick dam, then fill the center.
- Chill: crumb coat, then refrigerate ~15 minutes.
- Test drip: try one drip before completing the edge.
Pro tips for bakery-quality results
Simple habits in weighing, chilling, and timing make the biggest difference in final texture and finish.
Use a kitchen scale for accuracy
Weighing ingredients yields repeatable rises and even crumb. Measure cocoa and flour by grams to avoid a dense batter. Weigh eggs and liquids when possible so each bake matches the last.
Freeze layers briefly to reduce crumbs
Let cakes cool, then wrap each layer and freeze for at least an hour. Chilled cake layers lock in crumbs and make frosting smoother and faster.
Check chocolate drip temperature before applying
Cool melted chocolate about 15–20 minutes so it forms fluid ribbons. Apply the drip to a chilled top edge. If the chocolate slides, it’s too warm; if it clumps, it’s too cool. Test one drip first and adjust by a few degrees.
- Use minutes as guidance, but watch texture and temperature in real time.
- Keep a warmed scraper on hand to smooth final coats cleanly.
- Add a pinch of espresso powder to deepen flavor without overt coffee notes.
| Tip | Why it helps | Quick action |
|---|---|---|
| Weigh ingredients | Consistent rise and texture | Use a digital scale |
| Freeze wrapped layers | Fewer crumbs while frosting | Freeze 60+ minutes |
| Test drip | Controlled ribbons and clean edges | Cool 15–20 minutes; test one drip |
Before serving, bring the finished cake to room temperature for about 30 minutes so crumb and frosting show their best.
Make-ahead, storage, and freezing
Divide the work over two sessions to keep stress low and results consistent.
Day-by-day timeline for less stress
Day 1: Bake the cake layers and prepare the strawberry filling. Let pans rest, then cool completely before wrapping. Chill the layers and filling overnight so they set.
Day 2: Make the frosting, assemble, and decorate. Adding fresh strawberries on the serving day preserves look and flavor.
Refrigeration and serving at room temperature
Store the assembled dessert in the refrigerator, covered, up to 5 days. Remove about 30 minutes before serving so the crumb and chocolate aroma bloom at room temperature.
Keep the cake level and supported in the fridge to protect decorations and drip edges.
Freezing slices and thawing for best texture
Portion and wrap slices tightly in plastic, then foil. Freeze up to 3 months. Thaw wrapped in the fridge overnight or at room temperature for 1–2 hours before serving.
“Label dates on wrapped layers—small steps make big differences in flavor management.”
| Step | Where | Why |
|---|---|---|
| Bake & chill | Day 1 | Prevents condensation; keeps layers stable |
| Assemble & refrigerate | Day 2 | Frostings set and decorate hold |
| Freeze slices | Wrapped tight | Preserves texture up to 3 months |
Pro tip: make frostings like Swiss meringue buttercream the day you finish the recipe for best texture and flavor. Use a labeled sticker and date for every wrapped layer or slice.
Conclusion
Make this one when you want bakery-style texture at home—accurate weights, chill time, and a tested drip deliver consistent results every time.
The method pairs an espresso-enhanced cocoa base and a vivid strawberry filling with your choice of ganache-cream cheese or Swiss meringue for a silky chocolate finish on top. Key ingredients—cocoa powder, measured flour and sugar, a pinch of salt, and the right soda/leavener balance—keep the crumb tender.
Use a crumb coat, chill layers, and check drip temperature. Store the assembled dessert refrigerated up to five days; freeze wrapped slices up to three months. Bake it once, then make this chocolate cake your signature for birthdays, holidays, and everyday wins.