Classic Chocolate Cake Recipe: Easy to Make & Delicious
Surprising fact: Home bakers who try a one-bowl recipe report a 40% higher success rate on first bake than with multi-step formulas. That matters when you want reliable results.
This Website contains affiliate links. That means I may earn a small commission if you purchase through my links, at no extra cost to you.
This classic dessert balances ease and deep flavor. It uses natural cocoa and a pinch of espresso powder to amplify taste without a coffee note. Hot coffee or boiling water blooms the cocoa, so the batter turns thin by design and bakes into a moist crumb.
Built for beginners: Mix in one bowl, line two 9-inch pans with parchment, and bake at 350°F for roughly 23–35 minutes until a toothpick comes out clean. Buttermilk keeps the crumb tender; sour cream gives extra structure if you prefer.
Simple tools and pantry ingredients—a whisk, a bowl, and standard pans—are all you need. Layers cool fast and frost easily, making this recipe flexible for rounds, sheets, or cupcakes.
Key Takeaways
- One-bowl method saves time and cuts dishes while keeping great texture.
- Natural cocoa + espresso powder deepens flavor; hot water blooms cocoa.
- Bakes in two 9-inch pans at 350°F for about half an hour; check with a toothpick.
- Buttermilk or sour cream provide moist, tender crumb and good rise.
- Easy to adapt: sheet, cupcakes, or three-layer celebration versions work well.
Meet your new go-to chocolate cake
A reliable, everyday layer that bakes moist, slices tender, and forgives small mistakes. This recipe uses a one-bowl method to keep things simple while still delivering a bakery-style texture.
Why it works: Combine dry ingredients and wet ingredients separately, then bring them together before adding hot water or coffee. The hot liquid blooms cocoa and deepens flavor while creating a thin batter that bakes into a soft, velvety crumb.
Oil is preferred over butter because cocoa can dry a crumb. Oil keeps the slice supple and helps it stay moist for days. Buttermilk’s acidity reacts with baking soda and baking powder to lift the batter and produce a fine, tender crumb.
“A thin batter is normal — resist adding flour; it makes the difference between chewy and tender.”
Use room temperature eggs and milk so the batter emulsifies and rises evenly. Line pans with parchment for even layers and easy release. Keep oven temperature accurate and follow steps for a stress-free, impressive result.
chocolate cake: ingredients & why they work
Every item on the ingredient list has a job — from lift to moisture to flavor boost. Below we explain the function of key components so you bake predictably and get a tender, flavorful result.
Cocoa powder, espresso powder, and hot liquid for deeper flavor
Natural cocoa powder pairs best with baking soda to help leaven and to produce the slight reddish hue of a classic Devil’s Food. Espresso powder acts as a flavor amplifier—use a teaspoon to boost depth without adding coffee taste.
Hot coffee or boiling water blooms the powder and dissolves lumps for a glossy, bold batter.
Flour, baking soda, baking powder, and salt for structure and lift
Flour gives the framework. Baking soda and a touch of baking powder create rise and tenderness. Salt balances sweetness—use Diamond Crystal kosher, or cut the amount if using Morton’s or table salt.
Oil, eggs, buttermilk (or sour cream), and vanilla for moisture
Vegetable oil prevents the dry crumb that cocoa can cause. Eggs add structure and richness. Buttermilk’s acidity aids leavening; swap in full‑fat sour cream for a slightly sturdier crumb.
Vanilla rounds out flavor. Use room temperature dairy and eggs so the batter emulsifies and bakes evenly.
Sugar balance: sweetness, crumb, and browning
Sugar controls sweetness and moisture retention. It also promotes browning and a tender crumb, so don’t undercut the measure when following this chocolate cake recipe.
Tools & pans you’ll need
Start with the basics: the right pans and a roomy bowl set the stage for even layers and stress-free baking. Assemble what you need before you measure so the process flows.
Two 9-inch cake pans, parchment, and a large bowl
Grease two 9-inch round pans and line them with parchment circles for flawless release. This helps the cake layers lift cleanly and keeps edges intact.
Note: Thin batter can leak from springform pans. If that’s your only pan, butter the seam and place a catch tray on a lower oven rack to collect drips without blocking heat.
- Use a large bowl and a sturdy whisk for the one-bowl method; a stand mixer is optional.
- A lightweight scale improves accuracy, though spoon-and-level works for flour to avoid compacting powder.
- Place both pans on the center rack for even oven exposure and rise; if they don’t fit, stagger and rotate midway.
- Have a cooling rack ready so layers cool quickly before frosting to prevent soggy bottoms.
Extra tips: Parchment also protects bottoms if you freeze layers for make-ahead convenience. A long serrated knife or cake leveler makes flat tops easy before stacking.
| Tool | Purpose | Quick tip |
|---|---|---|
| Two 9-inch pans | Even layers and uniform bake | Line with parchment rounds for clean release |
| Large bowl & whisk | One-bowl mixing for this recipe | Whisk by hand or use a mixer if preferred |
| Cooling rack | Rapid, even cooling of cake layers | Cool fully before frosting to avoid condensation |
| Scale / serrated knife | Accurate measures and level tops | Scale for precision; knife for neat stacking |
Step-by-step: make the batter, bake, and cool
With one bowl and a warm cup of liquid, you’ll transform dry ingredients into a silky batter ready to bake.
Prep and whisk
Preheat the oven to 350°F and grease and line two 9-inch pans for easy release. In a large bowl, whisk flour, cocoa, sugar, baking soda, baking powder, salt, and espresso so the dry ingredients are even.
Combine wet ingredients
Whisk oil, eggs, and vanilla until smooth. Stir in buttermilk, then pour the wet mix into the dry and whisk just until combined to avoid overworking the cake batter.

Hot liquid, thin batter, and bake minutes
Add 1 cup hot coffee or boiling water and whisk until the batter is glossy and thin. This texture is normal and helps produce a moist chocolate cake.
- Divide batter evenly between pans and tap to release air bubbles.
- Bake about 23–35 minutes; start checking at the earlier time. Bake minutes vary by pan and oven calibration.
- A toothpick inserted in the center comes clean when done and the center springs back lightly.
Cool layers in the pan for 10 minutes, then invert onto a rack to cool completely before frosting. For extra convenience, wrapped cooled layers keep for time-saving make-ahead use.
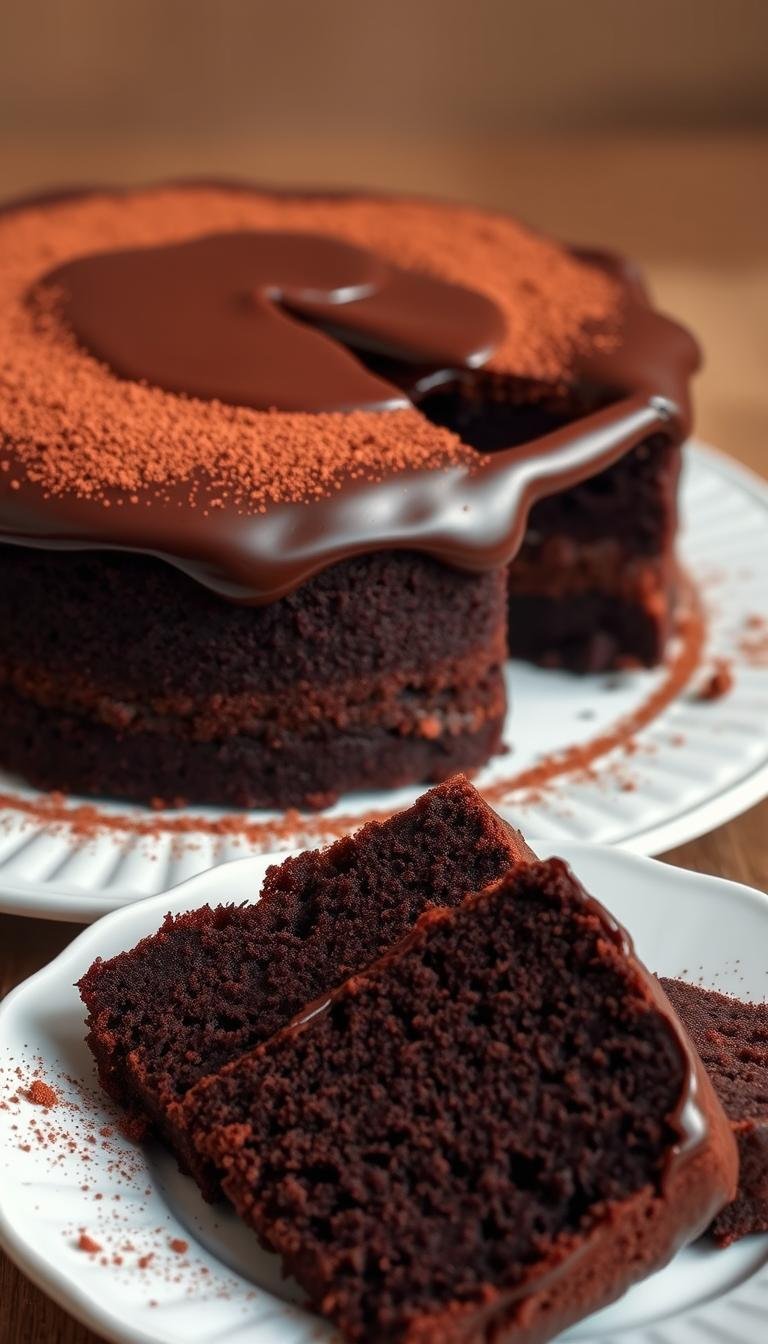
Chocolate buttercream frosting and finishing touches
The right frosting turns a good layer into a showstopper while staying simple to make. For a classic buttercream, beat room-temperature unsalted butter until creamy. Add sifted confectioners’ sugar and unsweetened cocoa powder, then pour in 3–5 tablespoons heavy cream or milk, a splash of vanilla, and a pinch of salt.
Adjust texture by adding more sugar or cocoa if the frosting is too loose. If it’s too stiff, whisk in a tablespoon of cream at a time until soft enough to spread. Beat just until smooth to avoid extra air that makes bubbles on the surface.
Crumb coat and finishing tips
Apply a thin crumb coat to trap crumbs, then chill 30–60 minutes to set. Use an offset spatula and a bench scraper for clean sides. A turntable speeds up even strokes and a neat finish.
- Either natural or Dutch-process cocoa powder works well—no leavening needed in frosting.
- Press chocolate chips around the base for extra texture and visual appeal.
- Refrigerate assembled layers; bring to room temperature before serving for best spreadability.
“Taste and tweak the salt to balance bitterness and sweetness for a harmonious frosting.”
Variations, swaps, and pan options
Small changes make this recipe fit diets and formats. Use these swaps to tailor texture, rise, and shape without losing the moist crumb.

Gluten-free, dairy-free, and egg-free paths
For gluten-free baking, replace all-purpose flour with a trusted 1:1 blend. The blend keeps rise and crumb close to the original.
Go dairy-free by using almond, oat, or coconut milk. Make nondairy “buttermilk” with milk plus a splash of vinegar or lemon for a similar tang.
To omit eggs, use 2/3 cup unsweetened applesauce or a commercial egg replacer. Expect to add a few extra minutes to bake time.
Oil and fat swaps
Vegetable oil and canola maintain moisture. Melted coconut oil works too and adds mild flavor. Melted butter changes crumb and gives a richer finish.
Pan conversions and layer options
Three 8- or 9-inch layers bake ~22–25 minutes. A 9×13 sheet needs about 35–40 minutes. Bundt pans take near 50 minutes.
This batter makes 2–3 dozen cupcakes; test for a spring-back top and a clean tester.
| Format | Bake time | Note |
|---|---|---|
| Three layers | 22–25 minutes | Even layers; check early |
| 9×13 sheet | 35–40 minutes | Cool fully before frosting |
| Bundt | ~50 minutes | Holds heat longer |
Sour cream option
For a slightly sturdier crumb, cut buttermilk and hot liquid to 1/2 cup each and add 3/4 cup full‑fat sour cream.
Tip: Use room temperature ingredients for reliable emulsions and consistent results across all swaps and pans.
Pro tips, baking science, and troubleshooting
Precise temperatures and steady technique are the baker’s best tools for consistent results. Use an oven thermometer to confirm your oven reads 350°F; uneven heat causes domes, sinking, or dense crumbs.
Room temperature ingredients & oven accuracy
Bring eggs and dairy to room temperature so the batter emulsifies and rises evenly. Cold ingredients slow mixing and can yield a tight crumb.
Natural vs Dutch-process cocoa and flavor bloom
Natural cocoa works with baking soda to boost lift and a reddish hue. Dutch-process may need recipe tweaks because it lacks acidity. Add a touch of espresso powder and hot water to bloom cocoa’s aroma for deeper flavor.
High altitude, thin batter, and pan tips
At altitude, reduce leaveners, cut sugar slightly, and watch bake time closely. Thin batters can leak from springforms—seal seams with butter and set a catch tray on a lower rack.
Doneness and common fixes
A toothpick comes out clean, the center springs back, and edges pull slightly from the pan. If centers sink, check oven temperature, avoid overmixing, and allow full bake time without early door openings.
| Issue | Cause | Quick fix |
|---|---|---|
| Domed top | Too-high temperature | Use oven thermometer; lower temperature 10–15°F |
| Sinking center | Undercooked or overmixed | Extend bake time; mix gently |
| Dry edges | Overbaking | Line pans with parchment; check earlier |
| Weak rise | Wrong cocoa type or leaveners | Match cocoa to soda/powder and measure precisely |
Conclusion
A straightforward recipe turns pantry staples into tender, deeply flavored layers. The one-bowl method, a thin glossy batter, and clear bake minutes make this chocolate cake easy for weeknights or celebrations.
Key wins: natural cocoa powder with baking soda helps lift and color, while buttermilk keeps the crumb soft. A teaspoon of espresso powder plus hot water blooms real depth without coffee notes.
Make buttercream ahead and adjust with extra powder or a splash of cream. Cool layers, wrap well, and freeze for later. Thaw in the fridge before assembling for best texture.
Use accurate oven temperature, room temperature ingredients, and gentle mixing. Trust the toothpick test, pick a pan format that fits your time, and make this chocolate cake today—share generous slices topped with buttercream.