Classic Chicken Wings Recipe: A Delicious Guide
Fact: Studies show a simple swap—using aluminum-free baking powder—can be the difference between bland skin and a deeply browned, crisp finish.
This Website contains affiliate links. That means I may earn a small commission if you purchase through my links, at no extra cost to you.
This guide shows how to get reliably crisp, juicy pieces in your oven or air fryer with clear steps anyone can follow.
Start by drying the skin well, ideally on a rack in the fridge to dehydrate. Bake at 425°F on a wire rack over a parchment-lined sheet for 40–50 minutes, flipping halfway, or air fry at 400°F for a brief, high-heat blast.
Why it works: aluminum-free baking powder avoids bitter notes and helps the surface brown without frying. Tossing in melted garlic butter at the end boosts flavor without sogginess.
Key Takeaways
- Use aluminum-free baking powder for better color and crispness.
- Dry skin on a rack in the fridge for the best texture.
- Bake at 425°F for 40–50 minutes; air fry as a faster alternative.
- Toss with garlic butter and finish with chives or parmesan.
- Creole-style seasoning and light brown sugar add depth without excess sweetness.
Why This Crispy Baked Wings Method Works
Crisp results come from managing moisture, heat, and fat so the skin can brown instead of steam.
Aluminum-free baking powder slightly dehydrates the surface and creates tiny bubbles that speed browning. Drying pieces on a rack in the fridge prevents steam and helps seasoning stick to the skin.
High, steady heat in the oven—preheated to oven 425—renders fat quickly. Placing items on a wire rack over a sheet pan lets rendered fat drip away and air circulate for even crisping.
Keep spacing so trays don’t crowd; pooled fat and trapped steam slow caramelization and add sogginess. Finish with a light toss of melted butter or garlic butter to add gloss and flavor without softening the crust.
- Dry skin first so seasoning forms a lasting crust.
- Maintain space and rack use for consistent fat drainage.
- The method scales for larger batches and other baked chicken pieces with small time adjustments.
Ingredients for the Best Baked Chicken Wings
Gather simple pantry items and a small technique tweak to lock in crunch and flavor.
Break down whole wings into drums and flats, and save the tips for homemade stock. Party-cut pieces give even cooking and a nicer presentation.
Pat pieces very dry. For best results, place on a wire rack over a sheet pan and air-dry in the fridge, uncovered, for several hours or overnight. This step boosts crispness and helps the seasoning adhere.
Dry-rub essentials
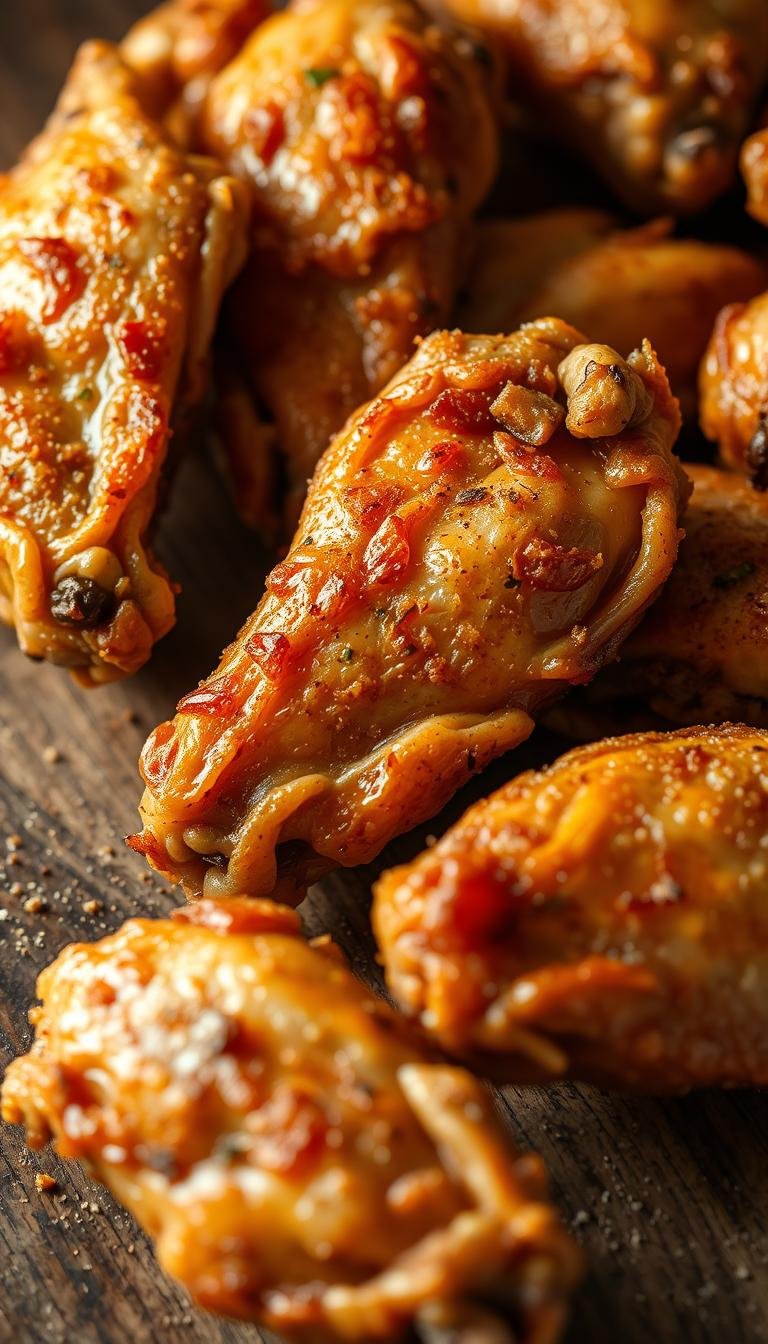
Combine kosher salt, freshly ground black pepper, garlic powder, onion powder, smoked paprika, and a pinch of cayenne. A teaspoon of brown sugar can help caramelize the surface—use it sparingly to avoid sweetness.
The garlic butter finish
Melt butter with minced fresh garlic, then toss just before serving. Finish with chopped chives or parsley for color and brightness. If you prefer a lighter finish, use a neutral oil instead of butter—oil stays cleaner at high heat.
Smart substitutions and notes
Use aluminum-free baking powder in the dry rub to promote crisp skin; do not swap in baking soda. Swap regular paprika for smoked paprika for a deeper, BBQ-like note, or add dried thyme and oregano for a Creole-leaning profile.
“Measure seasonings in a bowl before applying so every wing is evenly seasoned.”
- Measure seasonings in a bowl to coat uniformly.
- Adjust cayenne to match your heat tolerance.
- Keep black pepper freshly ground for brighter flavor.
Oven-Baked Chicken Wings: Step-by-Step
Get your oven and tools ready so each step flows smoothly and you hit the ideal crisping time.
Preheat and prep
Preheat oven to 425°F. Line a sheet pan with parchment and set a lightly greased wire rack on top. This setup encourages airflow and keeps fat away from the skin for even browning.
Dry and season
Pat pieces dry with paper towels, and if you have time, air-dry on a rack in the fridge. Dry skin speeds browning and helps seasoning stick.
In a large bowl, toss wings with aluminum-free baking powder and your dry seasoning blend so it adheres evenly.
Bake, baste, finish
Place wings in a single layer on the rack and bake 20 minutes. Flip and bake another 20–25 minutes until crisp and 165°F internal temp.
For Creole-style, baste with tray juices at ~30 and 40 minutes to deepen color. If pan juices look watery, remove wings and reduce liquid in the hot oven 3–5 minutes, then baste and return.
For extra snap, broil 1–2 minutes at the end, watching closely. Finish by tossing with warm garlic butter so it clings without softening the crust. Let rest a few minutes before serving.
Air Fryer Wings: Faster, Ultra-Crisp Alternative
An air fryer cuts cooking time and ups the crunch with intense circulating heat. This method gives a fast, reliable finish and works well when you need crisp results without deep frying.
Time and temp: Preheat if your model recommends it and lightly grease the basket with a neutral oil to prevent sticking. Place wings in a single layer so hot air circulates; cook in batches if needed.
Set the fryer to 400°F. Cook for 10 minutes, flip once, then continue for 6–8 more minutes until the thickest part reaches 165°F. Watch the minutes during the second half — small pieces finish sooner, larger pieces need the full window.
Let rest 4–5 minutes so juices settle and the crust stays intact. Immediately toss wings with warm garlic butter to coat without softening the exterior, then finish with chopped chives or a light dusting of grated parmesan.
- Tip: Seasoning is more concentrated when air frying — ensure even coverage before cooking.
- For reheating, an air fryer at 390–400°F crisps leftovers quickly without drying out.
The Science of Crispy Skin
Understanding how moisture, heat, and surface chemistry interact is key to a reliably crisp finish. This short science primer explains why small technique choices make a big difference.
Why aluminum-free baking powder beats baking soda
Aluminum-free baking powder gently draws moisture from the skin and creates tiny micro-bubbles that speed browning. That reaction forms a thin, shatteringly crisp surface without the bitter, metallic notes some baking soda or aluminum-containing powders can leave.
Butter vs oil: browning, moisture, and flavor
Butter adds depth because milk solids brown, producing richer color and savory notes. A neutral oil gives a cleaner flavor and prevents sticking, but it usually browns less intensely.
Use butter for finish gloss and flavor; use oil when you want a lighter profile or higher smoke tolerance.
Don’t crowd the pan: spacing for evaporation and crispiness
Give each piece breathing room on a wire rack so evaporating moisture escapes. Crowded trays trap steam, produce watery pan juices, and slow caramelization.
A rack also lets rendered fat drip away so the underside crisps instead of steaming in pooled fat. For the best finish, finish with a short broil to intensify surface browning—watch closely to avoid burning.
- Tip: Even seasoning distribution helps salt draw a little moisture early, promoting an even crust.
- High, steady heat promotes fast evaporation and crisping without overcooking the meat.
Flavor Boosters, Sauces, and Variations
Layering spice and a finishing sauce makes every bite pop without masking the crust.
Build a Creole/Cajun seasoning with paprika, thyme, oregano, garlic and onion powders, cayenne, salt, and a touch of brown sugar. Smoked paprika adds depth; hot paprika can replace cayenne if you prefer a single spice swap.
For sauced finishes, warm butter-forward sauce clings best to crisp skin. Balance heat with a little sugar or honey so the sauce brightens rather than overpowers.

Finishes and heat control
- Toss in garlic butter and top with fresh chives or grated parmesan for a savory finish.
- Buffalo fans: mix hot sauce with melted butter and toss hot wings just before serving.
- Adjust heat with cayenne, chipotle powder, or crushed red pepper to suit the table.
| Finish | Profile | Best use |
|---|---|---|
| Garlic butter | Rich, savory | Hot from oven; herbs and parmesan |
| Buffalo sauce | Tangy, spicy | Toss before serving to keep crust |
| Smoky sugar rub | Sweet-savory, caramelized | Great for baked chicken and cauliflower |
Apply the same seasoning to drumsticks, thighs, or cauliflower. For breast, pan-fry seasoned cutlets and finish with garlic butter to keep them juicy.
Storage, Reheating, and Make-Ahead
Plan storage and reheating so your next meal stays crisp and safe to eat.
Refrigerate and freeze: Cool pieces completely before packing. Transfer cooled portions to an airtight container and refrigerate for 3–4 days. For longer storage, freeze up to 3 months and label with the date.
Reheat for crisp: Preheat oven to 350°F and place items on a greased wire rack over a sheet. Reheat for 12–17 minutes, flipping once halfway, until hot through. In an air fryer, set 390–400°F for 7–8 minutes, flip once, and watch the minutes closely.
After reheating, toss briefly with a little warm garlic butter to restore gloss. Avoid microwaving as a primary method; if used, follow with a short oven or air-fryer blast to re-crisp the crust.
Make-ahead prep: For faster cooking later, dry raw pieces on a rack in the fridge, uncovered, up to 8 hours. Then season and seal, or cook straight away. This saves time and improves browning when baking or frying.
- Cool fully, then store in a sealed container.
- Label packages with date to track freshness and avoid forgotten leftovers.
- Always reheat to at least 165°F for safety.
Chicken wings recipe: Time, temperature, and seasoning at a glance
A compact guide helps you hit the right time and temperature without guessing. Keep this reference near your prep station so you can check temps, minutes, and seasoning at a glance.
Quick reference
Oven: 425°F on a wire rack over a sheet pan — about 40–50 minutes, flip once halfway. Baste late for deeper color or finish with a short broil.
Air fryer: 400°F — 10 minutes, flip, then 6–8 more minutes. Rest briefly so the crust sets and juices redistribute.
Seasoning and finish
Dry rub: kosher salt, garlic powder, onion powder, smoked paprika, black pepper, and a small amount of aluminum-free baking powder to boost browning.
Finish: Toss hot pieces with melted butter and minced garlic for shine and depth. Garnish with chives or grated parmesan if desired.

| Method | Temp | Time (minutes) | Key notes |
|---|---|---|---|
| Oven (rack) | 425°F | 40–50 | Flip once; baste late for color; target 165°F internal |
| Air fryer | 400°F | 10 + 6–8 | Single layer, rest 4–5 minutes to set crust |
| Reheat (oven) | 350°F | 12–17 | On a rack, flip once; restores crisp without drying |
| Reheat (air fryer) | 390–400°F | 7–8 | Quick blast to re-crisp; watch closely |
- Use a teaspoon to measure spices so ratios stay consistent when scaling.
- Space pieces to allow evaporation; crowded trays trap steam and slow browning.
- Aluminum-free baking powder in the rub promotes extra crunch without off-flavors.
- Remember wings oven best practices: dry well, season evenly, and cook hot with airflow.
Conclusion
A dependable finish comes from a few repeatable habits more than from one secret ingredient. Dry pieces well, use a bit of aluminum-free baking powder in the rub, and preheat oven hot so the skin browns fast.
Place items on a wire rack with room to breathe and let heat do the work for the right minutes. For a quicker path, use an air fryer at 400°F and flip once.
Toss hot pieces with warm garlic butter or your favorite sauce so flavor clings without softening the crust. Balance salt, pepper, and a touch of sugar to taste.
Store leftovers in an airtight container for 3–4 days or freeze up to 3 months. Re-crisp at 350°F in the oven or 390–400°F in the air fryer.
With these steps you can repeat a simple, crowd-pleasing chicken and wings approach that yields reliably crispy baked results every time.