Chocolate Birthday Cake Ideas: Recipes for a Sweet Celebration
Surprising fact: over 60% of top home bakers rely on a simple one-bowl method to bake rich, moist layers that wow guests every time.
This Website contains affiliate links. That means I may earn a small commission if you purchase through my links, at no extra cost to you.
This guide gathers reliable recipes you can bake tonight. You’ll find straightforward techniques, from mixing dry ingredients like flour and sugar to adding oil, eggs, and a hot liquid that makes a thin, tender batter.
We explain why a splash of hot coffee or espresso powder blooms the cocoa and deepens flavor, and how baking two 9-inch pans at 350ºF for about 30–35 minutes gives even, level layers.
Practical tips cover tools, room temperature ingredients, and simple frosting paths—silky buttercream or cream cheese ganache—that balance sweetness and texture.
Key Takeaways
- One-bowl methods cut prep time and deliver moist, tender layers.
- Hot coffee or espresso powder intensifies cocoa without extra sugar.
- Use room temperature ingredients for smooth batter and even rise.
- Freeze well-wrapped layers to keep moisture; brush with syrup if needed.
- Choose between buttercream or cream cheese ganache for reliable frostings.
Why Chocolate Birthday Cake Never Fails
Adding hot liquid and espresso powder to the batter is an old-school trick that intensifies cocoa and helps smooth lumps. This method lets the cocoa bloom so the flavor reads deeper, not like a mocha.
One-bowl recipes keep prep simple. Mixing dry and wet ingredients in a single bowl cuts cleanup and produces a thin batter that bakes up moist in about 30–35 minutes at 350ºF in standard pans.
Using buttermilk, sour cream, and oil gives a tender crumb that stays soft after cooling. Room temperature eggs and vanilla help the batter come together evenly and hold structure between layers.
- Classic flavor is familiar and crowd-pleasing for guests of any age.
- A touch of espresso powder or hot coffee deepens the profile without overt coffee taste.
- Pairs well with many frostings—buttercream, cream cheese, or ganache—for flexible finishes.
“A dependable one-bowl approach gives consistent results and predictable time for the rest of your party prep.”
Chocolate Birthday Cake Ideas
Pick a versatile one-bowl batter and you can make layered rounds, a tray cake for a crowd, or neat cupcakes without extra fuss.
Classic one-bowl layers with chocolate buttercream
Whisk dry and wet ingredients in a single bowl, then divide the batter between two 9-inch pans and bake 30–35 minutes at 350ºF. Let layers cool before stacking and finish with a fluffy buttercream for a clean, party-ready centerpiece.
Ultra-moist layers brushed with chocolate syrup
Make a quick syrup from cocoa, sugar, and water. Brush cooled layers to add moisture and boost flavor. A touch of espresso powder in the batter brings out deeper notes even without brewed coffee.
Fudgy sheet cake and cupcake spin
For transport, bake a fudgy sheet in a rimmed half-sheet or 9×13 pan and frost in the pan. The same batter also works for cupcakes—use a spouted measuring cup to pour the thin batter evenly into liners.
- Tip: Freeze wrapped layers ahead and assemble the day of.
- Serve: Mix a layer cake with a tray of cupcakes for easy portioning.
Ingredients that Make a Difference
The right pantry choices shape both flavor and texture in every successful layer. Focused ingredients steer color, lift, and crumb while keeping the process simple.
Unsweetened cocoa vs. Dutch-process
Natural unsweetened cocoa gives a slightly bitter, reddish crumb and works well with higher baking soda. Dutch-process delivers a darker hue and smoother flavor that pairs better with baking powder.
Buttermilk, sour cream, and oil for moist texture
Use buttermilk and sour cream for acidity and richness. Combine them with neutral oil to keep the crumb tender and moist for days.
Espresso powder and hot coffee for deeper flavor
A teaspoon of espresso powder amplifies flavor without making the batter taste like coffee. Bloom cocoa with hot coffee or boiling water to dissolve powder and intensify the profile.
Flour, leavening, and seasoning balance
All-purpose flour is forgiving—measure cups carefully and avoid overmixing. Balance baking soda and baking powder so layers rise evenly.
Best chocolate for frosting and ganache
Pick the best chocolate you like to eat—dark or semi-sweet. Melt with heavy cream to make ganache, or fold into buttercream to cut sweetness while adding depth and smooth texture.
“A small change in ingredients often has the biggest impact on final results.”
Tools and Prep: From Cake Pans to Stand Mixer
Good prep and the right pans set you up for even layers and tidy assembly. Take a few minutes to gather tools, check oven temperature, and bring dairy and eggs to the proper warmth before you mix.
Preparing 8-inch and 9-inch pans
Grease two 9-inch pans (or three 8-inch) and dust with flour, or use a chocolate goop pan release. Add parchment rounds after greasing to guarantee clean release and intact layers that are easy to stack and fill.
Stand mixer vs. large bowl and whisk
A stand mixer fitted with a paddle attachment speeds up mixing for busy bakers. But a large bowl and a whisk work fine—many one-bowl recipes were designed without heavy equipment.
Room temperature ingredients for a smooth batter
Bring eggs, milk, buttermilk, sour cream, and butter to room temperature so they emulsify quickly. Cold dairy can curdle the batter and waste time while you overmix.
- Prep tips: Use a kitchen scale for flour and cocoa, tap filled pans to remove big bubbles, and preheat until oven temperature is stable.
Step-by-Step: Mixing the Chocolate Cake Batter
Begin with precise measuring and a quick whisk of dry pantry staples to make a consistent base for the batter.
Whisk flour, sugar, cocoa powder, baking powder, baking soda, salt, and a touch of espresso powder in a large bowl or in the stand mixer bowl fitted with the paddle attachment. This spreads leaveners and powder so no pockets remain.
In a separate bowl, combine milk or buttermilk, oil, eggs, and vanilla. Whisk until smooth, then add the wet mix to the dry and stir just until combined to avoid tough crumb.
Slowly pour very hot coffee or boiling water into the mix while stirring. The cake batter will become very thin—that is correct and yields a moist, tender crumb after baking.
Divide the batter evenly by weight into prepared pans. Use a spouted cup or pitcher to pour the thin batter cleanly, tap pans to pop large bubbles, and bake about 30–35 minutes without opening the oven early.
| Step | Tool | Result |
|---|---|---|
| Whisk dry ingredients | Large bowl / stand mixer bowl | Even distribution of powder and leaveners |
| Blend wet ingredients | Small bowl or measuring cup | Smooth liquid mix, ready to combine |
| Add hot coffee or water | Spoon or pourer | Thin batter that blooms cocoa for moist crumb |
| Divide batter evenly | Spouted cup, scale | Matched layers, bakes in 30–35 minutes |
Baking, Cooling, and Layering Like a Pro
A few simple temperature and time checks will keep your layers tender and ready for frosting. Start by preheating to a steady 350ºF and plan to test around the 30-minute mark. Look for edges pulling slightly from the pan and a springy center that bounces back.

Time and temperature cues for doneness
Bake at 350ºF for 30–35 minutes until a tester comes out clean. Use the tester early rather than late to avoid overbaking and dry crumbs.
Cooling, de-panning, and keeping layers moist
Cool layers in the pan for 10–15 minutes to set their structure. Then turn them out onto racks so bottoms stay crisp and cooling speeds up.
Trim small domes with a long serrated knife for even stacking. Handle each layer gently—use cardboard rounds or wide spatulas to avoid cracking the crumb.
Optional syrup soak for extra richness
If you want added moisture, make a quick syrup by simmering cocoa, sugar, and water. Cool the syrup and brush onto completely cooled layers so absorption is even and not gummy.
- Allow a few minutes after brushing for the syrup to soak in; the layer will feel plush.
- Stack with a thin frosting dam if using soft fillings, and chill after a crumb coat for a clean finish.
- If baking ahead, cool fully before wrapping and freezing to preserve texture and flavor.
“Test early, cool correctly, and small touches like a syrup soak can turn good layers into great cakes.”
Frosting and Fillings: From Buttercream to Ganache
Finish your layers with a frosting that balances richness and spreadability for a polished presentation. A thoughtful filling adds structure and flavor between layers while a smooth outer coat makes the whole dessert look intentional and neat.
Silky buttercream enriched with ganache
Make a balanced buttercream by whipping softened butter with sifted powdered sugar and cocoa. Fold in cooled ganache—made by melting dark or semi-sweet chocolate with warm heavy cream—to cut sweetness and add silkiness.
Finish with a splash of vanilla and, if you like, a teaspoon of coffee to lift the flavor. Use a stand mixer to beat until light and smooth.
Chocolate cream cheese for tangy contrast
For a tangy finish, beat room-temperature cream cheese with butter, then add cocoa, powdered sugar, and melted chocolate. This frosting gives a bright counterpoint to rich layers and spreads easily without sliding.
Smoothing sides, sharp edges, and the spiral effect
Apply a thin crumb coat first and chill briefly. Use a bench scraper against a rotating turntable to smooth sides, then sharpen the top edge with an offset spatula.
“Hold a small offset spatula at the base and spin the turntable for a neat upward spiral; repeat on top from edge to center.”
- Adjust texture: add 1 tbsp cream to loosen, or a spoonful of cocoa/powdered sugar to thicken.
- Choose the best chocolate you love to eat for ganache—dark or semi-sweet both work.
- Use the crumb coat method for a clean final coat and professional look.
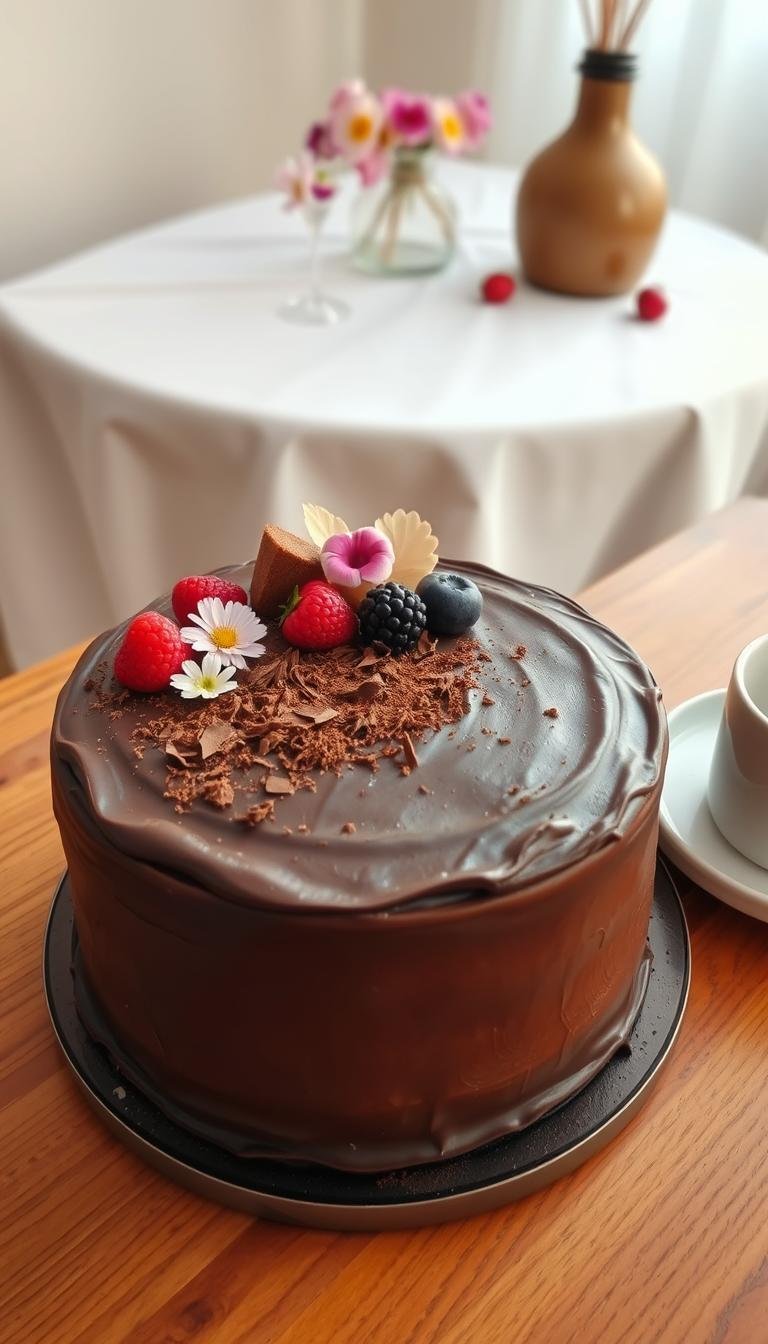
Decorating for Birthdays
A smooth final coat and a few well-placed accents create a polished presentation fast.
After smoothing, use a small offset spatula to make a spiral finish by rotating the turntable while pulling the spatula toward the center. Top the surface with rainbow sprinkles while the frosting is still soft so they adhere cleanly.

Simple tips that save time
Use a closed star tip like Ateco 847 for quick rosettes or a shell border. It gives instant polish with minimal piping skill.
For sharp edges, lightly overfill the top, smooth the sides, then sweep excess inward across the top edge in short strokes. If the kitchen is warm, chill the decorated dessert briefly before adding delicate accents.
- Sprinkle generously while frosting is soft so sprinkles stick and don’t slide.
- Create the spiral top by spinning and pulling the offset spatula toward center.
- Finish at the venue if you must transport, or use a tall box to protect piped edges.
| Finish | Best for | Why it works |
|---|---|---|
| Smooth buttercream | Layered desserts | Clean look, easy to spiral and frost |
| Spiral top | Quick focal finish | Fast, professional with one spatula motion |
| Sprinkle halo | Festive tables | High color impact with little time |
Keep designs simple: a smooth coat, spiral top, and a sprinkle halo read festive without hours of piping.
Make-Ahead, Storage, and Freezer Tips
A little planning around freezing and thawing saves time and preserves texture. Bake layers, cool completely, then wrap each layer tightly in plastic and a layer of foil. Label with the date so you track storage time easily.
Freezing layers vs. refrigerating
Freeze cooled layers whenever you won’t assemble right away. Freezing locks in moisture better than the fridge, which can dry a layer in hours.
Place wrapped rounds flat in the freezer. Whole unfrosted layers keep best for up to 1–2 months.
Thawing and finishing
Thaw wrapped layers overnight in the refrigerator for gentle temperature change. For a faster option, let them sit at room temperature for 10–20 minutes before frosting.
Some bakers prefer to frost while layers are slightly chilled; this gives cleaner crumbs and neater edges.
Storing finished desserts
Store a finished cake under a dome at room temperature when fillings are shelf-stable. The dome holds humidity and protects the finish.
If your frosting contains cream cheese or other perishables, refrigerate the cake and bring slices back to room temperature before serving for best texture.
- Wrap each cooled layer tightly in plastic, then foil; label with date.
- Freeze layers flat; thaw in the fridge overnight or at room temperature briefly.
- For transport, use a snug box and a non-slip mat in an air-conditioned car.
- Keep any coffee or water-based soaks refrigerated and bring to room temperature before brushing onto layers.
“Bake earlier in the week and assemble the day before to reduce stress and keep layers moist.”
Troubleshooting and Variations
A few quick checks usually fix common baking problems and help you adapt recipes for diet needs.
Dry, domed, or bumpy tops
If a layer bakes dry, test for doneness at the early end of the stated minutes. Overbaking dries thin, cocoa-rich batter fast.
Domed tops often mean too hot an oven or extra leavening. Check baking soda and baking powder amounts and oven temperature.
A bumpy top can come from undermixed batter after adding hot coffee or water—mix 2–3 minutes so the batter emulsifies.
High altitude and metric tips
At altitude, reduce leaveners slightly and add a splash more liquid. Use grams for repeatable results when scaling cups to metric.
Gluten-free, dairy-free, and egg-free swaps
- Use a 1:1 gluten-free flour blend in place of all-purpose flour and watch doneness.
- Swap almond, oat, or coconut milk plus a teaspoon vinegar for buttermilk.
- Replace two eggs with 2/3 cup unsweetened applesauce or an egg replacer; add a few extra minutes of bake time if needed.
Keep notes on cups, grams, and minutes that worked in your kitchen—small tweaks make a big difference.
Conclusion
A few reliable steps—right ingredients, warm liquids, and careful timing—turn a simple batter into a dependable celebration centerpiece. Use a one-bowl method and a splash of hot coffee or boiling water to bloom cocoa and make a thin, moist batter that bakes in about 30–35 minutes.
Lean on buttermilk, sour cream, and oil for a tender crumb, then choose a frosting that fits your crowd—silky ganache-kissed buttercream or tangy chocolate cream cheese add depth without fuss.
Prep pans properly, watch the bake window, and freeze wrapped layers to preserve moisture and free up your schedule. Finish with smooth sides, a spiral top, and sprinkles for a festive look that travels well.
Save your favorite cake recipe and frosting combo, light the candles, and slice generously—the results prove simple methods outperform stress every time.