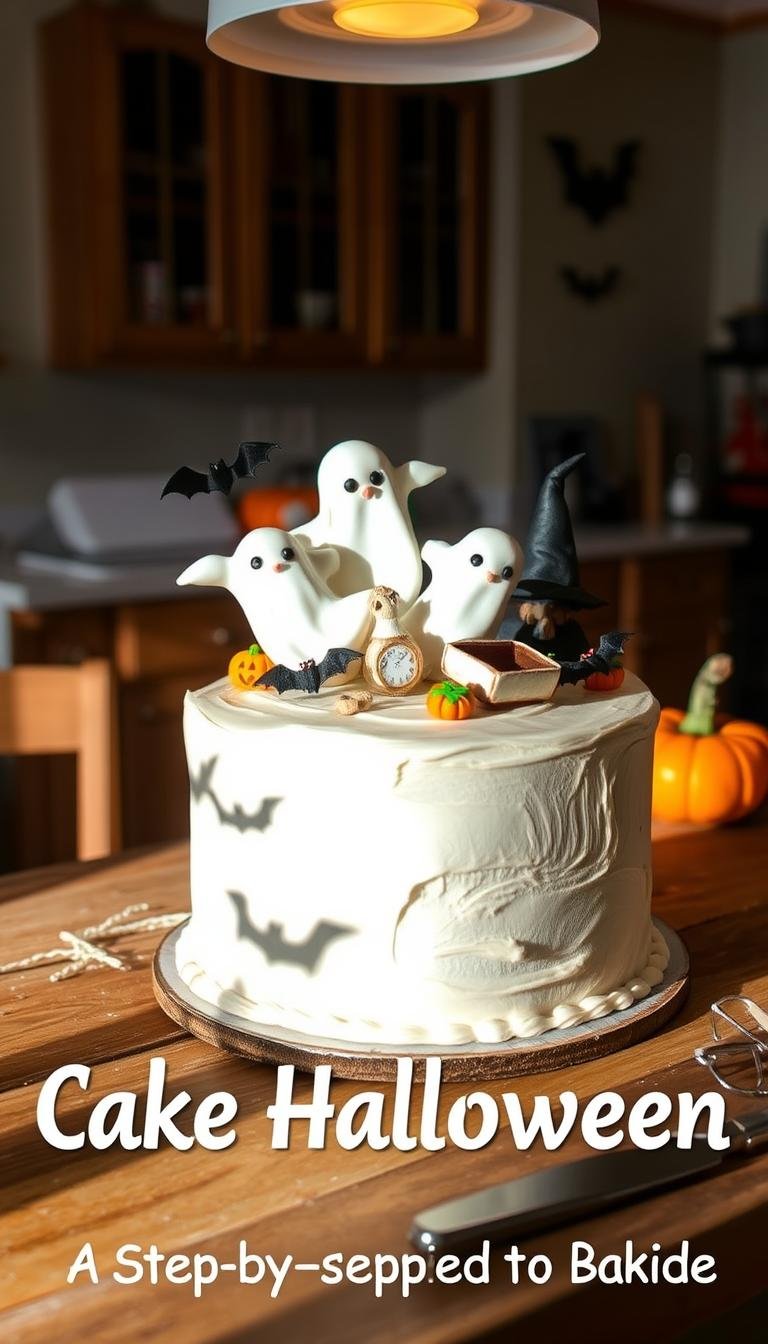
Cake Halloween: A Step-by-Step Guide to Baking
Did you know a naturally dark black velvet layer made with black cocoa powder can mimic an Oreo-like flavor without dyes?
This Website contains affiliate links. That means I may earn a small commission if you purchase through my links, at no extra cost to you.
This guide sets clear expectations for a striking centerpiece or a dramatic brain-style dessert. You will get a time-smart plan to make tender layers, mix dye-free black buttercream, and bake with reliable temperature and doneness cues.
We compare two hero looks: a rich, dye-free Lambeth buttercream that deepens over 24 hours, and a red-layer brain with raspberry jam “blood” for theatrical flair. Expect precise bake windows — typically 350ºF for about 32–36 minutes in three 6-inch or two 8-inch pans — plus tips on leveling and piping.
By the end, you’ll have a repeatable recipe workflow that balances flavor, structure, and dramatic visuals so your party food arrives on time and on point.
Key Takeaways
- Use black cocoa powder for dye-free black layers and buttercream that deepens after 24 hours.
- Bake at 350ºF for 32–36 minutes in 6- or 8-inch pans; check with a toothpick.
- Choose Lambeth piping tips for layered shells and ruffles or large round tips for brain squiggles.
- Follow timelines for baking, chilling, and decorating to stay on schedule.
- Prioritize taste: moist layers and balanced frosting that won’t stain mouths.
Plan Your Cake Halloween Bake for the Season Ahead
Start by choosing whether you want an elegant black velvet showstopper or a playfully gruesome brain centerpiece. That choice sets scope, tools, and the schedule you’ll follow.
Map the timeline backward from serving time. Build a two- or three-day plan: bake layers day one, make frosting and crumb coat day two, and finish piping and decoration day three. Account for cooling and chill minutes so each step has time to rest.
- List what you’ll need by phase—pans, parchment, turntable, tips, bags, silicone brush, offset spatulas—so you won’t scramble.
- Schedule room temperature windows for butter, eggs, and milk; cold ingredients can make the batter curdle.
- Note oven temperature and bake minutes: black velvet layers 32–36 minutes at 350ºF; brain layers 24–28 minutes.
“Mix black buttercream a day ahead; it darkens overnight for the deepest, dye-free color.”
Factor chilling: freeze briefly (~20 minutes) if trimming an oval brain for cleaner carving. Allow a buffer window before guests for final touch-ups and pack a small transport kit with extra frosting, a tip, and paper towels.
Ingredients and Tools You’ll Need at Room Temperature
Gather the right pantry staples and gear before you start. Measure dry ingredients precisely so the crumb and rise stay consistent. Use all-purpose flour, granulated sugar, black cocoa powder, baking soda, baking powder, and salt.
Bring wet items to room temperature: unsalted butter, large eggs, full-fat buttermilk, milk, oil, and vanilla. Room temperature ingredients emulsify faster and give a smooth cake batter.
Decide on food coloring and gel use. For a dye-free finish, rely on black cocoa. If you need a deeper near-black, add a touch of black gel. Use red gel sparingly for bright jam or pink cream cheese frosting accents.
Set up your workstation: a stand mixer or hand mixer, large bowls, measuring cups and spoons (cup, tbsp, tsp), pans lined with parchment, a silicone brush, and a clean bowl for color changes.
- Have Wilton 6B, 4B, 104, 32 and a large round tip (Ateco 805/Wilton 1A) ready.
- Keep a serrated knife, offset spatula, turntable, bench scraper, and extra parchment on hand.
| Item | Why it matters | Room-temp? (Yes/No) | Notes |
|---|---|---|---|
| All-purpose flour | Structure and crumb | No | Measure by cups or weight for accuracy |
| Black cocoa / cocoa powder | Color and flavor depth | No | Black cocoa yields darkest dye-free result |
| Unsalted butter & large eggs | Emulsify and leaven | Yes | Bring to room temperature for smooth batter |
| Mixer, pans, piping tips | Consistent speed and finishes | — | Stand mixer for low speed blending; line pans with parchment |
Mixing the Cake Batter the Right Way
Start by heating the oven and prepping pans so the batter has a steady home to rise in. Preheat to 350°F and prepare three 6-inch or two 8-inch pans with spray and parchment circles. This prevents sticking and gives even sides for stacking later.
Combine dry ingredients first. In the mixer bowl, whisk flour, cocoa powder, sugar, baking soda or powder, and salt on low for about 30 seconds so leaveners distribute evenly.
Add wet ingredients on low speed to avoid toughening the crumb. With the mixer running, emulsify oil, eggs, vanilla, and buttermilk until just combined. Scrape the bowl to remove flour pockets.
Stream in hot coffee or hot water to bloom the cocoa and make a tender crumb. Then beat at medium speed for about 2 minutes—the batter will be very thin and should flow easily into pans.
- Pour no more than two-thirds full to prevent overflow and doming.
- Use a scale or a cup to divide batter evenly among pans for uniform layers.
- Wipe pan rims clean so baked edges don’t burn and affect flavor.
Baking and Cooling: From Oven Time to Perfect Texture
Precise minutes in the oven plus smart chilling give you layers that stack and carve cleanly. Match pan size to the bake window and set a timer so you don’t overwork the crumb.
Bake times by pan size and doneness cues
Three 6-inch or two 8-inch pans with black velvet batter usually need 32–36 minutes. Red velvet or brain-style layers finish in about 24–28 minutes.
Doneness cues: a toothpick should come out clean or with a few moist crumbs. Edges that just pull from the pan are another reliable signal—trust tests, not color alone.
Cooling, leveling, and handling fragile layers
Let layers rest in pans 10–15 minutes so structure sets, then turn them out onto wire racks to cool completely. Warm rounds tear when trimmed.
For shaping, chill or quick-freeze layers about 20 minutes; firmer layers carve and round much cleaner. Level gently with a long serrated knife and save trimmings for snacks.
- Rotate pans halfway through baking if your oven has hot spots to even the color.
- Brush off loose crumbs before the crumb coat to achieve a smooth final coat cake finish.
“Freeze briefly for cleaner trims and easier handling.”
Frosting Recipes: Dye-Free Black Buttercream and Pink Cream Cheese
Two contrasting frostings give you both drama and delicate piping options for your final look. One uses black cocoa powder to reach a deep dye-free black, and the other is a stable pink cream cheese buttercream for brain-style piping.
Black cocoa buttercream that darkens overnight
Ingredients: 2 cups unsalted butter, 5 cups powdered sugar, 1 cup black cocoa powder, 4 tbsp whole milk, 2 tsp vanilla, 1/4 tsp salt.
Cream room-temperature butter about four minutes until pale. Add powdered sugar in two additions, then sift in black cocoa to avoid lumps. Add vanilla, milk, and salt, then mix on low for ~2 minutes, scraping the bowl as needed.
Tip: This frosting starts deep brown and will darken to black after resting for 24 hours. Plan ahead—color transformation happens at rest, not during mixing.
Cream cheese buttercream tinted pink for brain designs
Ingredients: 1.5 cups unsalted butter, 8 oz cream cheese, 1 tbsp vanilla, 1 tsp salt, 7 cups powdered sugar, 3 tbsp heavy cream.
Beat butter and cream cheese until smooth. Add sugar gradually and thin with cream to get a pipeable consistency. Tint a small portion with a tiny squirt of red gel for a light pink that holds squiggles.
Consistency, low speed mixing, and sugar adjustments
Mix on low speed once liquids go in to control air and texture. Add milk or cream sparingly until the frosting moves but holds peaks.
For firmer piping, add more powdered sugar. For smoother spreading, add a tablespoon of cream at a time. Season with a pinch of salt and vanilla to balance sweetness.
“Fill, crumb coat, chill, then finish — reserve a portion for texture and piping.”
Crumb Coat, Frosting Cake, and Assembly Tips
Anchor the first layer by placing the trimmed round on a board and securing it with a small dab of buttercream. This keeps the stack stable while you fill and level each layer.

Stacking, filling, and applying a smooth crumb coat
Spread an even layer of black buttercream between rounds. Use a scale or measuring cup to keep fillings uniform so the stack stays level.
Apply a thin crumb coat to lock in loose crumbs. Focus on coverage rather than perfection; small gaps and crumbs are fine at this stage.
Chilling times to set structure before the final coat
Refrigerate the crumb-coated cake for 20–30 minutes until firm to the touch. For a brain-style build, chill 20 minutes in the fridge or 5 minutes in the freezer before piping pink squiggles.
Tip: After piping, chill another 30 minutes before adding jam “blood” so details hold shape. Keep a bowl of hot water handy to warm an offset spatula for extra-smooth surfaces.
| Step | Why it matters | Timing |
|---|---|---|
| Anchor base | Prevents sliding and keeps layers aligned | Immediate |
| Thin crumb coat | Seals crumbs and sets the surface for final smoothing | 20–30 minutes chill |
| Brain prep | Trim to an oval for cleaner piping lines | Chill 20 min fridge / 5 min freezer |
| Final chill | Ensures piping and jam sit without smudging | 10–30 minutes |
Work at a measured speed. Use a turntable, offset spatula, and bench scraper with steady pressure for flat planes and sharp edges. If you spot bulges, chill and add a small correcting coat before the final finish.
Choose Your Halloween Finish: Black Lambeth or Brain Cake
Decide the final look before you start decorating. That choice sets which tools, tips, and timing you’ll use. A Lambeth finish feels polished; a brain design reads playful and dramatic.
Elegant black velvet with Lambeth piping: Frost the layers in black buttercream made from black cocoa powder for a dye-free base. Anchor with Wilton 6B shells, add 4B secondary shells, pipe 104 ruffle garlands, then layer 32 shells for texture. Accent with round black sprinkles for subtle shine.
Spooky brain with jam “blood” glaze
Trim to an oval, draw a shallow center groove, then pipe tight pink squiggles using a large round tip (Ateco 805 or Wilton 1A). Chill the frosted surface so lines stay crisp.
Thin seedless raspberry or strawberry jam with a splash of water and one drop of red gel for brighter color. Brush the glaze into crevices for a glossy, convincing effect.
Alternative themes and quick tips
- Spider-web: chill the frosting and drag a toothpick from center to edge for clean lines.
- Graveyard: add meringue ghosts and biscuit headstones atop matte buttercream.
- Pumpkin traybake: swap buttercream for cream cheese icing and dust with spice.
“Test piping on parchment first to dial pressure and rhythm.”
Sequence to avoid smearing: base coat, chill, primary borders, brief chill, secondary details, finish. Test once on parchment, then move to the cake. Let know any questions about tips, gel, or food coloring before you begin.
Cake Halloween Storage, Make-Ahead, and Substitutions
Proper storage preserves texture, color, and flavor so your final reveal goes smoothly. Plan who will finish piping and the time needed to bring items back to serving temperature.

Room temperature vs airtight container refrigeration
Store cooled layers wrapped tightly at room temperature up to two days. For longer holds, freeze layers up to two months and thaw fully at room temperature before you assemble.
Keep frostings in an airtight container. Black buttercream sits at room temperature about one day or in the fridge up to two weeks. Brain-style frosting stores refrigerated up to a month.
Freezing, thawing, and timing
Freeze a fully frosted cake up to a month. Bring chilled items back to room temperature 1–2 hours before serving so buttercream softens and flavors bloom.
Ingredient swaps that work
- Buttermilk: swap equal parts full-fat yogurt, sour cream, or milk with a splash of vinegar.
- Unsalted butter: use salted and cut added salt.
- Eggs: try flax eggs or an egg replacer—expect small texture changes in cake batter.
- Cocoa powder: black cocoa gives the darkest hue; Special Dark plus a dab of gel can deepen color.
Keep frostings in an airtight container and rewhip refrigerated buttercream to restore a silky finish.
Conclusion
You now have a clear, practical path from batter to final frosting that saves time and reduces stress. The dye-free black buttercream will deepen overnight and the pink cream cheese with jam glaze makes a convincing brain that serves about 20 people.
Use the timelines and chill minutes to get clean lines and steady texture. Frosted layers keep in the fridge up to a week and return to room temperature before serving for best flavor.
,Try swaps from the storage and substitution notes if pantry items change. If you bake this, let know how your cake and recipe turned out—share photos, tips on frosting control, or notes on food coloring and gel choices so other bakers can learn.