Best Strawberry Chocolate Cake Recipe – Simple & Delicious
Did you know over 60% of home bakers try a layered dessert for the first time when preparing treats for a holiday — and a well-made layered dessert can change how friends and family remember an occasion.
This Website contains affiliate links. That means I may earn a small commission if you purchase through my links, at no extra cost to you.
This recipe balances rich cocoa depth with a bright jammy fruit filling to deliver bakery-quality results at home. Key techniques include blooming cocoa with hot water, a touch of espresso to deepen flavor, and a stable buttercream that keeps slices clean.
Gather the right bowls and three 9-inch pans, parchment, an offset spatula, and accurate measuring cups. Expect focused active time for batter and filling, plus chilling between steps so layers set and the filling becomes jammy.
Storage tip: Press plastic wrap over the cut side and store leftovers in an airtight container in the fridge to keep the crumb moist for up to 5–6 days.
Key Takeaways
- Use fresh strawberries for a jammy filling and chill it for clean layering.
- Bloom cocoa in hot water and add espresso powder to intensify chocolate notes.
- Prep pans and ingredients ahead to keep baking smooth and stress-free.
- Finish with a buttercream and optional ganache drip for a professional top.
- Store slices in an airtight container with plastic wrap over cut sides to stay moist.
Why this strawberry chocolate cake stands out
A fudgy base and bright fruit filling give this dessert a striking balance in every slice.
Rich layers with fresh fruit flavor
The dense, soft layers deliver deep cocoa notes that contrast with jammy fruit between each layer.
Blooming cocoa with hot water and a pinch of espresso amplifies flavor without tasting like coffee. A smooth jam and fresh strawberries add bright, acidic lift.
Balanced sweetness, moist crumb, and simple decorating
Room temperature ingredients help batter emulsify and trap air for a tender crumb that stays moist for days.
Using a mix of granulated and brown sugar gives rounded sweetness and extra moisture. Weighing ingredients improves accuracy so you get repeatable results in different kitchens.
“Weigh your ingredients for consistent layers and clean assembly.”
- Structure supports a generous fruit filling without leaking when you pipe a border.
- Simple finishes—smooth coat and berries on top—look professional with minimal fuss.
- This method scales well for birthdays and holidays across pan sizes.
Ingredients at a glance: chocolate, strawberry, and frosting
Know the key components before you start: the dry mix, the wet mix, and two frosting options. This short list helps you prep and keep each step efficient.
Fresh berries, jammy filling, and vanilla
Fruit components: 1½ lbs fresh strawberries for filling and garnish, ½ cup granulated sugar, 1 tbsp cornstarch mixed with 1 tbsp water, and 1 tsp vanilla extract. These create a jammy center that bridges fruit and frosting.
Cocoa, espresso, and leaveners
Dry base: 3 cups all-purpose flour, 1 cup black cocoa, 1 tbsp espresso powder, 3 tsp baking soda, and 1½ tsp baking powder. These powder elements and leaveners give lift and deep flavor to the cake layers.
Buttermilk, oil, and room-temperature eggs
Wet mix: 1½ cups buttermilk, ¾ cup oil, 3 large eggs at room temperature, 1½ cups granulated sugar plus 1½ cups light brown sugar. Room-temp dairy and eggs help the batter emulsify in the bowl for a tender crumb.
- Frosting options: Strawberry buttercream with freeze-dried powder, or strawberry cream cheese frosting (grams shown for cream cheese and powdered sugar).
- Note: choose natural or Dutch-process cocoa based on your leavening plan.
Tools and cake pans you’ll need
Get your workspace ready before the oven timer starts. A tidy setup speeds each step and helps you get clean, even layers. Below are the key prep steps and tools to have within reach.
https://www.youtube.com/watch?v=g7n6yshR9E8
Preparing 6″, 8″, and 9″ pans with parchment
Trace and cut parchment rounds for each pan size. Grease the pan, press the round in, then grease the parchment and dust with flour or cocoa for darker layers to avoid white residue.
Tap out excess dust. For chocolate recipes, a light cocoa dusting prevents streaks. Accurate lining makes inverted release consistent and reduces tearing.
Essential finishing and cooling tools
Must-haves: offset spatulas (small and large), a cake scraper, a piping bag, and a sharp serrated knife for leveling.
Use a sturdy wire rack to cool layers evenly and protect the crumb during transfer. A turntable is optional but it speeds smoothing and drip work.
Keep your electric mixer and its bowl nearby so frosting stays lump-free and at workable room consistency. Stage tools set aside within arm’s reach to maintain momentum.
“Bake-even strips cut doming and save trimming time.”
Make the strawberry filling (jammy center)
Start the jam by cooking chopped berries gently so the sugars and juices concentrate into a glossy filling.
Stovetop method: simmer, thicken with cornstarch
Combine 1½ lbs chopped strawberries and ½ cup sugar in a saucepan over medium-high heat. Cook 23–28 minutes until reduced and jammy.
Mix 1 tbsp cornstarch with 1 tbsp water until dissolved. Stir the slurry into the bubbling fruit and cook 30–60 seconds to thicken. Remove from heat, add 1 tsp vanilla, taste, and adjust sugar as needed.
Roasted berries option for concentrated flavor
Preheat oven to 375°F. Toss 8 oz strawberries with 2 tbsp sugar, 2 tsp lemon juice, and a pinch of salt. Spread on a metal pan and bake 15–20 minutes, flipping once, until soft and syrupy. Cool completely before use.
Cooling the filling before assembly
Spread the warm filling into a shallow bowl to speed cooling. Chill until cold and set aside. Make-ahead: refrigerate up to two days.
| Method | Key Time | Texture |
|---|---|---|
| Stovetop | 23–28 minutes | Glossy, jammy |
| Roasted | 15–20 minutes | Concentrated, syrupy |
| Chill | Cool to room temp | Set for stacking |
Whisk together the chocolate cake batter
Begin by dissolving cocoa and espresso in very hot water. Bloom 1 cup black cocoa and 1 tbsp espresso powder in 1½ cups hot water. Whisk until fully dissolved and let the liquid cool to lukewarm.
Dry mix: combine flour, sugars, and leaveners
In a large bowl, whisk 3 cups flour with 1½ cups granulated sugar, 1½ cups light brown sugar, 3 tsp baking soda, 1½ tsp baking powder, and ¾ tsp salt. Break up any brown sugar lumps so the ingredients mix evenly.
Wet mix: buttermilk, oil, eggs, and vanilla
Whisk the wet components together in a separate cup: 1½ cups buttermilk, ¾ cup oil, 3 large eggs, and 1 tbsp vanilla extract. Keep these at room temperature so the batter emulsifies smoothly.
Combine gently for a smooth, pourable batter
Pour the cooled cocoa liquid and lightly beaten eggs over the dry mix. Whisk together gently until just combined. Then add the remaining wet mix and stir until the cake batter is fluid and glossy.
- Scrape the bowl bottom and sides to catch pockets of flour or cocoa.
- Keep mixing light — overmixing tightens gluten and ruins the crumb.
- Use a measuring cup or spouted bowl to divide batter into pans quickly so leavening acts in the oven, not on the counter.
“A fluid, glossy batter signals proper hydration and gives a tender crumb.”
Bake, test doneness, and cool the cake layers
Portioning batter by weight gives consistent results across pans and helps the final stack look professional.
Divide the batter evenly—about 735 g per 9″ pan. Preheat the oven to 350°F and place the filled pans on the middle rack. Bake for 24–28 minutes, watching the clock and rotating pans if your oven runs hot.

Toothpick and bounce-back cues
Begin checking doneness at the early end of the window. A toothpick with moist crumbs and a slight spring at the top means the layer is done.
Avoid overbaking. Edges should pull away slightly from the pan and not darken too much. Track minutes so your timing stays consistent across bakes.
Cool in pans, then on a wire rack
Let each layer rest in the pan for about 10 minutes. Run a thin knife around the sides before inverting to avoid tearing the crumb.
Flip layers onto a wire rack to cool completely. Cooling fully prevents trapped steam from making frosting slip when you stack and decorate the top. If domes form, level each layer after cooling so your assembled cake stacks flat and stable.
- Portion batter evenly for level layers.
- Bake at steady temperature and check with a toothpick.
- Rest 10 minutes in pans, then cool on a wire rack before frosting.
Frosting options: strawberry buttercream or strawberry cream cheese
Pick a frosting style that balances sweetness and structure for clean layers. Two reliable finishes work here: a concentrated buttercream for vibrant color and a tangy cream cheese for contrast with the rich base.
Buttercream method
Make the buttercream by processing freeze-dried berries to a fine powder. Beat 3 cups salted butter until smooth in a large bowl.
Add 7–8 cups powdered sugar gradually with 2–3 tbsp heavy cream. Fold in ½ cup jammy filling, 1 tbsp vanilla extract, a pinch of salt, and the fruit powder. Adjust sugar to taste and stop when the frosting holds peaks but stays spreadable.
Cream cheese option
Beat 115 g butter with 250 g cream cheese until silky. Add 100 g powdered sugar, 70 g jam, and 1 tsp vanilla. Reserve some in a piping bag for borders and leak-proof piping.
Consistency and finishing tips
- Beat fats first to ensure an aerated, smooth frosting before adding sugar.
- Add heavy cream a tablespoon at a time to reach a silky consistency for smooth sides.
- If the mix becomes too soft, chill briefly then rewhip to restore structure for final assembly.
Assemble the cake layers with strawberry filling
Work calmly and measure each step so the stack stays even and clean.
Anchor the base on your turntable with a tiny dot of frosting and get ready to build the stack. Level each cake layer so the stack is stable and the filling doesn’t migrate toward the edges.
Spread 1¼ cups frosting (≈312 g) over the first layer from edge to center. Pipe a tall, continuous border, then add a scant ½ cup (≈115 g) filling inside the border. Place the next layer, press gently to set, and chill 5–10 minutes.
Repeat the measured spreads for the third layer. Place the final layer upside down for a flat top. Apply a thin crumb coat to lock in crumbs; chill 20–30 minutes until set.
Final coat: Smooth the frosting with a scraper while spinning the turntable to get straight sides cake and crisp edges. Refrigerate while you prepare the drip.
- Optionally tuck a few chopped strawberries inside the borders for extra fruit in each layer.
- Wrap spare layers in plastic wrap if you stagger assembly times to prevent drying.
Make the chocolate drip and decorate with fresh strawberries
Finish the assembled layers with a glossy ganache to create controlled drips and a show-stopping top.
Place 4 oz finely chopped semi-sweet chocolate in a heatproof bowl. Heat 4 oz heavy cream to a simmer, pour over the chocolate, and let it rest for 4 minutes. Stir until smooth and glossy.
Add 1–3 tsp vegetable oil, a teaspoon at a time, until the ganache flows in a continuous ribbon from a spoon. Test the consistency before you work so the drip runs evenly down the sides of the cake.
Pour the ganache onto the chilled center. Spin the cake on a turntable while nudging ganache to the edge to form drips of varying lengths. Chill 20–30 minutes to set the drip.
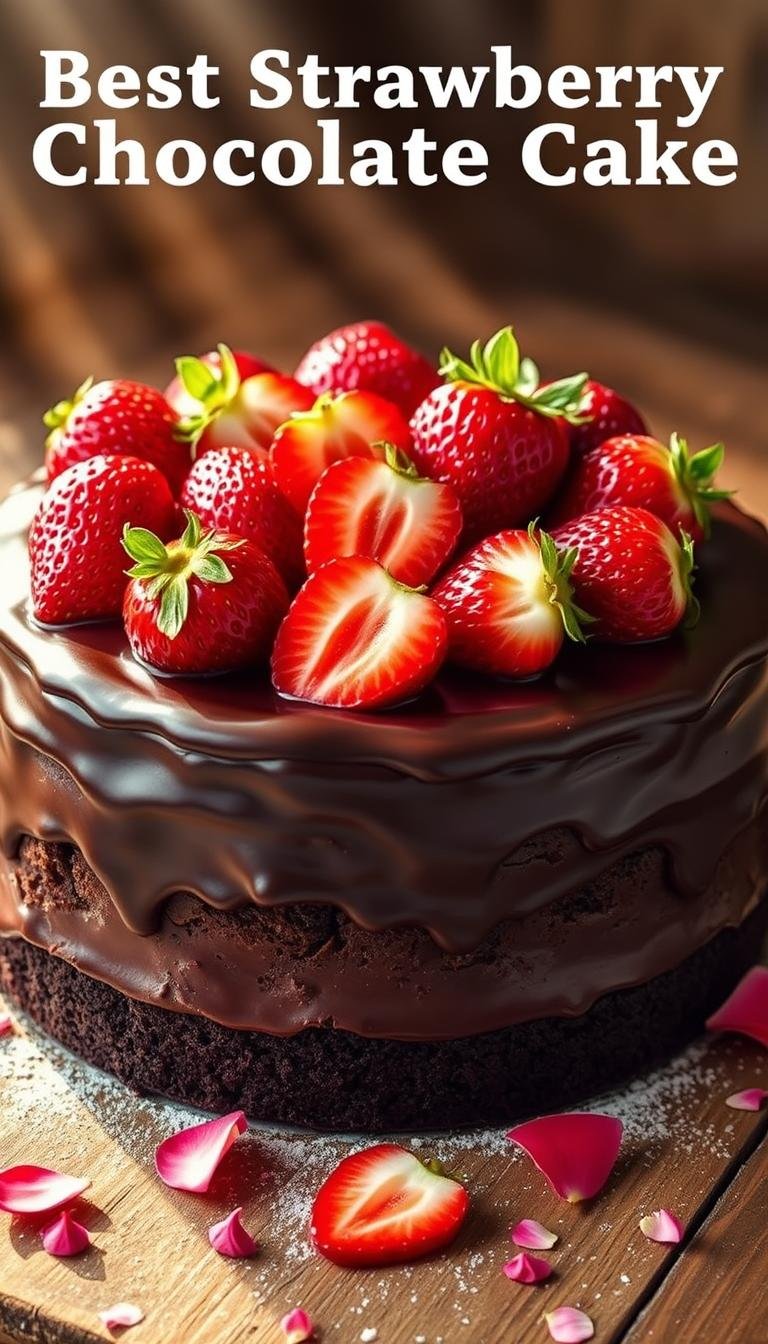
Pipe evenly spaced buttercream swirls, then arrange fresh strawberries top and a few small chocolate strawberry accents for height and color. A light dusting of vanilla-scented sugar on fruit adds a subtle shine.
| Step | Ingredient / Tool | Timing / Tip |
|---|---|---|
| Make ganache | 4 oz chocolate, 4 oz cream, oil | Rest 4 minutes; stir until glossy |
| Adjust drip | 1–3 tsp vegetable oil | Test on a spoon; should flow in a ribbon |
| Apply and set | Chilled cake, turntable | Pour center, spin to edges; chill 20–30 minutes |
| Finish | Buttercream, fresh strawberries | Pipe swirls, place fruit evenly around top |

Pro tips for the best results every time
A few careful steps at room temperature improve texture, rise, and final appearance every bake.
Room temperature basics
Bring eggs, butter, and dairy to room temperature so the batter emulsifies and traps air. This step helps the rise and gives a tender crumb.
Weigh and whisk for accuracy
Weigh flour and sugar in grams to avoid dense results. Whisk brown sugar lumps out of the dry mix so you don’t get pockets of unincorporated sweetness.
Freeze layers to reduce crumbs
Wrap cooled layers snugly and freeze briefly to lock moisture and firm the crumb. Frosting goes on cleaner when layers are chilled.
Store and serve right
Press plastic wrap over any cut surface and keep the finished cake in an airtight container in the fridge up to 5–6 days.
Bring the refrigerated dessert to room temperature before serving so the frosting softens and flavors bloom.
- Use a light hand when leveling and press layers gently to keep fillings in place.
- If your kitchen runs warm, chill frosting briefly between steps to maintain structure.
- Rely on spring-back, toothpick crumbs, and slight edge pull-back to judge doneness.
| Tip | Why it matters | Quick action |
|---|---|---|
| Room temperature ingredients | Improves emulsification and rise | Set out eggs and dairy 30–60 minutes prior |
| Weigh ingredients | Prevents dense, uneven crumb | Use a digital scale and tare bowl |
| Freeze wrapped layers | Reduces crumbs and locks moisture | Wrap in plastic and freeze 20–60 minutes |
| Storage | Prevents drying and flavor loss | Press plastic wrap to cut side; use an airtight container |
“Small timing and handling changes protect texture and make assembly easier.”
Scaling, substitutions, and timing
When you change pan sizes, a few simple rules keep layer thickness and bake times predictable.
Pan sizing: Two 6″ pans give thick layers; three avoid splitting. For 8″ pans, multiply a 6″ formula by about 1.78× or double the 6″ recipe and expect slightly longer bake time. Always fill pans no more than two-thirds.
Leavening and cocoa: Natural cocoa is acidic and works with baking soda. Dutch-process cocoa is neutral and pairs better with baking powder. Swap carefully—adjust leaveners to match the cocoa you choose.
Make-ahead timing: The fruit filling keeps 2 days refrigerated. Cake layers can be baked, cooled, wrapped, and frozen. Frostings store chilled; bring to room temperature and rewhip before use.
- Adjust bake time by pan depth and fill level; use spring-back and toothpick cues, not minutes alone.
- Use bake-even strips to reduce doming and save trimming time.
- Document how your oven behaves with specific pans for repeatable results.
Conclusion
A few careful finishing steps turn a good bake into a memorable centerpiece.
Bloom cocoa, bake moist layers, and lock in a jammy filling for a standout chocolate cake strawberry centerpiece. Choose buttercream or cream cheese to match your sweetness and texture goals.
Assemble with even layers, a piped border, and a chilled crumb coat for clean edges. Add a glossy drip and a cluster of strawberries top to crown the dessert with color and contrast.
Store leftovers in an airtight container and press plastic wrap over the cut face to keep the crumb soft for up to 5–6 days. Bring slices to room temperature before serving for best flavor and frosting texture.
Weigh, watch visual cues, and work steadily from bowl to final top so this recipe joins your go-to cake recipes for special days and everyday treats.