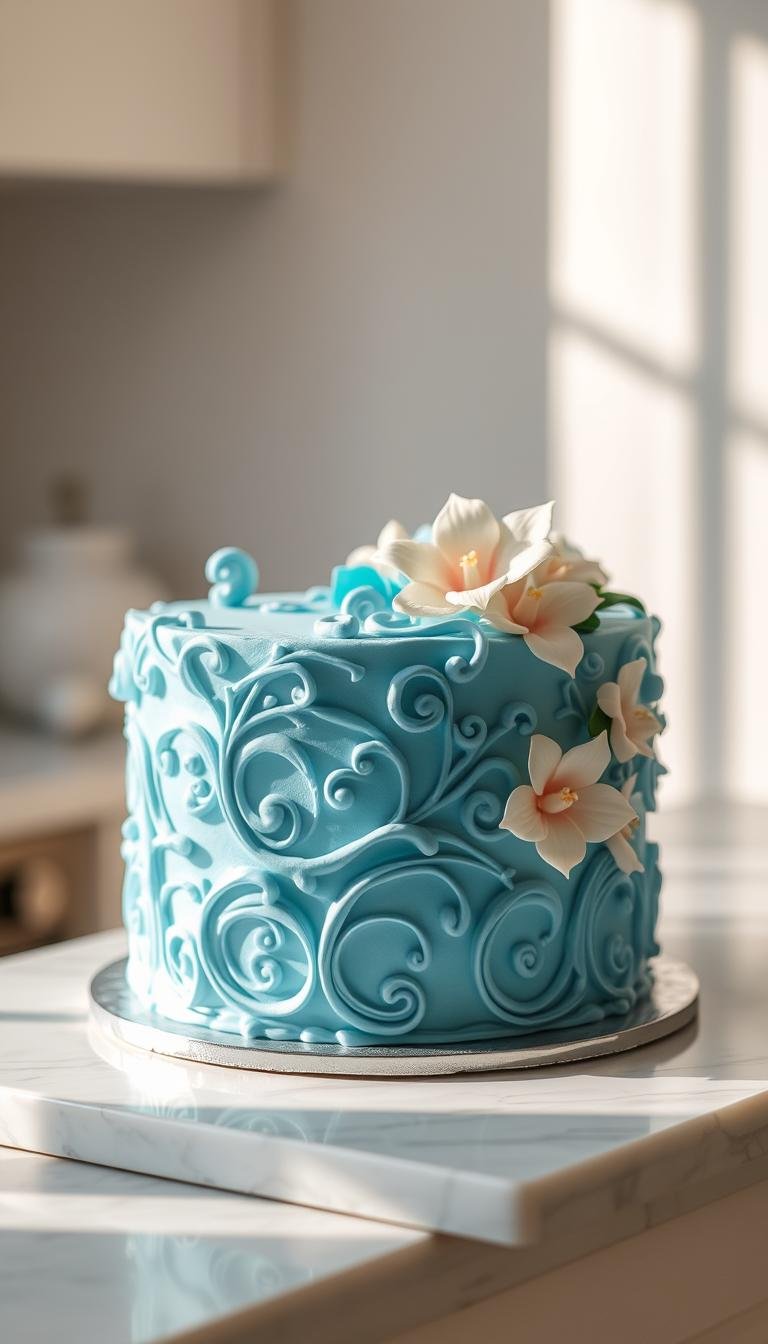
Best Red Velvet Cake Recipe: Simple & Authentic Instructions
Surprising fact: more than one in three home bakers say this classic Southern dessert is their go-to showstopper for holidays and celebrations.
This Website contains affiliate links. That means I may earn a small commission if you purchase through my links, at no extra cost to you.
This introduction shows what makes an authentic version stand out.
The ideal slice combines mild cocoa, warm vanilla, and tangy buttermilk for a tender crumb. Using cake flour and a pro trick—whipping egg whites to soft peaks and folding them in—creates an ultra-smooth texture.
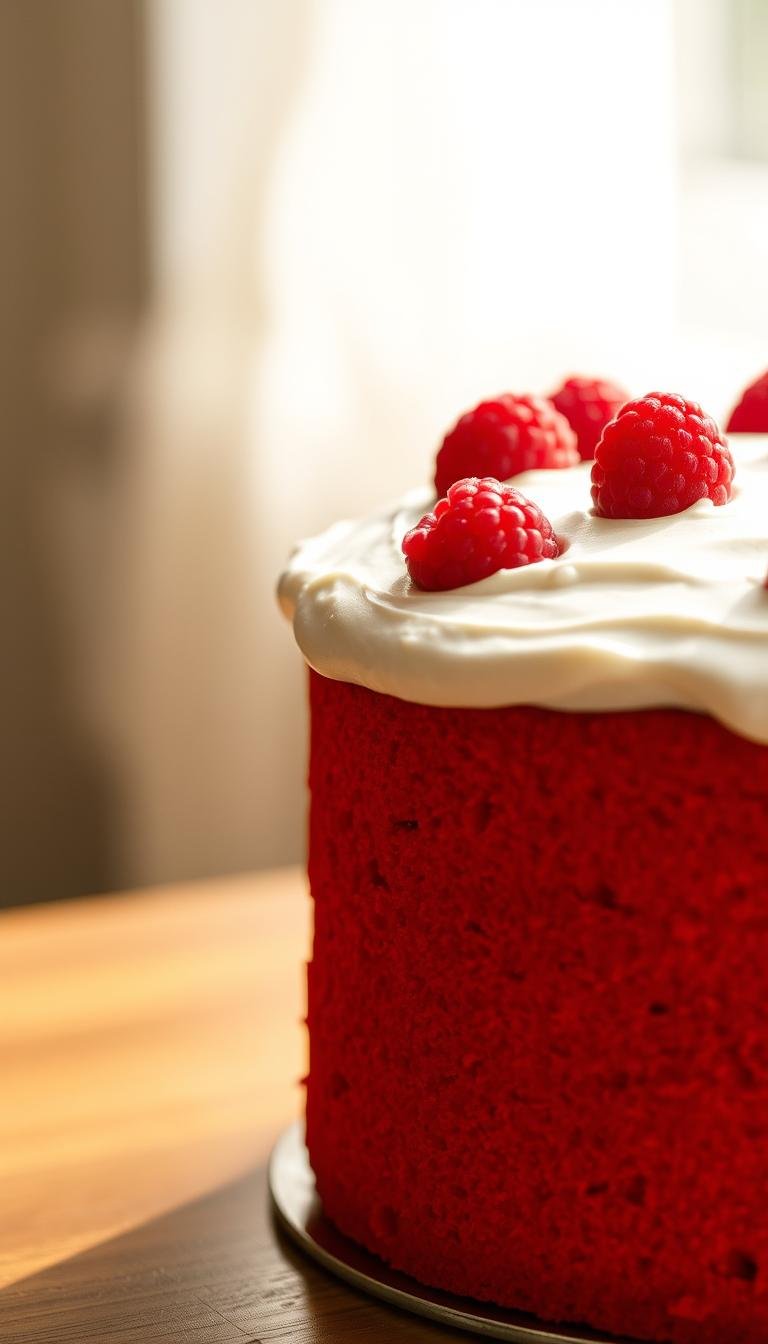
Expect clear steps and common tools. You’ll learn how gel food coloring or beet powder gives vivid tint without watering down flavor. A classic brick-style cream cheese frosting finishes the layers with a silky, pipeable consistency.
This guide sets simple timing and oven temp so the pans bake up tall and even. It also covers storage and make-ahead tips to keep moistness if you plan to freeze or refrigerate.
Key Takeaways
- Balanced flavors: cocoa, vanilla, and tangy buttermilk create the signature taste.
- Use cake flour and whipped egg whites for a bakery-soft crumb.
- Gel food coloring or beet powder gives vivid color without extra liquid.
- Classic cream cheese frosting pairs perfectly and can be chilled for piping.
- Bake at 350°F in two 9-inch pans for about 30–32 minutes; test doneness before cooling.
- Layers and frosted cake freeze well for 2–3 months; refrigerate up to 5 days.
Why This Red Velvet Cake Stands Out Right Now
What sets this apart is a smart ingredient blend that produces a soft crumb, stable layers, and a clean, cool frosting finish.
Using cake flour keeps the crumb tender. A partial swap of butter for neutral oil preserves rich flavor and adds lasting moisture. Whipping egg whites to soft peaks gives lift and an airy, velvet crumb without heavy mixing.
Buttermilk brings tang and reacts with a pinch of vinegar and baking soda to boost rise and enhance the cocoa-based hue when paired with coloring. Gel food coloring gives bold color with only 1–2 teaspoons; beet powder works as a natural alternative for those avoiding artificial food dyes.
The pairing of a cream-based frosting—classic cream cheese—adds cooling richness and a clean slice when chilled briefly before serving.
- Trending now: dependable bakery texture and consistent color for home bakers.
- Reliable timing: 350°F for 30–32 minutes in two 9-inch pans, or 22–25 minutes for three thinner layers.
- Modern meets classic: both updated technique and traditional flavor in one approachable method.
Red velvet cake recipe
This streamlined method delivers consistent, bakery-style layers using simple pantry staples.
User intent at a glance: achieve classic flavor and an airy, bakery-soft crumb with a straightforward process.
Start by whisking the dry mix: cake flour, baking soda, cocoa, and salt. In a separate bowl, cream butter and sugar, then add oil and egg yolks with vanilla and a splash of vinegar. Alternate adding the dry mix with buttermilk so the batter stays smooth and even.
Whip the egg whites to soft peaks and gently fold them in. This step preserves air and keeps layers tall with a fine texture. Tint the batter with gel coloring if desired.
Bake in two 9-inch pans for about 30–32 minutes, or use three pans for 22–25 minutes. Look for a springy center and a clean toothpick to confirm doneness. Cool completely before assembling and frosting.
The final assembly is simple: level layers, spread a brick-style cream cheese frosting, and chill briefly for cleaner slices. This approach prioritizes repeatability so home bakers get reliable results every time.
| Goal | Core flavors | Key technique | Bake times |
|---|---|---|---|
| Consistent bakery-soft layers | vanilla, mild cocoa, tangy buttermilk | Fold whipped egg whites into batter | 2×9″ pans: 30–32 min; 3 pans: 22–25 min |
| Easy, repeatable method | Balanced, not overly chocolatey | Alternate dry and buttermilk additions | Springy center / clean toothpick = done |
Ingredients & Tools for Authentic Flavor and Texture
A precise shopping list and a few key tools set the stage for consistent, bakery-style results. Below are measured ingredients and the essential equipment you need to bake with confidence.
For the cake
- Flour: 3 cups (360g) cake flour — spoon and level or weigh for accuracy.
- 1 teaspoon baking soda; 2 tablespoons natural cocoa powder; 1/2 teaspoon salt.
- 1/2 cup (113g) unsalted butter plus 1 cup (240ml) neutral oil for balanced fat.
- 2 cups (400g) sugar; 4 large eggs (separated); 1 cup (240ml) buttermilk; 1 teaspoon white vinegar; 1 tablespoon vanilla; gel food coloring as desired.
For the frosting
- 16 oz brick cream cheese (avoid tub-style) and 3/4 cup (170g) unsalted butter at room temperature.
- 5 cups (600g) confectioners’ sugar, 1 1/2 tsp vanilla, pinch of salt.
Essential tools & room temperature checklist
Equipment: a stand mixer with a paddle attachment, mixing bowl, two 9-inch cake pans lined with parchment rounds, spatulas, and a bench scraper. Use a wire rack for cooling.
Room temperature items: butter, eggs, buttermilk, and cream cheese should be at room temperature for even mixing and proper aeration.
“Accurate flour measurement prevents a dense crumb and helps layers bake evenly.”
| Category | Key Items | Why it matters |
|---|---|---|
| Cake ingredients | cake flour, cocoa, buttermilk, baking soda, vinegar, eggs | Tender crumb, mild cocoa flavor, chemical leavening with color interaction |
| Frosting | brick cream cheese, unsalted butter, powdered sugar, vanilla, salt | Structure, stable piping, balanced sweetness |
| Tools & prep | stand mixer (paddle attachment), bowl, cake pans, parchment, spatula, bench scraper | Even mixing, clean release, smooth assembly |
Step-by-Step: From Mixing Bowl to Bakery-Soft Layers
Follow these clear steps to turn basic ingredients into soft, bakery-style layers that hold their shape. The sequence keeps mixing light and efficient so the crumb stays tender and even.
Prep and dry mix
Preheat the oven to 350°F. Grease two 9-inch pans, line with parchment rounds, then grease the parchment for seamless release.
Whisk cake flour, cocoa, salt, and baking soda in a bowl to distribute leavening evenly and avoid pockets that hurt rise.
Creaming and emulsifying
Use a stand mixer with the paddle attachment to beat butter and sugar until combined. Add oil, egg yolks, vanilla, and vinegar and beat 2 minutes for a smooth base.
Color, buttermilk, and gentle folding
On low speed, alternate adding the dry mix with buttermilk so the batter stays glossy and cohesive. Tint with 1–2 teaspoons gel red food coloring until the shade looks vibrant.
Beat egg whites to fluffy peaks (about 3 minutes), then gently fold them into the batter to keep air for a velvety crumb.
Divide, bake, and cool
Divide the batter evenly between pans and bake about 30–32 minutes until tops spring back and a toothpick comes out clean. Remove pans and cool completely on a wire rack before frosting.
Frosting, assembly, and chill
Beat brick cream cheese and butter until smooth. Add confectioners’ sugar, vanilla, and salt, then beat until the frosting is soft but stable for spreading.
Level layers, stack with an even coat of frosting, and smooth sides with a bench scraper. Chill the finished cake 30–60 minutes to set for clean slices.

Pro Tips for Color, Crumb, and Consistency
Small adjustments at the mixing stage make a big difference in color and crumb. Follow a few focused practices to keep layers even, moist, and vivid.
Color choices:
Natural vs gel coloring and how much to use
Gel coloring is highly concentrated; start with 1 teaspoon and increase to 2 teaspoons for a deep hue. If you prefer a natural option, use beet powder pre-mixed with a teaspoon of water. Expect a softer tone and add color slowly to avoid overdoing it.
Measure flour right
Weigh flour when possible. If you don’t have a scale, use the spoon-and-level method to prevent overpacking. Accurate flour measurement keeps the crumb light and avoids a dense cake.
Why room temperature matters
Bring butter, eggs, buttermilk, and cream cheese to room temperature. This ensures fats and liquids emulsify easily and the batter reaches the right temperature for rise and texture.
Stand mixer best practices
Use the paddle attachment for creaming. Mix low when combining dry ingredients and buttermilk to limit gluten development. Switch to gentle hand folding once egg whites are whipped to preserve air.
Pro tip: keep a bowl scraper handy to fold and scrape sides; it helps distribute batter and color evenly.
| Focus | Action | Why it matters |
|---|---|---|
| Color | 1–2 tsp gel or beet powder premixed | Strong hue with minimal extra liquid |
| Flour | Weigh or spoon-and-level | Light crumb, correct density |
| Temperature | Room temperature ingredients | Smoother emulsification and rise |
| Mixer | Paddle for creaming; low speed for adds | Protects aeration and avoids toughness |
Pan Sizes, Bake Times, and Variations
Adjust pan choice to match your serving needs and the bake time will follow. Pick the right pan and you can convert one batch of batter into layered cake, a sheet, cupcakes, or a Bundt with reliable results.

Two 9-inch or three thinner layers
For standard height, divide batter between two 9-inch cake pans and bake about 30–32 minutes at 350°F. If you prefer more layers, split into three 9-inch pans and reduce baking to roughly 22–25 minutes.
Sheet cake and cupcakes
Use a 9×13-inch pan for a sheet presentation and plan on about 40–45 minutes. A larger 12×17-inch sheet bakes faster — around 20–25 minutes.
To make cupcakes, portion batter with a standard scoop, fill liners halfway to two-thirds, and bake for about 20–21 minutes.
Bundt option and testing doneness
Choose a Bundt with at least a 10-cup capacity. Expect roughly an hour in the oven; test doneness with a toothpick in a few spots to avoid underbaked centers.
- Keep oven steady: avoid opening the door early to prevent collapse.
- Cool in pans: allow layers to rest on a wire rack before turning out to protect crumb.
- Scale mindfully: when increasing servings, keep batter ratios and watch minutes over the clock—visual cues matter most.
| Format | Typical bake minutes | Notes |
|---|---|---|
| 2×9-inch pans | 30–32 minutes | Standard height; check springy center |
| 3×9-inch pans | 22–25 minutes | Thinner layers; quicker bake |
| 9×13 / 12×17 sheet | 40–45 / 20–25 minutes | Large servings; adjust time by depth |
Flavor Profile Explained: Cocoa, Vanilla, Buttermilk, and Butter
The flavor hinges on balance. Mild cocoa gives a gentle chocolate backdrop that never overwhelms. It supports, rather than competes with, the other notes.
Vanilla brings warmth and rounds the profile. A small amount of butter adds richness and a smooth mouthfeel that lifts each bite.
Buttermilk contributes both acidity and moisture. That tang brightens the batter and helps produce a tender, moist crumb. A splash of vinegar aids leavening and nudges color without leaving an obvious taste.
Sweetness and contrast matter. Sugar sweetens, but tart dairy and mild cocoa keep the slice from feeling heavy. This contrast is what separates a true red velvet from a straightforward chocolate cake.
“Cream cheese frosting adds a creamy, slightly tangy counterpoint that complements the cake’s velvet texture.”
- Cocoa: subtle chocolate underpinning.
- Vanilla: warmth and familiar balance.
- Buttermilk & vinegar: acidity, moisture, and lift.
- Butter and sugar: richness and tender mouthfeel.
| Element | Role | Effect on texture |
|---|---|---|
| Cocoa / Chocolate | Background flavor | Soft, mild chocolate notes |
| Buttermilk / Vinegar | Acidity & rise | Moist, tender crumb |
| Vanilla / Butter | Roundness & richness | Smooth mouthfeel, balanced sweetness |
In short: the harmony of these ingredients produces the unmistakable velvet character—subtle chocolate, bright dairy tang, and a silky texture that pairs perfectly with creamy frosting.
Troubleshooting & Texture Fixes
A few targeted adjustments can correct domed layers and stabilize a runny frosting fast.
Domed or sinking layers
If layers dome, wrap cake strips around pans to keep edges cooler so the rise is even. Trim domes with a serrated knife after cooling for flat layers that stack cleanly.
Sinking centers often come from opening the oven early. Wait until at least three-quarters into the bake window before checking. Track total bake minutes and rely on springy centers and a clean toothpick.
Frosting too soft or runny
Start with full-fat brick cream cheese, not tub-style cheese. Use softened butter, not melted, and add confectioners’ sugar slowly. Chill the mixing bowl 20 minutes to firm the blend before piping.
Keep the frosting at cool room temperature while spreading. If it warms, chill briefly and then finish smoothing. When stacking, apply a chilled crumb coat for extra support.
Tip: Freshness of baking soda matters—weak leavening flattens rise and harms texture.
| Problem | Likely cause | Fix |
|---|---|---|
| Domed layers | Uneven pan edge heat | Use cake strips or trim after cooling |
| Sinking center | Oven opened or underbaked | Limit door opening; check late in bake |
| Runny frosting | Low-fat cheese or warm butter | Use brick cream cheese; chill bowl and add sugar |
Make-Ahead, Storage, and Freezing
Plan storage steps early so texture and flavor hold up from prep to the final slice. Wrap cooled layers tightly at room temperature if you bake them a day ahead, then frost the next day to save active time and preserve moisture.
Refrigeration: Store a fully assembled cake, covered, in the refrigerator for up to 5 days. Chill the finished cake for about an hour or 30–60 minutes before slicing to set the frosting and get clean, precise cuts.
Serving: Bring the chilled cake to room temperature before serving for best crumb and frosting mouthfeel. Allow enough time so the temperature evens out and the velvet crumb returns to ideal texture.
Freezing: Freeze frosted cakes or individual slices by double-wrapping them tightly. Keep frozen for 2–3 months. Thaw overnight in the refrigerator, then rest briefly at room before serving. Reserve a few cups of frosting to touch up after thawing if needed.
“Brick cream cheese frosting holds structure better than tub-style during storage and transport.”
- Keep the cake covered to avoid fridge odors and moisture loss.
- If transporting, chill to set the frosting, box with supports, then allow a short rest at room on arrival.
- When portioning, use a warm, dry knife and wipe between cuts for smooth slices.
Conclusion
A dependable approach pairs measured technique with simple ingredients for consistent results. Use cake flour, natural cocoa, buttermilk, and a touch of vinegar. Whip egg whites for lift, bake at 350°F in well-prepared pans, and cool fully before finishing with brick cream cheese frosting.
This recipe is repeatable across formats—two 9-inch layers, a 9×13 sheet, cupcakes, or a Bundt—by following the tested times and tips. Accurate measuring, room-temperature ingredients, and gentle folding secure an even crumb and reliable rise.
Keep the finished cake chilled up to five days or freeze for longer. Save notes, share results, and use this foundation to customize finishes and decorations with confidence. A steady stand mixer and a calm approach make mastering this classic easier than it looks.