Best Chicken Panini Recipes for a Perfect Lunch
Surprising fact: Americans eat over 50 million sandwiches a day, and a well-made warm sandwich can turn a rushed lunch into a satisfying meal in under 15 minutes.
This Website contains affiliate links. That means I may earn a small commission if you purchase through my links, at no extra cost to you.
This post gathers three standout chicken panini options built for busy weekdays. Each uses easy pantry items — Italian loaf, ciabatta, or sliced bread — and reliable techniques so you can make panini that hold together, melt cheese evenly, and deliver steady protein without extra fuss.
Expect quick assembly guidance, sauce choices from pesto to marinara or honey mustard, and simple cook times for a panini press or a skillet. You’ll also get tips to match bread texture to filling to avoid soggy results and the best cheese pairings to bind fillings and boost flavor.
Key Takeaways
- Three easy sandwich builds: Italian, grilled with bacon, and Parmesan-style for varied weekday lunches.
- Choose sturdy bread and melting cheese to keep the sandwich intact and flavorful.
- Cook times: about 3–4 minutes per side on a hot press; skillet methods work with a weighted pan.
- Sauces like pesto, marinara, or honey mustard change the profile quickly without extra prep time.
- Layer roasted peppers, tomato, or red onion for freshness and depth.
- Equipment notes help you pick a press or pan setup that fits your kitchen and schedule.
Why these chicken panini make the perfect quick lunch
You can make a filling grilled lunch fast by pairing pre-cooked protein with melting cheese and a bright sauce. Using rotisserie or leftover grilled chicken speeds assembly and keeps the filling moist.
On a press, a pesto chicken panini needs just about 3–4 minutes per side to melt cheese and crisp bread. If you like use microwave bacon or pre-cooked strips, the bacon–tomato–cheddar build takes almost no extra time.
- Fast assembly: dice about a cup of meat per sandwich to keep fillings stable.
- Balanced bites: protein and fat from cheese and bacon give satiety without weighing you down.
- Flexible tools: a panini press speeds the process, but you can also use a skillet and press with a second pan for even browning.
- Bright finish: tomato or roasted peppers cut richness and keep the sandwich feeling light, perfect with a small side salad or chips.
These top recipes prioritize quick cook time, reliable texture, and easy swaps for sauce and bread so you can make a satisfying lunch in minutes.
Essential ingredients for a flavorful panini: chicken, bread, cheese, and sauce
A smart selection of bread, cheese, sauce, and cooked protein sets the stage for a tasty lunch.
Bread choice drives texture. Ciabatta compresses to a thin, crisp shell. An Italian loaf gives wide slices that hold saucy fillings. Standard sliced sandwich bread stays soft and convenient.
Pick melting cheese with purpose. Low‑moisture mozzarella limits sogginess and melts cleanly. Provolone adds stretch. Sharp cheddar stands up to bacon and tomato.
- Use 1‑inch bakery slices for saucier builds to prevent collapse.
- Choose cutlets, shredded meat, or a thin chicken breast for even coverage.
- Spread sauce lightly, then seal with cheese to control moisture and fat.
- Brush exterior with a little olive oil for even browning and a crisp crust.
- Layer roasted red peppers above cheese so the melt protects the bread.
| Component | Best Picks | Role | Notes |
|---|---|---|---|
| Bread | Ciabatta, Italian loaf, sliced bread | Texture & structure | 1″ slices for saucy builds |
| Cheese | Mozzarella, Provolone, Sharp Cheddar | Melt & seal | Thin slices melt evenly |
| Protein | Cutlets, shredded, thin breast | Even coverage | Pre‑cooked speeds assembly |
| Sauce & add‑ins | Pesto, marinara, honey mustard; roasted red peppers | Flavor anchor | Use sparingly to avoid soggy crumb; affiliate links for tools optional |
chicken panini recipes: three delicious ways to build your sandwich
Pick a build and follow the simple steps below to get melty cheese, crisp bread, and bold flavor in minutes.
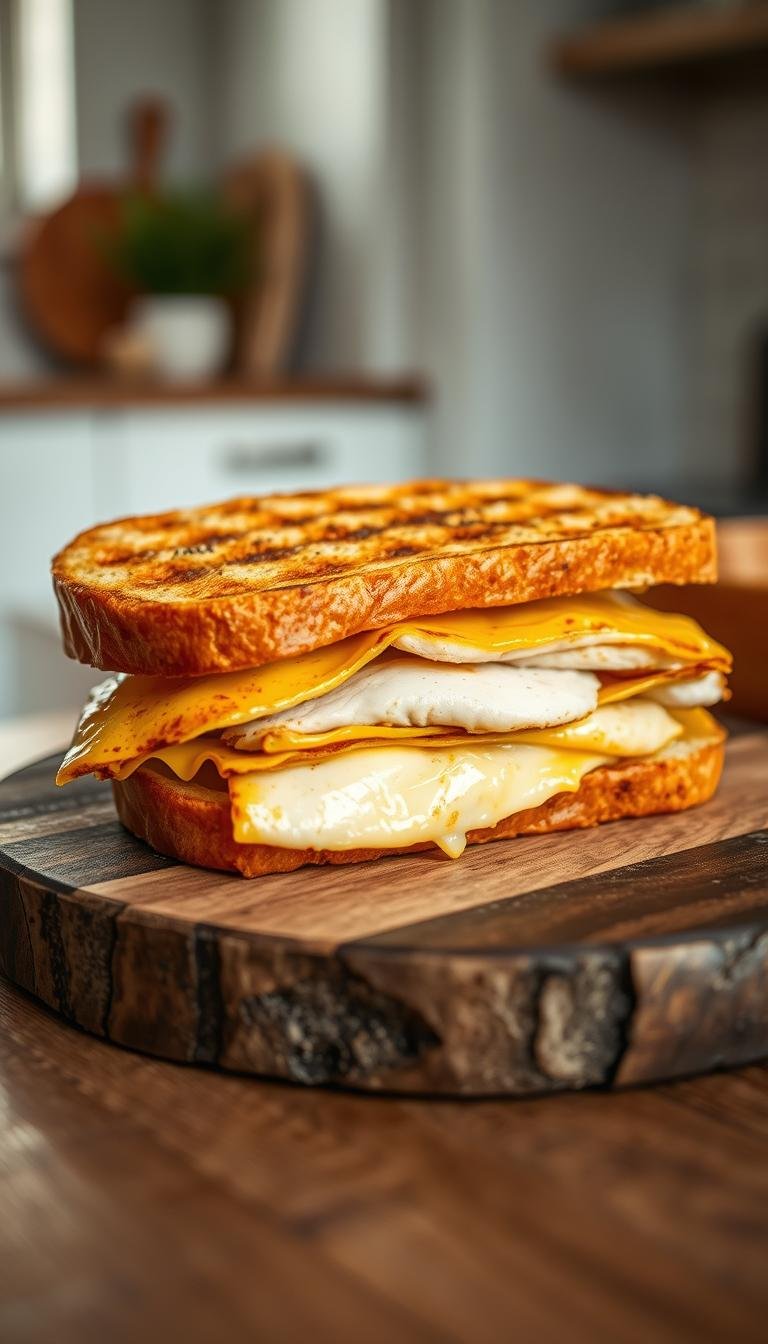
Italian Pesto Chicken with mozzarella and roasted red peppers
Assembly: Slather pesto on two slices of Italian bread. Top with half a cooked chicken breast, slivered red onion, thin roasted red peppers, and low‑moisture mozzarella.
Grill on a preheated, greased press about 3–4 minutes per side until the cheese melts and the crust is evenly crisp.
Grilled Chicken, Bacon, and Tomato with honey mustard
Halve a ciabatta roll and spread honey mustard on both cut sides. Layer tomato slices first, then 1 cup diced grilled chicken, two bacon slices, and sharp cheddar.
Press to half thickness and cook in a buttered pan or press until heated through and golden.
Chicken Parmesan with marinara, provolone, and roasted red bell peppers
Pound thin cutlets, bread with egg and a panko‑Parmesan mix seasoned with creole spice, and pan‑fry 7–8 minutes per side. Slice and stack on Italian bread with warm marinara, provolone, and roasted red bell peppers.
Lightly oil the outer bread and cook in a skillet, pressing with a second pan if you don’t have a press.
- Tip: Use 1–2 slices of cheese to bind fillings and keep the slice neat when you cut half.
Panini press and alternatives: how to grill to golden brown
Getting a golden crust comes down to heat control and steady pressure. Preheat your panini press fully before assembling. Coat the plates lightly with butter or a quick spray of cooking oil to help release and brown the surface.

Heat the press and grease lightly
Heat panini press until hot, then set sandwiches in place and close gently. Aim for about 3–4 minutes per side for most slices and bread thicknesses; thinner ciabatta cooks faster, wide Italian slices may take longer.
No press? Use a grill pan or skillet
A grill pan or heavy nonstick skillet works well. Place the sandwich in the hot pan, set a second heavy pan on top, and press down evenly.
- Butter or a small amount of olive oil on the exterior promotes even browning.
- You could also use a George Foreman style contact grill to mimic top-and-bottom heat.
- Rotate the sandwich once on a pan to avoid hot spots and let it rest 30 seconds before slicing for a clean cut.
Step-by-step: assemble, press, and cook until melty and golden
Follow a simple order: build on a clean board, preheat your device, then press until the cheese yields and the crust crisps.
Assembly: slice bread and spread sauce edge to edge. Add chicken evenly, then layer cheese above and below wetter ingredients so it acts as a binder.
Preheat: heat panini press or a heavy pan until hot. A greased, preheated press crisps the exterior quickly and reduces soak-through.
Cook: For the pesto build, press and grill about 3–4 minutes per side. For the bacon‑tomato sandwich, press to half thickness and cook until the exterior is golden brown and the center is warm.
Cook breaded chicken breast 7–8 minutes per side before assembling the Parmesan version, then finish in a skillet while weighing with a second pan if you don’t have a press.
- Keep fillings within 1/4″ of the crust to avoid spillover.
- Check after a few minutes and rotate if using a single‑sided pan.
- Let the sandwich rest briefly, then cut half with a serrated knife for a clean slice.
Tasty variations and swaps you can also use
Quick protein swaps and seasoning tweaks make each sandwich feel fresh.
If you don’t want to use a whole chicken breast, shred rotisserie meat for fast assembly. Rotisserie stays moist and is great with bacon–tomato builds that use microwave bacon for speed.
Thin grilled chicken slices fit neatly across wide bread. You could also bread cutlets quickly for a crisp exterior. For minimal prep, keep diced, pre‑cooked pieces on hand.
For richer crusts, brush a touch of olive oil on the outside before pressing. For a leaner profile with less fat, swap to a light cooking spray.
Quick swap guide
- Combine small amounts of shredded meat with a cheese slice to bind loose fillings in taller loaves.
- Mix cheeses to match sauce: provolone with marinara, sharp cheddar with bacon and tomato, mozzarella with pesto.
- Add spice with chili flakes or jalapeños, and season proteins with garlic powder or creole spice for depth.

| Swap | Use When | Effect |
|---|---|---|
| Rotisserie | Short prep time | Moist, shredded filling; pairs with microwave bacon |
| Grilled chicken breast | Lean, neat slices | Even coverage; clean bite |
| Breaded cutlet | Crispy texture wanted | Crunchy exterior; richer mouthfeel |
Smart add-ins and toppings to take it over the top
The right mix of creamy, crisp, and tangy add-ins turns an ordinary lunch into a standout meal. Use small, well-placed toppings so the sandwich heats evenly and slices cleanly.
Keep layers purposeful. Add tomato slices for juiciness and acidity that brighten rich cheese and balance savory bacon without overwhelming the chicken.
- Roasted red peppers add smoky sweetness and soft texture. They pair especially well with pesto and provolone.
- Thinly sliced red onion gives a crisp bite; slice thin so it softens slightly during pressing while keeping freshness on top.
- Avocado brings creaminess—place it beneath a slice of cheese so it stays put as the sandwich compresses.
- A light dusting of black pepper or red pepper flakes sharpens flavors and cuts through richness.
- Fresh basil tucked under mozzarella reinforces pesto notes; pat leaves dry to avoid extra moisture.
- Use a second, thin slice of cheese near the top to glue loose add-ins and keep them from spilling during the press.
- Finish with arugula after pressing for crunch and peppery lift, or add a few pickled peppers for extra tang.
Rule of thumb: keep total add-ins modest. Too many toppings prevent even heating and make the sandwich hard to slice cleanly.
Serve with these easy sides and make it a meal
The Italian Pesto Panini works as a compact meal on its own. Add one or two quick sides to make plates that feel finished without extra time in the kitchen.
Smart sides should be fast and complementary. Pick items that take under ten minutes or finish while the sandwich rests.
- Pair the sandwich with a simple arugula salad, kettle-cooked chips, or a cup of tomato soup to round out the plate.
- For a lighter option, serve cut fruit or a cucumber‑tomato salad; acidity balances the richer fat from cheese and bacon.
- Toast extra bread into croutons while the sandwich cooks to make efficient use of the hot pan or oven.
- Warm a skillet of marinara to serve as a dip for the Chicken Parmesan, or add pickles or giardiniera for crunchy, briny contrast.
“A few small sides turn one sandwich into a satisfying lunch in minutes.”
| Side | Prep Time | Why it works | When to choose |
|---|---|---|---|
| Arugula salad | 5 minutes | Fresh, peppery contrast | Balancing rich sandwiches |
| Tomato soup (cup) | 3–4 minutes | Comforting dip and warm pairing | Cold weather or lighter appetite |
| Toasted croutons | While sandwich cooks | Uses extra bread; adds crunch | When you have leftover slices |
| Steamed green beans | 6 minutes | Bright, low-fat veggie side | Quick, healthy option |
Conclusion
Finish strong by following a few steady steps that guarantee a crisp exterior, melted cheese, and balanced fillings every time.
Preheat and lightly grease your panini press or a hot grill pan. Cook until the crust is golden brown and the cheese yields. A skillet with a weighted pan works as an excellent alternative to specialty gear.
Choose sturdy bread like ciabatta or an Italian loaf to support fillings and peppers. Use sauces sparingly so moisture stays controlled.
These guidelines make each panini recipe repeatable: assemble thoughtfully, apply steady press, and serve hot. Thanks for reading this post — now build boldly and enjoy a hot, melty chicken panini that fits your day.