Beautiful Spring Cake Designs to Celebrate the Season
Spring cake designs capture the essence of the season, bringing a burst of color and creativity to your celebrations. From floral patterns to playful pastel shades, these designs add a cheerful touch to any occasion. It’s the perfect time to experiment with flavors and themes that embody the freshness and vibrancy of spring!
This Website contains affiliate links. That means I may earn a small commission if you purchase through my links, at no extra cost to you.
Delightful Lemon Lavender Cake For Spring Celebrations
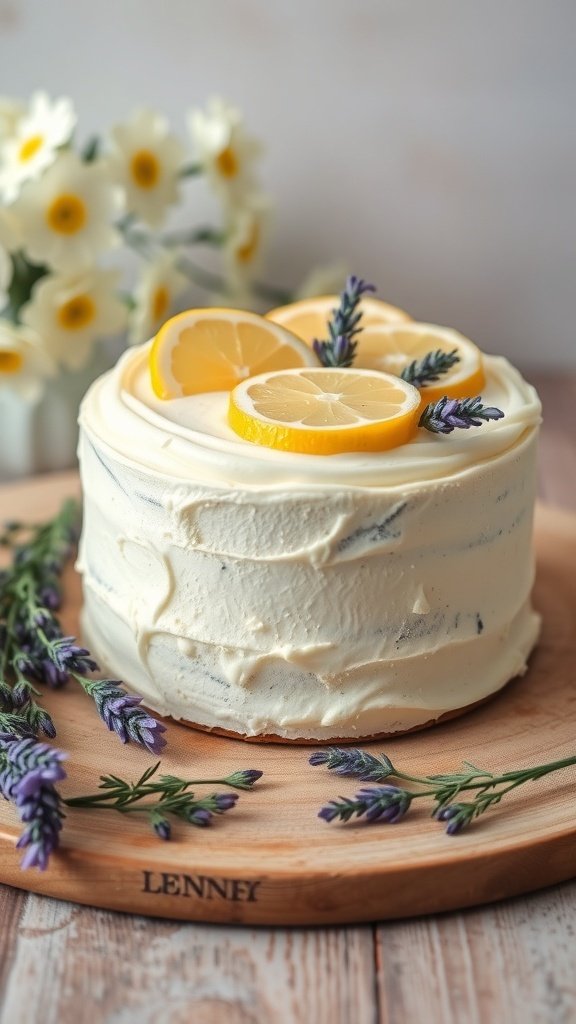
Spring is here, and what better way to celebrate than with a lovely Lemon Lavender Cake? This cake is a treat for the senses, combining the bright, zesty flavor of lemons with the delicate floral notes of lavender. The cake is beautifully decorated with fresh lemon slices and sprigs of lavender, making it a stunning centerpiece for any spring gathering.
The light and fluffy texture of the cake pairs perfectly with the creamy frosting, creating a delightful balance. It’s not just a feast for the eyes; each bite is refreshing and uplifting, capturing the essence of spring. Whether it’s a birthday, a spring picnic, or just a sunny afternoon, this cake is sure to impress.
Let’s get baking! Here’s how you can make your own Lemon Lavender Cake.
Ingredients
- 2 cups all-purpose flour
- 1 ½ cups granulated sugar
- 1 tablespoon baking powder
- ½ teaspoon salt
- 1 cup unsalted butter, softened
- 4 large eggs
- 1 cup buttermilk
- 2 tablespoons lemon zest
- 2 tablespoons culinary lavender
- 1 teaspoon vanilla extract
- For the frosting:
- 1 cup unsalted butter, softened
- 4 cups powdered sugar
- 2 tablespoons lemon juice
- 1 teaspoon vanilla extract
- Fresh lemon slices and lavender for decoration
Instructions
- Preheat your oven to 350°F (175°C). Grease and flour two 9-inch round cake pans.
- In a large bowl, mix flour, sugar, baking powder, and salt. Add the softened butter and mix until crumbly.
- In another bowl, whisk together eggs, buttermilk, lemon zest, lavender, and vanilla. Gradually add this mixture to the dry ingredients, mixing until just combined.
- Divide the batter evenly between the prepared pans. Bake for 25-30 minutes or until a toothpick comes out clean.
- Let the cakes cool in the pans for 10 minutes, then transfer to wire racks to cool completely.
- For the frosting, beat the softened butter until creamy. Gradually add powdered sugar, lemon juice, and vanilla, mixing until smooth and fluffy.
- Once the cakes are cool, spread frosting between the layers and on top and sides of the cake. Decorate with fresh lemon slices and lavender sprigs.
- Slice, serve, and enjoy your delightful Lemon Lavender Cake!
Refreshing Strawberry Shortcake With Homemade Whipped Cream
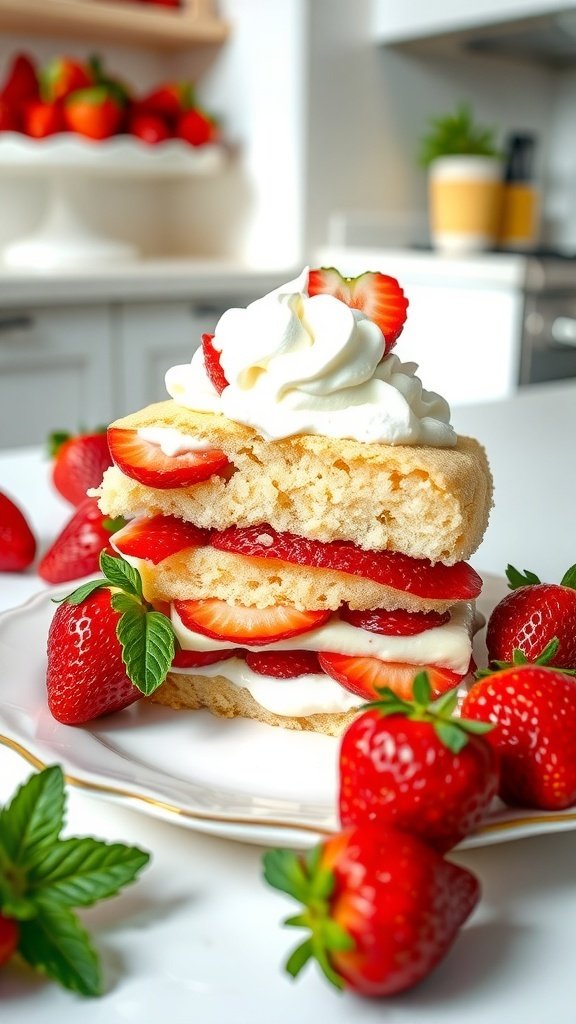
Spring is the perfect time for a light and fruity dessert, and nothing says spring quite like a strawberry shortcake. This delightful treat showcases layers of fluffy cake, fresh strawberries, and rich homemade whipped cream. The vibrant red strawberries pop against the soft, golden cake, making it a feast for the eyes as well as the taste buds.
In the image, you can see a beautifully stacked strawberry shortcake. Each layer is filled with sweet strawberries and creamy whipped topping. The fresh mint leaves add a touch of color and a hint of freshness. This dessert is not just delicious; it’s also a wonderful way to celebrate the season.
Making your own strawberry shortcake is easier than you might think. With just a few simple ingredients, you can create a dessert that impresses everyone at the table. Let’s get into the details of how to whip up this refreshing treat!
Charming Carrot Cake With Cream Cheese Frosting

Spring is the perfect time to enjoy a delightful carrot cake. This charming dessert is not only visually appealing but also packed with flavor. The cake features a moist texture, thanks to the grated carrots, and is topped with a rich cream cheese frosting that adds a creamy touch.
The cake is beautifully decorated with a sprinkle of orange carrot shavings and crunchy walnuts, making it a feast for the eyes. Surrounding the cake are fresh flowers, adding a cheerful spring vibe. The vibrant colors of the cake and the flowers create a lovely contrast that is sure to brighten any gathering.
Making this carrot cake is a breeze. You’ll love how simple it is to whip up this delicious treat for family and friends. Let’s get into the ingredients and steps to create this springtime favorite!
Ingredients
- 2 cups all-purpose flour
- 2 cups granulated sugar
- 1 teaspoon baking powder
- 1 teaspoon baking soda
- 1 teaspoon ground cinnamon
- 1/2 teaspoon salt
- 1 cup vegetable oil
- 4 large eggs
- 3 cups grated carrots
- 1 cup crushed pineapple, drained
- 1 cup chopped walnuts
- 8 oz cream cheese, softened
- 1/2 cup unsalted butter, softened
- 4 cups powdered sugar
- 1 teaspoon vanilla extract
Instructions
- Preheat your oven to 350°F (175°C). Grease and flour two 9-inch round cake pans.
- In a large bowl, mix together the flour, sugar, baking powder, baking soda, cinnamon, and salt.
- In another bowl, whisk together the oil and eggs until well combined. Stir in the grated carrots and crushed pineapple.
- Combine the wet and dry ingredients, mixing until just combined. Fold in the chopped walnuts.
- Divide the batter evenly between the prepared pans. Bake for 25-30 minutes, or until a toothpick inserted in the center comes out clean.
- Let the cakes cool in the pans for 10 minutes, then transfer to wire racks to cool completely.
- For the frosting, beat the cream cheese and butter together until smooth. Gradually add the powdered sugar and vanilla, mixing until creamy.
- Once the cakes are completely cool, spread frosting between the layers and on top of the cake. Decorate with additional walnuts and carrot shavings if desired.
Exquisite Raspberry Almond Cake For A Touch Of Elegance
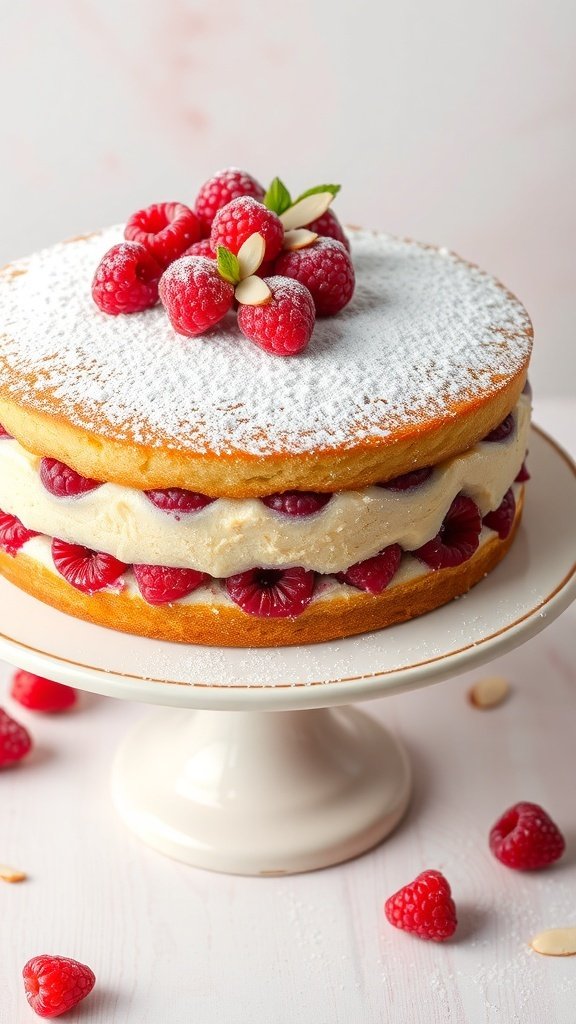
Spring is a wonderful time to celebrate with delightful desserts, and the Raspberry Almond Cake is a perfect choice. This cake features layers of soft, fluffy sponge filled with creamy almond frosting and fresh raspberries. The vibrant red raspberries not only add a pop of color but also a burst of flavor that complements the almond beautifully.
The cake is elegantly topped with more raspberries and a light dusting of powdered sugar, making it a showstopper for any gathering. It’s simple yet sophisticated, perfect for springtime celebrations like birthdays, brunches, or even a lovely afternoon tea.
To make this cake, gather your ingredients and follow the steps below for a delightful treat that will impress your guests.
Ingredients
- 1 ½ cups all-purpose flour
- 1 cup granulated sugar
- ½ cup unsalted butter, softened
- 2 large eggs
- 1 teaspoon almond extract
- ½ cup milk
- 2 teaspoons baking powder
- ¼ teaspoon salt
- 1 cup fresh raspberries
- 1 cup heavy cream
- 2 tablespoons powdered sugar
- Almond slices for garnish
Instructions
- Preheat the oven to 350°F (175°C). Grease and flour two 9-inch round cake pans.
- In a large bowl, cream together the softened butter and granulated sugar until light and fluffy. Add the eggs one at a time, mixing well after each addition.
- Stir in the almond extract and milk. In another bowl, combine the flour, baking powder, and salt. Gradually add the dry ingredients to the wet mixture, mixing until just combined.
- Divide the batter evenly between the prepared pans. Bake for 25-30 minutes, or until a toothpick inserted in the center comes out clean. Let the cakes cool in the pans for 10 minutes before transferring to a wire rack to cool completely.
- While the cakes cool, whip the heavy cream with powdered sugar until soft peaks form.
- Once the cakes are cool, spread a layer of whipped cream on top of one cake layer, then add fresh raspberries. Place the second layer on top and repeat the process. Finish by topping the cake with more whipped cream, raspberries, and almond slices.
- Dust with powdered sugar before serving. Enjoy your elegant Raspberry Almond Cake!
Zesty Orange Olive Oil Cake With Citrus Glaze
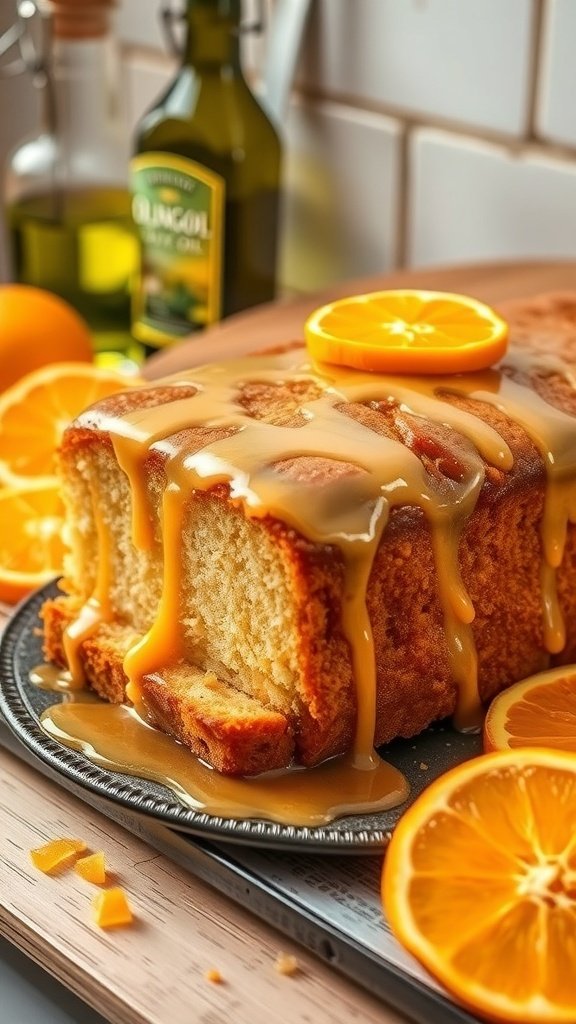
This Zesty Orange Olive Oil Cake is a delightful treat that perfectly captures the essence of spring. The image showcases a beautifully baked loaf, drizzled with a shiny citrus glaze that glistens under the light. Fresh orange slices sit atop the cake, adding a pop of color and hinting at the bright flavors inside.
Using olive oil instead of butter gives this cake a moist texture and a subtle richness. The citrus glaze, made from fresh orange juice, enhances the cake’s flavor, making each bite refreshing and light. Whether it’s for a spring gathering or a cozy afternoon snack, this cake is sure to impress.
Now, let’s get into the details of making this delicious cake!
Ingredients
- 1 ½ cups all-purpose flour
- 1 cup granulated sugar
- ½ cup extra virgin olive oil
- 3 large eggs
- 1 teaspoon baking powder
- ½ teaspoon baking soda
- 1 teaspoon salt
- 1 tablespoon orange zest
- ½ cup fresh orange juice
- 1 cup powdered sugar (for glaze)
- 2 tablespoons fresh orange juice (for glaze)
Instructions
- Preheat your oven to 350°F (175°C). Grease a loaf pan and set aside.
- In a mixing bowl, whisk together the flour, baking powder, baking soda, and salt.
- In another bowl, beat the sugar and eggs until light and fluffy. Gradually add the olive oil, orange zest, and fresh orange juice, mixing until well combined.
- Slowly add the dry ingredients to the wet mixture, stirring until just combined.
- Pour the batter into the prepared loaf pan and smooth the top. Bake for 45-50 minutes or until a toothpick inserted in the center comes out clean.
- While the cake is baking, prepare the glaze by mixing the powdered sugar with fresh orange juice until smooth.
- Once the cake is done, let it cool in the pan for 10 minutes before transferring it to a wire rack. Drizzle the glaze over the warm cake.
- Allow the glaze to set before slicing. Enjoy your zesty orange olive oil cake!
Decadent Chocolate Mint Cake For Chocolate Lovers
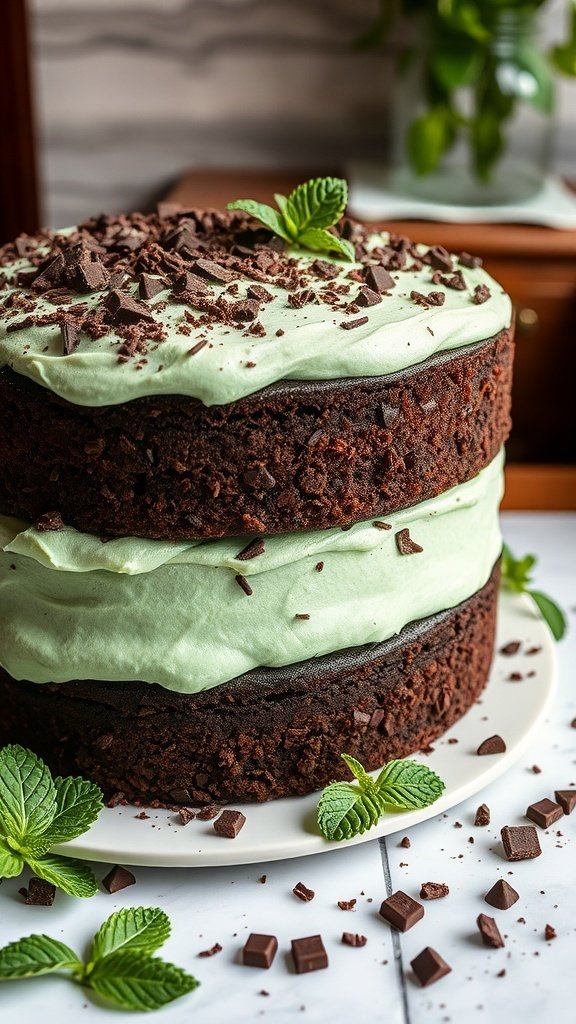
This chocolate mint cake is a dream come true for anyone who loves rich flavors. The deep, dark chocolate layers are perfectly complemented by a light and fluffy mint frosting. It’s a cake that not only looks stunning but also tastes incredible.
The cake is layered with a creamy mint frosting that adds a refreshing twist. Topped with chocolate shavings and fresh mint leaves, it’s as pleasing to the eye as it is to the palate. This dessert is perfect for spring gatherings or any celebration where you want to impress your guests.
Making this cake is easier than it looks. With simple ingredients and straightforward steps, you can create a show-stopping dessert that will have everyone asking for seconds.
Ingredients
- 1 3/4 cups all-purpose flour
- 3/4 cup unsweetened cocoa powder
- 2 cups granulated sugar
- 1 1/2 teaspoons baking powder
- 1 1/2 teaspoons baking soda
- 1 teaspoon salt
- 2 large eggs
- 1 cup whole milk
- 1/2 cup vegetable oil
- 2 teaspoons vanilla extract
- 1 cup boiling water
- 1 cup heavy cream
- 1/2 cup powdered sugar
- 1 teaspoon peppermint extract
- 1/4 cup chocolate shavings (for topping)
- Fresh mint leaves (for garnish)
Instructions
- Preheat your oven to 350°F (175°C). Grease and flour two 9-inch round cake pans.
- In a large bowl, mix flour, cocoa powder, sugar, baking powder, baking soda, and salt. Add eggs, milk, oil, and vanilla. Beat on medium speed for 2 minutes. Stir in boiling water until well combined.
- Pour the batter evenly into the prepared pans. Bake for 30-35 minutes or until a toothpick comes out clean. Let the cakes cool in the pans for 10 minutes, then transfer to wire racks to cool completely.
- For the frosting, whip the heavy cream until soft peaks form. Gradually add powdered sugar and peppermint extract, continuing to whip until stiff peaks form.
- Once the cakes are cool, place one layer on a serving plate. Spread a generous amount of mint frosting on top. Place the second layer on top and frost the top and sides of the cake.
- Garnish with chocolate shavings and fresh mint leaves. Slice and serve!
Light And Fluffy Coconut Cream Cake For A Tropical Twist
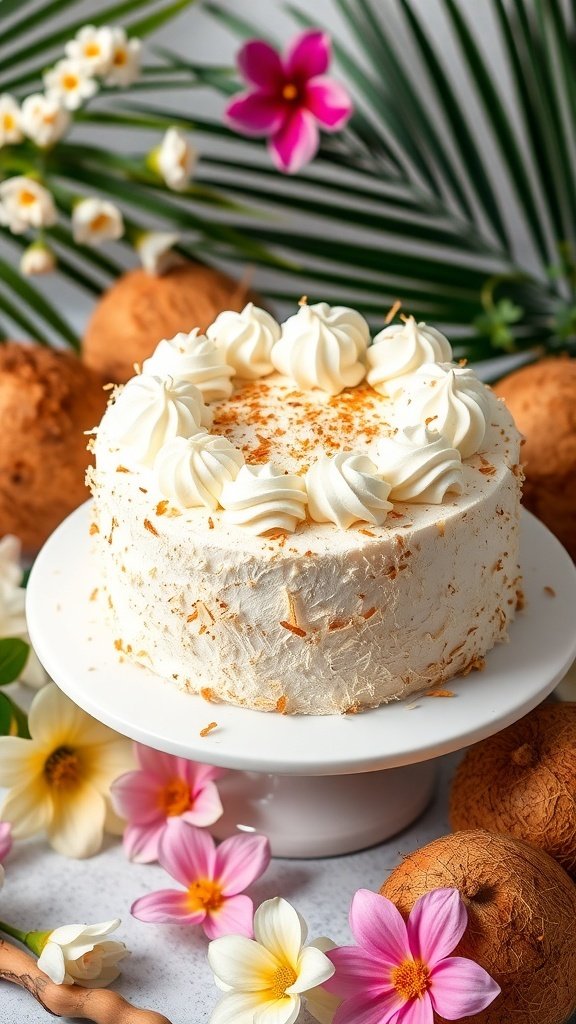
Spring is a wonderful time to enjoy light and fluffy desserts, and a coconut cream cake fits perfectly into this season. This cake is not just a treat for the taste buds; it’s also a feast for the eyes. The image showcases a beautifully decorated coconut cream cake, topped with delicate swirls of whipped cream and sprinkled with toasted coconut flakes. The vibrant flowers and palm leaves in the background add a tropical vibe, making it feel like a slice of paradise.
The cake itself is light and airy, perfect for warm spring days. Coconut brings a refreshing twist, making each bite feel like a mini vacation. Whether you’re hosting a spring gathering or simply treating yourself, this cake is sure to impress.
Ingredients
- 1 cup all-purpose flour
- 1 cup granulated sugar
- 1/2 cup unsalted butter, softened
- 1 cup coconut milk
- 1 teaspoon baking powder
- 1/2 teaspoon baking soda
- 1/4 teaspoon salt
- 3 large eggs
- 1 teaspoon vanilla extract
- 1 cup shredded coconut
- 1 cup heavy cream
- 2 tablespoons powdered sugar
- Toasted coconut flakes for decoration
Instructions
- Preheat your oven to 350°F (175°C). Grease and flour a round cake pan.
- In a large bowl, cream together the softened butter and granulated sugar until light and fluffy. Add the eggs one at a time, mixing well after each addition.
- In another bowl, combine the flour, baking powder, baking soda, and salt. Gradually add this dry mixture to the butter mixture, alternating with the coconut milk. Stir in the vanilla extract and shredded coconut.
- Pour the batter into the prepared cake pan and bake for 25-30 minutes, or until a toothpick comes out clean. Let it cool in the pan for 10 minutes before transferring to a wire rack.
- For the frosting, whip the heavy cream with powdered sugar until soft peaks form. Once the cake is completely cool, spread the whipped cream over the top and sides of the cake. Sprinkle toasted coconut flakes on top for decoration.
Classic Vanilla Bean Cake With Fresh Berries
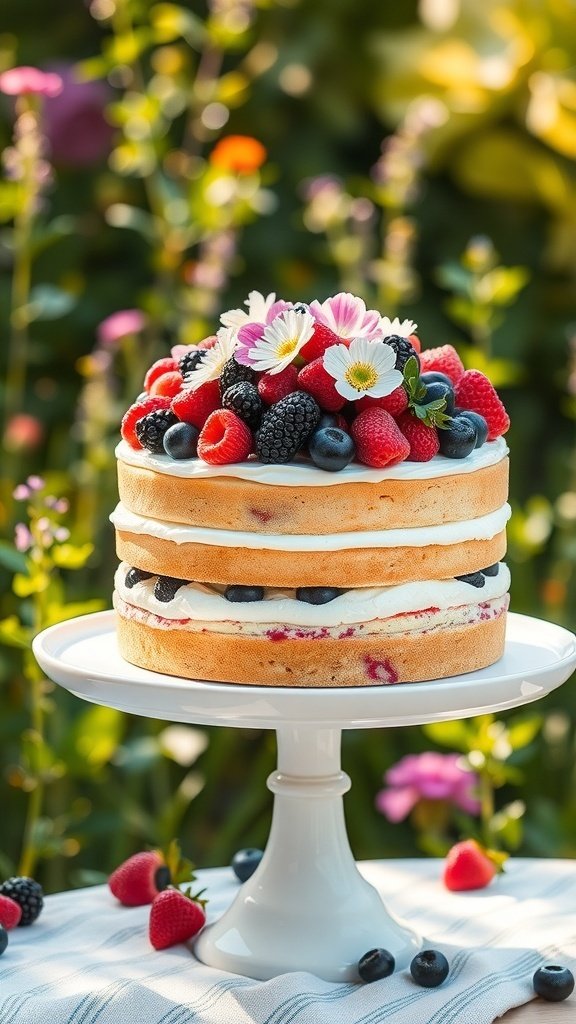
Spring is the perfect time to enjoy a light and refreshing dessert, and a classic vanilla bean cake topped with fresh berries fits the bill. This cake is not just about taste; it’s a feast for the eyes too. The layers of fluffy vanilla cake are beautifully complemented by a colorful array of berries, making it a stunning centerpiece for any gathering.
The cake is moist and tender, thanks to the rich flavor of vanilla beans. Each bite is a delightful experience, especially when paired with the sweet-tartness of strawberries, blueberries, and blackberries. The addition of whipped cream adds a creamy texture that balances the fruit perfectly.
Whether you’re celebrating a birthday, hosting a spring picnic, or simply treating yourself, this cake is sure to impress. It’s simple to make, and the fresh ingredients really shine. Let’s get into the details of how to whip up this delicious dessert!
Ingredients
- 2 ½ cups all-purpose flour
- 2 ½ teaspoons baking powder
- ½ teaspoon salt
- 1 cup unsalted butter, softened
- 2 cups granulated sugar
- 4 large eggs
- 1 tablespoon vanilla bean paste
- 1 cup whole milk
- 2 cups mixed fresh berries (strawberries, blueberries, blackberries)
- 1 cup heavy whipping cream
- 2 tablespoons powdered sugar
Instructions
- Preheat your oven to 350°F (175°C). Grease and flour three 8-inch round cake pans.
- In a bowl, whisk together flour, baking powder, and salt. Set aside.
- In a large mixing bowl, cream the softened butter and sugar until light and fluffy. Add eggs one at a time, mixing well after each addition. Stir in the vanilla bean paste.
- Gradually add the dry ingredients to the wet mixture, alternating with the milk. Mix until just combined.
- Divide the batter evenly among the prepared pans. Bake for 25-30 minutes, or until a toothpick inserted in the center comes out clean.
- Let the cakes cool in the pans for 10 minutes, then transfer to wire racks to cool completely.
- While the cakes cool, whip the heavy cream and powdered sugar until soft peaks form.
- Once the cakes are cool, layer them with whipped cream and fresh berries in between each layer. Top the cake with more whipped cream and a beautiful arrangement of berries.
- Slice and serve your delightful vanilla bean cake, and enjoy the burst of flavors!
Unique Pistachio Rose Cake For A Floral Flavor
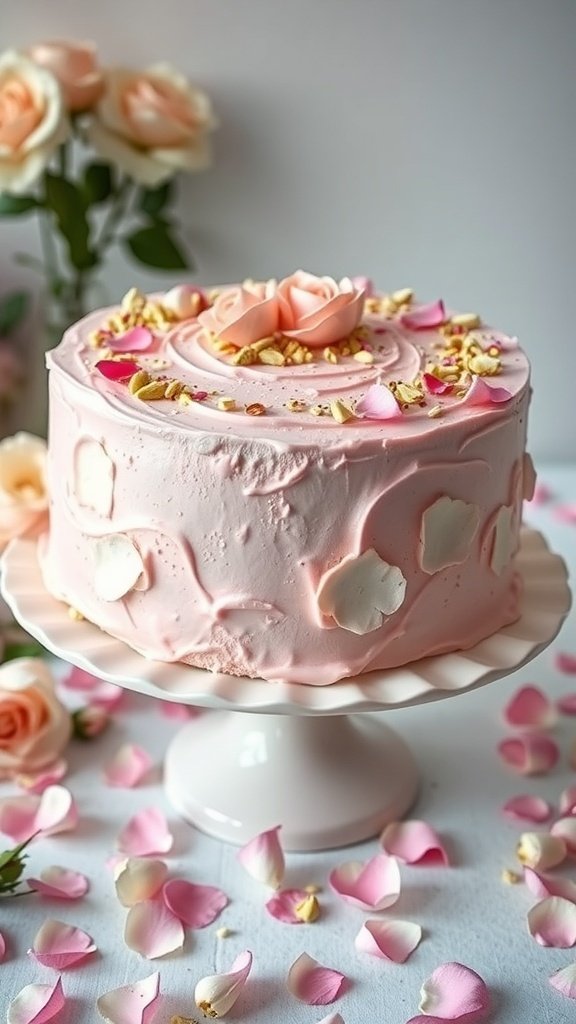
The Unique Pistachio Rose Cake is a delightful treat that captures the essence of spring. With its soft pink frosting and delicate rose decorations, this cake is perfect for any celebration. The combination of pistachio and rose flavors creates a unique taste that is both refreshing and fragrant.
This cake not only looks stunning but also brings a floral flavor that is sure to impress your guests. The crunchy pistachios add texture, while the rose essence provides a subtle sweetness. It’s a great way to celebrate the beauty of spring with a dessert that stands out.
To make this cake, you’ll need some simple ingredients. Gather your baking essentials and get ready to create something special!
Ingredients
- 2 cups all-purpose flour
- 1 cup granulated sugar
- 1/2 cup unsalted butter, softened
- 1 cup milk
- 3 large eggs
- 1 teaspoon baking powder
- 1/2 teaspoon baking soda
- 1/4 teaspoon salt
- 1/2 cup ground pistachios
- 1 teaspoon rose water
- 2 cups powdered sugar (for frosting)
- 1/2 cup unsalted butter (for frosting)
- 1-2 tablespoons milk (for frosting)
- Edible rose petals for decoration
Instructions
- Preheat your oven to 350°F (175°C). Grease and flour two 9-inch round cake pans.
- In a large bowl, cream together the softened butter and granulated sugar until light and fluffy. Add the eggs one at a time, mixing well after each addition.
- In a separate bowl, whisk together the flour, baking powder, baking soda, salt, and ground pistachios.
- Gradually add the dry ingredients to the wet mixture, alternating with the milk. Stir in the rose water until well combined.
- Divide the batter evenly between the prepared pans. Bake for 25-30 minutes, or until a toothpick inserted in the center comes out clean.
- Let the cakes cool in the pans for 10 minutes before transferring them to a wire rack to cool completely.
- For the frosting, beat together the softened butter and powdered sugar until smooth. Add milk as needed to reach your desired consistency.
- Once the cakes are cool, spread frosting between the layers and on top of the cake. Decorate with edible rose petals and additional chopped pistachios.
Whimsical Funfetti Cake For A Joyful Spring Celebration

Spring is the perfect time for cheerful celebrations, and what better way to mark the season than with a whimsical funfetti cake? This delightful treat is bursting with colorful sprinkles, making it a joyful centerpiece for any gathering. The light, fluffy cake pairs wonderfully with a creamy frosting, creating a sweet experience that everyone will love.
The vibrant colors of the sprinkles reflect the blooming flowers and sunny days of spring. Each slice reveals a rainbow of fun, inviting smiles and laughter. Whether you’re hosting a birthday party, a spring picnic, or just a casual get-together, this cake is sure to brighten the day.
Making a funfetti cake is simple and fun! Gather your ingredients and get ready to create a dessert that will bring joy to your table.
Ingredients
- 2 ¾ cups all-purpose flour
- 1 ½ cups granulated sugar
- 1 tablespoon baking powder
- ½ teaspoon salt
- 1 cup unsalted butter, softened
- 4 large eggs
- 1 tablespoon vanilla extract
- 1 cup milk
- 1 cup rainbow sprinkles
- 2 cups powdered sugar
- 1 cup unsalted butter, softened (for frosting)
- 2 teaspoons vanilla extract (for frosting)
Instructions
- Preheat your oven to 350°F (175°C). Grease and flour two 9-inch round cake pans.
- In a large bowl, mix flour, sugar, baking powder, and salt. Add softened butter and mix until crumbly.
- In another bowl, whisk together eggs, vanilla, and milk. Gradually add this mixture to the dry ingredients, mixing until smooth.
- Fold in the rainbow sprinkles gently, being careful not to overmix.
- Divide the batter evenly between the prepared cake pans. Bake for 25-30 minutes or until a toothpick comes out clean.
- Let the cakes cool in the pans for 10 minutes, then transfer to wire racks to cool completely.
- For the frosting, beat together softened butter, powdered sugar, and vanilla until creamy and smooth.
- Once the cakes are cool, spread frosting between the layers and on top of the cake. Decorate with additional sprinkles for a festive touch.