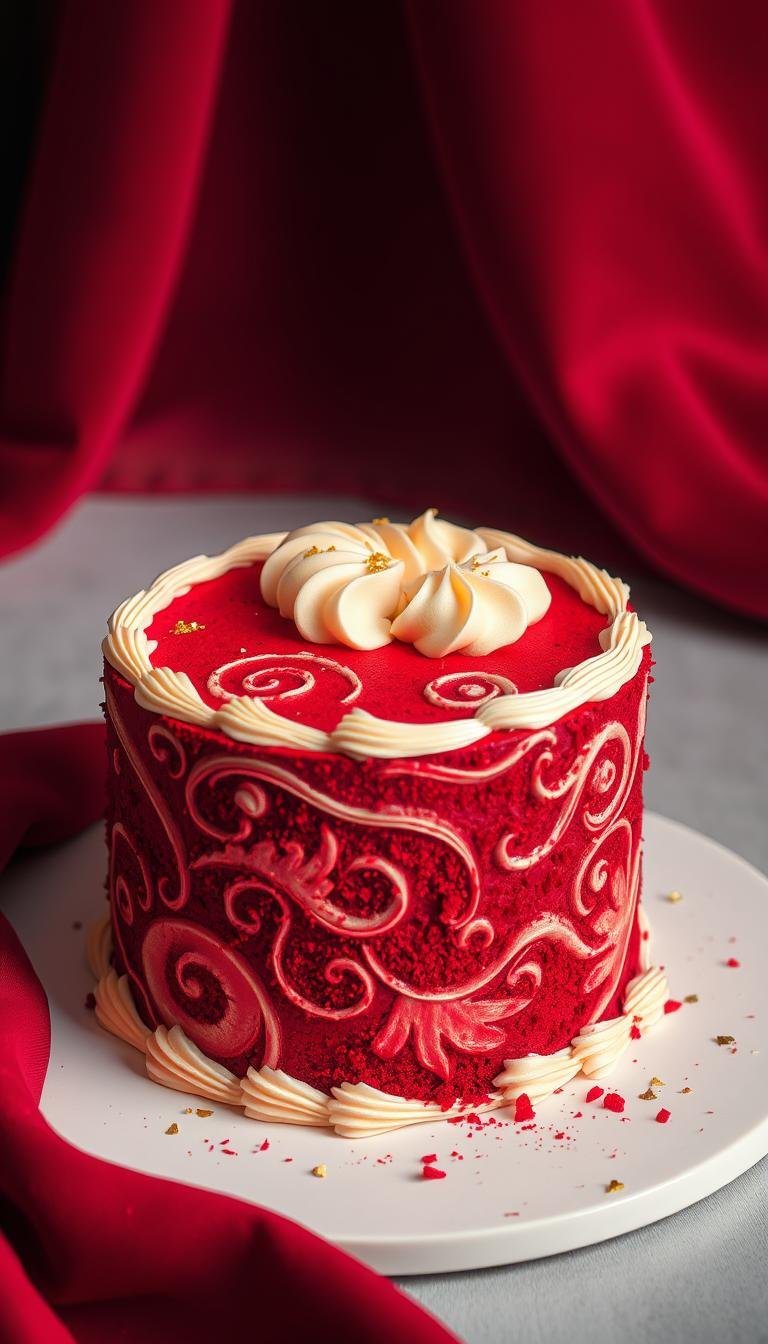
Beautiful Red Velvet Cake Design Ideas and Inspiration
Surprising fact: professional bakers say a single teaspoon of gel food coloring can shift a layer from pale to vivid, changing how every bite looks and photographs.
This Website contains affiliate links. That means I may earn a small commission if you purchase through my links, at no extra cost to you.
This guide helps you make a show-stopping treat that tastes authentic and looks polished. We’ll focus on proven techniques and U.S.-available products like Americolor and Chefmaster gels.
Start with gel food coloring for rich color without thinning batter, or try beetroot-based natural gels if you prefer avoiding synthetic dyes. For clean lines and neat borders, build structure into a cream cheese buttercream that can both frost and pipe with Wilton 1M or 4B tips.
Layer reliability comes from simple pan choices — three 6-inch or two 8-inch pans — and even batter portions. Bake at 350°F for roughly 27–35 minutes and chill layers for easier crumb-coating and final finish.
Key Takeaways
- Use gel food coloring for saturated color; consider natural beetroot gels as an alternative.
- Pair with structured cream cheese buttercream for smooth sides and piped accents.
- Common pans: three 6-inch or two 8-inch for even layers and reliable stacking.
- Texture and flavor rely on gentle cocoa, buttermilk tang, and balanced sweetness.
- Bake, cool, and chill layers ahead to save time and secure a clean finish.
Why Red Velvet Wins: Flavor, Texture, and Visual Impact
The appeal comes from a delicate cocoa whisper and the tang that buttermilk and vinegar add. This profile creates a balanced flavor that feels more nuanced than a straight chocolate loaf. A small measure of natural cocoa deepens taste without overwhelming the batter.
The ideal texture is fine and tender. Oil-based formulas often yield a moister, fluffier crumb than butter-only recipes. With careful mixing, layers slice cleanly and hold moisture over time.
Visual contrast drives recognition: a vivid interior set against smooth white cream cheese frosting creates instant impact. Crumb décor or a combed finish enhances this contrast and ties texture to presentation.
- Keep cocoa small for classic balance.
- Use buttermilk + vinegar to react with leaveners for lift and tenderness.
- Preheat the oven and watch bake time in minutes to protect moisture.
Thoughtful color choices and reliable gels hit the target shade without off-notes. For exact proportions and timing, see the following recipe sections that list flour, food color, and step-by-step methods to secure both taste and eye appeal.
Key Ingredients for Authentic Red Velvet Flavor and Color
Pick ingredients that build flavor and structure: acid, fat, and a touch of cocoa make the profile classic and reliable.
Buttermilk and vinegar work together for tang and lift. The acid reacts with baking soda so the crumb rises softly and stays tender. Use full-fat buttermilk for best mouthfeel.
Oil vs. butter: vegetable oil keeps the batter moist and yields a lighter crumb. Butter adds flavor but can make layers denser. Choose oil if you want fluffier results in this recipe.
Staples include all-purpose flour, granulated sugar, large eggs, fine salt, and baking soda. Weigh flour and sugar when possible. Combine dry powder leaveners in a bowl to mix evenly before adding wet ingredients.
A hint of natural cocoa deepens taste without turning the cake into chocolate. Avoid Dutch-processed cocoa to preserve lift.
For color, gel red food coloring (Americolor or Chefmaster) gives intensity without thinning. Liquid food coloring may need more volume. U.S.-friendly beetroot-based gels also deliver rich red food tones without off-flavors.
- Tip: Use brick-style cream cheese for stable frosting and piping.
- Measure: Mise en place and weighing prevent errors; batter will darken a few minutes into baking.
Tools and Cake Pans You’ll Need
Gather reliable tools and the right pans before you mix to keep layers even and finishes clean.
6-inch vs 8-inch pans and parchment prep
Three 6-inch pans give a tall, elegant look; two 8-inch pans cut down seams and bake faster. Bake at 350°F for standard timing and watch the minutes closely.
Line bottoms with parchment or wax circles and grease the sides to ensure a clean release. Use a kitchen scale to weigh batter so each layer bakes uniformly.
Stand mixer, offset spatula, bench scraper, and cake comb
A stand mixer speeds mixing; a hand mixer works if you keep speeds steady and avoid overmixing. Keep a clean bowl ready to switch between batter and frosting to prevent crumbs.
Use a small offset spatula to fill gaps and a bench scraper to smooth sides and sharpen edges. A cake comb adds linear or scalloped texture for a professional finish.
Piping tips (Wilton 1M, 4B) and small piping bags
Pair Wilton 1M and 4B tips with small piping bags for rosettes, stars, and borders that hold shape. A turntable makes frosting application faster and cleaner.
“Weighing pans and portioning batter is the easiest upgrade that fixes uneven layers every time.”
| Tool | Purpose | Recommended |
|---|---|---|
| 3 x 6-inch pans | Tall layers, elegant tiers | Use parchment circles; weigh batter |
| 2 x 8-inch pans | Classic silhouette, fewer seams | Grease sides; monitor bake minutes |
| Turntable & bench scraper | Smooth sides, sharp edges | Essential for frost and finish |
| Wilton 1M/4B & piping bags | Ro settes, stars, borders | Small bags for control |
Plan your workspace: reserve a staging area for filled pans and a cooling rack for layers the minutes after baking. This small prep step makes the rest of the recipes easier and cleaner.
Step-by-Step Recipe: Make the Cake Batter and Bake
Follow a simple sequence to build a smooth batter and predictable bake. Begin by combining oil, buttermilk, eggs, vanilla, vinegar, and gel coloring in a bowl until evenly blended. Add sugar and whisk until the mix looks glossy, then set aside briefly to streamline the next step.
Sift dry ingredients—flour, natural cocoa, salt, baking soda, and a touch of baking powder—so the leaveners and powder distribute evenly.
Fold the dry mix into the wet just until smooth. Stop when there are no streaks; overmixing makes the crumb tough. This batter should be glossy and pourable.
Portioning and baking
Divide the batter evenly by weight or by equal cups per pan. For three 6-inch pans, bake 27–30 minutes at 350°F. For two 8-inch pans, expect about 30–35 minutes in the oven. Start checking near the lower end of the minutes range.
- Cool layers in pans for a few minutes, then turn out to a rack.
- Let cool completely before assembly to protect the frosting.
- Level domes with a serrated knife and save the trimmed tops. Crumble those into fine crumbs for decoration.
“Portioning batter by weight is the easiest upgrade for even layers.”
This recipe yields roughly 6 cups (about 1300 g) of batter. Adjust for your pans and oven quirks, and avoid opening the door too early to prevent sinks.
Cream Cheese Frosting That Pipes Like a Dream
A piping-ready frosting starts with the right fats. Use full‑fat brick cream cheese and room-temperature unsalted butter to build structure that spreads cleanly and holds detailed work.
Cream until smooth: Beat the cream cheese and butter in a bowl until uniform and lump-free before adding powdered sugar. Add the sugar gradually to control sweetness and texture.
Add a splash of heavy cream to reach a silky, pipeable consistency. Flavor with real vanilla and a light pinch of salt to lift the tang without overpowering the sugar.
- Target texture: soft enough to spread, firm enough for rosettes and stars.
- Fill piping bags with Wilton 1M or 4B tips for consistent swirls.
- Make a 1.5x batch if you plan heavy piping or many borders.
If the frosting chills, re-whip briefly for a smooth, aerated finish. Apply a thin crumb coat, chill a few minutes, then finish with a thicker layer to get sharp edges and a clean canvas for your red velvet layers.
“Keep bowls and tools cool but not cold to maintain structure without stiffening too quickly.”
Red Velvet Cake Design Ideas & Inspiration
Contrast and texture create memorable presentations with simple steps. Start with a smooth white finish and use crumbs or comb work to add personality.

Classic white frosting with crumb sides
Create the iconic look: spread a clean layer of cheese frosting, chill after a thin crumb coat, then press crumbs gently into the lower third or full height for striking contrast.
Textured finishes using a cake comb
Use a comb to add ridges or waves. This transforms a plain surface into a refined exterior with minimal effort.
Rosettes and stars with cream cheese buttercream
Fit Wilton 1M or 4B tips and pipe rosettes in short bursts. Arrange them as a crescent or full crown for dramatic tops.
Minimalist edges vs playful borders
Choose ultra-smooth sides and sharp edges for a modern vibe. Or go playful with layered borders and varied star sizes for a festive feel.
“Chill after the crumb coat to keep lines crisp and the frosting stable.”
- Use three 6-inch layers for height or two 8-inch pans for a broader canvas.
- Keep color consistent; reserve leveled tops for crumbs to press on the sides.
- Warm a knife between slices to reveal clean layers and perfect presentation.
Mastering Color: From Gel Food Coloring to Natural Reds
Choose a concentrated gel when you need bold pigment with no change to batter texture. Gel pastes like Americolor and Chefmaster give deep tone with just a few drops. Add color into the wet phase—mix into buttermilk or the oil blend—for even dispersion.
Americolor and Chefmaster: how much to use
Start small and build. Aim for a pre-bake shade slightly deeper than your target; the crumb will darken in the oven. Measure by drops or grams so repeats match across batches.
Natural beetroot-based options in the U.S.
Consider Enco Natural Red or similar beetroot gels to avoid synthetic dyes like Red 3. These give vibrant tones while keeping flavor neutral in most recipes.
Balancing intensity without bitterness
Avoid excess liquid dyes that thin the batter and risk off-flavors. Gels minimize bitterness and let you keep structure. Test a small portion first and use white cream frosting to amplify contrast.
“Store gels with caps tight and track measurements to keep color consistent over time.”
- Pro tip: scrape bowl sides while mixing to prevent streaks.
- Expect slight darkening during bake; calibrate pre-bake tone accordingly.
Sizing, Bake Times, and Conversions
Sizing and timing matter more than you might think. Choose pans that match your serving goal before you mix batter. This simple choice changes how you portion, bake, and finish the layers.
Three 6-inch layers vs two 8-inch layers
Pick three 6-inch layers for a taller presentation or two 8-inch layers for a classic profile with fewer seams.
Three 6-inch rounds need roughly 440 g of batter each for even height. Two 8-inch pans use the full batch split evenly between them.

How many cups/grams of batter per pan
One batch yields about 1300 g or 6 cups of batter. Aim for roughly 440 g per 6-inch pan or divide by area when using other sizes.
Keep pans no more than two-thirds full to avoid overflow and center collapse.
Adapting for cupcakes and tiered cakes
For cupcakes, portion evenly and bake 18–21 minutes at 350°F. Avoid overfilling liners to keep domes neat.
To convert for tiers, multiply batter by the area ratio of each pan and keep layer thickness consistent for stability.
“Weigh pans and batter to prevent uneven rise and mismatched layer heights.”
| Pan Setup | Batter per Pan | Bake Time (350°F) | Notes |
|---|---|---|---|
| 3 x 6-inch pans | ≈440 g (~2 cups) each | 27–30 minutes | Taller look; more seams to level |
| 2 x 8-inch pans | ≈650 g (~3 cups) each | 30–35 minutes | Broader profile; fewer layers |
| Standard cupcakes (12) | ~100–110 g each | 18–21 minutes | Check early; avoid overfilling |
| Tier conversions | Scale by pan area | Adjust minutes + a few extra | Maintain leavener ratios and monitor structure |
Record the exact cups or grams you use per pan and note oven quirks. That practice makes future baking repeatable, whether you’re working with flour, cocoa powder, sugar, vinegar, or food coloring.
Make-Ahead, Storage, and Day-Of Timing
Plan a simple timing roadmap so cooling, chilling, and thawing happen without last-minute rushes. Break the work into stages: bake layers, cool fully, wrap tightly, and freeze. This spreads effort across days and saves time on the day you decorate.
Freezing layers and when to thaw
Wrap each layer in plastic and foil. Properly sealed layers keep as fresh after thawing. Thaw wrapped layers in the fridge or at cool room temperature to limit condensation.
Refrigerating cream cheese frosting and re‑whipping
Store cream cheese buttercream in an airtight container in the refrigerator for up to two weeks. Set aside to warm, then re‑whip to restore smooth texture before spreading.
Apply a thin crumb coat and chill 10–30 minutes so the exterior sets and resists smearing. A frosted cake keeps in the fridge up to a week and in the freezer up to a month.
“Serve at room temperature for the best texture; cold slices can taste muted.”
- Protect cut edges with a thin layer of frosting to prevent drying.
- Keep extra frosting on hand for touch-ups after transport or handling.
- If color matters, finish decorating the day-of to avoid condensation dulling the finish.
Pro Tips and Troubleshooting for a Flawless Finish
Simple checks before you start make a big difference. Use room-temperature ingredients to help emulsify the batter and keep the crumb even. Weigh portions so each layer bakes uniformly and the final stack stays level.
Room-temperature ingredients and accurate measuring
Bring eggs, butter, and cheese to room temp. This helps the batter blend without streaks and improves texture.
Measure flour and sugar by weight for repeatable results. Accurate grams reduce variation in minutes and rise across pans.
Preventing domes, sinks, and dry texture
- Fill pans under two-thirds and avoid extra leavening powder to prevent domes.
- Don’t open the oven early; sudden cool air can cause sinks.
- Overmixing or too many minutes in the oven cause dryness—adjust technique and time.
- If a layer domes, level it once fully cool before stacking to protect the final finish.
Smoothing sides, sharp edges, and clean slices
Apply a thin crumb coat, chill briefly, then finish with a final layer. Use steady pressure with a bench scraper on a turntable for smooth sides.
“Warm your knife and wipe between cuts for perfect, clean slices.”
| Issue | Quick Fix | When to Use |
|---|---|---|
| Soft frosting | Chill 10 minutes or add 1 tsp cream and re‑whip | Before final smoothing |
| Uneven layers | Level cooled layers with a serrated knife | Pre-assembly |
| Sinking center | Reduce oven door openings; check pan fill | During baking |
| Dry crumb | Shorten minutes or mix gently next time | Post-bake diagnosis |
Conclusion
Wrap-up: This short checklist ties texture, color, and timing to predictable results for a memorable red velvet cake.
Keep essentials in balance: a light cocoa base, buttermilk plus vinegar for tang, and concentrated gels or beetroot-based color deliver authentic flavor and hue.
Measure precisely, mix just until combined, and portion batter evenly so layers bake in the right minutes. Use three 6‑inch or two 8‑inch pans to match your serving goal.
Rely on brick cream cheese and calibrated cream for a stable frosting that spreads and pipes clean details. Bake ahead, chill layers, apply a crumb coat, then finish with combs, crumbs, or piped rosettes.
Final note, experiment within these guardrails and you’ll get professional results that taste exceptional and photograph beautifully.