Vintage Birthday Cake Recipe: A Blast from the Past
Surprising fact: Nearly 70% of home bakers say they return to a single classic dessert time and again because it never fails.
This Website contains affiliate links. That means I may earn a small commission if you purchase through my links, at no extra cost to you.
This vintage treat blends old-fashioned charm with modern technique so you can bake a crowd-pleasing classic on any special day. It highlights a pure vanilla profile and a tender, even crumb using pantry staples like all-purpose flour, sugar, eggs, milk, and butter.
Expect fluffy yet moist layers with balanced sweetness and a buttery finish. The post shows both the straightforward creaming method and a whipped-egg approach inspired by Japanese sponge work for an ultra-plush texture.
Practical details: Bake at 350°F for about 30–35 minutes for two round layers or a 9×13 sheet, learn doneness checks, and get cooling tips for neat assembly. You’ll also find a classic American buttercream that is creamy and easy to pipe.
Key Takeaways
- Classic and modern methods for reliable results every time.
- Focus on a clear vanilla flavor and tender crumb.
- Bake at 350°F for ~30–35 minutes; test for doneness before cooling.
- Simple buttercream that’s creamy, pipeable, and customizable.
- Make-ahead and storage tips, including freezing unfrosted layers.
A timeless vanilla cake with old-fashioned charm
When you combine real vanilla and classic methods, the result tastes like a memory from a neighborhood bakery.
Why vintage techniques still win for flavor and texture
Classic butter methods depend on creaming butter and sugar until light and fluffy. This creates structure and a fine, even crumb that feels velvety on the tongue.
Modern plush adaptations whip whole eggs with sugar for several minutes until pale and thick. That extra lift adds air without making the layer fragile.
Adding hot milk with melted butter helps emulsify fats. The result is a softer crumb that stays fresh for up to four days, which is useful for busy timelines.
From European celebrations to American parties: a quick history note
Birthday traditions in Europe go back to the mid-19th century, while German bakers sold cakes for weddings and festivities as early as the 15th century. Today, a classic vanilla layer remains one of the most requested choices in the U.S.
“Simple ingredients, handled with care, deliver more authentic flavor than any shortcut.”
- Focus on quality: real vanilla extract and butter create that nostalgic bakery-style flavor.
- Technique matters: proper creaming and gentle folding give a fine crumb and even rise.
- Hybrid methods: whipped eggs plus hot milk produce airy, moist results that hold up over days.
| Technique | What it does | Result |
|---|---|---|
| Creaming butter & sugar | Incorporates air for structure | Even, tender crumb |
| Whipping whole eggs & sugar | Builds volume and lift | Light, plush texture |
| Hot milk + melted butter | Emulsifies fats and adds moisture | Soft crumb that stays fresh |
Ingredients you’ll need and smart substitutions
A focused list of pantry basics sets the stage for a tender, vintage-style vanilla layer.
Dry mix essentials: all-purpose flour, teaspoons baking powder, and salt
Use all-purpose flour for structure and flavor. Sift flour with measured teaspoons baking powder and a pinch of salt so leavening spreads evenly.
Combine the dry ingredients in a bowl before adding them to the wet mixture to avoid clumps.
Room-temperature dairy and eggs: milk, unsalted butter, and egg basics
Bring milk, eggs, and unsalted butter to room temperature for a smooth emulsion. Whole milk gives the best richness; low-fat may change rise slightly.
Vanilla extract vs butter flavoring: what’s truly “vintage”
Vanilla extract is the classic choice for aroma and authenticity. Use real vanilla for the clearest nostalgic note.
Butter flavoring is optional and can boost a bakery-style finish, especially in frostings.
Sugar selection: granulated vs superfine for better aeration
Granulated sugar works well for most methods. Choose superfine sugar when whipping eggs for extra aeration and a silkier crumb.
“Simple ingredients handled well give the truest vintage flavor.”
- Use standard U.S. measures like cups and teaspoons for easy scaling.
- Smart swaps: lactose-free milk or gluten-free blends are fine; expect texture differences.
Tools, cake pans, and prep to set you up for success
Start by choosing pans that match the look and height you want, then prep them carefully. Small decisions now save time and give more consistent results during baking.
Pan size and layer height: Two 8-inch round cake pans yield taller, bakery-style layers. Two 9-inch pans make slightly shorter, wider layers and are often easier to find in stores.
Choosing pans and lining with paper
Always line pan bottoms with parchment paper rounds for clean release. Light-colored aluminum pans bake more evenly; dark pans brown edges faster.
Grease-and-flour vs nonstick spray
For most pans, a quick spray plus a parchment round is enough. Use the classic shortening-and-flour method for notoriously sticky pans — it’s the most reliable.
Specialty baking sprays like Baker’s Joy combine oil and flour and save a step when you want consistent results.
- Avoid springform or loose-base pans with thin batter; they can leak. Use solid-base pans instead.
- Place pans on the center oven rack and bake at 350°F for even top-to-bottom browning.
- Weigh or divide batter evenly so both pans bake at the same rate for uniform layers.
- Prep tools — bowls, a stand mixer or hand mixer, spatulas, and measuring cups — before starting to streamline the process.
birthday cake recipe
Precise folding, tempering, and gentle mixing are the real secrets to a tender vintage layer.
Make the batter: creaming or whipped-egg method
Creaming method: Beat softened butter and sugar in a bowl until light and fluffy. Alternate adding the dry mixture and the milk/egg mixture, mixing 2–3 minutes total until smooth.
Whipped-egg method: Use a mixer to beat whole eggs and sugar for about 7 minutes until pale and tripled in volume. Fold dry ingredients in thirds to maintain air.
The hot milk and butter step
Heat milk with melted butter so the butter just melts. This warm mixture improves lift and leaves a softer crumb when incorporated.
Folding, mixing time, and avoiding overmixing
Fold gently and keep strokes minimal. Overmixing knocks out air and yields a dense crumb.
Into the pans and bake
Divide batter evenly into prepared pans, level the top, and tap to release big bubbles. Bake on the center rack at 350°F for 25–35 minutes.
Check at the earlier minutes mark: edges should be set, center spring back, and a toothpick come out clean. Cool in pans 10–15 minutes, then unmold and cool upside down for flatter tops.
| Step | Key action | Timing/Result |
|---|---|---|
| Creaming | Beat butter + sugar | 2–3 minutes; light, even crumb |
| Whip eggs | Beat whole eggs + sugar | ~7 minutes; voluminous, plush texture |
| Hot milk step | Heat milk + melted butter | Tempered in; softer crumb, better lift |
| Bake & cool | Center rack at 350°F | 25–35 minutes; cool 10–15 min in pans |
Buttercream frosting that complements a vintage layer cake
Choose a frosting that supports the crumb and enhances vanilla notes without overpowering the cake.
Classic American buttercream
Whip softened butter until pale and light. Gradually beat in sifted confectioners’ sugar, then add vanilla extract and small splashes of milk or cream to reach a pipeable texture.
Sift the sugar for ultra-smooth results. Beat longer after adding sugar to drive air into the mix and tame perceived sweetness.
Butter flavoring or all-vanilla: balancing taste
For a bakery-style note, a touch of butter flavoring can sit alongside real vanilla. For a cleaner aroma, keep the mix all-vanilla using high-quality extract.
Reduce cloying sweetness with a pinch of salt, longer whipping, and good vanilla. Adjust consistency with milk so swirls hold but do not slide.
Cream cheese twist: a tangy alternative
Blend equal parts softened butter and cream cheese before adding sifted sugar and vanilla. A pinch of salt lifts the tang and prevents flatness.
Thin with milk if needed and chill briefly before spreading. This version pairs especially well between tender cake layers and offers a vintage, slightly tangy finish.
“A smooth frosting celebrates the layers beneath — simple, well-whipped, and true to flavor.”
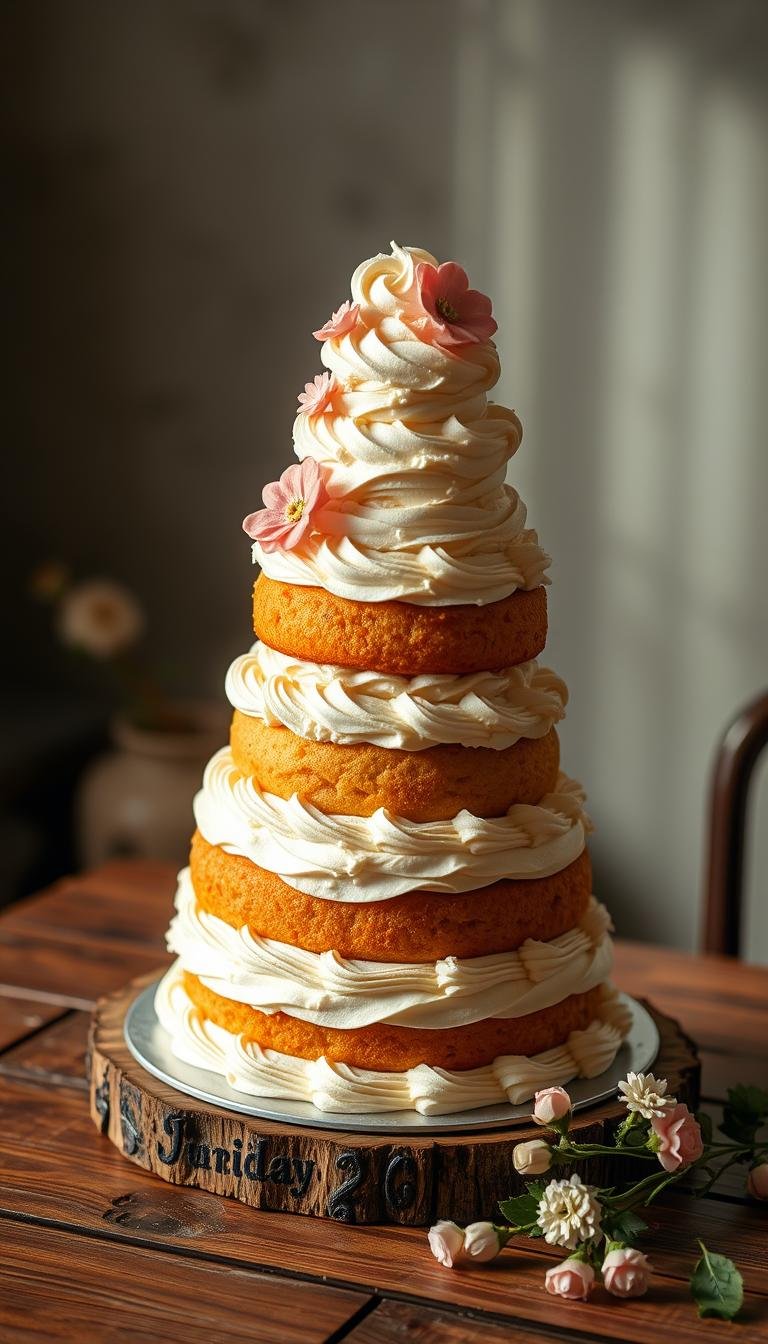
Layering, frosting, and decorating the homemade way
A neat assembly and thoughtful finishing touches make a homemade layer cake feel bakery-worthy.

Flat layers and crumb control
Cool pans briefly, then turn cakes upside down to flatten tops. This reduces trimming and helps each layer sit level.
Apply a thin crumb coat of frosting to trap loose crumbs. Chill 10–20 minutes so the coat firms before the final pass.
Smooth vs relaxed finishes
For a classic look, smooth the final frosting with a bench scraper while rotating the stand. For vintage charm, use a spatula to make casual swirls.
A generous layer of buttercream between cake layers keeps the stack stable and gives a satisfying bite.
Simple toppers: sprinkles, coconut, or flowers
Add sprinkles as soon as the frosting is spread so they stick before the surface sets. Confetti sprinkles give a playful finish.
Press shredded coconut into the sides for instant texture and a nostalgic bakery feel. For fresh flowers, wrap stems in foil and use pesticide-free blooms.
“Keep the design simple; homemade texture often looks warmer and more inviting than a perfectly smooth commercial finish.”
- Center the top layer carefully so sides align.
- Use a rotating stand to smooth or swirl with ease.
- Work quickly with decorations while the frosting is soft.
Pro techniques for that perfect vintage crumb
A few professional habits—consistent temperatures and prompt mixing—turn ordinary batter into a bakery-style layer.
Room temperature, fresh leavening, and steady mixer speeds
Keep all dairy and eggs at room temperature so ingredients blend smoothly into a uniform batter. Cold eggs slow whipping and can make the sugar seize, while warm eggs whip faster and higher.
Quick tip: Place chilled eggs in warm water for five minutes to raise their temperature before whipping.
Protect air: don’t pause the process
Once eggs and sugar are whipped, move steadily. Pauses let tiny bubbles collapse and reduce rise. Prepare pans and preheat the oven in advance so batter moves from bowl to oven in minutes.
- Check baking powder freshness; expired leavening yields flat, dense results.
- Make the hot milk-and-butter just before use so it stays warm and supports lift.
- Use high mixer speed to whip eggs, then switch to low when folding in flour to keep aeration.
“Small timing choices and steady technique make the crumb tender and reliably even.”
| Check | Why it matters | Quick action |
|---|---|---|
| Ingredient temperature | Improves emulsion and volume | Bring to room temperature |
| Baking powder | Controls rise | Test or replace if old |
| Mixer speed | Builds then protects air | High to whip, low to fold |
Flavor variations, fillings, and pan-size adaptations
Small flavor nudges and smart pan swaps let you adapt this classic for any gathering.
Subtle extract additions
Enhance the base with a touch of almond, lemon, or coconut extract.
Start with 1/4 to 1/2 teaspoon per batch. Taste as you go. A little goes a long way.
Fillings that add contrast
Try raspberry jam, lemon curd, or a rich chocolate ganache between cake layers for texture and flavor contrast.
Match the filling to the frosting: lemon cakes pair with lemon-zested frosting; coconut versions benefit from toasted coconut on top.
Pan conversions and timing tweaks
Fill pans about two-thirds full — roughly 2 to 3 cups of batter per 8-inch round, or adjust by cup for other pans.
| Pan type | Temp | Approx minutes |
|---|---|---|
| 9×13 sheet | 350°F | 25–30 minutes |
| Cupcakes (liners) | 350°F | 18–20 minutes |
| Bundt pan | 350°F | Similar to two rounds; check doneness |
- Thinner pans or larger surface area reduce total bake minutes—watch visual cues.
- Fold sprinkles in at the end for a funfetti effect and to limit color bleed.
Tip: Taste extracts sparingly and adjust to keep the vanilla cake balanced.
Troubleshooting, timing, and texture fixes
A few quick checks will tell you whether a dense center or a domed top is a fixable baking hiccup.
Dense or sunken centers: often come from inactive leavening, overmixing, or opening the oven early. Check baking powder freshness and avoid long pauses while folding. If a layer sinks, return it to the oven in short minutes bursts until the center sets.
Curdled mixture: happens when cold milk or eggs hit softened butter. Bring milk, eggs, and butter to room temperature. Add liquids slowly while mixing to emulsify and rescue the batter.

Domed tops and doneness: bake on the middle rack and verify oven temperature with a thermometer to reduce doming. Cool layers upside down to flatten slight domes. Confirm doneness with a clean toothpick, edges just pulling away, and a springy top.
| Pan type | Temp | Approx minutes |
|---|---|---|
| 8-inch round | 350°F | 25–30 minutes |
| 9-inch round | 350°F | 25–30 minutes |
| Cupcakes (liners) | 350°F | 18–20 minutes |
| 9×13 sheet | 350°F | 30–35 minutes |
Quick fixes: if sides brown too fast, tent with foil. If batter feels thick, recheck flour measurement—spoon and level instead of packing. For slightly dry layers, brush with milk or simple syrup before frosting.
“Small timing and temperature choices often save a batch.”
Storage, make-ahead, and freezing tips
Make-ahead planning makes assembly and serving much easier. Wrap layers well and note dates so you can rely on texture and flavor when the post arrives.
Refrigeration windows and short-term storage
Store a frosted cake in an airtight container in the refrigerator for up to four days. Chilling firms the frosting and slows moisture loss.
Freezing layers, wrapping, and thawing
Freeze unfrosted layers up to three months. Double-wrap each layer in foil or plastic, or use heavy-duty freezer bags to block odors and prevent freezer burn.
- Place parchment paper between stacked layers to prevent sticking and protect tops.
- Thaw frozen layers overnight on the counter, then allow them to reach room temperature before stacking and frosting.
- Label each package with the date so you can track freezer time and rotate items.
“Plan thawing into your timeline so assembly is quick and the final texture is near-perfect.”
Make buttercream ahead, then warm it slightly and re-whip before use. If transporting, chill to set the frosting, then bring up slightly in temperature before serving for best flavor with milk and butter-based frostings.
Serving, portions, and nutrition notes
Portion planning makes serving painless and keeps waste low for small gatherings. A standard two-layer round serves about 10–12 generous slices. For smaller appetites, cut thinner wedges and stretch servings further.
Let the cake sit at room temperature for several minutes before slicing. This softens the crumb and helps the frosting cut cleanly.
Use a long, sharp knife warmed in hot water and wiped dry between cuts for tidy slices. Offer a small dollop of lightly sweetened cream or fresh berries alongside for a balanced plate.
“Expect nutrition to vary widely: published examples range from roughly 414 to 571 kcal per serving.”
- For buffets, pre-cut and separate slices so guests serve themselves.
- If using rich buttercream, use thinner layers between layers to reduce sweetness and keep structure.
- Keep extra frosting in a few cups on hand for touch-ups after transport or slicing.
| Item | Typical value | Practical tip |
|---|---|---|
| Servings | 10–12 slices | Cut thinner for children or multiple desserts |
| Calories per serving | ~414–571 kcal | Depends on frosting, fillings, and portion size |
| Slicing technique | Warm knife | Wipe between cuts for clean edges |
Final note: remember candles and a stable, heat-safe topper before the celebratory moment. Then slice and serve within a few minutes for best texture and flavor.
Conclusion
A few steady techniques and quality ingredients turn a vintage vanilla cake into a reliable showstopper every time. This cake recipe blends old-school creaming or the whipped-egg, hot-milk approach so you can choose the method that fits your comfort and schedule. Use real vanilla and warm milk to keep the crumb tender and even.
Finish simply: a well-whipped buttercream or a cream cheese frosting complements the layers without hiding their flavor. Mind parchment, gentle folding, and careful cooling — those small details pay off in clean layers and a refined crumb. The method scales easily to a 9×13, cupcakes, or a bundt with minimal timing tweaks.
Make ahead and freeze or chill layers to ease party-day timing. Add sprinkles, toasted coconut, or flowers for an inviting, homemade look. With consistent technique, this vintage-style birthday cake will become one of your go-to recipes and delight guests for years to come.