Halloween Charcuterie Guide: Tips for a Frightful Feast
Nearly 7 in 10 hosts report that a themed platter becomes the focal point of a small gathering, turning simple snacks into a memorable centerpiece.
This Website contains affiliate links. That means I may earn a small commission if you purchase through my links, at no extra cost to you.
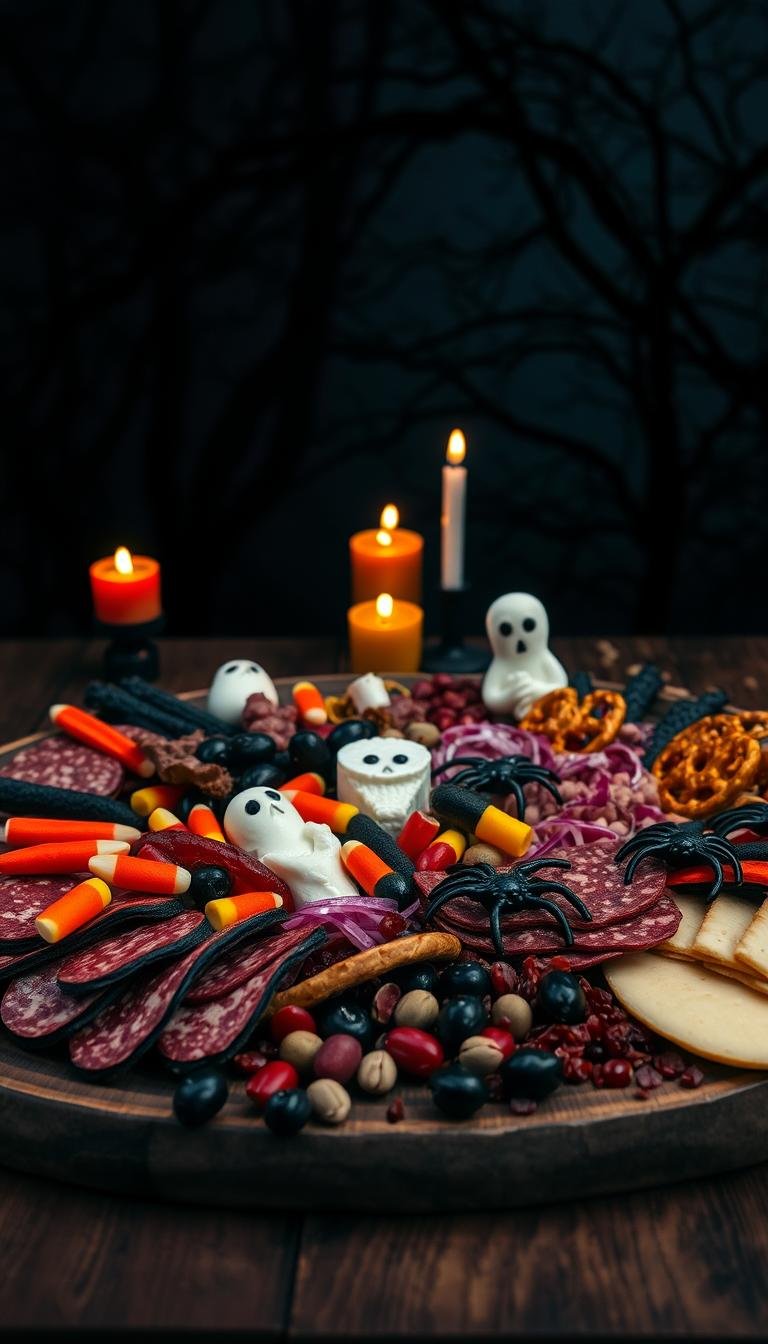
This guide shows how to build a festive halloween charcuterie board that is both stylish and easy to eat. Start with a sturdy serving board or tray, then layer a mix of cheeses like sharp cheddar cut into pumpkins and creamy brie shaped as skulls.
Fold prosciutto and salami for visual movement, add grapes, blackberries, apple slices, and dried apricots for color. Use assorted crackers for structure, bowls for dips, and finish gaps with nuts, chocolate, and playful extras like candy eyes.
Quick tip: let cheese rest 30–60 minutes at room temperature before serving and keep items covered until guests arrive. Follow the simple anchor-to-fill assembly order in this article to create a crowd-pleasing halloween snack that works in any home or holiday party.
Key Takeaways
- Balance sweet, savory, crunchy, and creamy for broad appeal.
- Use a reliable board or tray and start with bowls and large items.
- Layer cheeses, meats, and produce, then fill gaps with crackers and candy.
- Let cheeses rest at room temperature for best flavor.
- Small themed touches—cheddar pumpkins, mozzarella “eyeballs”—add big impact.
- This guide saves time and helps avoid common mistakes like soggy crackers.
Start Here: What Makes a Great Halloween Charcuterie Board
Balance and variety make the board sing—mix firm, soft, and spreadable cheeses with bright produce.
The easiest way to define a great platter is balance. Aim for three cheese textures: a firm cheddar, a soft brie or goat cheese, and a semi-soft or spreadable option like smoked gouda or pepper jack.
Pair those cheeses with savory cured meats such as prosciutto and genoa salami. These add salt, movement, and height to the layout.
Add seasonal fruits for color and acidity—grapes, blackberries, apples, and dried apricots work well. Choose crackers and crisps that can hold spreads without crumbling.
Offer dips: small bowls of hummus, jam, or honey widen guest options and make the snack feel complete.
- Color tip: use oranges, greens, blacks, and purples for a festive look without relying only on candy.
- Keep it inclusive: pick mild and bold cheeses to suit varied tastes and dietary needs.
- Pro tip: give cheese a little time at room temperature to amplify aroma and flavor.
Plan Your Board Like a Pro
Start your plan by picking a surface that matches guest count and how you’ll serve.
Use a medium to large tray so pieces sit securely. A 20-inch round tray comfortably serves 6–8 and its angled sides help ingredients rest in place.
Rectangular cutting boards work but can be harder to move once built. Any flat surface will do: wooden pizza boards, slate, stone, or a rimmed baking sheet could also keep smaller items corralled if you make board designs for kids at home.
Tools and accents to gather
Prep tools first—ramekins and small bowls for jams, honey, olives, or hummus. Add cheese knives, spreaders, and small cookie cutters to shape cheddar or brie into festive pieces.
| Item | Why it helps | Best option |
|---|---|---|
| 20″ round tray | Serves 6–8; stable for moving | Wood or rimmed tray |
| Slate/stone | Keeps cheese cool | Leave in place (heavy) |
| Ramekins & knives | Speeds serving; prevents crowding | Small bowls, spreaders, cheese knives |
| Spooky accents | Finishing touch without food contact | Plastic spiders, mini pumpkins, skeleton hands |
Map anchors on paper to save minutes during assembly. Add spooky accents last to avoid food interference and keep the board clean for guests.
Ingredient Strategy: Balance Sweet, Savory, and Spooky
Pick ingredients that balance sweet bites, savory anchors, and a little spooky fun. A planned selection keeps the board varied and easy to navigate.
Cheeses to shape and serve
A trio of cheeses covers textures: a firm cheddar for pumpkin cutouts, a soft brie chilled and stamped into ghost shapes, and a spreadable goat cheese or pepper jack for zip.
Tip: pre-chill soft wheels so cuts stay clean and slice some pieces ahead to speed serving.
Meats that add movement
Choose silky prosciutto rolled into ribbons and folded salami or calabrese for ruffled clusters. These meats add height and make grabbing easy.
Starches that hold up
Pick sturdy crackers and fig or olive crisps that stand up to hummus, jam, or honey. Include wide planks and smaller crisps to vary texture and fill gaps.
Fruits and finishing extras
Use green grapes, blackberries, apple slices, and dried apricots for color and season. Scatter chocolate chunks, cookies, and a few candy pieces to satisfy sweet cravings.
“Olives and nuts work best in ramekins—keep sticky items like honey or jam in bowls to prevent mess.”
- Layer smart: place bowls first, then cheeses, meats, and finally fruits and nuts.
- Balance flavors: pair bold items like pepper jack with milder mozzarella “eyeballs” so every guest finds a favorite.
Step-by-Step Assembly: From Anchors to Finishing Touches
Lay down big items first to create the flow and serving zones on your board. Start with ramekins, a central skeleton brie skull, and any large centerpiece so guests know where to begin.

Make the brie skull: chill a 16-ounce brie for 15-20 minutes. Cut wedges from the lower third, slice off the top half, spread blueberry jam on the base, then cut eye circles, a triangular nose, and a rectangular mouth. Replace the top and press small manchego squares as teeth.
Place cheeses next, varying height and texture. Fold salami into quarters and tuck between manchego ribs as “guts.” Add string cheese as a sternum and a yogurt-covered pretzel for a neck. Cluster grapes and fruit in small mounds to fill color gaps.
Finish and check
- Fan crackers and crisps near dips so pairing is intuitive.
- Put olives and chocolate-covered cranberries in ramekins and ring edges with calabrese.
- Fill remaining spaces with nuts, candy, and decorative accents; place props so they don’t touch sticky foods.
Quick check: ensure bowls are stable, stacks won’t topple, and serving tools sit where guests can reach them without bumping the centerpiece.
Spooky Styling Tips and Theme Ideas
Start with a vivid centerpiece and let smaller clusters echo that motif for an effortless, cohesive look.
Build a skeleton layout using a brie skull spread with blueberry jam as the head. Use yogurt-covered pretzels for the neck, string cheese for the sternum, and manchego triangles as ribs. Tuck folded salami as “guts” beneath the ribs for texture and drama.
Festive shapes and colors
Punch cheddar into pumpkin shapes and cut brie or crackers into ghost silhouettes. Top mozzarella balls with candy eyes to suggest “eyeballs.” Balance oranges, dark grapes, and whites so the theme reads from across the room.
Kid-friendly swaps
Offer mummy dogs (Lit’l Smokies wrapped in thin dough) and yogurt pretzel “mummies” with candy eyes attached using melted white chocolate. Add decorated sugar cookies so kids have a clear sweet option.
- Quick tip: keep chocolate and sticky items in ramekins so sweets support the snack without ruining crackers.
- Place plastic spiders and cobwebs where they won’t touch food; give serving tools clear paths.
“A bold skeleton centerpiece makes the board instantly recognizable and highly shareable.”
Timing, Prep, and Food Safety for the Big Night
Plan backward from the party start so big tasks fall on quiet days, not the final hour.

Long-lead items first: bake and frost cookies a day ahead. Make gummy worms 1–2 days before. Pre-fold meats and wash and dry fruit 1–2 days in advance to save precious minutes on the event day.
Serving temperature and safety
Assemble the board 30–60 minutes before serving to allow cheese to come to room temp and flavors to bloom. Keep items covered until guests arrive to prevent drying.
Watch the clock: perishable food—soft cheese, hummus, cut fruit, and meats—should not sit at room temperature past safe windows. Sanitize serving tools between refills.
Storing leftovers
Wrap cheeses in wax or parchment, then place loosely in a container; this helps the cheese breathe. Refrigerate meats in airtight containers right after the event.
- Keep crackers sealed in bags or tins so they stay crisp.
- Stage components at home on small plates, then transfer to the main snack board just before guests arrive.
- Refresh the display by rotating in prepped fruit bowls and cracker stacks rather than piling directly onto boards.
“Return leftovers to the fridge promptly and replace depleted ramekins to keep quality high.”
halloween charcuterie Ideas for Different Occasions
Start by picking a clear focus—party-friendly bites or dessert-led treats—so each choice supports that aim.
Party board for 6-8: follow the 3-3-3-3 rule and scale your servings
Build a party-ready charcuterie board for 6–8 using the 3-3-3-3 rule: three meats, three cheeses, three starches, and three accompaniments.
On a 20-inch round board, feature prosciutto, salami, and calabrese. Pair with cheddar, brie, and a spread like jalapeño pimento cheese.
Add Wheat Thins, sea salt & chive crackers, and date crisps. Complement with grapes, olives, and a jar of jam or honey so guests can mix sweet and savory.
Dessert-forward board: cookies, chocolate, fruit, and sweet dips
For a dessert-driven holiday spread, cluster yogurt pretzel “mummies,” sugar cookie varieties, and chocolate-covered pretzel witch fingers.
Include fresh fruits and two sweet dips—one chocolate and one fruit-based—to keep texture contrast. Keep a modest savory lane with brie and mozzarella paired with honey or jam.
- Kids options: tuck a corner for mummy treats and candy while adults use the main zone.
- Scale quantities by guest count and what else you serve; plan staged refills for long parties.
- Save a simple recipe list after the event so you can repeat a successful board next time.
Conclusion
End your spread with a clear plan: pick the right board size, layer cheeses and meats, then add fruit, crackers, and a single showpiece to anchor the display.
Remember the brie skull: chill the wheel, cut off the top half, fill with jam, and set it as a skeleton centerpiece that draws the eye.
Use ramekins for olives and hummus, choose crackers that hold spreads, and tuck grapes, blackberries, or dried apricots for seasonal color.
Fold prosciutto and salami to add height and movement. Scatter modest sweets—chocolate, candy, and a cookie cluster—so treats complement, not overpower, savory bites.
Final steps: let cheese warm slightly before serving, protect delicate items until last, and wrap cheeses and chill meats promptly after the event. With this sequence and a few signature parts like mozzarella “eyeballs” and pumpkin cutouts, you’ll have an easy, repeatable halloween charcuterie board plan.