DIY Halloween Veggie Tray: A Step-by-Step Guide
Surprising fact: nearly 60% of hosts say adding a themed healthy option improved party balance and guest satisfaction last year.
This Website contains affiliate links. That means I may earn a small commission if you purchase through my links, at no extra cost to you.
This guide shows a super easy way to build a monster-themed display that turns ordinary produce into playful bites.
Attach craft googly eyes to clear glasses, fill them with cut veggies and dip, and the colors pop through—shorter glassware makes grabbing finger food simple.
You can prep ahead by chopping, attaching eyes, and making dips, then assemble right before the party to save time.
Quick ideas: arrange baby carrots into a jack-o’-lantern with two small dip bowls as eyes, cucumber slices for a mouth, and an olive for the nose.
Later sections cover scaling for any crowd, dip pairings (including a spider-web 7-layer option), storage tips, and food-safety reminders.
Key Takeaways
- This is a festive, super easy appetizer that balances sweets at your halloween party.
- Prep steps: attach eyes, chop veggies, make dips, then assemble before serving to save time.
- Designs are approachable—no crafting skill required—and scale from small snacks to large party spreads.
- Options suit many diets for a healthy halloween choice that pleases kids and adults.
- Later tips include storage timelines, food safety, and related recipes to round out the menu.
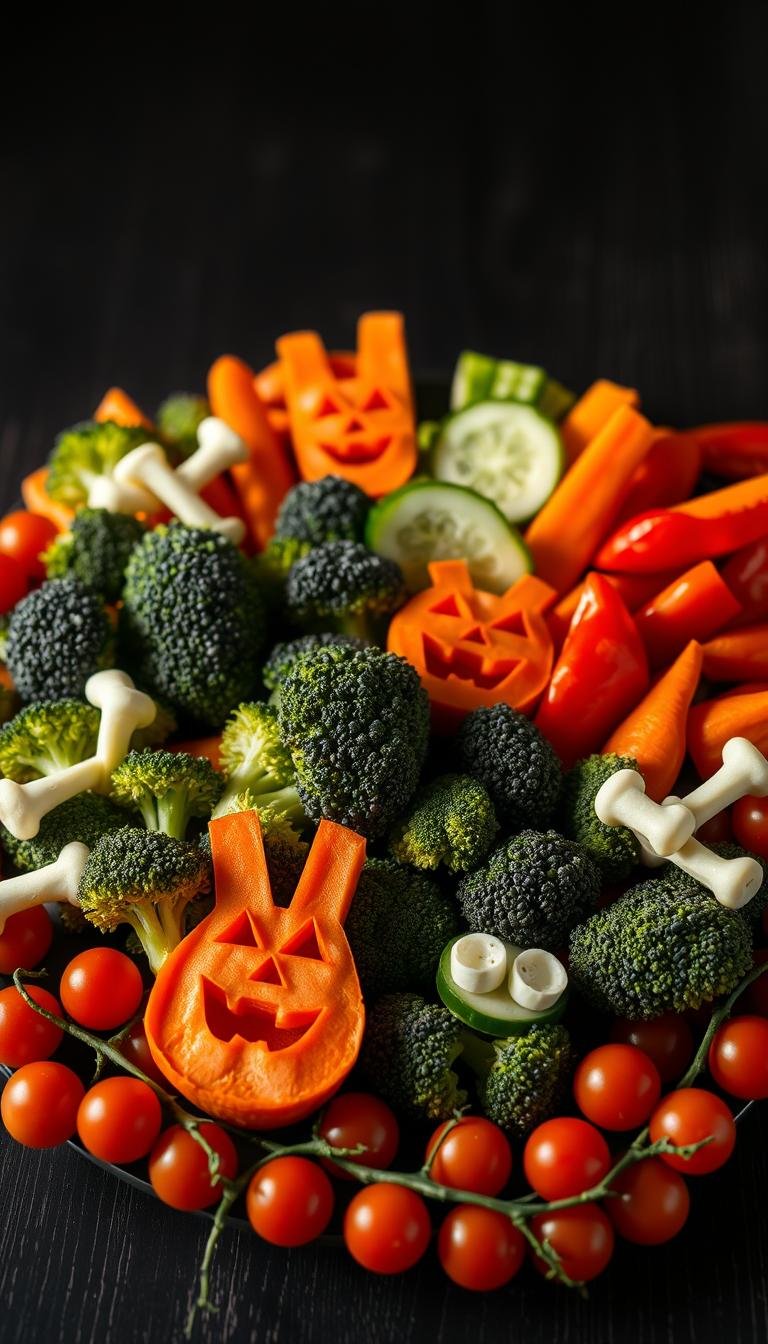
What you’ll need for a spooky, healthy Halloween veggie platter
Gathering the right ingredients and props makes building a spooky, healthy platter fast and fun.
Core vegetables: Choose colorful, crisp choices for maximum appeal. Shop for carrots, celery, cucumber, bell peppers, broccoli, cauliflower, cherry tomatoes, and black olives for accents.
Dips and extras
Pick dips that cling: ranch, tzatziki, hummus, whipped feta, cottage cheese dip, and guacamole all work well. Cheddar or whipped feta can add color and tang to layered bowls.
Tools and props
Use a large circular board or sturdy serving board, clear drinking glasses or small mason jars, small dip bowls, a pumpkin cookie cutter, and craft googly eyes.
“Clear glassware in varied shapes shows color and makes grabbing easy; avoid pieces that are too tall.”
| Item | Why it helps | Tip |
|---|---|---|
| Baby carrots | Bright base for a pumpkin layout | Pair with two small bowls of dip for “eyes” |
| Celery stalk | Creates a believable stem | Buy an extra bunch for dipping sticks |
| Pumpkin cookie cutter | Makes tortilla chips festive | Bake at 350°F: 10 min, flip, then 5 min |
| Airtight container | Keeps prepped produce crisp | Stage prepped pieces until assembly |
How to make a halloween veggie tray step by step
Begin with a stable base and organize your glasses, bowls, and prepped produce before assembly. This setup keeps each step tidy and speeds the process.
Monster cups
Arrange a mix of short clear glasses on the tray and attach craft googly eyes with double-sided tape. Short glassware makes grabbing easy and reduces spills.
Fill each cup with a spoonful of dip at the bottom, then stand longer carrot, celery, and pepper sticks so they peek out like wild hair.
Pumpkin layout
Form a rounded bed of baby carrots to read as the pumpkin body. Nestle two small bowls of creamy dips as the “eyes,” add a curved strip of cucumber for the mouth, a single black olives piece for the nose, and a celery stalk at the top as the stem.
Keep components tight so the face reads clearly and guests can grab from the edge without crowding.
Spider-web 7-layer dip
In a clear 9×9 dish layer: refried beans, half the guacamole, corn, sour cream (reserve 2 tbsp), grated cheese, salsa (leave a 1/2-inch border), then a final guacamole layer on top. Pipe sour cream webs and add olive spiders using a whole olive plus thin slices for legs.
Bake pumpkin tortilla chips at 350°F for 10 minutes, flip, then 5 more to crisp. Surround the dip with sliced cucumbers, carrots, and celery so guests can scoop without extra utensils.
- Place monster cups to one side, the pumpkin face centered, and the webbed dip near the front for balance.
- Keep prepped pieces chilled until assembly to preserve crunch.
Creative Halloween veggie tray ideas kids and adults will love
Simple shapes and bold colors help you craft snack displays that read clearly from across the room.
Pumpkin veggie tray (super easy, ready to serve in minutes)
For the fastest centerpiece, form a rounded bed of baby carrots as the pumpkin body. Nestle two small dips for the “eyes,” add a cucumber curve for a smiling mouth, a black olive for the nose, and a celery stalk for the stem.
This pumpkin veggie scales up or down and looks great on any board.
Monster bell peppers with candy eyes and veggie “hair”
Make mini bell pepper faces by dabbing a tiny bit of sour cream to attach candy eyes. Stuff peppers with chopped carrot, celery, and shredded pepper for playful “hair.”
Spider bread or pumpkin-shaped tortilla chips around your dip board
Bake pumpkin-cut tortilla chips at 350°F for 10 minutes, flip, then 5 minutes to crisp. Circle your main dip with these chips for a crunchy, festive border that looks like a pumpkin ring.
Skeleton or candy-corn style veggie board for variety
Arrange celery, carrots, and cucumber as limbs with a ramekin of dip as the skull. Or build bands of yellow, orange, and white vegetables to look like candy-corn for a sweet-color contrast.
“Keep designs simple so shapes read at a glance—solid blocks of color help your display look like a polished party spread.”
- Mix and match two designs (pumpkin face plus monster cups) to delight guests.
- Swap in mini peppers and cherry tomatoes to make the platter pop with seasonal color.
Best veggie dip pairings and lighter swaps
Choose two to three dips so guests can pick flavors that match their plates. Offer a creamy option, a tangy yogurt base, and a lighter plant-powered choice.

Creamy go-tos
Greek yogurt ranch, tzatziki, and sour cream with chive are classic crowd-pleasers. They cling well to carrot sticks and celery and work across most vegetables.
Lighter swaps
Trade heavier mixes for butter bean hummus, whipped feta, or a cottage cheese dip to trim saturated fat and overall fat without losing texture.
- Make-ahead recipe idea: Layer a smooth yogurt-bean base, a thin salsa band, then a bright orange cheddar cheese strip for color. Chill so it sets and clings to veggies.
- Thicker dips reduce drips on the board and help pieces hold flavor.
- Label bowls and place each dip near the vegetables they flatter (tzatziki with cucumber; ranch with broccoli; whipped feta with bell pepper).
| Dip | Best match | Why it works |
|---|---|---|
| Greek yogurt ranch | Broccoli, cauliflower | Rich texture with less saturated fat than full sour cream |
| Tzatziki | Cucumber, celery | Bright, herby flavor that cools crunchy vegetables |
| Butter bean hummus | Carrot sticks, pita | Lower in saturated fat and very creamy |
| Whipped feta / Cottage cheese | Bell pepper strips | Salty tang and spreadable texture that pairs well with sweet peppers |
Make-ahead tips, timing, and serving for your Halloween party
Plan your prep so finishing the display takes only a few calm, confident minutes. Do the messy work in advance and keep components chilled until assembly time.
Prep in advance
Wash and chop vegetables, attach googly eyes to short glasses, and portion dips into a sealed container. When each item is ready, stack containers in the fridge so final assembly takes just minutes.
Scale for any crowd
A single round board works for a family night. For a larger party, make multiple smaller trays placed around the room to cut table traffic and keep food fresh all evening.
Presentation and serving
Use a large circular serving tray for pumpkin-shaped layouts and keep glassware short so guests grab easily. Place plates and napkins at the front so the line stays moving.
“Stage ingredients in the fridge and set a reminder to assemble close to serving time so everything looks crisp.”
- Cover layered dips tightly and refrigerate; add olive “spiders” right before ready serve.
- Stagger popular vegetables in multiple spots to avoid empty sections partway through the year.
- Refresh wilted items from the fridge to keep the display crisp.
| Task | When to do it | Why it helps |
|---|---|---|
| Chop and store vegetables | 1–2 days in advance | Saves time and keeps assembly under 15 minutes |
| Portion dips into containers | Same day or 1 day before | Keeps flavors fresh and speeds setup |
| Attach eyes to glasses | Hours before party | Makes monster cups easy to place at the last minute |
| Final assembly on board/tray | Right before guests arrive (minutes) | Ensures crisp vegetables and best presentation |
Kid-friendly tricks to make veggies fun (and actually eaten)
Let kids take the lead and turn simple vegetables into playful characters they’ll want to eat. This approach keeps prep light and makes tasting part of the excitement.

Hands-on helpers
Hands-on tasks give every child a small role. Let them stick on the eyes for monster cups, shape the carrot pumpkin, or pick favorite dips for a quick taste test.
- Invite kids to attach the googly eyes and build the pumpkin face so they feel invested.
- Turn dip selection into a vote to make sampling more fun.
- Ask them to place cucumber slices into a smile-shaped mouth and add a celery stalk as a stem.
- Offer mini tasks—sorting carrots, lining up peppers, or starting one monster cup from start to finish.
- Cut slices thin and sticks small so textures stay friendly and easy to chew.
Simple roles, praise for trying new foods, and a playful setup create an easy way to help kids enjoy fresh snacks at your halloween gathering.
Storing leftovers, freshness, and food safety
A few simple storage steps keep cut produce crisp and dips tasting fresh. Follow these tips so you can enjoy leftovers safely and avoid waste.
Quick storage basics
Vegetables: Transfer cut vegetables to an airtight container lined with a paper towel. The towel wicks moisture and helps them stay crisp for up to 4 days.
Dips: Store each dip separately in sealed containers and plan to finish them within about 2 days for best flavor and safety. For layered dip pans, press parchment on the surface before wrapping the pan.
Practical handling tips
Label containers with a date and time if you prepped items in advance. This makes rotation easy and keeps food safety clear.
- Keep the tray out for limited minutes at room temperature; swap in chilled backups to maintain quality.
- Avoid storing leftover vegetables and fruit together; fruit moisture can soften veggies.
- Re-crisp carrots and celery by soaking briefly in ice water, then pat dry before serving again.
- Cool tortilla chips completely before sealing so trapped steam doesn’t soften them.
If you’re watching fat intake, repurpose leftovers into salads with lighter dressings the next day. Always discard items that sat out too long or show signs of spoilage to keep your household safe.
Conclusion
A simple final sweep—freshen edges, add olive spiders, and chill dips—turns prep into a polished spread.
You now have everything to build a festive halloween veggie tray that comes together in minutes. Focus on the super easy wins: monster cups with googly eyes, a pumpkin built from baby carrots with dip “eyes,” a cucumber smile, a black olive nose, and one celery stalk as the stem.
Anchor the platter with one standout dip and add a second or third for variety. Bake pumpkin chips as directed (350°F: 10 minutes, flip, then 5 minutes) and add olive spiders just before ready serve.
Store cut veggies up to 4 days and dips up to 2 days in airtight containers. Scale the recipe for kids or adults, print this guide, and enjoy a healthy halloween balance to sugary party fare.