Best Chicken Thigh Recipes Oven
Surprising fact: a single, five-minute seasoning step often leads to a 30–40 minute bake that transforms bone-in, skin-on cuts into juicy, crowd-pleasing dinner in under an hour.
This Website contains affiliate links. That means I may earn a small commission if you purchase through my links, at no extra cost to you.
Here’s a clear, no-nonsense guide for reliable weeknight results. With minimal prep you can get tender, well-seasoned meat and crisp skin every time.
Simple pantry spices—garlic powder, onion powder, paprika and an Italian or poultry blend—create deep flavor without fuss. Patting the skin dry and using a rack on a sheet pan helps air circulate for extra crispness.
We’ll outline timing options—about 30–40 minutes at 400°F or a slightly quicker 35–40 at 425°F—plus when to finish with a brief broil for crackly skin. You’ll also learn safe and preferred pull temperatures, and smart storage tips for tasty leftovers.
Key Takeaways
- Five minutes of seasoning plus a simple bake delivers big flavor with little work.
- Bone-in, skin-on cuts give superior juiciness and crisp skin for family dinner.
- Use a wire rack for crispness or a baking dish for saucy finishes.
- Common bake windows: 30–40 minutes at 400°F or 35–40 at 425°F; broil 2–3 minutes to finish.
- Store leftovers 3–4 days in the fridge or freeze 1–3 months; reheat to restore texture.
Why Oven-Baked Chicken Thighs Win for Busy Family Dinners
Set a pan, slide it in, and in under an hour you have a dinner the whole family will eat. Bone-in, skin-on pieces are economical and forgiving, so they deliver flavor without fuss.
Dark meat needs a bit more time because connective tissue and fat break down as the internal temp rises. That process makes the meat tender and juicy, even if you let it cook a few extra minutes.
This method is hands-off: no flipping, no constant checking. A single sheet pan frees you to prep simple sides, roast vegetables on a second rack, or set the table while the oven does the work.
- Budget friendly: thighs cost less per pound and still give big flavor.
- Beginner friendly: forgiving bake times and steady results build confidence fast.
- Family friendly: sturdy protein kids like, and seasoning is easy to adjust.
In short, baked chicken delivers crisp skin, reliable texture, and low-stress cleanup — a practical weeknight win for busy households.
Chicken Thigh Recipes Oven
Weeknight baking turns basic cuts into crisp-skinned, juicy dinners with almost no babysitting.
What readers love: crisp skin, tender meat, and a hands-off approach that frees up time for sides or cleanup.
What readers love: crispy skin, juicy meat, hands-off baking
Quick prep: plan about 5 minutes to pat dry, oil, and season before the pan goes in.
Most home cooks report the best balance of color and tenderness with a 30–40 minute bake at 400°F or 35–40 minutes at 425°F, then a 2–3 minute broil for extra crackle.
At a glance: prep time, cook time, and ideal internal temperature
Use an instant-read thermometer in the thickest part, avoiding bone, to check doneness. The safe minimum internal temperature is 165°F, but many prefer 170–190°F for very tender results.
| Step | Action | Typical Time | Target Temp |
|---|---|---|---|
| Prep | Pat dry, oil, season | 5 minutes | — |
| Bake | Roast on rack or tray | 30–40 minutes @400°F or 35–40 @425°F | — |
| Finish | Optional broil for crisp | 2–3 minutes | — |
| Check doneness | Use instant-read thermometer | — | 165°F safe; 170–190°F for tender |
Ingredients That Deliver Big Flavor With Minimal Effort
A few staple spices and a little oil deliver deep flavor without long marinades.
Core pantry items
Keep it simple: garlic powder, onion powder, paprika, dried Italian herbs, kosher salt, and freshly ground black pepper form a fast, reliable rub.
Smart seasoning swaps
Use a poultry or Italian seasoning blend for convenience, but check the salt level before adding more. Add a pinch of cayenne for heat or swap oregano for thyme to lean into herbal notes.
- Olive oil helps the rub cling and promotes even browning.
- Use about a teaspoon per spice for a full pan, then adjust to taste.
- Dry seasoning speeds prep and creates a crisp, flavorful crust.
| Ingredient | Role | Amount (per pan) |
|---|---|---|
| Garlic powder | Savory backbone | 1 teaspoon |
| Paprika | Color and warmth | 1 teaspoon |
| Dried oregano/thyme | Herbal lift | 1 teaspoon |
| Kosher salt & pepper | Seasoning balance | Salt: adjust; Pepper: freshly ground |
Tip: These ingredients are cost-effective, versatile, and ideal for weeknight service with chicken thighs or larger batches of thighs.
Gear Check: Preheat Oven, Pan Setup, and Thermometer Musts
Good gear sets the stage for consistent browning and reliable timing every time. A few choices before baking cut guesswork and improve texture.
Sheet pan + wire rack vs. baking dish
Sheet pan with a wire rack lets hot air circulate under the meat for crisp skin and even browning. Line the pan with foil for easier cleanup.
Baking dish holds rendered juices close, which keeps meat moister and makes pan drippings easy to turn into gravy.
Instant-read thermometer and accuracy
An instant-read thermometer gives a fast, reliable temperature check near the finish. Insert the probe into the thickest area without touching bone to avoid skewed readings.
Keep the tool handy so you can check doneness in the final minutes without leaving the oven door open too long.
- Always preheat oven fully to 400–425°F so the skin starts rendering instead of steaming.
- Use a sturdy, rimmed pan that handles high heat and keeps juices contained.
- Place chicken with space between pieces; crowding traps steam and softens the skin.
| Gear | Role | Quick tip |
|---|---|---|
| Sheet pan + rack | Airflow for crisping | Line with foil for cleanup |
| Baking dish | Self-basting | Collects drippings for sauce |
| Instant-read thermometer | Verify internal temperature | Probe into thickest part, avoid bone |
Step-by-Step: From Pat-Dry to Perfectly Baked
A tidy prep routine—trim, pat, and season—sets the stage for a dependable roast. Preheat oven while you prep so the pan reaches steady heat before the meat goes in.
Pat dry, oil, and rub seasoning
Trim any loose excess skin for tidier portions that crisp more evenly. Pat the skin very dry with paper towels to remove surface moisture so browning starts immediately.
Drizzle about 1–2 tablespoons of olive oil across the pan, then sprinkle roughly a teaspoon per spice. Rub the seasoning over fronts, backs, sides, and under the skin for full coverage.
Bake, then optional broil for extra crispy skin
Place chicken thighs in a single layer in a 9×13-inch baking dish or on a rack set over a pan. Leave space between pieces so hot air circulates.
Bake at the chosen temperature and check doneness in the last few minutes. For extra crackle, broil 2–3 minutes at the end, watching closely so the skin blisters but doesn’t burn.
Resting time for the juiciest results
Remove the pan and let the pieces rest 5–10 minutes so juices redistribute and slicing loses less moisture. Season simply with salt pepper to taste, and layer in garlic, onion powder, paprika, and Italian herbs for a savory finish.
“Resting the meat gives you juicier slices and less loss on the cutting board.”
- Use pan drippings to jump-start a quick gravy or to flavor roasted vegetables on the next sheet pan.
- Check internal temp if you prefer extra tenderness; the safe minimum is 165°F, and many cooks roast to higher temps for softer meat.
Time and Temperature Guide for Oven-Baked Chicken Thighs
Match your bake time to piece size and you’ll hit the sweet spot of color and tenderness every time.
400°F — 30–40 minutes: Use this as a reliable baseline. For 5–10 ounce bone-in, skin-on pieces expect about 30 to 40 minutes until the thickest area reaches your target internal temperature. This setting gives steady heat for tender, juicy results.
425°F — 35–40 minutes: Choose this when you want deeper browning and slightly faster roast time. The higher heat promotes stronger Maillard color. Check doneness near the end so you don’t overshoot the finish.

Practical tips to nail timing
- Check larger pieces a few minutes before the timer ends and add minutes as needed for even cooking across the pan.
- Account for oven variance; do a quick thermometer check in the final 5 minutes to avoid guesswork.
- If skin looks pale at target temp, broil 2–3 minutes to crisp without drying the meat.
- Keep pieces spaced so hot air circulates; for batch cooking, rotate racks or stagger pans for uniform exposure.
“The safe minimum is 165°F, but many cooks roast to 170–190°F to render connective tissue for extra tenderness.”
| Setting | Typical minutes | Expected internal temp | Best for |
|---|---|---|---|
| 400°F | 30–40 minutes | 170–190°F (varies by size) | Tender, reliable results |
| 425°F | 35–40 minutes | 170–190°F (check early) | Faster roast, deeper browning |
| Finish | 2–3 minutes (broil) | — | Crisp skin without drying |
Internal Temperature, Doneness, and Food Safety
Temperatures tell the real story—visual cues can mislead you when judging doneness. Relying on numbers keeps dinner safe and tasty. Use an instant-read tool to check at the end of the bake for best accuracy.
Safe minimum and why higher temps help
The safe minimum is 165°F. That level kills harmful bacteria and makes the meat safe to eat.
Many cooks prefer 170–190°F for thighs because the extra heat breaks down connective tissue. This renders fat and yields a more tender, juicy result even if the skin is already crisp.
Where to place the thermometer for accurate readings
Insert the probe into the thickest part, avoiding bone. Bone conducts heat and gives a falsely high read.
- Aim for at least 165°F measured in the thickest part.
- Use a fast, reliable thermometer to limit oven-door time.
- Check during the last minutes of baking so you stop at your ideal temperature.
- Rest the pieces 5–10 minutes; carryover heat will nudge the final temp up slightly.
“Consistent probe placement helps you learn your oven and get repeatable results.”
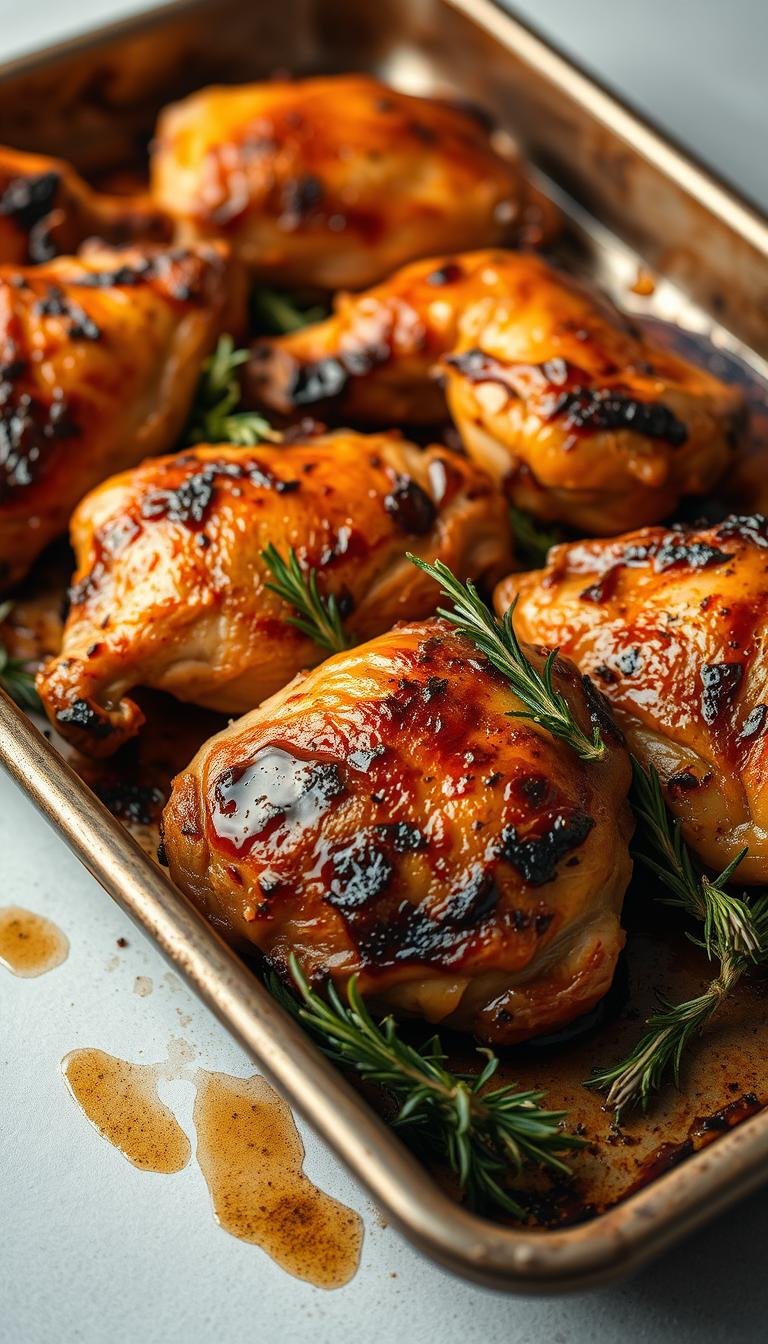
Crispy Skin Secrets Without Extra Fat
A quick drying and an elevated pan setup are the secret to a golden, shattering finish. Start by patting the skin very dry so moisture doesn’t steam and soften the surface.
Pat, elevate, and finish
Elevate pieces on a rack over a sheet pan so hot air circulates beneath and around each piece. This helps the underside crisp as well as the top without extra oil.
Let the natural fat do the work. As the fat renders it bastes the meat and browns the surface. Use only a light brush of oil if needed; heavy fats are unnecessary.
- Keep pieces spaced so steam can’t form between them.
- Season evenly so the flavor sticks and a savory crust forms.
- Avoid covering the pan—line it under the rack for easier cleanup instead.
- Resist flipping during the bake; steady dry heat and airflow give a consistent crisp.
If the skin needs a final push, broil 2–3 minutes and watch closely as blistering happens fast. That short blast produces a restaurant-style finish without adding fat or long cook times.
“Dry, elevated roasting plus a 2–3 minute broil is the fastest route to reliably crisp skin.”
Variations: Bone-In vs. Skinless Chicken Thighs and Boneless Options
Choosing the cut changes how you cook and what you get. Bone-in, skin-on pieces render fat and build deeper flavor. They also give you that crisp exterior many cooks prize.

Adjusting bake time for boneless skinless pieces
Boneless skinless options cut roughly ten minutes from standard bake windows. Start checking internal temp earlier to avoid overshooting tenderness.
Tip: group uniform sizes together when you place chicken thighs on the pan so they finish at the same time.
Flavor boosters: herb blends, spice rubs, and quick marinades
Skinless chicken won’t get a crackly crust, but a bold seasoning rub builds a satisfying crust. Try a pepper-forward blend with garlic and onion powder for reliable results.
- Rotate blends: Italian herbs, smoky paprika, or poultry mixes keep meals varied.
- Quick marinades: 30–60 minutes add punch; always pat dry before roasting to encourage browning.
- Lean option: boneless skinless gives faster cooks and fewer calories while staying versatile for many recipes.
“A simple salt-and-pepper rub is a dependable baseline for both bone-in and boneless cuts.”
Serving Ideas and Sides That Make It a Complete Dinner
Choose sides that soak up juices and add bright contrast to the roasted mains.
Comforting starches: mashed potatoes or mashed sweet potatoes are the classic pick. They soak up pan drippings and pair well with crisp skin and savory meat.
Roasted vegetables like Brussels sprouts or broccoli can go on a second rack at the same temperature. That saves time and keeps everything finishing together.
- Pair the main with mashed potatoes for a cozy, savory side.
- Roast Brussels sprouts or broccoli on a separate rack so both cook evenly.
- Toss a green salad with lemon vinaigrette to cut richness and add crunch.
- Use pan drippings to whisk a quick gravy to spoon over potatoes and veggies.
- Quick stovetop options: garlic sautéed spinach or green beans with shallots if the oven is full.
| Side | Prep | Oven temp | Why it works |
|---|---|---|---|
| Mashed potatoes | Boil, mash with butter | Serve warm | Absorbs gravy, comfort starch |
| Roasted Brussels sprouts | Toss with oil, salt | 400–425°F | Roasted bite balances richness |
| Steamed broccoli | Steam 5–7 min | Serve warm | Fresh contrast and color |
| Sautéed spinach | Quick garlic toss | Stovetop | Bright, fast green side |
“Generous protein plus hearty sides makes a satisfying, simple dinner.”
Leftovers, Storage, and Reheating for Crispy Results
How you cool, pack, and reheat will decide whether the next serving stays crisp and tender. Cool pieces quickly at room temperature no more than two hours, then move them to the fridge.
Fridge and freezer timelines
Place cooled portions in an airtight container to lock in moisture and slow spoilage. Refrigerate for 3–4 days.
For longer storage, wrap portions tightly and freeze up to 1–3 months depending on packaging quality. Removing meat from bones before freezing helps it lie flat and thaw faster.
Reheating to revive crisp
Reheat in a 350°F oven for about 15 minutes so the interior warms gently while the exterior regains crunchy texture. In an air fryer, 350°F for 3–4 minutes quickly restores crispy skin without drying the meat.
Use a rack over a sheet pan to promote airflow and avoid steaming. Keep times conservative; add a few minutes if needed.
- Cool and store in an airtight container to keep quality and vitamin retention.
- Save rendered fat for next-day hash or to flavor roasted vegetables.
- Label containers with dates and reheat only what you will eat.
| Storage | Time | Tip |
|---|---|---|
| Fridge (airtight container) | 3–4 days | Cool before sealing |
| Freezer | 1–3 months | Remove meat from bones for flat packs |
| Reheat (air fryer) | 350°F — 3–4 minutes | Fast crisp without drying |
| Reheat (oven) | 350°F — ~15 minutes | Gentle, even warming |
Conclusion
, Consistent results come from measured steps: dry, oil, season, bake, finish, and rest.
Use a simple spice mix—garlic powder, onion powder, paprika, and an Italian or poultry blend—with about a teaspoon per spice and a light drizzle of olive oil. Bake in a preheated oven (30–40 minutes at 400°F or 35–40 at 425°F), then broil 2–3 minutes if you want extra crisp skin.
Check the internal temperature with an instant-read thermometer; 165°F is safe, and 170–190°F yields more tender meat. These steps make baked chicken thighs a dependable weeknight recipe that scales well and keeps flavor front and center.