Easy Stuffed Chicken Breast Recipes for Home Cooking
Surprising fact: nearly 70% of home cooks say a single, reliable weeknight main dish saves them hours each week—and a simple stuffed chicken version is one of the most repeatable options.
This Website contains affiliate links. That means I may earn a small commission if you purchase through my links, at no extra cost to you.
This post shows easy, reliable ideas for weeknight meals that use common pantry items like olive oil, garlic, spinach, and shredded cheese. You’ll get practical tips on creating a secure pocket, using about just under 1/2 cup of filling per piece, and searing once before finishing in the oven for juicy results.
Expect clear guidance on temperatures (target 160°F, then rest to 165°F), storage (3–4 days refrigerated, freeze up to 3 months), and quick reheating. I’ll also preview two cook methods: a cast-iron sear then bake, or an easy oven-only bake in a 9×13 dish.
Ready for family-friendly flavors—from spinach and three-cheese to broccoli-cheddar-bacon—and simple swaps that keep meals tasty and doable on busy nights.
Key Takeaways
- Simple steps make this stuffed chicken approach reliable for weeknights.
- Use common ingredients: spinach, cream cheese, mozzarella, Parmesan, and olive oil.
- Sear first, then bake to reach 160°F and rest to 165°F for tender meat.
- Fill each piece with about 1/2 cup of mixture and shred cheese from a block for best melt.
- Store safely: refrigerate 3–4 days or freeze up to 3 months; reheat wrapped at 325°F.
- Tools that help: instant-read thermometer, cast-iron skillet, and a sturdy grater.
Why stuffed chicken breast recipes are perfect for busy home cooks
A quick, flavor-forward main can turn a hectic night into a family meal in about half an hour.
Easy here means fewer steps and fewer dishes. Microwave-steam broccoli for 2 minutes with 2 tablespoons of water, mix fillings in one bowl, then use brief sears (about 2–3 minutes per side) and a predictable oven finish at 375°F. That routine fits neatly into 30–40 minute weeknight windows.
Simple ingredient lists make shopping painless: cream cheese or ricotta, cheddar or mozzarella, garlic, herbs, and olive oil. Use just under 1/2 cup filling per piece for tidy assembly. Add 3 tablespoons low-sodium chicken broth to the baking pan to build a quick pan sauce and boost flavor while you prep sides.
How this post meets search intent
This post gives clear instructions, step-by-step cues, and timing so beginners get consistent results. Cook to 160°F in the thickest part, then rest to 165°F for safety and juiciness. Swap cheeses, herbs, or vegetables to match what’s on hand and avoid extra store runs.
| Technique | Time | Why it helps |
|---|---|---|
| Microwave-steam veggies | 2 minutes | Saves time and reduces pans |
| Pan sear | 2–3 minutes per side | Locks flavor and speeds oven finish |
| Oven finish | Bake at 375°F to 160°F | Predictable doneness and juicy results |
| Filling amount | Just under 1/2 cup | Neat assembly and even cooking |
Core method: how to stuff chicken breasts step by step
A focused routine makes assembly fast and predictable. Start by prepping each piece so it cooks evenly and stays tender. Work on one at a time to keep the process smooth.
Prep and pound for even thickness
Pound each breast to a uniform thickness. Aim for about 1/2 inch across the whole piece. Even thickness prevents thin edges from overcooking while the center reaches the right temperature.
Cut the pocket the right way
Slice a horizontal pocket along the thicker side. Stop before you cut through—the safe cut way keeps the filling inside. This creates a neat cavity for the creamy mix.
Make the creamy filling
Mix softened cream cheese with shredded mozzarella and dried basil, oregano, onion powder, and minced garlic. Fold in sun-dried tomatoes or a broccoli mix for texture. Keep each portion just under 1/2 cup so it fits without spillover.
Sear in olive oil, then bake
Season the exterior and preheat oven to 375°F. Heat a skillet until nearly smoking, add a thin film of olive oil, and sear 2–3 minutes per side to build color. Optionally add 3 tablespoons low-sodium chicken broth to the pan before transfer.
Temperature cues
Finish in the oven until the thickest point reaches 160°F. Remove and rest 5 minutes so the internal temperature rises to 165°F. Use an instant-read thermometer and check the meat, not the filling, for accuracy.
| Step | Action | Why it matters |
|---|---|---|
| Pound | Even thickness (~1/2″) | Uniform cooking and tenderness |
| Cut pocket | Horizontal slit, stop before cutting through | Contains filling and keeps surface intact |
| Sear + Bake | Sear 2–3 min/side, bake at 375°F | Good color, controlled finish, safe temperature |
Ingredients and smart substitutions
Good results begin with the right-sized portions and a few quality pantry staples. Gather simple ingredients so assembly is fast and consistent.
Size, thickness, and trimming tips
Use four medium chicken breasts (about 6–8 ounces each, 5–6 inches long and 1–1.5 inches thick) to balance meat and filling. Trim surface fat and ragged bits, then lightly pound thicker pieces with a mallet to an even thickness for predictable cooking.
Cheese choices that melt and hold
Choose block cream cheese (not tub) for structure. Shred mozzarella and Parmesan from blocks for the best melt and flavor. For an Italian option, stir ricotta with Parmigiano Reggiano, lemon zest, and fresh basil or parsley.
Aromatics, herbs, and searing oil
Keep aromatics simple: minced garlic, dried basil, and oregano mix well into the filling. Season the pocket and exterior with salt and pepper. Use olive oil for searing to build a golden crust and add flavor.
| Key item | Why it helps | Tip |
|---|---|---|
| Four medium portions | Even cook time | 6–8 oz each |
| Block cheese | Better melt and structure | Shred fresh |
| Aromatics | Layered flavor | Garlic + dried herbs |
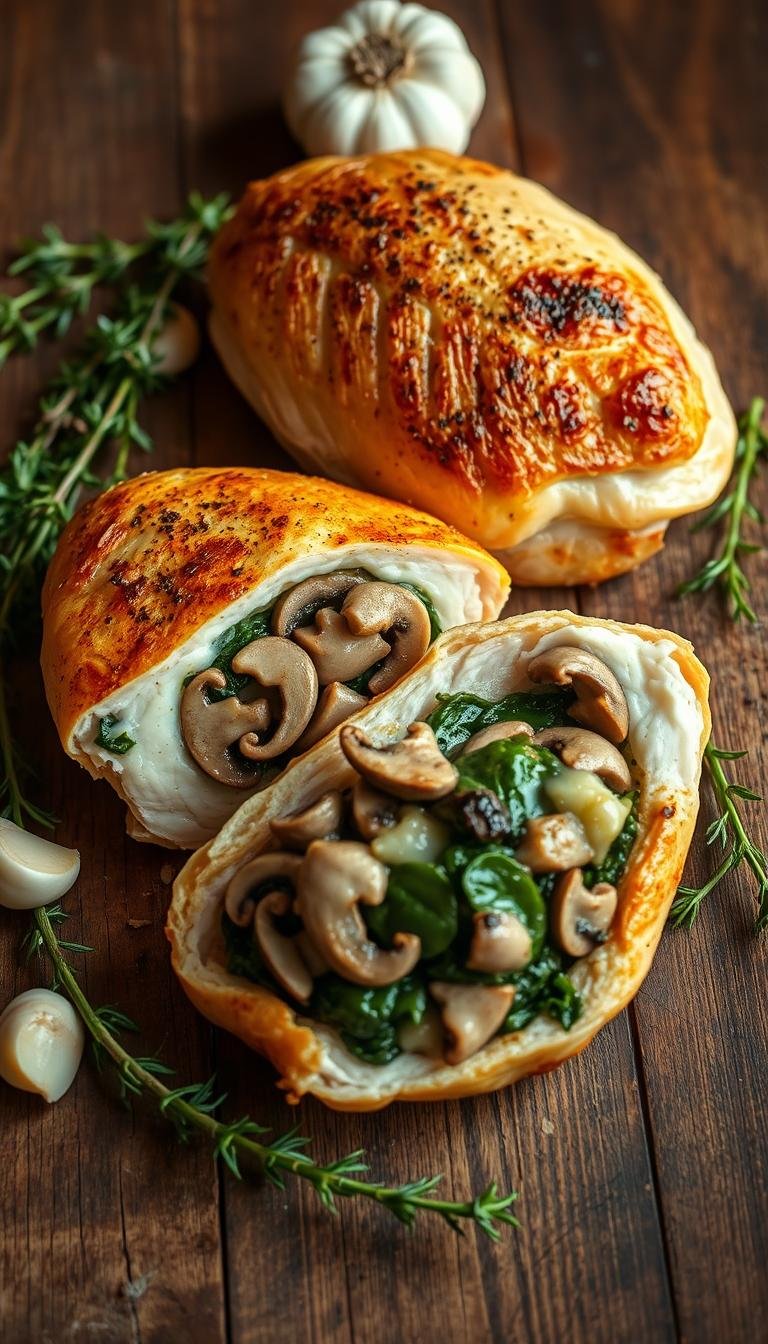
Flavor-packed fillings you’ll love
Bright, easy-to-assemble fillings turn a simple pocket into a weeknight favorite.
Spinach and three-cheese
Why it works: tangy and creamy with fresh herb notes.
Combine chopped spinach with softened cream cheese, shredded mozzarella, and grated Parmesan. Add minced garlic, dried basil and oregano, plus chopped sun-dried tomatoes for savory bursts.
Use just under a cup of mixed vegetables distributed across portions so texture stays even.
Broccoli, sharp cheddar, and bacon
Steam finely chopped broccoli 2 minutes with a splash of water. Fold into cream cheese with freshly shredded sharp cheddar, diced red bell pepper, and chopped thick-cut bacon.
Finish with dried parsley, chives, and dill for a light ranch-style note and a pinch of black pepper.
Mediterranean, mushroom, and Italian options
For briny, bold flavor mix artichoke hearts, Kalamata olives, sun-dried tomatoes, and shredded mozzarella.
Mushroom and Swiss with caramelized onions gives deep umami and subtle sweetness.
Pesto with mozzarella and roasted red peppers or a Caprese blend (tomato, fresh basil, mozzarella, balsamic drizzle) offer bright Italian profiles.
| Mix | Key notes | Best add-ins |
|---|---|---|
| Spinach three-cheese | Creamy, tangy | Sun-dried tomatoes, garlic |
| Broccoli-cheddar-bacon | Crunch, richness | Red pepper, ranch herbs |
| Mediterranean/Caprese | Bright, briny | Olives, basil, balsamic |
Tip: Aim for a creamy base plus a small, complementary veg or accent so the filling packs neatly into each pocket. Taste and season with a pinch of salt and pepper before stuffing.
Pro tips for “pocket chicken” that never dries out
A few pro moves in the prep and sear turn a good pocket into a reliably moist meal.
Pound, cut, and season the right way
Pound evenly so each piece cooks at the same rate and stays tender from edge to center. Slice the pocket on the thicker, flat side and stop before the knife exits—this is the proper cut way to keep the filling inside.
Pat spices and pack the filling
Pat your spice blend on instead of rubbing. This helps the seasoning adhere without tearing the surface. Push the filling deep into the pocket; if it holds when flipped, you won’t need toothpicks.
Sear hot, add oil after preheating
Preheat the skillet until nearly smoking, then add a thin film of oil. A hot pan gives a fast sear and color without overcooking. For extra juiciness, add 3 tablespoons low-sodium chicken broth to the pan before baking.
Temperature, finish, and toothpick tips
Bake at 375°F until the thickest part reaches 160°F, then rest to 165°F. Use toothpicks only if the filling won’t stay put, and remove them before serving. An oven-safe skillet or a 9×13 dish makes it easy to move from stovetop to oven.
Two easy cooking methods that deliver
Two straightforward cooking paths give you great color and juicy interiors without fuss. Pick the approach that fits your schedule and equipment. Both methods use the same oven temp and the same temperature cue so results stay consistent.

Cast-iron sear + oven bake with a splash of broth
Preheat oven to 375°F and heat a cast-iron skillet until very hot. Add a thin film of olive oil, then sear two pieces at a time for 2–3 minutes per side to build a quick crust.
After searing, pour 3 tablespoons low-sodium chicken broth into the skillet, cover with foil, and transfer to the oven. Begin checking internal temperature at 12 minutes and continue until the thickest point reads 160°F. Remove and rest 5 minutes so carryover heat reaches 165°F.
Oven-only bake in a 9×13 dish
If you skip the stovetop, arrange portions in a lightly greased 9×13 baking dish. Add a small splash of broth or 1–2 teaspoons water to the pan to help keep edges moist.
Preheat oven to 375°F and bake until the thickest part reaches 160°F. Rest 5 minutes before serving. This hands-off method is ideal when you want fewer steps and less cleanup.
Quick checklist
- Preheat oven to 375°F for both methods.
- Sear 2–3 minutes per side in a hot skillet; crowding causes steaming.
- Add 3 tablespoons broth for skillet method; splash broth or water in the 9×13 for oven-only.
- Check temperature starting at 12 minutes; target 160°F, then rest.
- Use olive oil for searing and keep an instant-read thermometer handy.
| Method | Key step | Timing |
|---|---|---|
| Cast-iron sear + bake | Sear 2–3 min/side, add 3 tbsp broth, cover | Bake 12–17 minutes, check at 12 |
| Oven-only 9×13 | Arrange in dish, splash broth/water, lightly grease | Bake to 160°F, timing varies by thickness |
| Finish | Rest 5 minutes for carryover | Internal temp rises to 165°F |
Tools that make stuffing chicken easier
Small kitchen upgrades—like a heavy skillet and a sharp knife—lift results without extra work.
These tools speed prep, protect texture, and help you hit safe temperatures every time. A reliable set keeps weeknight cooking simple and repeatable.
Must-have items
- 12-inch cast-iron skillet: a heavy pan delivers an even, high-heat sear that locks in flavor before baking. (iron)
- Instant-read thermometer: check the thickest part of the meat to reach 160°F, then rest to 165°F.
- Microwave-safe bowl with lid (≈2.5 qt): steam chopped broccoli about 2 minutes with a splash of water or a damp paper towel. (bowl)
- Sharp chef’s and boning knives: make safe, clean pocket cuts for neat assembly.
- Sturdy grater: shred block cheddar or mozzarella for better melt and flavor. (cheese, mozzarella)
- Silicone-tipped tongs and foil: flip gently and trap moisture when finishing in the oven.
- Light coat of oil: a thin film in the pan prevents sticking and aids browning. (oil)
| Tool | Why it helps | Quick tip |
|---|---|---|
| Cast-iron skillet | Even heat, good sear | Preheat until nearly smoking |
| Microwave-safe bowl | Fast veg steam | Cover and check at 2 min |
| Instant-read thermometer | Precision doneness | Test meat, not filling |
Storage, freezing, and safe reheating
Store cooked portions the right way to keep flavor and food safety front of mind.
Refrigerate promptly. Place cooled, cooked portions in an airtight container and keep them chilled. They stay good for 3–4 days in the fridge when sealed correctly.
Freeze for longer storage. Wrap or place portions in a freezer-safe bag and label with the date and filling so you can rotate meals easily. Use within 3 months for best quality.
Reheating & make-ahead tips
For gentle reheating, preheat the oven to 325°F. Loosely wrap each piece in foil and add 2–3 teaspoons of water inside the foil. The small amount of water creates steam and helps retain juiciness.
Start checking after about 15 minutes; timing will vary by size and thickness. Always check the internal temperature at the thickest part of the meat and aim to reach the safe temperature used during cooking.
You can assemble uncooked portions up to 24 hours ahead. Remove chill for 15–20 minutes before cooking, and allow extra minutes in the oven if pieces go in chilled or from frozen.
Quick checklist
- Refrigerator: Airtight for 3–4 days.
- Freezer: Up to 3 months; label date and filling.
- Reheat: 325°F oven, loosely wrapped, add 2–3 teaspoons water.
- Rest: Let refrigerated portions sit 15–20 minutes before heating.
- Safety: Check thickest part for correct internal temperature.
| Action | Storage time | Reheat temp | Pro tip |
|---|---|---|---|
| Cooked, refrigerated | 3–4 days | 325°F | Use airtight container; label with date |
| Frozen portions | Up to 3 months | 325°F (from thawed) | Thaw overnight in fridge for best texture |
| Assembled, uncooked | Up to 24 hours | Adjust bake time | Bring to room temp 15–20 minutes before baking |
Serving ideas and sides that pair perfectly
Thoughtful pairings make the filling and pan juices the star of the meal. Pick sides that add texture and soak up sauce without overpowering the main dish.
Classic, reliable sides:
- Crispy roasted potatoes or a fluffy rice pilaf are ideal to catch pan juices and add comfort to the plate.
- A simple green salad dressed with olive oil and lemon brightens rich, cheesy fillings and adds contrast.
- Roasted broccoli or green beans add color and a crunchy counterpoint for a balanced meal.

Italian-style and casual serving ideas:
- Warm marinara spooned on top or served alongside gives an Italian-restaurant feel, especially with spinach or ricotta fillings.
- Try a Caprese finish: fresh tomato, basil, and mozzarella with a quick balsamic drizzle after slicing for a bright, fresh bite.
- For casual nights, tuck slices into a toasted roll with marinara for an easy handheld option.
- When serving family-style from a baking dish, spoon the pan sauce over each portion and finish with fresh herbs and a crack of black pepper.
Quick plating tip: Keep one side that soaks up juices and one that adds brightness. This combo highlights flavors while keeping the plate visually appealing.
Nutrition notes and lighter swaps
A single portion delivers strong protein and a mix of nutrients, but small swaps make it lighter.
Macro overview per serving and sodium considerations
Example nutrition for a three-cheese spinach version: ~559 calories, 61 g protein, 30 g fat (13 g saturated), 701 mg sodium, 10 g carbs, 2 g fiber, 293 mg calcium, and 3 mg iron.
A spinach-ricotta option drops to about 501 calories, 55.6 g protein, 28.4 g fat, and 404 mg sodium. Using low-sodium broth helps control salt. Baking bacon separately also limits extra rendered fat in the pan.
Lower-fat options and practical swaps
Manage fat by choosing reduced-fat cream cheese and milder, lower-fat cheese. Cut added butter and use a thin film of oil for searing.
- Expect high protein per portion; adjust portion size to meet goals.
- Monitor salt by seasoning lightly and using low-sodium broth for the bake.
- Add extra chopped veggies to reduce rich cheese and keep a creamy texture.
- Leafy sides add potassium, fiber, and boost iron and calcium from greens plus dairy.
| Focus | Typical value | Swap to reduce |
|---|---|---|
| Calories (three-cheese) | ~559 kcal | Use ricotta mix (~501 kcal) |
| Fat | 30 g (13 g sat) | Reduced-fat cream cheese, mild cheese |
| Sodium | 701 mg | Low-sodium broth, light salt |
| Iron & calcium | 3 mg iron, 293 mg Ca | Keep spinach and herbs for micronutrients |
Stuffed chicken breast recipes
Below you’ll find a single, printable component that brings ingredients, steps, tips, and storage guidance together for simple weeknight cooking.
Find the printable recipe card and instructions below in this post
What the printable card includes: a clear ingredient list, step-by-step assembly, sear-then-bake or oven-only timing, and storage notes so you can cook once and eat multiple times.
Consolidated steps (printable):
- Pound to even thickness; cut a deep pocket without slicing through.
- Mix a creamy base (cream cheese, shredded mozzarella, optional Parmesan or ricotta) with add-ins like spinach, broccoli, sun-dried tomatoes, olives, bacon, or mushrooms.
- Stuff just under 1/2 cup per piece and pat on seasoning.
- Sear 2–3 minutes per side, add 3 tablespoons low-sodium broth, then bake at 375°F to 160°F; rest 5 minutes to reach 165°F.
- Store cooked portions 3–4 days refrigerated or freeze up to 3 months; reheat at 325°F wrapped in foil with 2–3 teaspoons water.
Why use the card: it enforces consistent fills and temps so each portion cooks evenly. Follow the measuring cues and thermometer checks for repeatable, safe results.
Extras in the printable card: curated filling combos (spinach three-cheese, broccoli-cheddar-bacon), pro tips for moisture and thermometer use, make-ahead notes, and quick side ideas like roasted potatoes or marinara for a bright finish.
| Component | Includes | Quick tip |
|---|---|---|
| Ingredients | Base cheeses, add-ins, seasoning | Weigh or use a 1/2-cup measure for even fills |
| Method | Pound, pocket, stuff, sear, bake | Check thickest point with an instant-read thermometer |
| Storage | Refrigerate 3–4 days; freeze 3 months | Label date and filling; thaw overnight before reheating |
Conclusion
By following a simple fill-and-sear routine, you’ll get consistent, juicy results every time.
Key takeaways: Choose medium portions (about 6–8 oz), pound to even thickness, and slice the pocket on the thicker side so the filling stays put. Mix a creamy base with cream cheese, shredded mozzarella or ricotta, add vegetables like spinach or broccoli, and season inside and out.
Sear 2–3 minutes per side, finish in a 375°F oven (optionally with 3 tbsp low-sodium broth), and pull when the thickest point reaches 160°F; rest to 165°F. Store cooked portions 3–4 days refrigerated or freeze up to 3 months. Reheat at 325°F wrapped in foil with 2–3 teaspoons water.
Use a cast-iron skillet, an instant-read thermometer, a microwave-safe bowl, and a sturdy grater to save time. Serve with roasted potatoes, rice pilaf, a crisp salad, or a spoonful of marinara for a balanced side and bright finish.