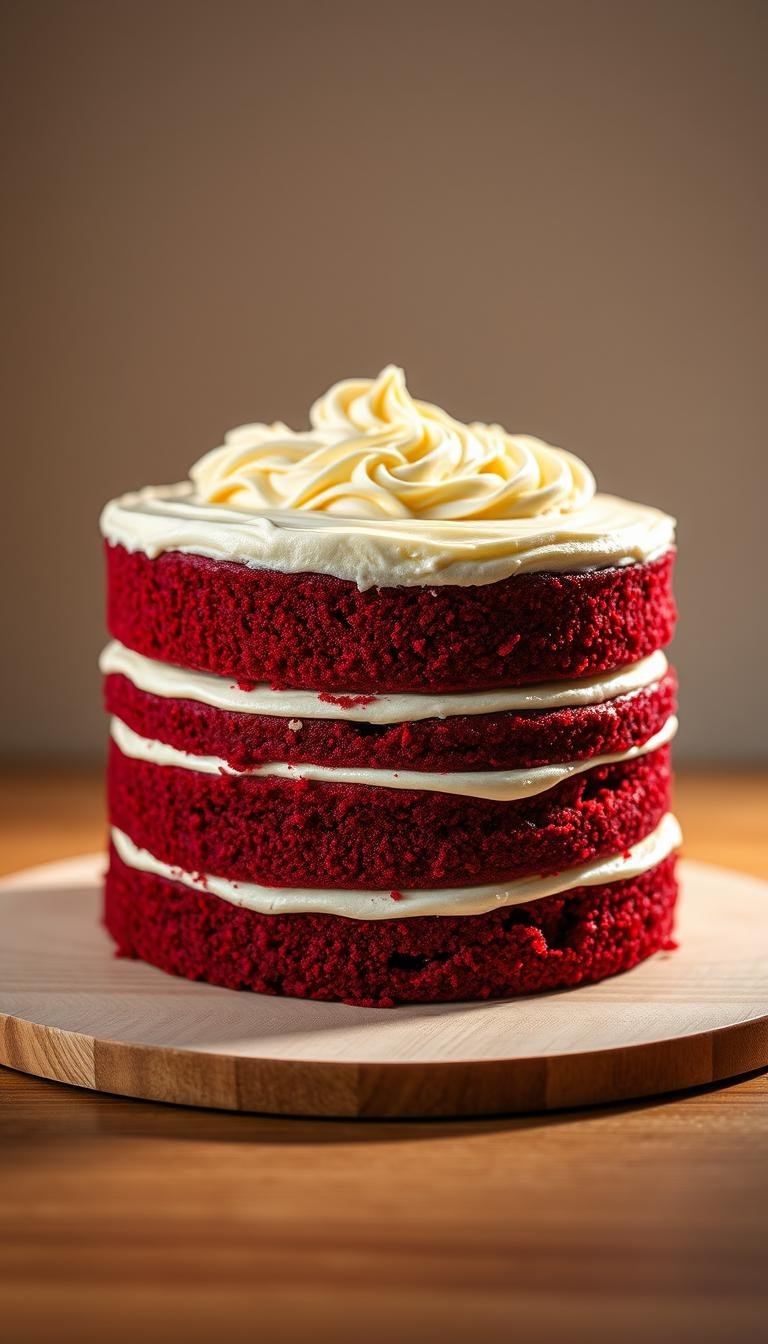
Easy Red Velvet Cake Recipe: Perfect for Any Occasion
Surprising fact: more than one in three home bakers say they choose this classic layer for celebrations because its mild cocoa and tangy finish please most crowds.
This Website contains affiliate links. That means I may earn a small commission if you purchase through my links, at no extra cost to you.
This moist, crowd-pleasing dessert blends a gentle cocoa note with a vanilla lift and a bright tang from buttermilk and vinegar. Bakers often cream sugar with oil and butter to build lightness, then whisk in eggs and vanilla before folding in sifted flour and cocoa powder.
Settle in: preheat a conventional oven to 350°F or 320°F fan-forced, line two or three 8-inch pans with parchment, and have bowls and measuring cups ready. Bake times usually range from 23 to 35 minutes, depending on pan size and oven type.
Finish with a silky cream cheese frosting that balances the batter’s gentle acidity. Chill briefly for clean slices, then bring the whole dessert to room temperature so the crumb feels plush and tender on the plate.
Key Takeaways
- Balanced flavor: vanilla meets mild cocoa with a tang from buttermilk and vinegar.
- Simple setup: preheat the oven and line 8-inch pans for steady results.
- Mixing flow: cream sugar with fats, add eggs and vanilla, then fold in dry ingredients with buttermilk.
- Bake time: expect about 23–35 minutes based on pan size and oven type.
- Frosting tip: pair with cream cheese frosting and chill briefly for neat slices.
Why Red Velvet Works: Flavor, Texture, and What Makes It “Velvet”
The secret to its plush texture is an acid-base reaction paired with modest cocoa and a clear vanilla profile.
Acidity creates lift. Buttermilk and vinegar supply the acid that reacts with baking soda to form fine bubbles. That reaction gives a tender, airy crumb rather than a dense crumb.
Less is more with cocoa. A small amount of cocoa powder adds a subtle chocolate note without turning the crumb brown or masking vanilla aroma. This is why red velvet differs from a straight chocolate cake.
Balanced fats and sugar matter. Measured oil, butter, and sugar lock in moisture and keep the mouthfeel soft. Properly sifted dry ingredients ensure even mixing and a consistent rise.
Tip: taste the batter for balance—vanilla should lift the cocoa, and the tang should be present but not sour.
- Frosting match: cream cheese frosting adds a mild tang that harmonizes with the cake’s acidity and tames sweetness.
- Color control: restrained cocoa and acid preserve the visual hue after baking.
- Room-temperature basics: eggs, flour, and dairy at room temp help avoid dense patches and give even structure.
Ingredients and Smart Substitutions
Start with quality pantry staples and a few smart swaps to keep the crumb tender and the color lively.
Dry mix basics
Sift the dry ingredients—all-purpose flour, a touch of cornstarch, cocoa powder, baking powder, baking soda, and salt. Sifting combines them and reduces the chance of overmixing when you fold wet and dry.
Fats, liquids, and structure
Use unsalted butter with a little vegetable oil to get buttery flavor and lasting moisture. Cream or whisk butter, oil, and sugar, then add large eggs and vanilla for structure.
Color, tang, and the frosting base
For color and lift, stir in white vinegar and your chosen red food color. Gel color is concentrated, so you need less; liquid color may thin the batter slightly.
For a silky finish use block-style full-fat cream cheese and sifted powdered sugar. This helps the cream cheese frosting set smooth and slice clean.
Natural vs Dutch-processed cocoa
| Type | Effect | When to use |
|---|---|---|
| Natural cocoa | Bright tone, reacts with acid | Traditional red velvet cake |
| Dutch-processed | Deeper chocolate notes, less tang | When you want richer chocolate flavor |
| Swap | AP + cornstarch → cake flour | Use cake flour for extra tenderness |
- Buttermilk adds moisture and acidity; sour 1 cup of milk with 1 tbsp vinegar if needed.
- Adjust salt if you use salted butter and measure liquids in cups for consistency.
red velvet cake recipe easy: Step-by-Step Mixing and Baking
Start by preheating the oven and prepping pans so the batter spends as little time waiting as possible.
Prep and pans: Set temperature to 350°F for conventional ovens or 320°F for fan ovens and allow full preheat. Line two 8-inch pans with parchment for about 30 minutes, or use three 8-inch pans and expect 23–25 minutes. Consider cake strips to reduce doming and get even layers.
Whisk the wet base: In a bowl or stand mixer with a paddle attachment, beat sugar with vegetable oil and softened butter 1–3 minutes. Add eggs one at a time and stir in vanilla just until smooth to keep the batter tender.
Build color and tang: Stir in buttermilk, a splash of white vinegar, and red food color. For deeper tone, bloom cocoa powder in hot water before folding it in.
Handle dry ingredients: Sift flour and other dry ingredients, then fold gently into the wet mix to avoid developing gluten. Divide batter evenly, smooth tops, and bake without opening the oven early.
Tip: Test with a toothpick at three-quarters of the bake time; look for moist crumbs, not wet batter.
Silky Cream Cheese Frosting That Sets Just Right
Room temperature matters. Start with full-fat block cream cheese (Philadelphia is a reliable choice) and unsalted butter softened to room temperature. Working at the right temperature keeps the mixture lump-free.
Method: In a clean bowl, beat butter, cream cheese, vanilla, and a pinch of salt until smooth. Use a stand mixer with a paddle attachment or a hand mixer on medium speed for about 2–3 minutes, scraping the bowl once.
Sift powdered sugar before adding. Add the sugar in stages and taste as you go to balance sweetness. If the cheese frosting seems loose, chill it for a few minutes to firm up.

“Beat the base until smooth before adding sugar so the texture stays light.”
| Step | Tool | Outcome |
|---|---|---|
| Soften ingredients | Counter, 30 minutes | Lump-free start |
| Beat base | Stand mixer, paddle attachment | Silky, homogeneous frosting |
| Add sugar & chill | Sieve and fridge | Spreadable, holds edges |
- Make extra if you plan to pipe borders or rosettes.
- For clean finishes, apply a light crumb coat, chill, then finish with the final layer.
Tools, Temperatures, and Technique
A consistent heat source and the correct mixing method help the batter rise evenly every time.
Mixing tools: A stand mixer with a paddle attachment speeds creaming and gives steady results. A hand mixer is a solid alternative. A whisk will work, but take care to avoid overmixing and to stop as soon as the ingredients come together.
Room temperature matters. Bring butter, eggs, and buttermilk to room temperature so the batter emulsifies smoothly. This helps the crumb stay fine and the layers rise uniformly.
Oven style and temperature: Conventional ovens typically bake at 350°F. For fan-assisted ovens, lower the temperature to about 320°F to prevent overbrowning and faster drying. Watch minutes and visual cues—springy centers and moist crumbs—rather than just the timer.
Prep and workflow: Line cake pans with parchment and consider cake strips to reduce doming. Scrape the bowl and paddle during mixing to remove pockets of flour. Handle the batter gently after adding dry ingredients to avoid a tight crumb.
“Measure cups and grams ahead of time; a calm workflow makes baking predictable and fast.”
| Tool | When to use | Benefit |
|---|---|---|
| Stand mixer (paddle) | Creaming butter & sugar | Consistent texture, less effort |
| Hand mixer | Smaller batches | Versatile, portable |
| Whisk | Small recipes or delicate folding | Control, minimal aeration |
| Fan vs conventional oven | Adjust temperature | Even bake, avoid dry edges |
- Keep ingredients at room temperature for best emulsification.
- Monitor minutes and check with a toothpick for moist crumbs.
- Prepare pans and measures in advance for a smoother bake.
Pro Tips and Troubleshooting for a Perfect Velvet Crumb
Simple habits—measured ingredients and steady heat—produce a consistent, fine crumb.
Avoid overmixing and overbaking. After you add dry ingredients, fold with restraint. Overworking the batter tightens gluten and yields a dense, dry final product.
Watch the minutes but rely on sensory cues. A toothpick should come out with moist crumbs and the center should spring back at room temp.
Gel vs liquid color: Use gel color for vibrant tone without thinning the batter. Liquid red food adds extra moisture and can change bake time and texture.
Dome control and leveling. Use cake strips and even oven temperature to limit domes. Trim cooled layers with a serrated knife for clean, level stacking before frosting.
If you see tunnels or big holes: Small holes often come from the vinegar + baking soda reaction. Large tunnels are usually from overmixing or excess air. Fold gently and tap pans to release trapped bubbles.
“Measure flour accurately—spoon and level or use a scale—to avoid dense results.”

- Mix gently after dry ingredients to prevent tunnels.
- Prefer gel color to preserve batter viscosity.
- Use strips or trim cooled layers for flat layers.
- Judge doneness by moist crumbs, not just minutes.
Make-Ahead, Storage, and Simple Variations
Bake, wrap, and chill—you can simplify the final assembly without losing moist crumb or flavor.
Refrigerating and serving: Bake layers ahead, wrap them tightly, and refrigerate for 1–2 days to ease next-day assembly. Chill the assembled treat briefly so the frosting firms, then bring slices to room temperature for the best mouthfeel.
Freezing: Double-wrap unfrosted layers or individual slices and freeze up to 3 months. Thaw in the fridge overnight, then allow time on the counter to reach room temperature before serving for a plush crumb.
Simple size swaps: Convert this mix into cupcakes by shortening bake minutes, or halve the batter for a three-layer 6-inch version. Use parchment between stored layers to protect the top.
Oil-forward option: If you plan to keep the dessert chilled, use more vegetable oil in the batter. Oil stays tender in cool temperatures, so the slice remains moist under cream cheese frosting.
“Label and date frozen items so you can track freshness and serve confidently.”
- Refrigerate wrapped layers for simple assembly.
- Chill to set frosting, then serve at room for best texture.
- Freeze double-wrapped pieces; thaw gently before serving.
Conclusion
Finish strong: Follow the modern method — cream sugar with oil and butter, add eggs and vanilla, then fold buttermilk, vinegar, and sifted flour for a consistent batter. Bake at 350°F (320°F fan) and check in the 23–35 minutes window for moist crumbs and a springy top.
Frosting and storage: Top with silky cream cheese frosting made from block cream cheese and sifted sugar. Chill to set, then bring to room temperature before serving for the best texture.
Scale this mix for different pans or cupcakes, freeze wrapped layers for later, and finish with clean swoops, piped borders, or a light crumb garnish for a bakery-style look.