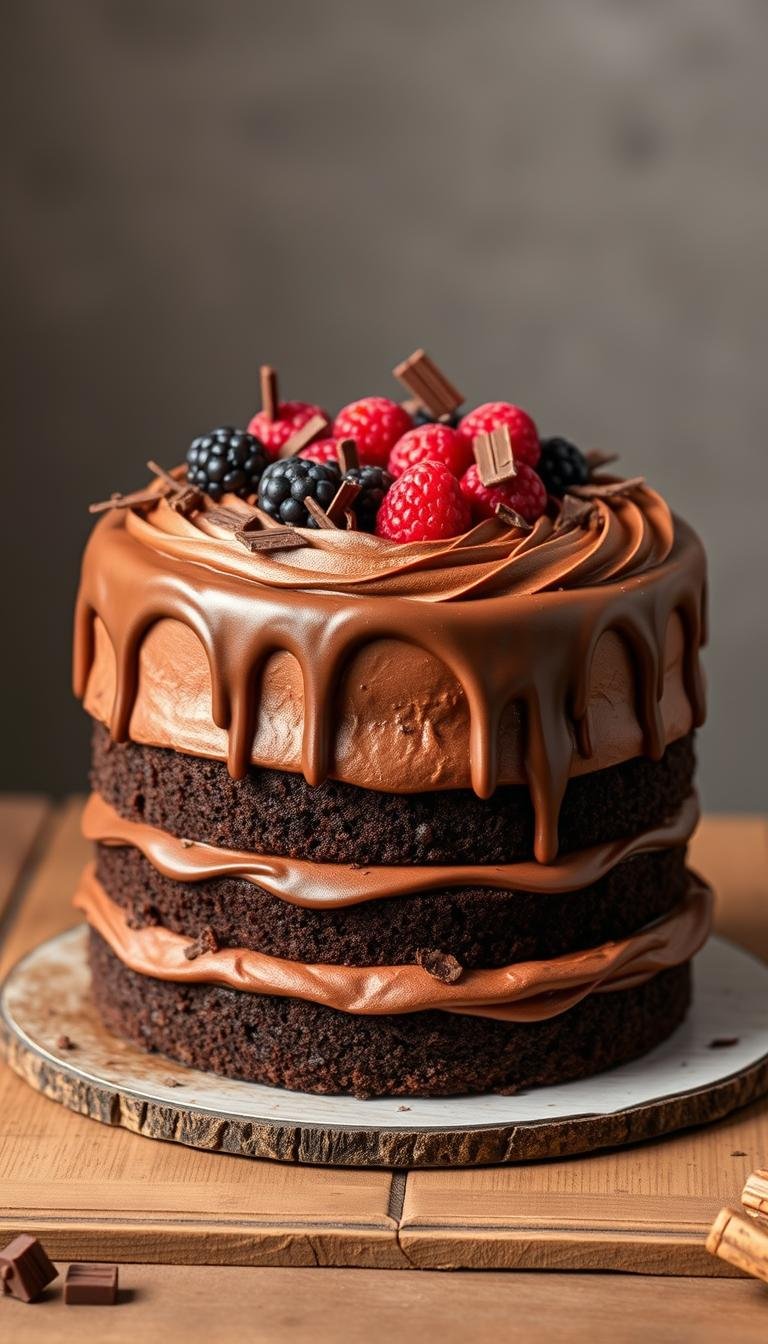
Delicious Chocolate Cake Birthday Recipe to Try Now
Surprising fact: more than 70% of top-rated modern desserts rely on a thin batter and hot coffee to deliver an extra moist crumb.
This Website contains affiliate links. That means I may earn a small commission if you purchase through my links, at no extra cost to you.
This guide gives a clear, friendly route from pantry to celebration. Start by whisking dry ingredients like all-purpose flour, sugar, natural cocoa powder, baking agents, and a pinch of salt. Then mix eggs, vanilla, oil, and buttermilk.
Add hot coffee or hot water to bloom the cocoa. That step deepens flavor without making the batter taste like coffee. The intentionally thin batter produces a fudgy yet light bite that home bakers rave about.
Standard baking time is short: about 23–26 minutes for two 9-inch pans, or a bit longer for different pans. A simple chocolate buttercream—butter, confectioners’ sugar, cocoa, cream, vanilla, and salt—pairs beautifully.
Key Takeaways
- Whisk dry and wet components separately for even texture.
- Bloom cocoa with hot coffee or water for richer flavor.
- Thin batter = moist crumb, not a mistake.
- Bake two 9-inch layers about 23–26 minutes; adjust for pan size.
- Freeze cooled layers tightly; thaw in the fridge before frosting.
Celebrate Big: Why This Chocolate Birthday Cake Belongs at the Party
Reviewers call this recipe the best they’ve had: it delivers deep flavor, an extra-moist crumb, and simple one-bowl prep that fits a busy celebration morning.
The use of natural cocoa and baking soda builds a classic devil’s food-style texture. Hot coffee and a pinch of espresso powder bloom the cocoa for richer, more intense notes without a bitter finish.
The method scales easily. Bake two 9-inch rounds, three 8-inch layers, or a 9×13 sheet and expect even rises and level tops. This makes it perfect for intimate dinners and larger parties alike.
- Fudgy yet light: slices stay tender for days, so leftovers taste great.
- Simple prep: whisk, pour, and bake—no special tools needed to make cake that looks professional.
- Versatile finish: chocolate buttercream, sprinkles, or chips lock in moisture and boost the festive look.
Vanilla and balanced sugar keep the crumbs bright and crowd-pleasing, so guests ask for seconds and you can relax knowing the recipe performs.
Ingredients & Tools: Build Your Chocolate Cake Base the Right Way
Gathering the right ingredients and tools sets you up for a reliably tender, even bake. Lay out measured items and the pans before you start. That small step keeps mixing calm and prevents missed steps.
Dry items to measure
- 2 cups all-purpose flour
- 2 cups sugar
- 3/4 cup unsweetened cocoa powder
- 2 tsp baking powder, 1½ tsp baking soda, 1 tsp salt
- 1–2 tsp espresso powder (optional)
Wet items to combine
- 2 eggs, 1 cup buttermilk
- 1/2 cup neutral oil (vegetable, canola, or melted coconut)
- 2 tsp vanilla extract
- 1 cup hot coffee or water to bloom the cocoa
Tip: Use natural cocoa with baking soda for proper lift and that classic deep hue. Dutch-process cocoa shifts acidity and can change rise.
Essential tools
- Two 9-inch or three 8-inch cake pans with parchment rounds
- Mixing bowls, a large bowl for dry ingredients
- Whisk or stand mixer (a simple mixer works too)
- Spatula and cooling racks for quick, even cooling
“Measure flour and cocoa by spoon-and-level or grams — accuracy keeps the crumb moist.”
| Item | Amount | Purpose | Notes |
|---|---|---|---|
| All-purpose flour | 2 cups | Structure | Spoon and level or weigh for best results |
| Unsweetened cocoa powder | 3/4 cup | Flavor & color | Use natural cocoa for this recipe |
| Buttermilk | 1 cup | Tenderness | Acidity reacts with baking soda |
| Oil | 1/2 cup | Moist crumb | Neutral oils keep texture soft |
Room Temperature Matters: Preparing Ingredients for Perfect Cake Batter
Start warm, bake better. Getting your ingredients to the right room temperature improves mixing and helps the batter trap air. That means a lighter, more even crumb after baking.
Quick warming tricks save time and reduce fuss.
How to bring eggs, dairy, and butter up to speed
- Bring eggs to room temperature by soaking them in warm (not hot) water for 10 minutes. This helps eggs emulsify with oil and dairy for a smoother batter.
- Take the chill off buttermilk or milk with a very short microwave burst — just a few seconds — to avoid curdling and clumps when mixed with cocoa.
- Warm sour cream gently to room temperature so it blends without streaks and keeps the crumb tender.
- Soften butter for frosting by resting it in a warm, turned-off microwave; avoid melting so the butter stays creamable for silky icing.
Pre-measure ingredients into cups before de-chilling. Mise en place speeds the process and reduces mixing time, which lowers overmixing risk.
| Item | Quick method | Approx time |
|---|---|---|
| Eggs | Soak in warm water | 10 minutes |
| Buttermilk / milk | Brief microwave burst | 3–6 seconds |
| Butter (for frosting) | Rest in warm, off microwave | 5–10 minutes |
Tip: Aim for ingredients that feel neither cold nor warm to the touch; consistent temperature gives your leaveners the best chance to perform.
Step-by-Step: Make Cake Batter Like a Pro
Set the oven to 350°F and prep your pans so the batter bakes evenly and releases cleanly. Grease and line two 9-inch pans or three 8-inch pans with parchment rounds.
Whisk dry ingredients first. In a large bowl, sift or whisk together flour, cocoa powder, sugar, baking powder, baking soda, salt, and espresso powder until the dry ingredients are clump-free.
Combine wet ingredients
In a separate bowl, whisk oil, eggs, vanilla extract, and buttermilk until smooth. No stand mixer is required here—just a quick mix will do.
Bring it together
Pour the wet into the dry and whisk until just combined. Overmixing tightens gluten and can toughen the crumb, so stop when you see a uniform mix.
Stream in 1 cup of hot coffee or water and whisk gently. The coffee blooms the cocoa and loosens the batter; this thin consistency is intentional and key to a moist, velvety crumb.
Divide the cake batter evenly between pans using a spouted cup or scale. Tap pans on the counter to remove large bubbles, then bake. For two 9-inch pans start checking at 23 minutes; adjust to 30–35 minutes for other pans. A toothpick should come out with a few moist crumbs.
Let layers rest briefly in the pans before turning out to cool completely. Warm layers are fragile; cooled layers are ready to level and frost for the final finish.
Bake, Cool, and Level: From Cake Pans to Fluffy Cake Layers
Settle the pans on the center rack and use the shortest recommended bake time as your starting point. That approach helps you avoid overbaking and keeps crumbs tender.
Bake times for two 9-inch pans and three 8-inch pans
For two 9-inch cake pans, bake at 350°F and start checking at 23 minutes. For three 8-inch pans, begin checking at 22 minutes.
Some ovens or larger batter volumes push total baking to 30–35 minutes. Use a toothpick; it should show moist crumbs, not wet batter.
Cooling, releasing, and leveling layers for a smooth stack
Let layers rest in their pans for 10–15 minutes. This short time firms the crumb so the layers release cleanly.
Run a thin knife around the edge, invert, and peel parchment while still warm. Cool completely on racks before trimming.
- If a dome forms, trim with a long serrated knife so each layer stacks flat.
- Slight center settling is normal with cocoa-rich batter and less flour; trimming and frosting correct it.
- Measure batter by cup or scale so pans receive equal volume and finish at the same time.
| Step | What to watch for | Timing |
|---|---|---|
| Bake two 9-inch pans | Toothpick shows moist crumbs | 23–26 minutes |
| Bake three 8-inch pans | Edges set, center slightly springy | 22–25 minutes |
| Cooling & release | Edges pull away, parchment peels | 10–15 minutes in pans |
Tip: Keep an eye on oven temperature and rotate pans midway if needed to avoid hot spots.
Frosting & Finish: Chocolate Buttercream that Spreads Silky Smooth
Finish your layers with a butter-rich frosting that spreads like velvet. A well-made buttercream adds flavor, structure, and a clean look before serving.

Classic chocolate buttercream with cocoa and cream
Beat room-temperature butter until creamy. Add sifted confectioners’ sugar and unsweetened cocoa powder in cups, then mix in heavy cream or milk, vanilla, and a pinch of salt.
Tip: Start on low speed in the mixer to avoid dust clouds, then increase briefly for a smooth finish.
Ganache-enriched buttercream for a luxe finish
Melt dark or semi-sweet chocolate with cream, cool until thick but pourable, then beat into the buttercream. The result is silkier, less sweet, and holds sharp edges.
Decorating ideas
- Use an offset spatula and bench scraper for smooth sides.
- Spin the turntable while sweeping the top to create a spiral finish.
- Press chocolate chips around the base or add sprinkles for a festive touch.
- Chill the frosted dessert 30–60 minutes to set before slicing.
“Sift dry ingredients for your frosting to avoid lumps and get a glossy, even spread.”
chocolate cake birthday Variations: Pans, Layers, and Batch Sizes
Choosing the right pans and layer heights lets you scale this recipe for any crowd. Small changes to pan size affect bake time, texture, and how easily you stack and slice.
Three-layer, two-layer, and 9×13 sheet timing
Two 9-inch rounds are the classic choice for parties. For dramatic height, bake three 8-inch layers or split the batter into 3–4 thinner 8- or 9-inch rounds for extra strata.
For a 9×13 sheet, use the same batter and bake at 350°F for about 35–40 minutes. Watch the center; thinner trays may finish faster.
Cupcakes and mini cakes using the same batter
Portion cake batter into liners two-thirds full and bake until a toothpick comes out clean. The base yields roughly six cups, so you can scale to cupcakes, mini rounds, or stacked individual desserts.
When to choose sour cream for a sturdier crumb
Use the sour cream variant when you need a denser, sturdier crumb under fondant or heavy frosting. Reduce buttermilk and hot coffee to 1/2 cup each and add 3/4 cup full-fat sour cream. This tweak balances moisture while giving more structure.
- Tip: Measure batter by cup or scale so each pan gets equal volume.
- Tip: Add a touch more cocoa for deeper color in thin layers and pair with lighter frosting for contrast.
Smart Swaps: Diet-Friendly and Pantry Substitutions
Small swaps in the pantry unlock diet-friendly versions without changing how the batter behaves. Use these options to adapt the recipe while keeping texture and flavor consistent.
DIY buttermilk, oil vs butter, and coffee alternatives
- DIY buttermilk: Add 2 teaspoons vinegar or lemon juice to 1 cup of milk and let rest 5 minutes. This gives the acidity your leaveners need.
- Oil options: Use vegetable or canola oil for a neutral crumb. Melted coconut oil works too for a subtle note. Butter can replace oil 1:1 for richer taste and a slightly denser texture.
- Coffee swap: Use decaf coffee, hot water, or even hot chai to bloom the cocoa. The hot liquid loosens the batter and deepens flavor without adding strong coffee notes.
Dairy-free, egg-free, and gluten-free pointers
- For dairy-free baking, use almond, oat, or coconut milk with a splash of acid instead of buttermilk. Stick to an oil-based batter so the texture stays tender.
- Going egg-free? Replace two eggs with 2/3 cup unsweetened applesauce or a reliable egg replacer. Expect to bake a few extra minutes so the crumb sets.
- For gluten-free needs, swap in a 1:1 gluten-free flour blend. Measure by cups or grams for consistent results.
Natural vs Dutch-process powder
- Use natural cocoa in the cake when the recipe calls for baking soda; the acidity matters. Dutch-process works well in buttercream where leavening is not active.
- Add a pinch of salt to batter and frosting to balance sweetness and sharpen the chocolate profile.

Tip: Measure consistently and keep swaps simple — subtle changes protect the texture and let the flavor shine.
Make Ahead, Storage, and Freezing for Months
Freezing smartly preserves moisture and saves you party-day stress. Cool layers completely before wrapping. Proper packing and timing keep texture and flavor at their best for future serving.
Freezer-friendly layers and how to thaw
Bake and cool layers fully, then wrap each in plastic wrap and a second layer of foil. Freeze up to 1–3 months without losing moisture.
To thaw, move wrapped layers to the refrigerator overnight. Keep them wrapped while chilling to prevent condensation on the crumb.
Storing whole desserts and leftovers: room vs refrigerator
For same-day service, store a finished cake under a dome at room temperature. It stays fresh and slices cleanly.
For longer time, refrigerate well-covered for 4–5 days. A brief 30–60 minute chill helps frosting set and stabilizes layers for transport.
“Label packages with bake date and flavor so you can rotate desserts without guesswork.”
- Frost slightly chilled layers for easier spreading and fewer crumbs.
- Freezing preserves moistness better than storing unfrosted layers in the fridge.
- Let refrigerated leftovers sit 10–20 minutes at room temperature before serving for peak flavor.
Conclusion
This modern layer approach pairs pantry staples with one clear method to deliver bakery-level results at home. Natural cocoa, oil for moisture, buttermilk for tenderness, and a hot liquid bloom create a reliably tender crumb for a chocolate birthday cake or family dessert.
The method adapts easily. Use two 9-inch rounds, a tall three-layer showpiece, a 9×13, or cupcakes. You can make cake in the format that fits your event and timeline.
Choose classic buttercream or a ganache-enriched finish for a silky look. Plan ahead: freeze wrapped layers, thaw in the fridge, and you save prep time while keeping bakery-quality texture.
Bookmark this cake recipe and print the steps. With clear times, swaps, and finishing tips, you’ll move from mixing bowl to final candle with confidence and more time to enjoy the celebration.