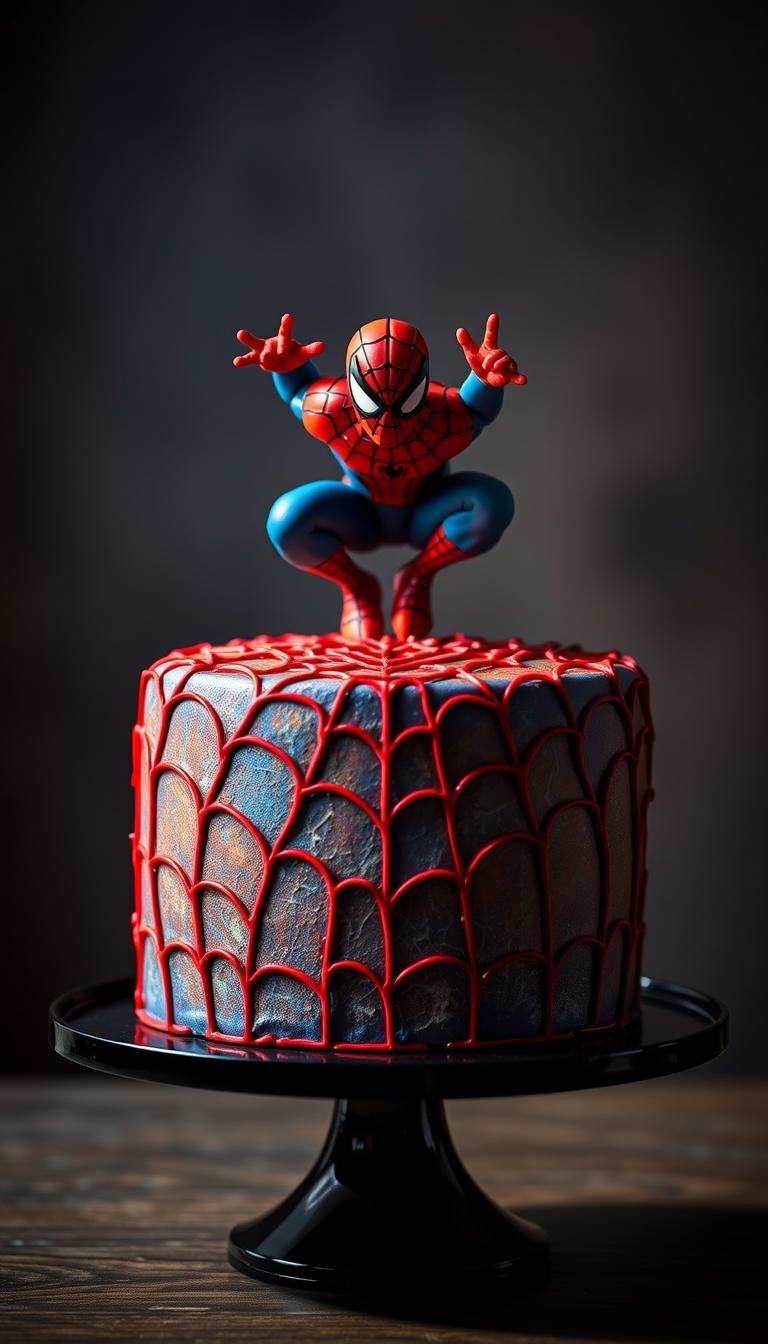
How to Make a Spiderman Birthday Cake
Surprising fact: one home baker turned two frozen 9-inch chocolate layers into a standout mask-shaped centerpiece using only a crumb coat and homemade marshmallow fondant.
This Website contains affiliate links. That means I may earn a small commission if you purchase through my links, at no extra cost to you.
This guide shows a clear, step-by-step route to build a striking Spiderman-themed party centerpiece at home. You will learn when to freeze and level layers, how to shape an oval mask, and why a quick chill helps for cleaner edges.
Practical tips include a fondant recipe (16 oz marshmallows, 2 lb sifted powdered sugar, water, shortening), red gel for color, cornstarch to roll to 1/4 inch, and black decorator gel for web piping. Finish with crisp white and black fondant eyes for the hero look.
Expect beginner-to-intermediate difficulty, realistic timing, and must-have items like an X-Acto knife, piping gel, and a sturdy box for delivery or transport. Many bakers offer eggless versions and delivery windows from same-day to midnight for busy planners.
Key Takeaways
- Make a mask shape by freezing and trimming two 9-inch layers for easier carving.
- Use a thin crumb coat, mist with water, then smooth with marshmallow fondant for a neat finish.
- Color fondant with red gel, roll on cornstarch to 1/4 inch, and pipe webs with black gel.
- Pack essential items: X-Acto knife, cornstarch, piping tools, and a secure transport box.
- Consider delivery slots and eggless designs when planning a party or comparing bakery services.
Plan Your Superhero Birthday Vision
Start by shaping a clear vision for the party centerpiece so your design matches the day’s energy. A tight plan saves time and keeps the final reveal dramatic without last-minute stress.
Choosing a look: mask, cityscape, or action pose
Mask designs are clean and bold, using red fondant and black webbing for instant recognition. They work well for single-tier formats and small guest lists.
Cityscape tiers stack edible buildings to create height and a true comic skyline. This suits two-tier cakes sized for larger groups (0.5 kg to 3 kg options).
Action pose designs add movement with 2D cutouts or small figurines. Comic words like “Thwip!” add playful energy and help sell the adventure theme.
Setting the party vibe for kids and boys who love heroes
Match décor colors—red, blue, black, white—to the cake design so photos pop. Add the child’s name and age in a bold comic font for personalization without clutter.
- Pick single, two-tier, or sheet format based on guests and table space.
- Choose edible elements or cutouts to fit your budget and serving needs.
- Plan timing so baked layers, chilling, and decorating align with the number topper reveal.
Tools and Items You’ll Need at Home
Gathering the right products and tools ahead of time makes the decorating process smooth and stress-free. Stage a compact workstation so each step—melting marshmallows, rolling fondant, or piping webs—flows without interruption.
Essential bakeware, mixers, and spatulas
Make sure these items are ready: two 9-inch round pans, cooling racks, a serrated knife, offset spatulas, a bench scraper, and a stand mixer with a dough hook.
Add measuring tools: a digital scale, measuring cups, and an oven thermometer to keep consistency across cakes and batches.
Fondant tools and prep notes
Grease a large microwave-safe bowl, mixer bowl, dough hook, and spatula with shortening before you melt 16 oz marshmallows with 4 tbsp water in 30‑second intervals.
Sift 2 lb powdered sugar, reserving about 1 cup. Use cornstarch on the work surface and roll fondant to 1/4 inch. Trim the cake board to shape with an x-acto knife for crisp edges.
Decorating supplies and transport materials
Keep piping bags, small round tips or tubes of black decorator gel, and optional stencils on hand for neat web lines and symmetrical eyes.
- Turntable for smoother frosting and fondant application
- Cut-to-shape cake board, food-safe wrap, non-slip mat, and a snug cake box for delivery
- Disposable gloves for kneading colored fondant and a small paintbrush for touch-ups
“Stage every item before you begin—this checklist step prevents rushed moves when the fondant is ready.”
Pro tip: Watch a short video tutorial to preview kneading and rolling. Then run a quick checklist so every product and item is staged before you start.
Ingredients Checklist for Cake, Frosting, and Fondant
Before you bake, line up every product and item you’ll need so decorating is smooth. A short prep session saves time and keeps the fondant workable when you reach the finishing steps.
Boxed mix versus homemade recipes
Boxed cake mixes (15 oz) give a reliable crumb and predictable volume. They cut prep time and reduce stress for first timers.
Homemade cakes let you control flavor and sweetness for a showpiece. Choose based on how much time and customization you want.
Marshmallow fondant essentials
- 16 oz marshmallows (about 1.5 bags)
- 2 lb sifted powdered sugar
- 4 tbsp water for melting
- Vegetable shortening to grease bowls and tools
- 1 can/tub white frosting for crumb coat and filling
Coloring and finishing items
- Red gel food coloring and extra on hand — gel, not liquid
- Black decorator gel for crisp web lines
- Reserve a portion of white fondant for the eyes
Tips: rest fondant at least 2 hours or overnight for improved texture. Add a few drops of clear vanilla or flavor oils to balance sweetness. Keep food-safe alcohol or water nearby for small piece adhesion. Consider printing a simple photo plan of the mask layout to guide cuts over the years.
Bake, Chill, and Level the Cake Layers
A steady process—bake, cool, freeze briefly, then level—makes carving easier and neater.
Pan selection and doneness cues
Use two sturdy 9-inch round pans that give even heat and line them with parchment for clean release. Follow the package or recipe bake time, but confirm doneness by a springy center and a clean toothpick.
Short freeze for cleaner cuts
Cool both layers completely, then place them in the freezer for about one hour to firm the crumb. Ovens vary, so an oven thermometer helps ensure proper temperature and consistent results across batches.
- Level domes with a long serrated knife; steady your hand and rotate the cake on a turntable for an even plane.
- Return leveled layers to chill so the surface firms and crumbs are minimized during filling and frosting.
- Use a measured filling layer of about half a centimeter to avoid bulges and keep sides straight for the mask shape.
After filling, chill briefly to set the structure before carving. Keep a labeled box handy to move layers between steps quickly and safely.
Stage key items—a bench scraper, offset spatula, ruler, and serrated knife—before you begin. Consistent technique and patience cut down product waste and improve the final birthday finish.
Shape the Spiderman Face with Simple Cuts
Transform two round layers into a bold oval mask with a few simple cuts and careful reassembly. This method gives a stable base that reads clearly once covered in fondant and decorated with webs.
Creating an oval “mask” from round cakes
- Mark a 1.5-inch central strip on each round and remove those pieces to begin shaping the mask.
- Slide the remaining sides together to form an initial oval; check the profile against your reference.
- If the face looks too short, rotate the oval a quarter turn, cut it in half, and reinsert saved strips to lengthen the shape.
Reinserting pieces to lengthen the face shape
Press seams gently and add a light squeeze of frosting between joins for adhesion. Chill the assembled form so it firms before you crumb coat.
Trim the cake board to match the outline with an X-Acto knife for cleaner fondant edges. Sketch simple guide lines on parchment to keep eyes and the central line symmetrical.
- Keep tools and small items labeled so pieces fit back quickly.
- Confirm balance from multiple angles so webs and eyes sit right on the final product.
Crumb Coat and Final Frosting for a Smooth Base
Before you reach for fondant, lock in crumbs and shape with a light coat of white frosting. This step traps loose crumbs and gives you a stable base for any fondant cake finish.
Why a thin coat matters
A thin crumb coat keeps stray crumbs from showing through the final layer. Apply a thin, even layer with an offset spatula so seams and joins stay neat.
Misting and smoothing before chilling
After the crumb coat, chill the assembled form for a couple of hours so the frosting sets and won’t smear. Add the final frosting layer, then mist lightly with water and smooth with an icing spatula for a polished, web-ready surface.
- Keep thickness consistent across curves so fondant won’t reveal bulges or gaps.
- Scrape sides and top with a bench scraper while rotating slowly for sharp edges.
- Seal with a light plastic wrap if chilling longer to prevent drying but avoid direct contact with the surface.
Stage all items and product needed for covering—cornstarch, rolling pin, and cutters—so the chilled cake does not warm on the counter. Check for air pockets near seams and smooth them now to avoid tenting under fondant.
“Keep the cake cold but not frozen when you move to cover; this helps prevent condensation spotting.”
Make Homemade Marshmallow Fondant Like a Pro
Ready-made fondant can be handy, but homemade marshmallow fondant gives better stretch and control. With the right prep, you can make smooth fondant for a fondant cake at home that rolls clean and colors vividly.
Mixing method: melting, dough hook kneading, and resting
Grease first. Lightly coat the mixer bowl, dough hook, spatula, and microwave-safe bowl with shortening so the marshmallow mixture won’t stick.
Sift 2 lb powdered sugar and set aside about 1 cup to adjust consistency. Melt 16 oz marshmallows with 4 tbsp water in 30-second bursts, stirring between to avoid scorching.
Pour the melted marshmallows into the greased mixer over most of the sugar. Cover partially with plastic film to contain dust and mix on low until a cohesive ball forms.
Common mistakes to avoid from real-world experience
- If the dough is tacky, add the reserved sugar a little at a time—stop when it feels pliable.
- Don’t skip the short rest: wrap the fondant tightly and let it rest at least 2 hours or overnight for easier rolling and fewer tears.
- Avoid adding cornstarch while mixing; keep a small box of cornstarch nearby for rolling later instead.
“A quick video refresher on kneading can prevent overmixing and save time in the kitchen.”
Store different color pieces wrapped separately to prevent cross-tinting. If you’ll transport or stash extras, place wrapped fondant in a small box to keep it clean and ready when you cover your final cake.
Color, Roll, and Cover with Red Fondant
Mixing gel color into fondant takes patience—start with small amounts and build to deep red.
Use gel color, not liquid
Gel food color gives a bold, non-sticky finish. Portion most of your fondant and knead in red gel until the hue is even. Wear gloves to keep hands clean and to prevent uneven tinting.
Roll to even thickness and drape
Dust the work surface with cornstarch and roll the fondant to about 1/4 inch. This thickness lets the fondant drape without tearing or thinning at the edges.
- Center the rolled fondant over the mask and smooth from the top down to reduce air bubbles and pleats.
- Glide a smoother around curves to keep mask contours crisp and avoid stretching thin areas near the bottom.
- Trim excess against the shaped board for a tight, professional edge.
- Reserve small portions of uncolored and black-tinted fondant for eyes and accents later in the design.
Pre-plan where the web lines will sit so seams do not cross key spokes. A light buff with a soft cloth removes cornstarch and brings up a gentle sheen without adding oil.

“Portion, tint, and test the color on a small scrap before you cover the top — red often deepens after resting.”
Pipe the Spider Web and Add Spidey Eyes
Complete the look with sharp black webbing and carefully cut white-and-black eyes that read from across the room. These final steps give the mask personality and make the design pop in photos and at parties.
Black patterns that pop on red fondant
Map the central hub slightly above the mask midline. Use a tube of black decorator gel to pipe straight spokes outward. Keep pressure steady so each line stays the same width.
Connect the spokes with evenly spaced arcs to form the classic spider web geometry. Small, smooth motions help the lines flow without breaks. If you wobble, pause and steady your hand before continuing.
Cutting and layering white/black fondant eyes
Draw eye templates first, then trace them onto white fondant. Cut crisp shapes and add a thin black edging for the signature look.
- Adhere eyes with a tiny brush and a drop of water to avoid smudges.
- Adjust the eye angle to change expression—narrow for intensity, wider for friendly.
- Add a minimal cake topper or a small fondant spider if you want a subtle accent that won’t compete with the mask.
“Stage fine items—toothpicks, tweezers, and a dry cloth—so small details go on cleanly.”
Before final photos, use a gentle dry cloth to remove stray cornstarch so the red appears bold. Capture one straight-on shot and one at about 45 degrees to show both the webs and eyes clearly.
spiderman birthday cake Design Ideas for Every Party
Decide whether you want a sleek mask or a multi-tier scene to set the party tone. A clear plan helps you pick flavors, scale, and the right finishing touches.
Mask-only classics, 3D webs, and comic “Thwip!” accents
Mask-only designs are bold and fast to serve. Use red fondant, crisp white eyes, and black webbing for instant recognition.
3D web strands can arch off the surface for dramatic depth. Thin wires or piped royal icing create that lift without adding heavy weight.
Comic-style bubbles and a small “Thwip!” panel add playful motion. These cartoon captions suit active kids and boys who love graphic-novel energy.
Cityscape tiers and action scenes for superhero birthdays
Stacked skyline tiers with edible windows, bridges, and tiny fondant spiders build vertical interest. This ties the hero to a city adventure while keeping slices tidy.
Action poses and cutouts work well on side panels or as toppers. Keep figure placement clear of major serving lines so the cake stays easy to slice.
- Offer a gallery from mask classics to 3D strands that lift off the surface.
- Use skyline tiers to evoke New York-style adventure with windows and bridges.
- Mix comic panels and bold onomatopoeia for a graphic, kid-friendly theme.
- Match flavors to visuals—red velvet or strawberry swirl for red highlights; chocolate fudge for deep contrast.
“Balance bold visuals with simple serving—hybrid designs (mask on top, city around sides) give impact without extra slicing trouble.”
Flavor, Size, and Count: Match the Crowd and Theme
Plan the menu around crowd-pleasing flavors and smart portion counts to simplify service.
Kid-friendly flavor picks
Choose familiar favorites like chocolate fudge, cookies and cream, or red velvet to please most guests. Strawberry swirl and vanilla with raspberry are light options for mixed groups.
For tiered designs, offer dual flavors so adults and children both get a preferred slice. Add a small batch of coordinating cupcake desserts to cover overflow.
Serving guide: portions and guest number
Match size to the guest count. Small families often use a 0.5 kg option. Larger parties need 2–3 kg. Plan a small margin for seconds or late arrivals.
| Size (kg) | Standard servings | Kids (half portions) | Suggested flavors |
|---|---|---|---|
| 0.5 | 4–6 | 8–10 | Cookies & cream, vanilla |
| 1.0 | 8–12 | 16–20 | Chocolate fudge, strawberry swirl |
| 2.0 | 16–24 | 32–40 | Red velvet, mixed tiers |
| 3.0 | 24–36 | 48–72 | Dual-flavor tiers |
- Translate servings into a clear count to avoid waste.
- Adjust end slices for oval masks so the design stays intact.
- Stock extra product items—plates, knives, and napkins—for smooth service.
No-Fondant Options: Buttercream Webs, Toppers, and Photo Cakes
Not using fondant can save time and still look polished. Smooth buttercream handles well and makes a clean surface for piping and edible prints.
Buttercream piping with web designs and simple toppers
Use a small round tip and steady pressure to pipe a bold spider web over chilled buttercream. Add a compact cake topper plaque or a licensed figurine for instant theme clarity.
Pair the main treat with matching cupcake minis decorated with tiny web swirls for easy serving and a cohesive table display.
Photo cake ideas and edible prints
Order an edible photo print for fast, graphic impact. Place the image on a chilled surface and frame it with a simple border to protect edges during cutting.
- Swap fondant for smooth buttercream and pipe crisp web lines with dark gel or tinted buttercream.
- Add a small cake topper plaque or figurine—verify it’s food-safe and sized right.
- Order an edible photo for quick visual appeal and align it on a chilled surface for best adhesion.
- For time-pressed plans, check a local store or bakery offering same-day delivery and cartoon-themed options.

Timing, Transport, and Delivery Tips for Party Day
A calm timeline and reliable transport plan keep your centerpiece intact and stress-free on party day. Set the delivery window early and confirm who will handle pickups and drop-offs.
Common delivery windows and planning
Choose the right time for your needs. Common slots include same-day for last-minute orders, early morning (7–9 AM) to place the item before guests arrive, fixed-time windows between 10 AM–11 PM for precision, and midnight (12 AM) for surprise drops.
Boxing, wrapping, and keeping the cake cool in transit
Use a snug box with a non-slip mat under the product to stop sliding in the car. Keep the vehicle air-conditioned and put the product on a flat surface, never a car seat.
- Pad your timeline so the cake rests 20–30 minutes at room temperature before slicing.
- Apply a light wrap shield if humidity is high, but avoid sealing tight to stop condensation.
- Assign a handler to steady the box during doorways and venue load-in.
“Confirm arrival time with the venue so the dessert comes after decor is set and before guests gather.”
Carry small repair items like wipes, extra gel, fondant scraps, and a spare piping tip. Pre-clear a level table away from sunlight and vents for final display.
| Delivery Window | Best Use | Transit items |
|---|---|---|
| Same-day | Last-minute orders | Snug box, non-slip mat |
| Early morning (7–9 AM) | Set table before guests | AC in car, flat surface |
| Fixed-time (10 AM–11 PM) | Precise arrival | Light wrap, handler |
| Midnight (12 AM) | Surprise reveals | Secure box, repair kit |
Budget, Shopping, and Store vs. Home Decisions
Deciding whether to bake at home starts with a clear budget and a list of the most impactful product you need. Count your time, tools, and the value of skills you already own before committing.
Cost-saving swaps and when to buy from a store
Use boxed mix and canned frosting to cut time and cost, then invest in quality gel colors and a good smoother to lift the finish. If the design is complex or you need a guaranteed finish, ordering from a local store can be more reliable.
Shopping list recap: product items you shouldn’t forget
Prioritize items that change the result: a sturdy turntable, sharp X-Acto knife, and reliable gel colors. Pack marshmallows, powdered sugar, red gel, black decorator gel, shortening, cornstarch, and packaging.
- Compare total costs of baking at home vs. ordering — include your time and tool value.
- Evaluate delivery fees and timing guarantees before you commit.
- Read recent reviews to check taste and design accuracy.
- Keep receipts and note which product and items worked best for future anniversary or baby treats.
“For hybrid plans, bake the layers yourself and buy a few signature items from a store to save time while keeping a polished look.”
Share, Review, and Capture the Moment
Arrange a quick shoot near natural light to highlight the web lines, eyes, and surface texture.
Taking a great cake photo and collecting reviews
Stage the mask in soft daylight. Snap a straight-on photo to show symmetry, then take a 45-degree shot to reveal depth.
Keep the background clear so the hero design stands out. Capture reaction shots—candles lit and the first slice—to preserve memories.
Invite guests to leave short reviews on taste and presentation. Three quick notes from friends are more useful than a long review form.
Inspiring friends and family with your superhero design
Share a brief build summary and a few in-process photos to help others try the method. Tag friends and vendors to credit helpers and encourage saves and requests.
Save your best images and notes in a folder so you can repeat or improve the design next year. Small thank-you posts build goodwill with suppliers and friends.
“Capture multiple angles and ask for honest feedback — these small steps turn one project into many better versions.”
| What to Capture | Why It Helps | Action |
|---|---|---|
| Straight-on mask | Shows web symmetry and eye shape | Use a tripod or steady hand |
| 45° profile | Highlights contours and depth | Shoot slightly above table level |
| Reaction shots | Documents the hero moment | Photograph the first slice and smiles |
| Build summary | Guides aspiring bakers | Post a few step photos with short notes |
Conclusion
Conclusion
Close the project by reviewing timing, tools, and small tricks that keep a bold mask design clean during delivery.
Recap the method: bake two 9-inch rounds, freeze briefly to level, cut a central strip and reinsert to form an elongated mask. Crumb coat, mist and chill. Make marshmallow fondant (16 oz marshmallows, 2 lb powdered sugar, water, shortening), tint red with gel, roll to 1/4 inch, and cover.
Pipe the spider web with black decorator gel and add crisp white/black fondant eyes. Plan delivery windows—same-day, early morning, fixed-time, or midnight—and consider eggless options and alternate designs like cityscapes.
Tip: pack a short checklist of product and items, choose a small cake topper or subtle city detail, and scale portions or add cupcakes so the hero theme suits boys, kids, and anniversary events.