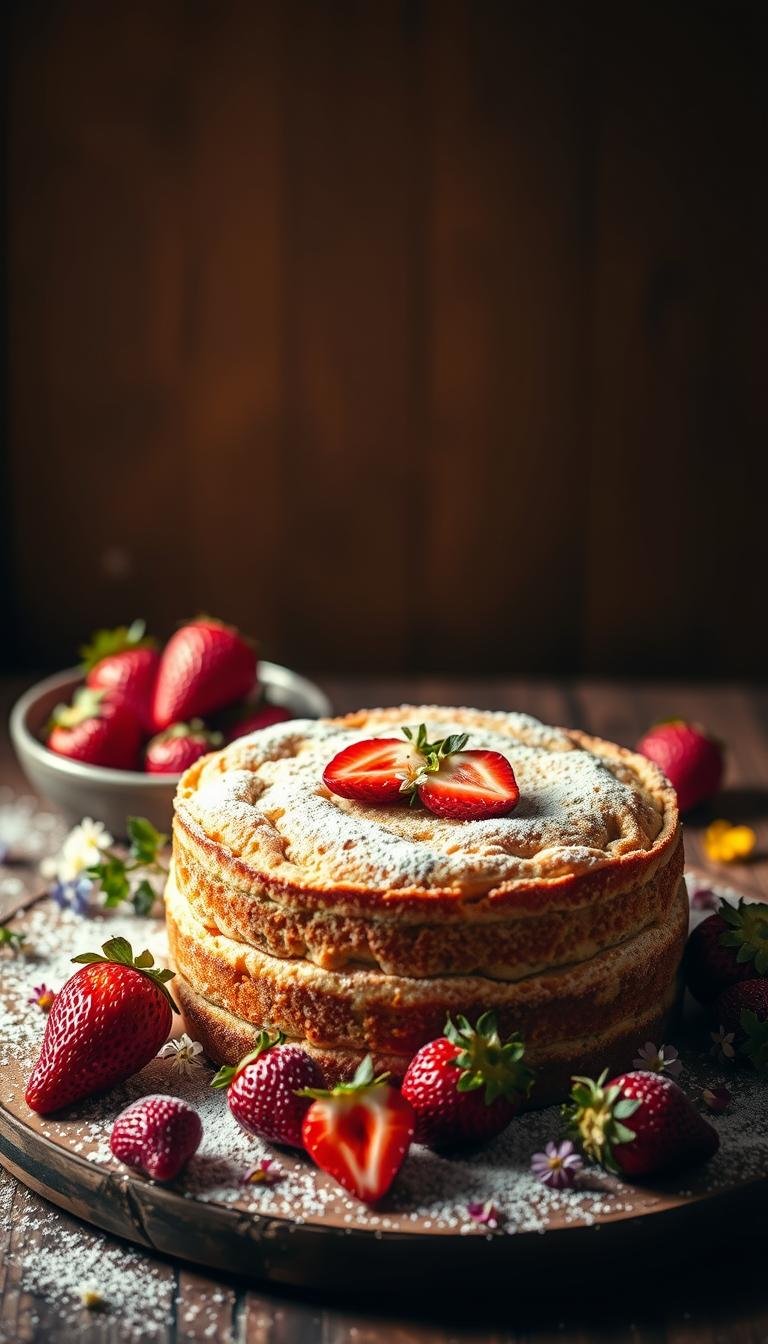
Make a Beautiful Pink Birthday Cake with This Simple Recipe
Surprising fact: nearly 60% of home bakers say a fail-safe recipe makes them bake more often — and that confidence shows on the plate.
This Website contains affiliate links. That means I may earn a small commission if you purchase through my links, at no extra cost to you.
This guide walks you through a reliable, bakery-style cake that uses everyday ingredients and easy tools. You can choose three 6-inch pans for tall, even layers or one 8-inch pan baked in thirds to save time.
Practical tips tested at 340°F and 350°F mean you can plan minutes for each layer and still get a moist crumb. Use American buttercream, cream cheese buttercream, or stabilized whipped cream for a balanced finish.
Quick workflow: prep ingredients, mix batter, bake, cool, level, stack, apply a thin crumb coat, chill, then finish with a smooth, soft coat and simple piping.
Key Takeaways
- Choose pans and bake times to fit your schedule and desired height.
- Swap yogurt for sour cream or buttermilk for extra tender crumb.
- Use cake strips and an offset spatula for flat tops and clean sides.
- Build colors a bit at a time; fruit emulsions give a natural tint.
- Keep dairy-forward cream chilled and bring to room temp before serving.
Why this easy cake is perfect for birthdays and special occasions
Home bakers love this approach because it produces a light, fluffy crumb and a festive finish every time. The recipe uses everyday ingredients like milk, butter, and sugar so flavors stay familiar and crowd-pleasing.
The method is approachable: about 40–45 minutes of hands-on time to make batter, then 30–45 minutes of baking depending on pan size. Cooling and a brief chill after you spread thin the crumb coat give a smooth top and clean edges.
- Use cream cheese buttercream for a balanced, not-too-sweet finish that adults and kids enjoy.
- Choose American buttercream and sprinkles for classic birthday cake flavors and easy decorating.
- Scale pans and play with colors or berry emulsions to match your theme without changing the baking steps.
This is a practical way to get bakery-style results with minimal tools. Let kids help measure or sprinkle so the celebration starts before the dessert hits the table.
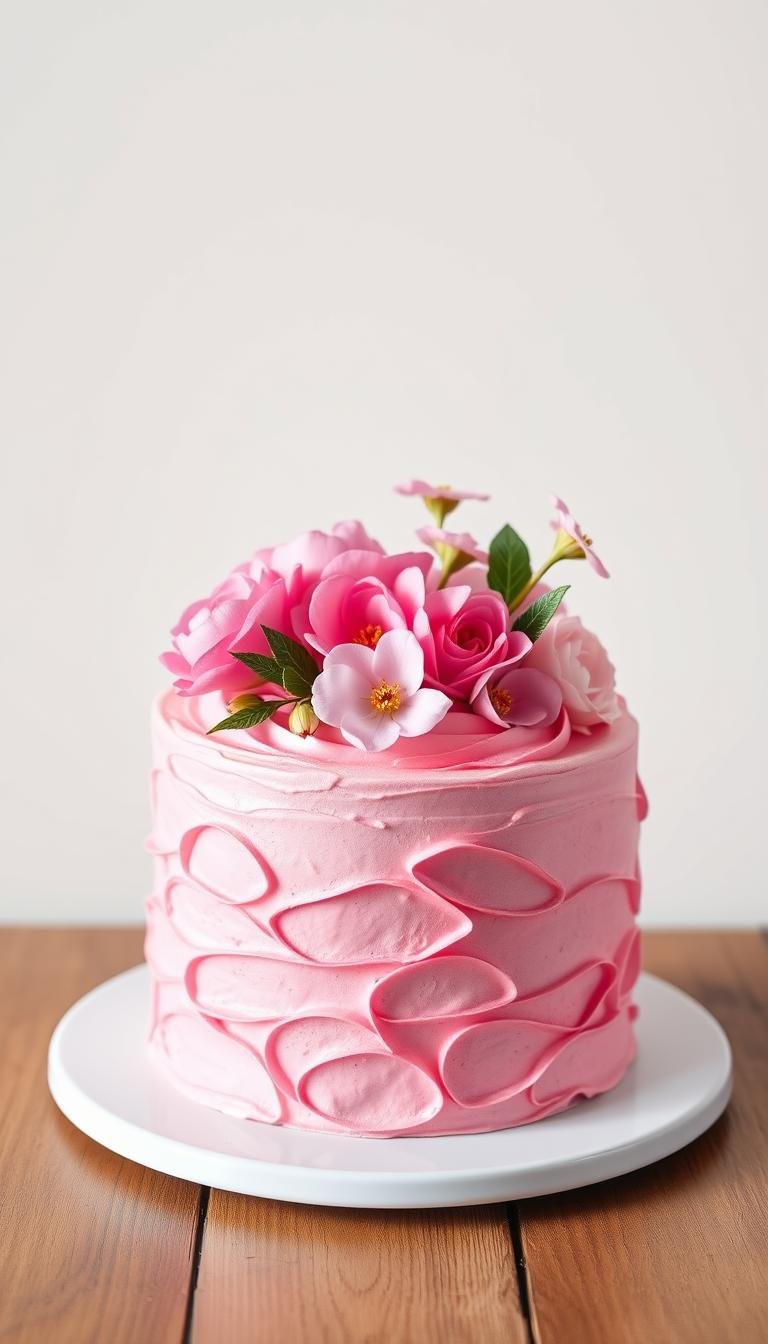
pink birthday cake
A tinted layer transforms a classic vanilla base into a striking centerpiece without changing how you bake. What sets this version apart is consistent blush tone, achieved with measured food coloring or natural fruit emulsions rather than random sprinkles.
What makes it different from vanilla or funfetti
The funfetti approach folds sprinkles into a vanilla batter so specks appear inside each slice. By contrast, a blush version favors a smooth crumb and uniform layers for a refined look.
Velvet-style recipes use buttermilk, baking powder, and baking soda to create a light, fine crumb that still stacks well. You can tint the batter for full-color layers or tint only the frosting to keep the interior pale and airy.
Who will love it
Kids and teens gravitate to bright presentation, while adults often prefer a balanced slice with cream cheese or lighter frostings. Families value the simple way to customize colors from whisper pale to bold tones.
- Measure sugar and milk by cup or weight and whisk dry ingredients so rise and color stay even.
- Whole milk adds richness; swap buttermilk or yogurt for added tenderness without heaviness.
- Works well in multi-layer formats where each slice shows neat, uniform color.
Ingredients and equipment you’ll need
Gathering the right ingredients and tools up front makes every step faster and your final dessert more reliable. Start by measuring everything so the batter mixes evenly and the bake stays consistent.
Cake batter essentials
Core ingredients: all-purpose flour, sugar, baking powder, baking soda, egg whites, butter, vanilla, and either whole milk, yogurt, or buttermilk to balance richness and tenderness.
Frosting choices
- American buttercream: 1 cup butter, 5 cups confectioners’ sugar, 1/4 cup heavy cream — classic and stable for piping.
- Cream cheese buttercream: full-fat cream cheese plus butter and powdered sugar for a tangy finish (use block cream cheese, not whipped).
- Stabilized whipped cream: heavy cream with powdered sugar and gelatin for an airy, holding finish.
Tools that make a difference
Use sturdy cake pans — three 6-inch or one 8-inch (bake in batches if needed). Add cake strips for flat layers, an offset spatula and bench scraper for smooth sides, and at least one piping bag for borders or two-tone piping.
- Oven thermometer, lined pans, and a turntable if available.
- Whisk dry ingredients together so leaveners distribute evenly before adding liquids.
- Keep dairy and eggs at room temperature so fat blends into the batter for a uniform crumb.
Step-by-step: make the batter, bake the layers, and prep for frosting
Start by readying your pans and setting the oven so every layer bakes evenly.
Prep the pans: grease or spray three 6-inch cake pans and wrap cake strips around the outside. Preheat the oven to 340°F for the classic method or 335–350°F for velvet-style baking.

Mix dry ingredients and prepare wet ingredients
Whisk or sift dry ingredients to evenly distribute leaveners and avoid lumps. Measure sugar and flour by cup or weight for consistent results.
In a separate bowl, beat room temperature wet ingredients — butter, egg whites, vanilla, and milk. If you want to make pink, add gel pink food coloring and disperse until no streaks remain.
Bake the layers and check doneness
Divide batter evenly among the cake pans. Bake about 25–30 minutes for the classic method; velvet-style may need 35–40 minutes.
Check centers with a toothpick or press lightly; they should spring back. Avoid overbaking so the crumb stays moist.
Cool, level, stack, and crumb coat
Cool pans 10 minutes, then turn cakes onto racks. Tap pans once as they come out to reduce shrinking.
Level domes with a serrated knife. Place the first layer on a board and pipe a ring of frosting to contain filling before setting the second layer.
Spread a thin layer crumb coat with an offset spatula, chill until firm, then finish with the final frosting. Load a piping bag if you plan borders or accents.
| Method | Temp (°F) | Bake Time (minutes) | Key Step |
|---|---|---|---|
| Classic | 340 | 25–30 | Sift dry ingredients; add wet to dry until just combined |
| Velvet-style | 335–350 | 35–40 | Reverse-cream: butter into dry, then milk, then egg whites |
| Cooling & stacking | Room temp | 10 (initial cool) | Level, pipe ring, align second layer, spread thin crumb coat |
Frosting and decorating: get that soft pink finish
A clean finish comes from steady hands, the right tools, and small, repeated smoothing passes. Start by spreading a thin layer to lock crumbs. Chill briefly so the surface firms before final smoothing.
Two-tone piping technique
Fill one bag with white buttercream and a second with a tinted cream. Nest both inside a third piping bag, snip the tip, and pipe to get an even swirl of color. This creates a consistent two-tone effect without extra fuss.
Smooth sides and top
Apply buttercream in vertical rings, rotate the board, and gently smooth with a bench scraper. Use an offset spatula to refine the top and pull the edge inward for a crisp rim.
Final accents and coloring tips
Press sprinkles around the base, then pipe a star or rope border on the top. For frosting choice, pick American for stability, cream cheese for tang, or stabilized whipped cream for a lighter mouthfeel.
| Technique | Tool | Why it helps |
|---|---|---|
| Two-tone piping | Three nested piping bags | Even color swirl; consistent lines |
| Smoothing | Bench scraper + offset spatula | Flat sides and crisp top rim |
| Coloring | Gel / liquid / natural emulsions | Gel = vivid, liquid thins, natural adds flavor |
Variations and substitutions to make it your way
Use simple ingredient swaps to tailor texture and hue while keeping the same reliable method. Below are easy variations that help you adjust moisture, tenderness, and finish without extra fuss.
Pink velvet with buttermilk
Try a pink velvet option by using buttermilk or milk mixed with a splash of vinegar. This adds acid that tenderizes the crumb and reduces the need for syrup.
Add a small amount of pink food coloring or a fruit emulsion for a soft tint. The result is moist, fine-textured layers that slice cleanly.
Yogurt or sour cream swaps
If you lack sour cream, swap in whole milk yogurt or Greek yogurt. Both add fat and moisture so the cake stays plush and stacks well.
Color the cream instead of the layers
Short on time? Bake a single cake and split it horizontally. Tint the frosting—cream or cream cheese—so you still make pink without extra bake time.
- Flavor tips: add vanilla or a touch of citrus zest to complement natural tints.
- Sweetness options: choose cream cheese or stabilized whipped cream for lighter sweetness; use American butter for classic taste.
- Scaling: keep leavener ratios consistent and mix coloring gradually to avoid over-saturation.
Pro tips and troubleshooting for bakery-level results
A few focused adjustments during mixing and baking make home layers bake flat and moist. These tips cover prep, timing, and handling so you get a steady rise and a fine crumb every time.
Flat, moist layers with simple pan prep
Wrap cake pans with cake strips so the edges stay cooler and the center and rim bake at the same rate. Weigh ingredients and practice mise en place to reduce mistakes and keep layers uniform.
Room temperature ingredients and mixing method
Bring eggs, milk, butter, and cream to room temperature so the batter emulsifies and avoids curdling. For a stable, light fluffy crumb try reverse-creaming: beat butter into the dry ingredients, then add liquids.
Timing, cooling, and leavener checks
Aim to bake at 335–350°F and remove pans when a toothpick is clean and the edges have not pulled away. Overbaking by a few minutes dries the crumb.
- Tap the pan once on the counter right after baking to release steam and reduce shrinking.
- Level cooled layers, then chill briefly—cold layers stack and frost far cleaner.
- Test baking powder and baking soda regularly; stale leaveners flatten rise.
| Focus | Action | Benefit |
|---|---|---|
| Pan prep | Use cake strips; weigh pans and batter | Flat tops; even bake time |
| Ingredient temp | Bring eggs, milk, butter, cream to room temperature | Stable emulsion; smooth batter |
| Mixing & timing | Reverse-creaming; watch minutes in oven | Fine crumb; moist layers |
| Cooling | Tap pans; chill layers before stacking | Less shrinkage; cleaner assembly |
Storage, timing, and nutrition
Plan storage and serving steps now so the dessert stays fresh and tastes its best on the day. Proper chilling and simple timing make a big difference in texture and flavor.

Make-ahead timeline, refrigeration, and serving at room temperature
Bake layers 1–2 days ahead, wrap them tightly, and refrigerate or freeze. Decorating works best the evening before or the day you serve.
If you use stabilized whipped cream or cream cheese frosting, refrigerate the finished item. Remove it 60–120 minutes before serving so the crumb softens and flavors open.
For quick timing, set aside short blocks of minutes between the crumb coat and final coat. A brief chill gives cleaner edges and a smoother finish.
Approximate calories per slice and serving size guidance
Calorie counts vary by frosting and portion size. A three-layer 6-inch with American buttercream is about 240 calories per slice when cut into 10 servings.
A richer pink velvet version with stabilized whipped cream can approach 656 calories per serving depending on slice size.
| Item | Typical serving | Approx. calories |
|---|---|---|
| 6-inch, 10 slices (American buttercream) | 1 slice | 240 calories |
| Pink velvet, richer frosting | 1 slice | ~656 calories |
| Leftovers (storage) | Airtight container or wrapped | Keeps fresh for days; freeze for months |
- Safety: In warm climates refrigerate finished desserts to protect food quality.
- Store leftover slices in airtight containers; freeze well-wrapped pieces and thaw in the fridge overnight.
- Portion planning: 6-inch cakes serve 8–12; 8-inch serve 12–16—adjust so everyone gets a satisfying slice.
For full ingredient notes and a printable recipe card, refer to the bottom of this guide. Small swaps like a cup of milk or less sugar change calories and taste—adjust with intention.
Conclusion
Follow a compact workflow and you’ll get even layers, smooth sides, and a clean top.
You now have a clear, reliable recipe to bake, stack, and decorate a pink birthday cake that looks professional and tastes fantastic. Prep, preheat the oven, whisk dry, blend wet, bake, cool, and then spread thin layer as a crumb coat before the final finish.
Lean on a piping bag and basic tools for piping details. Pick American buttercream, cream cheese, or stabilized whipped cream to match your crowd. Measure by cup or weight, save the printable recipe card, and pick the way that fits your time and tools.
Celebrate with a cake that slices cleanly, holds shape, and delights every bite.