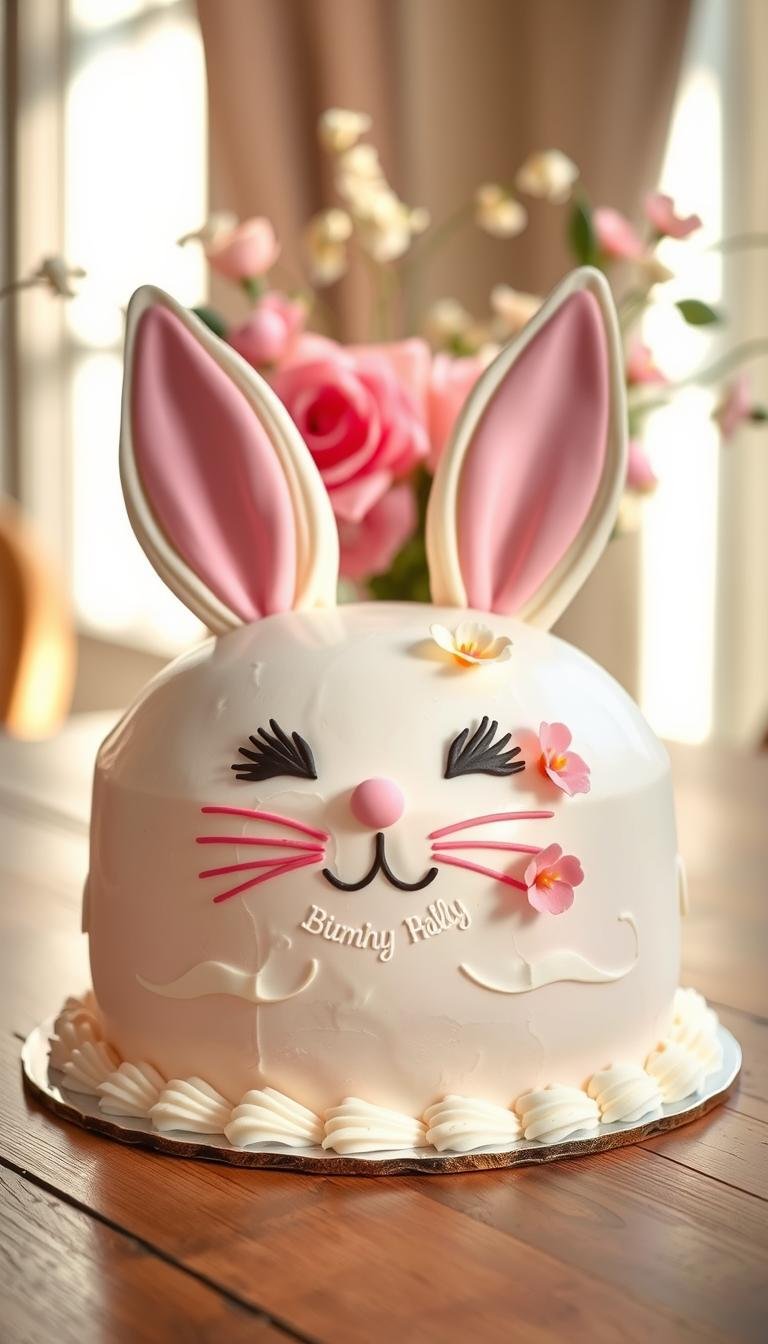
Bunny Birthday Cake Ideas: Easy Easter Dessert Recipes
Surprising fact: nearly 70% of home bakers report that simple tweaks to a box mix turn a dry loaf into a moist centerpiece.
This Website contains affiliate links. That means I may earn a small commission if you purchase through my links, at no extra cost to you.
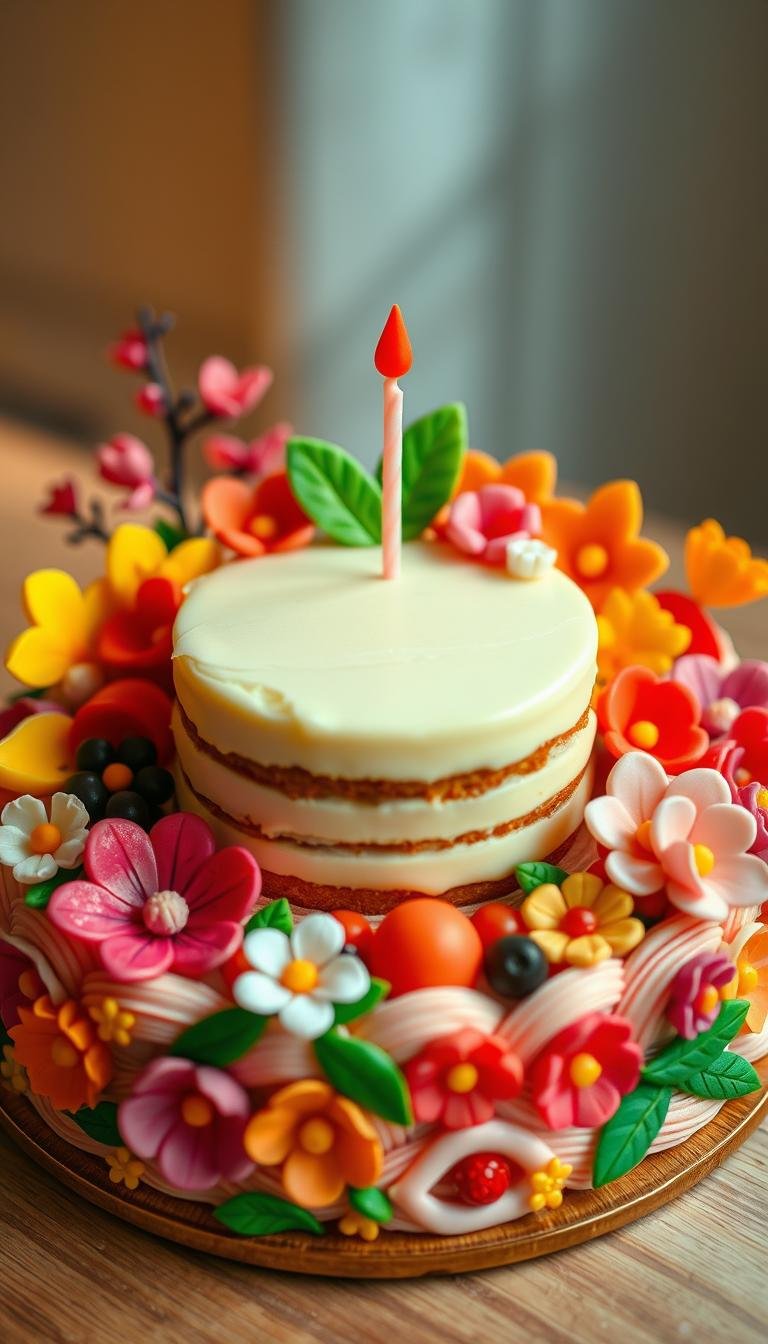
This guide shows three fun ways to build a show-stopping bunny birthday cake that doubles as an Easter dessert. Choose a classic two 9-inch round with coconut “fur,” a one-pan 9×13 cut-out piped with grass, or a layered funfetti design with fondant ears and a buttercream flower crown.
For speed, use a doctored box mix—add 1/2 cup sour cream, swap water for milk, and toss in an extra egg—to make cake layers more tender. Chill layers, apply a crumb coat, and use a bench scraper for smooth frosting.
Decoration options range from jelly bean faces and licorice noses to sprinkles-filled ears and coconut fur. Save scraps for cake pops and consider gluten-free or dairy-free swaps to suit guests.
Key Takeaways
- Three build paths: two-round cut, 9×13 cut-out, and layered funfetti.
- Doctored mix tips: sour cream, milk, and an extra egg for moisture.
- Prep smart: chill layers, crumb coat, and use a bench scraper for clean finish.
- Decorate with coconut, sprinkles, jelly beans, or fondant for different looks.
- Adapt recipes for dietary needs and save trimmings for cake pops.
Why a Bunny Cake Is the Sweetest Easter or Birthday Centerpiece
A playful rabbit-shaped dessert instantly signals celebration. The bunny face—with glossy black jelly beans for eyes and a small pink nose—feels whimsical and familiar for spring gatherings.
Textured finishes add visual interest and hide small flaws. Shredded coconut or piped rosettes and grass-tip fur give the design depth. These touches make a simple treat look polished and professional.
Kids love the surprise of candy details and a bright bow tie. Adults enjoy clean slices and a nostalgic look. The design adapts well as a single-layer, cut-out, or stacked celebration piece.
- Manageable timelines: build in stages and chill a crumb coat 10–30 minutes to smooth edges.
- Color matters: pastel swirls or a flower crown add seasonal flair without extra fuss.
- Budget-smart: pantry staples, jelly beans, and licorice create charm without custom orders.
- Personalize: swap candies or bow patterns to match themes while keeping the signature silhouette.
Make sure even beginners can achieve charm by using simple candies, short chill minutes, and patient smoothing. A well-styled centerpiece anchors desserts and looks great in photos.
Ingredients and Tools at a Glance
Gather the right pans and pantry staples before you preheat so assembly flows without hiccups. Below are concise gear and ingredient notes to set you up for a smooth build.
Pan sizes: use two 9-inch round cake pans for the classic cut, one 9×13 pan for the rectangular cut-out, or four 7-inch (or three 8-inch) pans for a layered funfetti build. Line each pan with parchment paper to ensure a clean release.
Core ingredients: all-purpose flour, granulated sugar, baking powder, fine salt, unsalted butter, vanilla (plus almond extract if desired), egg whites, buttermilk, vegetable oil, and rainbow sprinkles for funfetti.
Why room temperature matters: butter, buttermilk, and egg whites mix more smoothly at room temperature, which improves emulsification and gives a more stable crumb at baking temperature.
Tools and prep tips
- Mixing: stand mixer or hand mixer, a large bowl, rubber spatula, measuring cups, and a kitchen scale.
- Decorating: offset spatulas, piping bags with grass or star tips, bench scraper, and wooden skewers for fondant ears.
- Cutting/shaping: serrated knife and an offset spatula to loosen cakes from the pan after a brief cool.
“Prep and parchment are the quiet heroes of a flawless release and tidy trimming.”
Pre-measure ingredients, grease pans, cut parchment rounds or a fitted sling for a 9×13 pan, and leave room to cool layers on wire racks before assembling.
Method A: Classic Round Bunny Head from Two 9-Inch Cakes
Prep first: preheat the oven to 350°F (325°F for dark/nonstick) and grease two 9-inch round pans. Line bottoms with parchment so the round cake layers release cleanly.
Mix and bake: make an ultra-moist cake batter by doctoring a box mix—stir in 1/2 cup sour cream, replace the water called for with milk, and add one extra egg. Optionally tint thirds of the batter pink, purple, and yellow and layer without stirring for a festive swirl.
Cutting and shaping
Cool cakes 10 minutes, then turn out onto wire racks and cool completely. Use a serrated knife to cut one layer into two long ears and a small bow tie. Arrange these above and below the intact round to form the bunny head.
Frost and finish
Apply a generous coat of frosting, chill a few minutes, then press shredded coconut over the top for fluffy texture. Add black jelly beans for eyes and a pink jelly bean for the nose. Outline the bow tie with pull-apart licorice and dust inner ears with pink sugar.
| Step | Time | Tip |
|---|---|---|
| Preheat & prep pans | 5 minutes | Grease sides and parchment for clean release |
| Bake batter | Box timing | Swap milk for water; add sour cream and extra egg |
| Cool & cut | 10 minutes then complete cool | Use a serrated knife for smooth edges |
| Frost & decorate | Chill minutes between steps | Press coconut into frosting; add jelly bean face |
Method B: Rectangular 9×13 Cut-Out Bunny Cake
Start by lining a 9×13 pan with a parchment sling so the sheet cake lifts out intact. Bake a boxed vanilla or yellow cake at 350°F for about 25 minutes, until a toothpick comes out clean. Cool fully before shaping.
Trace a squat oval on the cooled sheet and carve it with a sharp knife. Use the trimmings to cut two ears and position them at the top of the face. Make sure the assembled shape chills at least 30 minutes so crumbs stay put.
Whip jarred vanilla frosting briefly to lighten it, then fill a piping bag fitted with a grass or star tip. Pipe short “fur” strands over the surface for texture.
- Press rainbow sprinkles into the inner ear frosting for color.
- Add a simple face with pink frosting, jelly beans, or Twizzlers.
- Save scraps: mix with 1/3 cup frosting, roll into balls, chill, and dip in white chocolate for cake pops.
Tip: Keep top cake details low-profile if you plan to travel; flatter piping reduces smudging and keeps features intact.
Method C: Layered Funfetti Bunny Birthday Cake with Fondant Ears
Begin with a reliable funfetti batter: combine AP flour, sugar, baking powder, and salt, then work in room temperature butter until the mix looks sandy.
Assemble layers: add egg whites, then buttermilk in two additions, followed by vanilla, a splash of almond if desired, and oil. Fold in rainbow jimmies last to keep specks bright.
Divide batter evenly into prepared round cake pans and bake four 7-inch or three 8-inch layers at 350°F for 33–36 minutes. Cool briefly, level each layer, and stack with vanilla buttercream, adding about 1/4 cup sprinkles between layers for fun texture.
Frosting and structure
Apply a thin crumb coat and chill 10–30 minutes. Finish with a smooth final coat using a bench scraper for sharp sides. Keep buttercream frosting medium-consistency so it spreads and holds detail.
Fondant features and finishing
Make fondant bunny ears by sandwiching pink and white ovals around wooden skewers. Cut small cheeks, eyes, whiskers, and a heart-shaped nose in advance.
Insert skewered ears just before serving to protect decorations during chilling. Optionally pipe a pastel buttercream flower crown for a festive topper.
“Even layers, a light crumb coat, and final smoothing make a home-baked layered dessert look professional.”
| Task | Details | Why it matters |
|---|---|---|
| Mixing order | Dry, butter, egg whites, buttermilk, vanilla, oil, sprinkles | Preserves texture and prevents sprinkle streaking |
| Bake times | 7-inch: 33–36 min; 8-inch: 33–36 min at 350°F | Even rise and moist crumb |
| Stacking | 1/4 cup sprinkles between layers; level each layer | Stable stack and visual pop inside |
| Finish | Crumb coat chill 10–30 min; final smooth with bench scraper | Clean edges and professional look |
Buttercream Frosting 101
Mastering a stable vanilla frosting gives you control when piping ears, fur, or flowers. Start with technique before you color or pipe. Small steps make a big difference in texture and handling.
Whipped vanilla buttercream vs. cream cheese
Vanilla American buttercream is sweet, stable, and smooth for clean finishes. Use it when you need firm edges or detailed piping.
Cream cheese frosting adds tang and a softer finish. It works well under shredded coconut or for a casual, swoopy look. Keep layers chilled if you choose cream cheese.
Room temperature butter, powdered sugar, and cream or milk
Beat 3 cups unsalted butter until smooth in a large bowl. Add 1 1/2 tablespoons vanilla and 1 teaspoon fine salt.
Gradually mix in 11 cups powdered sugar, adding 1/3 cup heavy cream halfway. Adjust with more cream or powdered sugar to reach the right spreadability for your cake.
Whip store-bought frosting briefly to increase volume if you need more for piping.

| Use | Consistency | Chill/Handling |
|---|---|---|
| Crumb coat | Soft, slightly thin | Chill 10–15 minutes |
| Final smooth coat | Medium, spreads cleanly | Work at room temperature |
| Piping fur/flowers | Thicker, holds shape | Keep cool to hold detail |
“Cover frosting when idle to prevent crusting and stir briefly before use.”
Decorating the Bunny Face: Eyes, Nose, Whiskers, and Ears
Map the bunny face before you pipe: lightly mark eye, nose, and whisker positions on the top so features stay centered and even. This small guide keeps symmetry when you add candies and piping.
Build features simply: use black jelly beans for the eyes and add a tiny white sprinkle as a highlight for life. Place a pink jelly bean at the center for the nose, or use a fondant heart or a teardrop of tinted frosting.
- Whiskers: lay red pull-apart licorice on fresh frosting so it sticks; trim ends to match and angle them slightly up for a friendly look.
- Ears: fill inner ear areas with pink sugar or sprinkles and press gently so they stay put without sinking.
- Fur & base: pipe short strands with a grass tip to add texture, then tint shredded coconut green and press around the base for coconut grass and extra sprinkles of color.
“Wipe your piping tip between elements and place small candies with tweezers for a neat top that slices well.”
Secure each candy with a dab of frosting and follow your guide marks to make bunny faces consistent across a sheet or a layered cake. These quick steps help you make bunny decor that looks polished and stays put.
Pro Techniques to Make Cake Like a Pro
Controlled chills and tidy trims will give your finished dessert crisp lines and clean slices. Follow a few focused steps to lift a home bake into something that looks professional on the table.
Make sure layers are level; use a serrated knife
Make sure cooled layers are fully room temperature before trimming. Warm layers tear and compress.
Use a serrated knife and a small turntable. Rotate the cake steadily and keep the blade level for even layer thickness.
Chill minutes between coats; bench scraper for sharp edges
Apply a thin crumb coat, then chill 10–30 minutes until firm to the touch. This traps crumbs and steadies surfaces for a clean finish.
Smooth the final coat with a bench scraper held at a slight angle. Warm the scraper briefly under hot water and dry it for glassy sides.
Line pans with parchment paper to release cleanly
Always line cake pans with parchment paper to prevent sticking and reduce breakage when demolding.
Run an offset spatula around the edge after a short rest to loosen before flipping. Keep your workspace cool—room temperature and lighting affect buttercream handling.
“A calm workspace and small pauses between detail steps make professional results repeatable.”
Smart Swaps and Dietary Options
A few smart substitutions let you keep the same flavor while meeting dietary needs. Use these swaps to adapt a cake recipe without losing texture or taste.
Flour choices: Use all-purpose flour for structure. If guests need gluten-free, choose a high-quality gluten-free blend that lists xanthan gum or a similar binder.
Dairy and milk swaps: Replace buttermilk with whole milk plus 1 tsp lemon juice, or use yogurt or sour cream for extra tenderness. For dairy-free, choose almond, soy, or oat milk and swap butter for vegan butter sticks.

Eggs, oil, and sugar
Use an egg replacer per package directions for egg-free bakes; avoid aquafaba in tall layered builds where structure is critical.
Keep a neutral oil like vegetable or canola to preserve moistness. Stick with granulated sugar to retain crumb and browning; cutting sugar changes texture.
Flavor and allergy notes
Omit almond extract for nut-free needs and boost vanilla for warm flavor. For fondant-free designs, craft features from frosted piping or allergy-safe candies so the whole dessert can be dairy-free when frosting uses vegan butter and dairy-free cream alternatives.
| Swap | Use instead | Why it works |
|---|---|---|
| AP flour | Gluten-free blend | Maintains crumb when blend includes binder |
| Buttermilk | Yogurt, sour cream, or milk + lemon | Adds tenderness and acid for rise |
| Butter | Vegan butter sticks | Mirrors fat and creaming for texture |
| Eggs | Commercial egg replacer | Gives structure without animal products |
“Test a single cupcake with your chosen swaps before baking a full celebration layer.”
Try a small batch first to ensure the final texture pleases everyone and to confirm candies and colors meet allergen labels. These swaps help you reliably make bunny features and a festive centerpiece that guests can eat with confidence.
Make-Ahead, Storage, and Serving Tips
Think ahead: freezing leveled layers and prepped frosting turns a hectic morning into a smooth setup. Freeze layers well wrapped in plastic and foil so they stay moist and stackable.
Freezing and buttercream storage
Freeze leveled layers: wrap each layer in plastic, then foil, and store flat in the freezer. Thaw about 20 minutes before stacking so layers are cold to the touch but not frozen solid.
Buttercream: keep in an airtight container in the fridge for up to a month. Let it sit at room temperature briefly, then stir or rewhip to restore a smooth, spreadable texture.
Serving temperature and transport
Decide whether to serve at room temperature or chilled. Cream cheese frostings and tall decorations benefit from a cooler environment until just before serving.
- Make sure the pan and board are stable when transporting; place the dessert on a non-slip mat and keep the top decorations low.
- Add fondant ears or tall toppers at the venue to avoid damage in transit.
- Chill a crumb-coated layer for several minutes before final frosting to reduce dents during handling.
- Carry a small kit—offset spatula, extra frosting, paper towels—for last-minute touch-ups.
“Cover exposed cut sides with a thin coat of frosting to lock in moisture and keep slices fresh.”
Use a cold, sharp knife for clean slices and wipe between cuts. Store leftover slices in airtight containers; flavors often improve after a day. Follow these steps and your dessert will travel, store, and serve with confidence.
Bunny Birthday Cake: Ideas, Add-Ons, and Leftover Cake Pops
Use simple accents and smart scraps to make the whole dessert setup feel intentional and festive. This short guide shows easy add-ons to dress the top cake and a quick method to turn trimmings into treats.
Bow tie, sprinkles, and seasonal candy accents
Outline a bow tie beneath the head with thin licorice strands and fill the center with colorful jelly beans or M&M’s for a bright focal point.
Use seasonal candies in ear interiors and the flower crown. Press pink sugar in the inner ear for soft contrast. Add small buttercream blossoms or pastel dragées on the top to echo spring tones.
Frame the base with coconut grass tinted green and press it lightly into fresh frosting for a meadow effect that improves presentation.
Turn cake scraps into cake balls or pops coated in white chocolate
Place crumbs in a bowl and mix with about 1/3 cup frosting until the mix holds. Roll into balls or little eggs and chill 30 minutes.
Dip in melted white chocolate and decorate with sprinkles while the coating is wet. Stand pops upright in a foam block or lay on parchment to set.
- Assemble a dessert board: surround the main cake with pops, cookies, and candies for a photo-ready spread.
- Bag pops as favors and tie with ribbon that matches the party palette.
- Or drizzle instead of fully coating to cut sweetness while keeping flavor.
| Idea | What to use | Why it works |
|---|---|---|
| Licorice bow tie | Thin licorice + jelly beans | Bright focal point under the head |
| Coconut grass | Tinted shredded coconut | Frames base and hides crumbs |
| Leftover pops | Crumbs + 1/3 cup frosting, white chocolate | Minimizes waste and adds portable treats |
“Turn every trim into a treat—small touches make a big party impact.”
Conclusion
Conclusion
Pick a path—the two-round coconut-topped classic, the one-pan cut-out with piped fur, or the layered funfetti showpiece with fondant ears—and focus on finishing touches for a standout bunny birthday cake.
Each bunny cake approach is approachable. Follow clear steps in the cake recipe, use simple candies for faces, and rely on basic tools to get neat results.
Key techniques lift the look: doctor mixes for moisture, chill crumb coats, smooth with a bench scraper, and trim layers evenly. Make ahead by freezing layers, keep buttercream covered, and add tall ears at the last minute for safe transport.
Personalize with colors, a bow tie, or a flower crown. Try swaps like gluten-free blends or vegan butter so everyone can enjoy. Slice with a warm, clean knife, snap a photo, and share your version to inspire others who want to make cake with confidence.