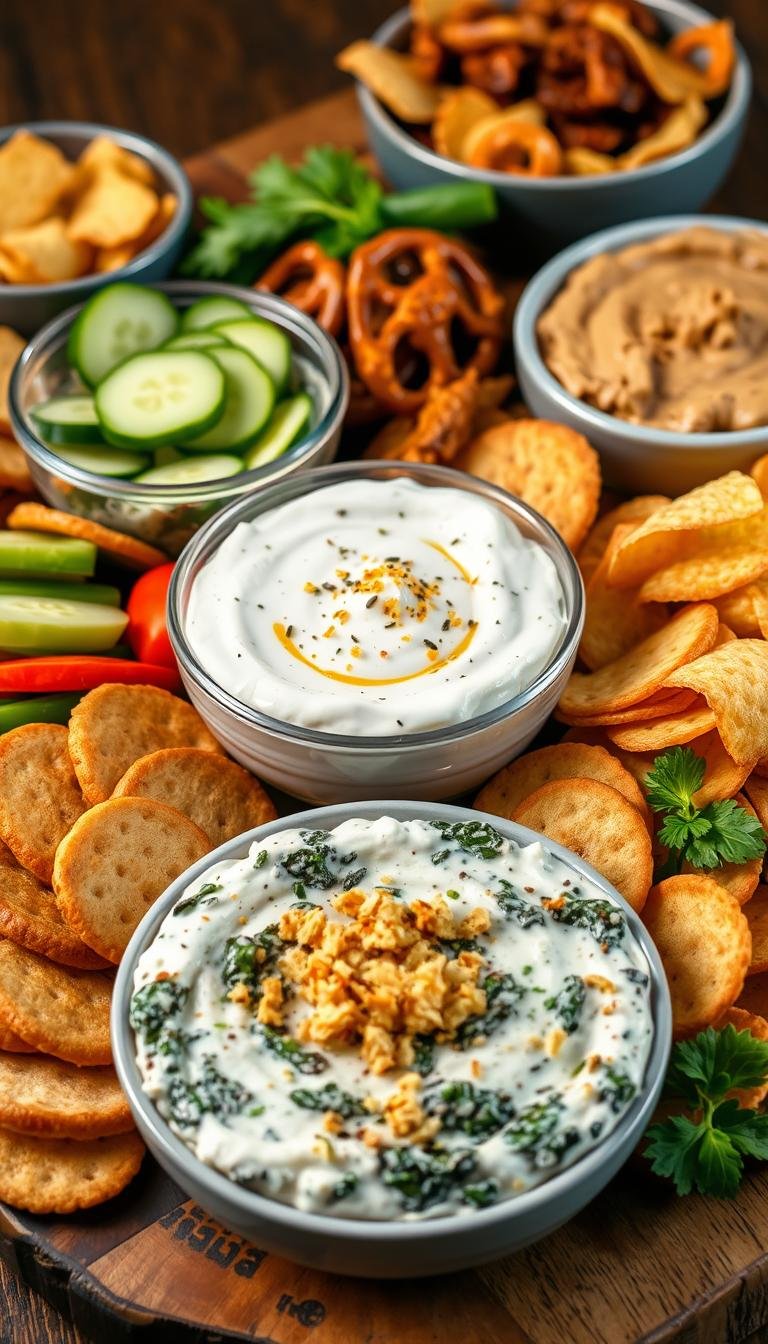
7 Chip Dip Recipes That Will Impress Guests
Hosting a party at home is now easier. Crowd-pleasing dips make any event a hit. They’re perfect for game days or fancy cocktail parties.
This Website contains affiliate links. That means I may earn a small commission if you purchase through my links, at no extra cost to you.
Picture your guests enjoying delicious homemade dips. They’re tasty and look great. Our homemade dip recipes have classics and new ideas. They’re easy to make and always impress.
Key Takeaways
- Easy-to-make dips for any occasion
- Variety of flavors to suit different tastes
- Tips for presentation and serving
- Simple ingredients for big impact
- Perfect for both casual and formal gatherings
The Art of Creating Memorable Chip Dips
Making a memorable chip dip is all about flavors, textures, and looks. It’s not just mixing stuff together. It’s about making an experience that wows your guests.
What Makes a Great Dip
A great dip has a mix of savory, sweet, spicy, and tangy flavors. The texture adds depth, from creamy to chunky. Looks matter too; a nice dip presentation can grab attention before you even taste it.
Think about the dip’s temperature and how thick it is. Some dips are better warm, others cold. It should be easy to dip chips without them breaking. Getting the dip consistency right is key for a good snack.
Essential Equipment for Dip Making
The right tools make making dips easier. You’ll need a food processor for smooth blends, mixing bowls for mixing, and quality knives for chopping. Good serving dishes also help show off your dip.
| Equipment | Use |
|---|---|
| Food Processor | Blending ingredients to desired consistency |
| Mixing Bowls | Combining ingredients and adjusting seasoning |
| Quality Knives | Chopping fresh herbs and ingredients |
| Serving Dishes | Enhancing the presentation of the dip |
Planning Dips for Different Occasions
Think about the event and what your guests like. For a casual get-together, try a Spicy Southwest Layered Bean Dip. For a fancy event, go for something like Caramelized Onion and Gruyère Dip.
Plan ahead for dips that can be made before the event. Make sure they stay at the right temperature and have enough for everyone. This way, your dip is ready when your guests arrive, and there’s enough for all.
Classic Loaded Bacon and Cheddar Dip
Try our Classic Loaded Bacon and Cheddar Dip. It’s a mix of crispy bacon and sharp cheddar cheese. It’s great for any party or game night.
Ingredients You’ll Need
Here’s what you need for this tasty dip:
- 6 slices of high-quality bacon
- 1 cup of sharp cheddar cheese, shredded
- 1/2 cup of cream cheese, softened
- 1/2 cup of sour cream
- 1/4 cup of chopped green onions
- 1/2 teaspoon of garlic powder
- Salt and pepper to taste
Step-by-Step Preparation
Here’s how to make the dip:
- Cook the bacon until crispy, then chop it into small pieces.
- Mix the cheddar cheese, cream cheese, and sour cream in a bowl until well combined.
- Add the chopped bacon, green onions, garlic powder, salt, and pepper to the cheese mixture. Stir until everything is fully incorporated.
Cooking the Bacon Perfectly
Cooking the bacon right is key. Preheat your oven to 400°F (200°C), and lay the bacon slices on a baking sheet lined with parchment paper. Bake for 15-20 minutes, or until the bacon reaches your desired level of crispiness.
The cheese quality matters a lot. Sharp cheddar gives a rich, tangy taste. Cream cheese makes it smooth. To melt the cheese, bake the dip in the oven at 350°F (175°C) for 20-25 minutes, or until it’s bubbly and slightly golden brown on top.
| Cheese Type | Flavor Profile | Melting Quality |
|---|---|---|
| Sharp Cheddar | Rich, Tangy | Excellent |
| Cream Cheese | Smooth, Mild | Good |
| Mozzarella | Mild, Creamy | Excellent |
Serving Suggestions
Enjoy this dip with kettle chips or toasted baguette slices. For a twist, pair it with potato chips or crackers.
Storage and Make-Ahead Tips
This dip can be made ahead and stored in the fridge for up to 3 days. To reheat, bake in the oven at 350°F (175°C) until warm and bubbly. Leftovers can be stored in an airtight container in the fridge for up to 5 days.
Spicy Southwest Layered Bean Dip
Make your next party special with our Spicy Southwest Layered Bean Dip. It’s full of Southwestern flavors. You’ll find refried beans, avocado, sour cream, cheese, tomatoes, olives, jalapeños, and a special spice mix. It’s a snack or appetizer you won’t forget.
Ingredients You’ll Need
To make this tasty layered bean dip, you need a few things:
- Refried beans
- Mashed avocado
- Sour cream
- Shredded cheese (Monterey Jack or Cheddar)
- Diced tomatoes
- Sliced olives
- Jalapeños or other hot peppers
- Custom spice blend (including cumin, chili powder, and paprika)
- Fresh cilantro for garnish
Step-by-Step Preparation
Preparing the Bean Base
First, make the bean base. Use canned refried beans and add your spice mix. Add cumin and chili powder for that Southwest flavor. Saute onions and garlic for extra taste.
Creating Perfect Layers
Now, start layering. Begin with the bean mix, then sour cream or Greek yogurt, and shredded cheese. Add diced tomatoes, olives, and jalapeños. Top with cheese and fresh cilantro.
Heat Level Customization
This spicy Mexican dip lets you control the heat. Use different peppers or less jalapeño for a milder taste. For less heat, use just a bit of jalapeño or remove seeds and membranes.
Serving Suggestions
Enjoy this protein-rich appetizer with tortilla chips. You can also try it with crudités or pita chips. Pair it with a salad or Mexican street corn for a great meal.
Nutritional Benefits
This layered bean dip is not only tasty but also healthy. Beans offer protein and fiber, and avocado adds healthy fats. It’s a great choice for any gathering.
Mediterranean Tzatziki Dip with Fresh Herbs
Escape to the Mediterranean with our refreshing tzatziki dip recipe. It’s made with fresh herbs and Greek yogurt. This dip is cool, creamy, and perfect with many dippers.
Ingredients You’ll Need
To make this delicious tzatziki dip, you’ll need:
- 1 large cucumber, peeled and grated
- 1 cup Greek yogurt
- 2 cloves garlic, minced
- 1/4 cup fresh dill, chopped
- 1/4 cup fresh mint, chopped
- 2 tablespoons lemon juice
- 1 tablespoon olive oil
- Salt to taste
Step-by-Step Preparation
Preparing tzatziki dip is easy. Just follow these steps:
- Drain the grated cucumber of excess moisture using a cheesecloth or a fine-mesh sieve.
- In a bowl, combine the drained cucumber, Greek yogurt, minced garlic, chopped fresh herbs, lemon juice, and olive oil.
- Season with salt to taste and mix well.
- Refrigerate for at least 30 minutes to allow the flavors to meld.
Cucumber Preparation Techniques
Removing excess moisture from the cucumber is key. Use a cheesecloth or a fine-mesh sieve.
Yogurt Selection Tips
Choosing the right yogurt is important. Greek yogurt is best because it’s thick and creamy.
| Yogurt Type | Fat Content | Texture |
|---|---|---|
| Greek Yogurt | High | Thick, Creamy |
| Regular Yogurt | Low | Thin, Watery |
Authentic Flavor Enhancements
For an authentic Mediterranean flavor, try these tips:
- Use high-quality olive oil for a richer taste.
- Add fresh herbs like dill and mint for a refreshing flavor.
- Adjust the amount of garlic according to your preference.
Serving Suggestions
Here are some ways to serve tzatziki dip:
- Pita chips or pita bread for a traditional Greek experience.
- Vegetable crudités like carrots or cucumbers for a healthier option.
- Pretzel thins for a salty, crunchy contrast.

Make-Ahead and Storage Guidelines
To keep your tzatziki dip fresh, follow these tips:
- Store in an airtight container in the refrigerator.
- Consume within 3 days for optimal freshness.
- Stir well before serving to maintain the creamy texture.
Caramelized Onion and Gruyère Dip
This dip is fancy and tasty. It’s a French-inspired appetizer. It mixes sweet caramelized onions with nutty Gruyère cheese.
Ingredients You’ll Need
Here’s what you need for this yummy dip:
- 1 large yellow onion, thinly sliced
- 2 tablespoons butter
- 1 tablespoon olive oil
- 1 cup Gruyère cheese, grated
- 8 ounces cream cheese, softened
- 1/2 teaspoon salt
- 1/4 teaspoon black pepper
- Optional: 1 tablespoon chopped fresh thyme or 1 tablespoon white wine
Step-by-Step Preparation
There are two main steps. First, caramelize the onions. Then, mix in the cheese.
Caramelizing Onions to Perfection
Heat butter and olive oil in a big skillet. Add sliced onions. Cook for 40-50 minutes until they’re golden brown.
Incorporating the Cheese
Let the onions cool a bit. Then, mix them with Gruyère cheese, cream cheese, salt, and pepper. Add thyme or white wine if you like.
Cheese Selection Guide
Gruyère is the main cheese. But you can try other cheeses too. Here are some options:
| Cheese | Flavor Profile |
|---|---|
| Gruyère | Nutty, slightly sweet |
| Comté | Fruity, slightly sweet |
| Emmental | Mild, creamy |
| Aged Swiss | Sharp, nutty |
Serving Suggestions
Enjoy this dip with rustic chips, crostini, or crackers. It’s perfect with them. For a fancy look, add fresh herbs or paprika.
Reheating Instructions
To keep it warm, reheat it gently. You can do this on the stovetop, in the microwave, or in the oven.
Buffalo Chicken Dip with Blue Cheese Crumbles
This dip is sure to excite your taste buds. It’s like buffalo wings in a dip. It’s great for game days, parties, or any time you want something spicy.
Ingredients You’ll Need
Here’s what you need for this tasty dip:
- Chicken (rotisserie, canned, or freshly cooked)
- Cream cheese
- Buffalo sauce
- Ranch or blue cheese dressing
- Blue cheese crumbles
- Optional: chopped green onions, crumbled bacon, or diced celery for added flavor
Step-by-Step Preparation
It’s easy to make this dip. First, heat your oven to 350°F (175°C).
Chicken Preparation Options
There are a few ways to prepare the chicken:
| Method | Pros | Cons |
|---|---|---|
| Rotisserie Chicken | Convenient, already cooked | May be slightly dry |
| Canned Chicken | Easy to use, long shelf life | Texture may not be as appealing |
| Freshly Cooked Chicken | Best texture and flavor control | Requires cooking time |
Creating the Perfect Sauce
Mix softened cream cheese with ranch or blue cheese dressing until smooth. Add shredded or chopped chicken and buffalo sauce. Stir until everything is well mixed.

Heat Level Variations
Change the heat to your taste. Use different buffalo sauces or add more blue cheese crumbles. For less heat, use less buffalo sauce or try a milder sauce.
Serving Suggestions
Warm the dip and top with blue cheese crumbles and green onions if you like. Serve with:
- Celery sticks
- Carrot sticks
- Tortilla chips
- Crackers
Storage and Reheating Tips
Store the cooled dip in an airtight container in the fridge for up to 3 days. Reheat at 350°F (175°C) until warm and bubbly. Stir often to keep the cheese together.
Creamy Spinach and Artichoke Dip
Get ready to wow your guests with our Creamy Spinach and Artichoke Dip. It’s a restaurant-style appetizer that’s easy to make. This dip mixes the earthy taste of spinach with the tangy artichokes in a creamy base.
Ingredients You’ll Need
To make this delicious dip, you’ll need:
- Spinach: Fresh or frozen, thawed and drained
- Artichoke hearts: Canned or marinated, chopped
- Cream cheese: Softened for easy mixing
- Sour cream: Adds a tangy flavor and creamy texture
- Mayonnaise: Enhances the richness of the dip
- Garlic: Minced for added depth of flavor
- Parmesan and mozzarella cheese: For a creamy, cheesy base
- Seasonings: Salt, pepper, and any additional herbs you prefer
Step-by-Step Preparation
Preparing this dip involves a few key steps:
Preparing the Vegetables
Start by preparing your spinach and artichoke hearts. If using fresh spinach, thoroughly wash and dry the leaves, then chop them finely. For frozen spinach, ensure it’s fully thawed and squeeze out as much moisture as possible. Artichoke hearts should be drained and chopped into small pieces.
Creating the Creamy Base
To create the creamy base, mix softened cream cheese with sour cream and mayonnaise until smooth. Add minced garlic and your choice of seasonings, then stir in Parmesan and mozzarella cheese until well combined. Finally, fold in the prepared spinach and artichoke hearts.
Fresh vs. Frozen Ingredient Tips
Both fresh and frozen spinach can be used for this dip, depending on your preference and what’s available. Fresh spinach offers a brighter flavor, while frozen spinach is convenient and works well if you squeeze out excess moisture. For artichoke hearts, canned options are readily available and easy to use.
Serving Suggestions
Serve your Creamy Spinach and Artichoke Dip with a variety of dippers, such as tortilla chips, pita chips, or crudités. For a more elegant presentation, consider serving it in hollowed bread bowls or with endive leaves.
Make-Ahead and Freezing Options
This dip can be made ahead and refrigerated for up to a day before serving. You can also freeze it for longer storage. To reheat, bake it in the oven until warm and bubbly. If frozen, thaw it overnight in the refrigerator before reheating.
7 Chip Dip Recipes That Will Impress Guests: Sweet and Savory Dessert Dip
We’ve reached the end of our chip dip journey. Now, we introduce a sweet and savory dessert dip. It’s perfect for any event, blending sweet and savory in a unique way.

Ingredients You’ll Need
To make this dessert dip, you’ll need creamy and sweet things. Use cream cheese and mascarpone for a creamy base. Add brown sugar and vanilla extract for sweetness. Don’t forget chocolate chips for a chocolatey flavor.
For extra texture and taste, add toffee bits or crushed cookies.
- Cream cheese
- Mascarpone
- Brown sugar
- Vanilla extract
- Chocolate chips
- Toffee bits or crushed cookies (optional)
Step-by-Step Preparation
Creating the Base
Begin by mixing the cream cheese and mascarpone until smooth. This makes the dip fluffy and even. Make sure both are at room temperature for easy mixing.
Mix-in Options
Once your base is smooth, add your mix-ins. For a toffee delight, use 1/2 cup of toffee bits. For a cookie crunch, add 1 cup of crushed cookies. Mix gently to keep it fluffy.
Flavor Variations
This dip can be many flavors. Try a s’mores version with mini marshmallows and graham cracker crumbs. For a birthday cake flavor, add rainbow sprinkles and almond extract. Or, make a salted caramel version with caramel sauce and sea salt.
- S’mores: Add mini marshmallows and graham cracker crumbs.
- Birthday Cake: Incorporate rainbow sprinkles and almond extract.
- Salted Caramel: Drizzle with caramel sauce and sprinkle with sea salt.
Serving Suggestions
Serve with sweet dippers like graham crackers, fruit slices, and pretzels. Arrange dippers in a circle around the dip. Add more mix-ins or chocolate for a nice look.
Storage Guidelines
Keep this dip in the fridge because it has dairy. Use it within 3 days. Let it soften at room temperature for 30 minutes before serving. If it separates, stir gently.
Pairing the Perfect Chips with Your Homemade Dips
Finding the right chip is key to enjoying your homemade dips. The perfect match can make your snack time better.
Texture Considerations
Texture matters a lot when choosing chips for dips. Thick dips need strong chips that don’t break. For example, a thick potato chip is great with creamy spinach and artichoke dip.
But, thin, crispy chips are best for light dips.
Flavor Complementing Guide
Matching flavors between chips and dips makes taste better. A smoky chip goes well with tangy tzatziki dip. But, mixing flavors can also be fun, like spicy chips with cool dips.
Homemade Chip Options
Homemade chips let you pick flavors for your dips. You can make:
- Potato chips with herbs and spices
- Tortilla chips with lime and chili powder
- Pita chips with olive oil and garlic
These can be baked, fried, or air fried. This gives you many textures and tastes.
Store-Bought Recommendations
Store-bought chips are also great. Brands like Kettle Brand and Jackson’s Honest have many flavors. Pick chips that match your dip’s taste and texture.
Presentation Tips for Dip Serving
Make your dip stand out with these tips. The way you serve your dip can make a big difference. It can make snacking more fun.
Serving Bowl Selection
Choosing the right bowl is key. It should look good and work well. For warm dips, ceramic bowls are great. Glass bowls are elegant for cold dips.
- Ceramic bowls for warm dips
- Glass bowls for cold dips
- Wooden bowls for a rustic look
Garnishing Ideas
Garnishes make your dip look and taste better. Use fresh herbs, flowers, or spices. For example, paprika adds smokiness to savory dips.
Some popular garnishing ideas include:
- Fresh herbs like parsley or cilantro
- Edible flowers for a colorful touch
- Spices like paprika or cumin
Temperature Considerations
Keep dips at the right temperature. Use insulated bowls for hot dips. For cold dips, try ice or chilled dishes.

Creating an Impressive Dip Station
Set up a cool dip station. Arrange dips with different flavors and textures. Use heights and labels for a neat look.
Tips for creating a dip station:
- Use varying heights to add visual interest
- Label dips and ingredients for clarity
- Arrange dips with complementary flavors and textures
Dietary Adaptations for Special Needs
Making chip dips for special diets is easy. Just a few changes can make them tasty for everyone.
Gluten-Free Options
For gluten-free dips, avoid hidden gluten in cheese or spices. Use gluten-free crackers or veggies instead. Replacing soy sauce with a gluten-free version helps a lot.
Tip: Always check labels for gluten-free ingredients.
Dairy-Free Alternatives
Dairy-free options can replace regular dairy in dips. Vegan cream cheese or coconut yogurt works well. Choose them based on taste and texture.
Vegan-Friendly Substitutions
To make dips vegan, swap animal products for plant-based ones. Vegan mayo or cashew cream can replace dairy. This makes dips tasty and inclusive.
“The key to a great vegan dip is to focus on fresh, high-quality ingredients.” – Food Expert
Low-Calorie Modifications
To cut calories, change how much of each ingredient you use. Greek yogurt instead of sour cream lowers calories. Baked chips are also a good choice.
Try herbs and spices to add flavor without extra calories.
Conclusion
Learning to make great dips can make any party better. It gives hosts tasty, crowd-pleasing dishes that fit any event. Whether it’s a fun game day or a fancy cocktail party, these dips are sure hits.
Having a good selection of homemade dips is key for any party. It lets you offer many food choices that everyone can enjoy. This way, you make your parties unforgettable for your guests.
These recipes are easy to change and make your own. Try new ingredients and flavors to make them special. Share your ideas and tips with others to grow a community of dip lovers.
Using these appetizers at your parties makes hosting easy and fun. You know you have tasty dishes that everyone will love.