20 Spooky-Fun Nightmare Before Christmas Cake Ideas
The beloved characters and eerie charm of Tim Burton’s “The Nightmare Before Christmas” have captivated audiences for decades, inspiring a plethora of creative expressions, including baking. Fans of the film can now bring a touch of its magic to their celebrations with Tim Burton cake ideas that blend the spooky with the festive.
Whether you’re planning a Halloween party with a twist, a Christmas celebration, or simply want to indulge in some themed baking, these Nightmare Before Christmas cake designs offer a range of inspiration. From simple to complex, these cake ideas capture the essence of the film’s unique aesthetic.
Key Takeaways
- Explore a variety of Nightmare Before Christmas cake designs suitable for different skill levels.
- Discover how to incorporate Tim Burton cake ideas into your celebrations.
- Learn tips for creating Halloween and Christmas cake designs with a twist.
- Find inspiration for themed baking that captures the essence of the film.
- Bring a touch of magic to your parties with these unique cake ideas.
The Magic of Nightmare Before Christmas Cakes
The Nightmare Before Christmas has become a cult classic, inspiring a wide range of creative cake designs that capture its unique blend of Halloween and Christmas spirit. This stop-motion animated film, directed by Henry Selick and produced by Tim Burton, has captivated audiences with its hauntingly beautiful visuals and memorable characters.
The film’s enduring popularity can be attributed to its unique fusion of Halloween and Christmas themes, making it a staple for fans during both holiday seasons. As a result, Nightmare Before Christmas themed cakes have become increasingly popular for various celebrations.
Why Nightmare Before Christmas Themed Cakes Are Popular
The Nightmare Before Christmas themed cakes are popular due to the film’s timeless appeal and the versatility of its characters and settings. The film’s cult following has driven the demand for these themed cakes, with fans eager to incorporate their love for the movie into their celebrations. Social media platforms like Pinterest and Instagram have further fueled this trend by showcasing creative cake designs inspired by the film.
The distinctive visual style of Tim Burton’s animation provides bakers with a wealth of recognizable characters and settings to draw from. From Jack Skellington’s skeletal face to the haunted landscapes of Halloween Town, the film offers a rich palette of inspiration for cake designers.
| Character/Inspiration | Cake Design Idea |
|---|---|
| Jack Skellington | Skeletal face cake with a mischievous grin |
| Halloween Town | Haunted landscape cake with ghostly figures |
| Sally | Patchwork doll-inspired cake with stitched details |
Best Occasions for These Themed Cakes
Nightmare Before Christmas cakes are perfect for a variety of occasions beyond the obvious Halloween and Christmas celebrations. They are ideal for October and December birthdays, themed movie nights, costume parties, and even gothic or alternative weddings.
These cakes can be tailored to suit different age groups, from children’s parties featuring whimsical elements to sophisticated adult gatherings with more detailed and darker aspects of the film. By incorporating complementary decorations, invitations, and party favors, hosts can create a cohesive Nightmare Before Christmas experience for their guests.
Essential Techniques for Nightmare Before Christmas Cake Designs
To bring the magic of Nightmare Before Christmas to life in cake form, you’ll need to master several essential techniques. This includes understanding the right supplies and ingredients, choosing between fondant and buttercream for character designs, and capturing the film’s distinctive color palette.
Basic Supplies and Ingredients You’ll Need
To start, you’ll need basic baking equipment such as round and sheet cake pans, offset spatulas, bench scrapers, and cake turntables. For decorating, essential tools include fondant rolling pins, smoothers, cutters, modeling tools, and food-safe paintbrushes.
For ingredients, focus on sturdy cake recipes and buttercream formulations that hold their shape well. Fondant brands that are workable for character modeling are also crucial. Additionally, consider food coloring options that achieve the film’s color palette, particularly black, white, purple, and orange.
| Supply/Ingredient | Purpose |
|---|---|
| Round and sheet cake pans | Baking cakes of various sizes |
| Fondant rolling pins and cutters | Creating fondant decorations |
| Food-safe paintbrushes | Adding fine details to designs |
| Black and orange food coloring | Achieving Nightmare Before Christmas colors |
Fondant vs. Buttercream for Character Designs
Fondant offers precision for detailed character modeling, ideal for sharp edges and defined features like Jack Skellington’s face. Buttercream creates softer, more painterly effects, suitable for backgrounds and textures like Zero’s ghostly form.
Key Considerations:
- Fondant is ideal for intricate designs and sharp edges.
- Buttercream is better for softer, textured effects.
- Temperature affects both fondant and buttercream workability.
Color Palettes That Capture the Movie’s Essence
The Nightmare Before Christmas features distinctive color schemes, including Halloween Town’s black, white, and gray tones, and Christmas Town’s bright reds and greens. To recreate these, use specific food coloring mixing ratios.
Color Mixing Tips:
- Mix black and white to achieve various gray shades.
- Combine orange and purple for Halloween elements.
- Use bright reds and greens for Christmas Town elements.
Jack Skellington Face Cake
The iconic Jack Skellington face makes for a great cake design that’s both spooky and fun. This beloved character from The Nightmare Before Christmas can be recreated on a cake using simple techniques and materials.
Design Elements and Instructions
To create a Jack Skellington face cake, start with a smooth white fondant or buttercream base. Use a food-safe marker or black fondant cutouts to draw Jack’s distinctive features, including his wide skeletal grin and large hollow eye sockets. Ensure the proportions are correct to capture his expressive character.
Decoration Tips and Variations
To add some creativity to your Jack Skellington cake, try different expressions by modifying his mouth and eyes. You can also add backgrounds like spiral hill silhouettes or bats, or dimensional elements like a 3D bow tie. For a Christmas twist, consider adding a Santa hat topper. These variations make the design adaptable to different cake sizes and themes.
Sally Patchwork Cake
Sally, the ragdoll character from The Nightmare Before Christmas, is known for her unique patchwork appearance, making her a fascinating subject for cake design. To capture her essence, you’ll need to master the art of creating irregular patchwork sections on your cake using different colored fondant pieces.
To achieve Sally’s signature look, divide the cake surface into sections and cover each with fondant in her characteristic blue, green, and pink tones. The key is to maintain clean edges between patches while preserving a handmade, slightly imperfect quality.
Creating Sally’s Iconic Stitched Look
To recreate Sally’s stitched appearance, use either piped royal icing, edible markers, or thin fondant strips to create realistic-looking stitches. Emphasize the uneven, handstitched quality that makes Sally’s design distinctive. On curved cake surfaces, work carefully with fondant to avoid tears or wrinkles, ensuring the integrity of the design.
Color Mixing Techniques and Details
Accurately capturing Sally’s color palette requires precise color mixing. Use food coloring to achieve her blue-gray skin tone, and mix specific shades of teal, pink, and purple for her patchwork dress. For her auburn hair, combine colors using fondant or buttercream. To give Sally a weathered appearance, subtly fade the colors and add details like wide eyes with long lashes and a stitched smile.
Spiral Hill Cake Design
The Spiral Hill from Nightmare Before Christmas is an iconic landmark that can be recreated in cake form with some creativity and skill. This distinctive hill is a hallmark of Halloween Town’s eerie landscape, and capturing its curled shape and texture in cake form requires some specialized techniques.
Sculpting the Perfect Curled Hill
To achieve the Spiral Hill’s signature curve, start by carving a dense cake, such as pound cake or chocolate mud cake, to create a sturdy base. Use a template or pattern to cut out the cake and assemble the pieces with internal supports as needed. Apply a buttercream crumb coating to smooth out the surface, then cover with fondant to maintain the hill’s silhouette. Use texture tools to create subtle ridges and undulations, capturing the hill’s otherworldly quality.
Adding Jack and Zero Figures
Complete the scene by adding Jack Skellington and Zero figures. Model Jack’s slim silhouette and expressive posture using fondant or modeling chocolate, and create Zero’s translucent, floating appearance using white fondant or modeling chocolate. Use internal supports like toothpicks or wire to ensure the figures are structurally sound. Position Jack at the hill’s curve and Zero floating nearby, recreating the film’s famous scene. Consider adding a moon backdrop or twinkling stars to complete the nighttime atmosphere, as “The right details can make all the difference in bringing this iconic scene to life.”
Oogie Boogie Burlap-Textured Cake
If you’re looking for a unique cake design for Halloween, consider Oogie Boogie’s burlap sack texture. This distinctive character from Nightmare Before Christmas can be brought to life with the right techniques and attention to detail.

To achieve the burlap texture, you can use a textured rolling pin or impression mat with fondant. Alternatively, you can use a freehand method with various tools to imprint the characteristic woven pattern.
Creating the Burlap Texture Effect
Using a textured rolling pin is one of the easiest ways to achieve the burlap effect. Simply roll the pin over the fondant to create the desired texture. You can also use an impression mat to achieve a similar effect.
| Technique | Description | Effect |
|---|---|---|
| Textured Rolling Pin | Roll the pin over fondant | Burlap texture |
| Impression Mat | Press fondant onto the mat | Detailed burlap pattern |
| Freehand Method | Use tools to imprint pattern | Unique, handmade texture |
Adding Bugs and Dice Details
To bring your Oogie Boogie cake to life, you can add edible insects and dice. Use fondant or modeling chocolate to create realistic-looking bugs, and fondant cubes with painted or fondant dot details for the dice.
By combining these techniques, you can create a spooky and impressive Oogie Boogie cake that’s sure to be a hit at any Halloween party.
Zero the Ghost Dog Cake
Zero, Jack Skellington’s loyal ghost dog, can be brought to life in cake form with some creative techniques and attention to detail. To capture his ethereal essence, bakers can use white fondant or buttercream to achieve a ghostly appearance.
Floating Ghost Effect Techniques
To create the illusion of Zero floating, bakers can employ clear acrylic supports or internal structures that are carefully positioned to make the cake appear as if it’s defying gravity. Using a combination of these techniques along with strategic design elements can result in a visually stunning effect.
Tips for Achieving the Floating Effect:
- Use clear acrylic rods or supports to create the illusion of floating.
- Position the supports in a way that they are not visible from the outside.
- Ensure the cake is balanced to prevent it from toppling over.
Making Zero’s Glowing Nose and Features
Zero’s glowing pumpkin nose is one of his most distinctive features. To recreate this, bakers can use food-safe LED insertions or techniques involving orange isomalt, gelatin, or fondant with edible luster dusts. For his facial features, black fondant or royal icing can be used to create definition against the white ghost body.
Additional Tips: To capture Zero’s friendly and loyal personality, focus on crafting expressive eyes and a mouth that convey his character. Dimension can be added to his features while maintaining a cartoonish simplicity.
Halloween Town Gate Cake
The iconic wrought-iron gates of Halloween Town offer a unique and spooky inspiration for cake designs this Halloween season. To recreate this eerie entrance, you’ll need to focus on achieving the distinctive curved archway and spindly gate design.
Architectural Elements and Structure
To construct the gate, use food-safe materials like black fondant or gum paste, reinforced with internal supports for stability. You can achieve the weathered, gothic appearance by using texturing techniques to mimic wrought iron and aging effects with edible dusts.
- Use black fondant or gum paste for the gate structure
- Reinforce with internal supports like wire or cake dowels
- Texture the fondant to resemble wrought iron
Spooky Details and Finishing Touches
To bring the gate to life, add the “Halloween Town” signage using piped royal icing or fondant cutouts. Incorporate atmospheric elements like miniature pumpkins, twisted dead trees, and gravestones around the gate. Use crushed cookies or colored sugar to create a spooky ground effect.
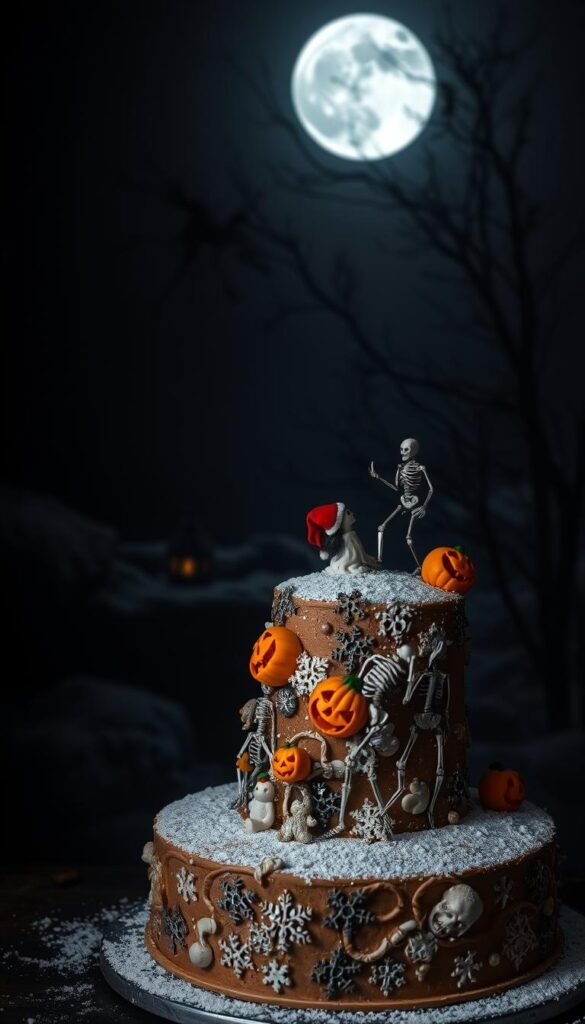
Christmas Town Meets Halloween Cake
Celebrate the crossover of Christmas and Halloween with a cake that embodies the dual holiday theme, inspired by the beloved film. A Christmas Town Meets Halloween cake is a unique dessert that brings together the festive and spooky elements in a contrasting cake design. This fusion dessert is perfect for fans of The Nightmare Before Christmas looking to showcase their holiday spirit in a creative way.
Designing such a cake involves combining the bright, cheerful elements of Christmas Town with the dark, gothic aspects of Halloween Town. The key is to achieve a clear visual distinction between the two themes, using techniques such as sharp demarcation lines, gradual fades, or swirled integrations.
Combining Holiday Elements
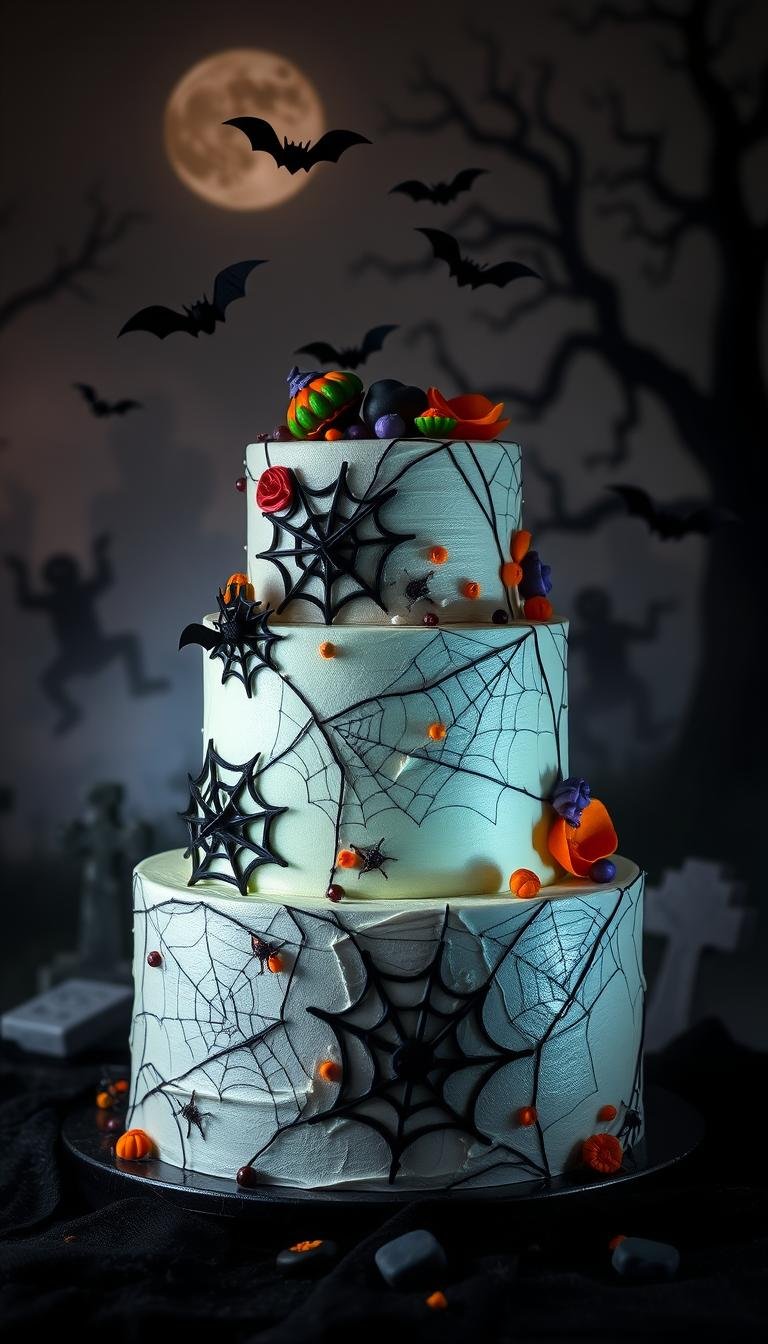
To create a holiday mashup dessert, start by selecting a color palette that represents both worlds. Christmas Town’s bright reds, greens, and whites can be contrasted with Halloween Town’s blacks, oranges, and purples. Incorporate iconic elements from both realms, such as candy canes and presents alongside pumpkins and spiderwebs, ensuring they are rendered in the film’s distinctive stylized manner.
| Element | Christmas Town | Halloween Town |
|---|---|---|
| Colors | Reds, Greens, Whites | Blacks, Oranges, Purples |
| Icons | Candy Canes, Presents | Pumpkins, Spiderwebs |
Creating the Snow and Spooky Contrast
Achieving the stark visual contrast between Christmas Town’s snowy brightness and Halloween Town’s spooky darkness is crucial. Use edible snow techniques such as coconut flakes, white chocolate shavings, or royal icing to create different snow textures. Contrast these with Halloween elements like spiderwebs or eerie fog, balancing the design to guide the eye across the cake’s narrative.
Lock, Shock, and Barrel Cake
The mischievous trio of Lock, Shock, and Barrel can be brought to life on a cake with the right techniques and attention to detail. These characters, known for their roles as Oogie Boogie’s henchmen in The Nightmare Before Christmas, offer a fun and challenging cake design opportunity.
Character Modeling Techniques
To create Lock, Shock, and Barrel, you’ll need to master fondant or modeling chocolate figure modeling. Start by crafting their distinctive masks: Lock’s devil mask with pointed horns, Shock’s witch face with a prominent nose and hat, and Barrel’s skeleton mask with its round shape and wide grin. Use reference images to achieve accurate proportions and details.
Key details to focus on include:
- Capturing the unique features of each character’s mask
- Achieving the right proportions for their small bodies
- Conveying their mischievous personalities through posture and facial expressions
Bathtub Transport Design
The iconic walking bathtub that Lock, Shock, and Barrel use as transportation is a showstopper on any cake. To create this, use fondant, gum paste, or modeling chocolate to construct the claw-footed tub. Pay attention to achieving the proper shape and an aged appearance. The mechanical legs that support the tub should be positioned to create the impression of movement.
Tips for the bathtub design include:
- Using internal supports for stability
- Adding small elements like trick-or-treat bags or Sandy Claws
- Positioning the characters effectively within or around the tub
Mayor of Halloween Town Cake
The Mayor of Halloween Town is a character that can be brought to life through cake design, showcasing his unique two-faced feature. This character’s dual expressions offer a creative challenge for cake designers.
Creating the Two-Faced Design
To capture the Mayor’s essence, the cake must display both his happy and worried faces. This can be achieved through a split design or a rotating element, allowing both expressions to be visible.
A successful two-faced design requires attention to detail, particularly in replicating the character’s conical head shape, prominent eyebrows, and exaggerated expressions.
Hat and Ribbon Details
The Mayor’s tall hat and “Mayor” ribbon sash are distinctive features that can be recreated using fondant or gum paste. The hat’s smooth black finish and striped band add to its authenticity.
| Feature | Description | Technique |
|---|---|---|
| Two-Faced Design | Happy and Worried Expressions | Split Design or Rotating Element |
| Tall Hat | Smooth Black Finish, Striped Band | Fondant or Gum Paste |
| Mayoral Ribbon | “Mayor” Sash | Fondant, Correct Lettering |
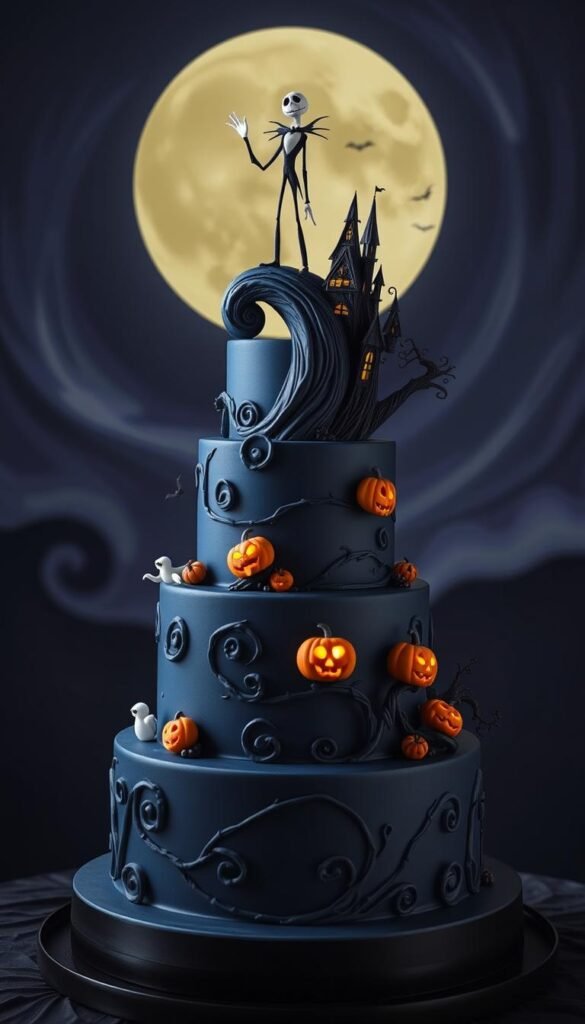
This Is Halloween Tiered Cake
Designing a multi-tiered cake that captures the essence of ‘This Is Halloween’ requires careful planning, precise cake stacking techniques, and attention to detail in character design. The complexity of this project lies in creating a stable structure that showcases various characters and scenes from the song, making it a true showstopper for any Nightmare Before Christmas fan.
Multi-Tier Construction Tips
Building a stable multi-tiered cake begins with proper planning and preparation. Start by baking cakes of varying sizes to create the different tiers. It’s crucial to use a sturdy cake board for each tier to prevent collapse. Doweling is essential for supporting the weight of upper tiers; use food-grade dowels or straws cut to the appropriate height of each tier minus the thickness of the cake board.
When stacking the tiers, ensure that they are centered and that the weight is evenly distributed. Use a small amount of frosting or ganache between tiers to act as an adhesive. Covering each tier smoothly with fondant or buttercream not only enhances the appearance but also helps in achieving clean edges and seamless transitions between layers.
| Construction Element | Purpose | Tips |
|---|---|---|
| Cake Boards | Support Base | Use sturdy, food-grade boards |
| Dowels | Tier Support | Cut to exact height, use food-grade materials |
| Fondant/Buttercream | Covering Tiers | Apply smoothly for clean edges |
Incorporating Multiple Characters
Incorporating multiple characters from the ‘This Is Halloween’ sequence into your tiered cake design adds a dynamic and engaging element. Start by selecting key characters such as the Hanging Tree with skeletons, the Clown with the Tear-Away Face, and the Werewolf. These characters can be created using fondant or modeling chocolate, with attention to capturing their distinctive features.
Strategic placement of characters around and between tiers creates a scene-based design that tells the story of the song. Consider adding environmental elements like the Halloween Town gate or pumpkin patches to establish context. Incorporating lyrics from the song using edible text methods can further enhance the theme.
Pumpkin King Crown Cake
Inspired by Jack Skellington’s regal attire, the Pumpkin King crown cake is a show-stopping centerpiece for any Nightmare Before Christmas-themed party. This iconic dessert embodies the spirit of Halloween Town, making it a must-have for fans of the beloved film.
Creating a Pumpkin King crown cake involves several intricate steps, starting with crown modeling techniques. To achieve the distinctive silhouette of Jack’s crown, bakers can use fondant, gum paste, or modeling chocolate. The key is to capture the wild, organic quality that contrasts with Jack’s skeletal appearance.
Crown Modeling Techniques
To model the crown, start by creating the tall, pointed spires and irregular edges that characterize Jack’s headpiece. Using a combination of fondant and gum paste can provide the necessary structure and flexibility. It’s essential to achieve the proper proportions to ensure that the crown is recognizable as Jack’s iconic Pumpkin King attire.
| Material | Pros | Cons |
|---|---|---|
| Fondant | Flexible, easy to color | May become too soft |
| Gum Paste | Strong, dries hard | Can be brittle |
| Modeling Chocolate | Realistic chocolate flavor, pliable | Can be messy, melts easily |
Flame and Pumpkin Details
Incorporating flame and pumpkin elements is crucial to capturing the essence of the Pumpkin King. Realistic-looking flames can be created using pulled sugar, isomalt, or thinly rolled fondant with appropriate coloring gradients from yellow to orange to red. Positioning these flames around the crown or emerging from pumpkin elements creates a dynamic, energetic effect.
To add an extra layer of detail, miniature pumpkins in various sizes can be incorporated throughout the design. Achieving the proper shape, color, and texture, including characteristic ridges and stems, enhances the overall aesthetic. A smoky or charred effect around flame elements can be achieved using edible black dust or airbrushing, adding depth to the design.
“The Pumpkin King crown cake is not just a dessert; it’s a celebration of the film’s most iconic character.”
By combining these elements and techniques, bakers can create a Pumpkin King crown cake that is both visually stunning and deeply rooted in the spirit of Nightmare Before Christmas. Whether serving as a centerpiece or a show-stopping dessert, this cake is sure to impress fans of the film.
Dr. Finkelstein Laboratory Cake
Cake enthusiasts can bring the eerie atmosphere of Dr. Finkelstein’s lab to life with intricate details and decorations. To create this mad scientist cake, you’ll need to craft various laboratory equipment cake decorations that reflect the steampunk aesthetic of the film.
Creating Scientific Equipment Details
To capture the essence of Dr. Finkelstein’s lair, focus on creating steampunk cake design elements such as Tesla coils with spiraling copper-colored details, bubbling beakers, and electrical switchboards. Use fondant, gum paste, and modeling chocolate to achieve realistic textures and metallic finishes. Consider using edible paints and dusts to capture the metallic tones characteristic of the lab equipment.
Brain Dome and Laboratory Elements
Dr. Finkelstein’s hinged head cake design is a defining feature. To recreate this, use fondant or modeling chocolate to create a realistic brain texture and a skull cap that appears to open. The laboratory setting can be enhanced with stone walls, arched windows, and lightning effects, creating a dramatic backdrop for the doctor’s experiments. Incorporating a miniature Sally figure or other narrative elements can add depth to the design.
Nightmare Before Christmas Wedding Cake
A Nightmare Before Christmas themed wedding cake combines the spooky charm of Halloween Town with the elegance of a wedding celebration. To achieve this unique blend, consider incorporating elegant yet spooky design elements that reflect the film’s aesthetic.
Elegant Yet Spooky Design Elements
To create a sophisticated Nightmare Before Christmas wedding cake, consider using a refined color palette of black, white, and selective accent colors. You can also incorporate delicate lace-like patterns using royal icing or stencils that echo Victorian gothic elements from Halloween Town. Subtle texture elements like stitching or spiderwebs can add depth to the design while maintaining an upscale appearance.
| Design Element | Description | Technique |
|---|---|---|
| Lace Patterns | Delicate, intricate designs | Royal icing or stencils |
| Stitching | Subtle texture element | Fondant or buttercream |
| Spiderwebs | Eerie, romantic touch | Piping or stencils |
Jack and Sally Topper Ideas
Creating wedding-appropriate Jack and Sally figures to top the cake can be a fun and creative process. Consider modeling the characters in formal poses that capture their romantic relationship while staying true to their distinctive appearances. You can create Jack in his pinstriped suit and Sally in her patchwork dress, perhaps with subtle wedding enhancements like a bow tie for Jack or flowers for Sally.

Haunted Christmas Tree Cake
Creating a Haunted Christmas Tree Cake inspired by The Nightmare Before Christmas is a unique way to celebrate the holiday season. This cake combines the spooky elements of Halloween with the festive spirit of Christmas, making it a perfect centerpiece for fans of the film.
Tree Structure and Support
Building a stable vertical cake structure is crucial for a 3D Christmas tree cake. You can achieve this by stacking cake layers, using rice cereal treats, or combining both methods with appropriate internal supports. To get the distinctive conical shape, you can either carve the cake or build it up with elements, ensuring it’s structurally sound while maintaining a slightly crooked appearance characteristic of the film’s aesthetic.
Covering the 3D tree structure with fondant or buttercream requires careful technique to achieve a smooth finish or intentional texture that suggests pine needles. Ensuring the tree can stand securely on a cake board is vital, with tips for transportation and display being crucial for this complex structural element.
Spooky Ornament Details
The distinctive spooky ornaments that decorate the Halloween Town Christmas tree are a key feature. You can craft miniature shrunken heads, snakes, spiders, bats, and other macabre decorations using fondant, modeling chocolate, or royal icing. Achieving the proper scale, color, and texture for each ornament type is essential, ensuring they’re recognizable but proportionate to the tree.
Attaching these decorations securely to the tree structure can be done using edible glue or small supports. Additional details like a twisted tree topper, garlands of tiny bones or spiderwebs, and small presents beneath the tree with Halloween-inspired wrapping and bows can enhance the overall look. Lighting effects achieved with isomalt or edible glitter can suggest the tree’s eerie glow.
Sandy Claws Jack Cake
Transforming Jack Skellington into Sandy Claws is a creative challenge that brings together the spooky and festive elements of Nightmare Before Christmas. This unique cake design combines Jack’s skeletal features with the traditional red suit of Santa Claus, creating a truly show-stopping dessert.
To achieve the perfect Sandy Claws look, you’ll need to focus on two key elements: Jack’s red suit and his sack of presents. The red suit requires precise color matching to avoid a pinkish hue, using food coloring to achieve a deep Christmas red with fondant or buttercream.
Red Suit and Beard Techniques
To create the red suit, use fondant or buttercream colored with food dye to achieve a deep, vibrant red. For the white fur trim, utilize piping techniques or textured fondant to capture the suit’s volume and texture. Jack’s skeletal features should peek out from under the Santa disguise, maintaining his skull face while incorporating the beard and hat.
Sack of Presents Details
Crafting the sack of presents involves creating a burlap-textured sack using fondant with impression tools or textured rolling pins. Fill the sack with an assortment of spooky presents, such as shrunken heads, snakes, and Christmas-wrapped spiders, to create a chaotic and festive display.
By combining these elements, you’ll create a Sandy Claws Jack Cake that’s sure to impress. With careful attention to detail and a dash of creativity, this cake is sure to be a hit at any Nightmare Before Christmas celebration.
Bathtub Full of Gifts Cake
Inspired by the film’s quirky characters and storylines, a bathtub cake filled with spooky Christmas gifts is a unique dessert idea. This cake design brings together the eerie and whimsical elements of Halloween Town’s take on Christmas, as seen in Jack Skellington’s iconic bathtub scene.
Creating the Bathtub Structure
To create the bathtub structure, you can use fondant, gum paste, or modeling chocolate over a cake base or as a separate structure placed on a cake. Achieving the proper proportions and vintage appearance of the tub is crucial, including its high back, curved sides, and decorative feet. For a more realistic look, consider using edible silver paint or dust to give the tub an aged appearance.
Halloween-Style Christmas Gifts
Crafting the Halloween-style Christmas gifts involves creating oddly-shaped presents with Halloween Town wrapping. Techniques include using fondant, wafer paper, or hand-painted designs to achieve different wrapping paper effects. You can also create miniature spooky toys peeking out from partially wrapped packages, such as vampire teddy bears or snake-like candy canes. Arranging these gifts within the tub to create a full, overflowing appearance while maintaining distinction between individual presents is key.
Deadly Nightshade Potion Cake
Creating a cake inspired by Sally’s deadly nightshade potion from “The Nightmare Before Christmas” can be a show-stopping centerpiece for any Halloween or themed party. This dessert combines intricate design with a touch of the macabre, making it perfect for fans of the beloved film.
Bottle and Potion Effect Techniques
To create a realistic potion bottle, bakers can use materials like isomalt, gelatin, or fondant. The key is achieving the right level of transparency or translucency to mimic glass. For a more dramatic effect, internal lighting with food-safe LED lights or edible luminous dusts can give the potion a glowing appearance.
Labels for the bottle can be created using edible images, hand-painting, or piped details. Adding skull and crossbones warnings or “Deadly Nightshade” text enhances the theme. Techniques for creating cork or stopper elements and aging effects can make the bottle look like an old, well-used potion container.
| Material | Transparency Level | Skill Level |
|---|---|---|
| Isomalt | High | Advanced |
| Gelatin | Medium | Intermediate |
| Fondant | Low | Beginner |
Toxic Spill Details
Crafting a realistic spilled potion effect involves using piping gel, isomalt, or specialized edible slime recipes. The goal is to achieve the right consistency and color to represent the toxic nightshade potion. Techniques for creating bubbles, ripples, or smoke effects can add a magical touch.
Incorporating elements from Sally’s story, such as miniature soup bowls or a tiny Sally figure, can enhance the narrative. Positioning the spill element for maximum visual impact while integrating it with the overall cake design is crucial.
Using edible slime or piping gel, bakers can create a dynamic and realistic spill effect that captures the essence of the deadly nightshade potion.
Skellington Manor Cake
Bringing the twisted charm of Halloween Town to your dessert table, the Skellington Manor Cake is a showstopper that combines gothic architecture with cake decorating artistry. This intricate design captures the essence of Jack Skellington’s haunted abode, requiring a blend of creativity and technical skill.
Haunted House Architecture
To create the Skellington Manor Cake, you’ll need to focus on constructing a tall, thin, crooked structure that defies normal architectural rules. This can be achieved by stacking cakes with internal supports or using rice cereal treat sculpting for lighter upper elements. The key is to maintain the precarious, off-kilter appearance that defines Halloween Town buildings.
Techniques for Construction:
- Stacked cakes with internal supports for stability
- Rice cereal treat sculpting for lighter elements
- Combination of fondant and buttercream for exterior finish
| Technique | Description | Advantages |
|---|---|---|
| Stacked Cakes | Using internal supports for stability | Provides a solid foundation, allows for complex designs |
| Rice Cereal Treats | Sculpting for lighter elements | Reduces weight, allows for more intricate details |
| Fondant Finish | Smooth exterior finish | EASY to achieve complex textures and designs |
Jack’s Tower and Window Details
The distinctive architectural details of Jack’s manor, particularly his tower bedroom with large windows, are crucial to capturing the character’s essence. Use fondant cutouts, piped royal icing, or wafer paper to create the large, arched windows with their distinctive crossbar patterns.
Adding a glowing effect to the windows can be achieved through internal lighting options or translucent colored elements, suggesting Jack is home.
Jack and Sally Valentine’s Cake
Create a show-stopping Valentine’s cake that captures the essence of Jack and Sally’s love story with a gothic Valentine’s theme. This unique dessert combines the beloved characters from the Nightmare Before Christmas with the spirit of the holiday.
Heart-Shaped Design with a Spooky Twist
To create a heart-shaped cake with a spooky twist, consider using a slightly asymmetrical or stitched-together heart design reminiscent of Sally’s patchwork appearance. You can achieve this by using fondant or buttercream to create a heart shape with irregular edges or visible stitching.
Balance traditional Valentine’s reds and pinks with the darker tones of Halloween Town by incorporating a color palette that blends these contrasting elements. Consider adding decorative techniques such as delicate spiderwebs, small bats, or skeletal motifs to transform traditional Valentine’s imagery into something more suited to Jack and Sally’s world.
| Design Element | Description | Technique |
|---|---|---|
| Heart Shape | Slightly asymmetrical or stitched-together heart | Fondant or buttercream |
| Color Palette | Blend of traditional Valentine’s colors and Halloween Town tones | Color mixing |
| Decorative Elements | Delicate spiderwebs, small bats, or skeletal motifs | Piping or molding |
Romantic Scene Creation
Recreate the iconic romantic scene between Jack and Sally on Spiral Hill under the moon, adapted for a Valentine’s theme. Use a simplified version of Spiral Hill as a cake topper or design element, with its distinctive curled shape serving as the perfect setting for the couple.
Craft small but recognizable Jack and Sally figures in their embrace from the film’s finale, positioned atop the hill in silhouette against a full moon backdrop. Consider adding surrounding environment details such as small pumpkin elements, a starry sky background, or falling snow/flower petals to enhance the romantic mood.
20 Spooky-Fun Nightmare Before Christmas Cake Ideas
Bringing the beloved world of Nightmare Before Christmas to life through cake decorating opens up a realm of creative possibilities. The 20 cake designs presented earlier in this article offer a wide range of options for bakers of all skill levels.
Difficulty Levels for Nightmare Before Christmas Cakes
Understanding the skill level required for each cake design is crucial for a successful baking experience. Cakes like the Jack Skellington face are ideal for beginners, requiring minimal special tools and straightforward techniques. Intermediate bakers can tackle designs like Sally’s patchwork cake, which demands more complex color mixing and detail work. Advanced bakers can take on intricate designs like the multi-tiered “This Is Halloween” cake, which requires significant technical skill and time.
Adapting Nightmare Before Christmas Cakes for Any Season
The Nightmare Before Christmas cake designs aren’t limited to Halloween or Christmas; they can be adapted for various occasions throughout the year. By adjusting color schemes and thematic elements, bakers can create cakes suitable for birthdays, anniversaries, or other celebrations. For instance, Jack Skellington’s iconic face can be recolored for different holidays, while Sally’s patchwork design can be adapted with seasonal colors to fit any time of year.
Conclusion
The Nightmare Before Christmas offers a wealth of Nightmare Before Christmas baking inspiration for creative cake designers. The film’s unique blend of Halloween and Christmas, combined with its memorable characters and distinctive visual style, provides endless possibilities for artistic expression through cake.
By exploring the various cake designs and techniques presented, bakers can tap into their own Tim Burton cake creativity and bring a touch of the film’s magic to their creations. From simple to complex designs, these cakes can be adapted to suit different occasions and skill levels, making them a great way to connect with fellow fans and create memorable centerpieces for gatherings.
The character cake techniques and holiday fusion desserts showcased throughout this article demonstrate the versatility of Nightmare Before Christmas-inspired baking. Whether you’re a seasoned baker or just starting out, these designs offer a chance to experiment with new techniques and add your personal touch to traditional desserts.
As you continue to explore the world of Nightmare Before Christmas baking, consider sharing your creations on social media and joining the community of enthusiasts who are passionate about bringing this beloved film to life through cake design.

