20+ Best Chocolate Cake Decorating Ideas for Any Occasion
Surprising fact: more than 60% of home bakers say a single finishing technique makes their bakes look professionally made.
This Website contains affiliate links. That means I may earn a small commission if you purchase through my links, at no extra cost to you.
This guide promises present-day ways to make any chocolate cake look bakery-level using simple tools and pantry staples. You’ll learn from glossy ganache drips and mirror glaze shine to buttercream textures and sprinkle belts.
Start with practical skill-builders: how to get a pourable, not runny ganache, why starting at the back of a cake with a spoon helps, and how a gelatin-sugar base gives mirror glaze its high shine.
You’ll also pick up quick wins for beginners and showstoppers for special events. The list covers birthdays, weddings, seasonal bakes, and playful themes so you have inspiration for every guest and every schedule.
Follow simple timing, temperature, and consistency tips so your finish stays neat from top to base. Use your favorite recipe and add drips, shards, or rosettes for instant impact.
Key Takeaways
- Learn pourable ganache technique and spoon-start drip method.
- Mirror glaze needs gelatin, sugar, condensed milk and white chocolate for shine.
- Press sprinkles into a buttercream fault line for a bold belt effect.
- Stacking clean tiers and simple supports create gravity-defying displays.
- Most pro finishes use basic pantry items and timing, not fancy tools.
Welcome! Your guide to chocolate cake decorating, present-day inspiration
Kick off your decorating journey with practical, modern approaches that save time and improve results. This short guide sets clear goals for what you’ll master and the tools to keep on hand.
User intent and what you’ll learn today
The aim is simple: find straightforward ways to elevate a chocolate cake with modern techniques that respect your skill level and schedule.
You’ll learn to stack layers, make neat drips, pipe rosettes, add sprinkles and shards, and use simple supports for a clean finish. A how-to video can teach expert buttercream tricks, and a spoon often gives even ganache drips when you start at the back.
Tools and basics you’ll want on hand
Essentials: offset spatula, bench scraper, turntable, piping tips, piping bag, squeeze bottle or spoon, skewers or straws, and an instant-read thermometer. Chilling is your friend—work with a cold, crumb-coated base to reduce smudges.
| Tool | Purpose | Quick tip |
|---|---|---|
| Offset spatula | Smooth frosting | Warm slightly for a glassy finish |
| Turntable | Even edges | Spin slowly for controlled strokes |
| Spoon / squeeze bottle | Drips & accents | Test on parchment before the final pour |
| Instant-read thermometer | Temperature control | Check ganache and glaze for perfect set |
Prep your station: measure ingredients, line up toppings, and test consistencies. Follow simple rest times so coatings set before delicate additions. Keep dairy items chilled and wash fruit to avoid cross-contamination.
Pro tip: start with a reliable recipe, practice small samples, and learn by doing — each short trial teaches a faster, cleaner way to finish your next bake.
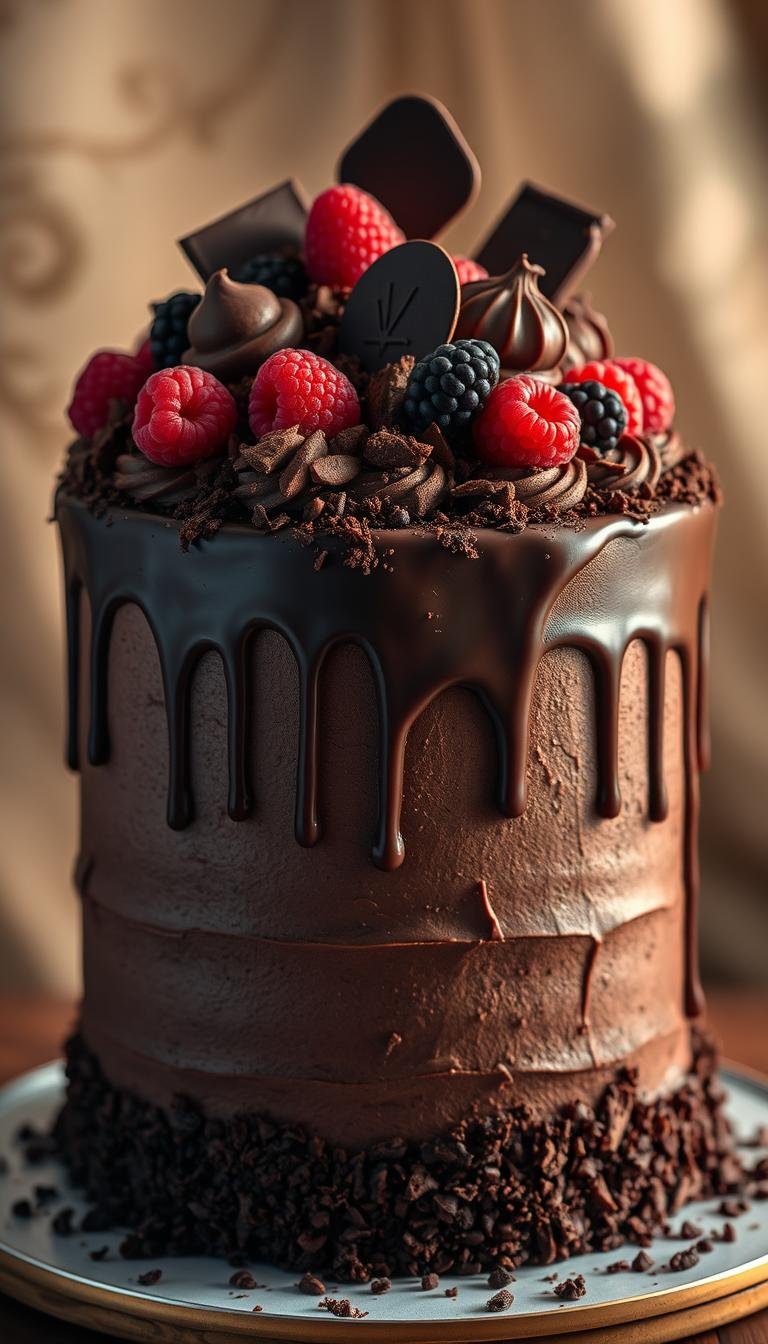
Glossy chocolate ganache drip cake
A glossy ganache drip turns a simple bake into a showstopper with just a few steady moves. Start with a chilled, smooth base so the first contact sets fast and the drips stay neat.
Ganache ratio and temperature for the perfect drip
Use a classic 1:1 ratio by weight of hot heavy cream to finely chopped chocolate for a drip that sets shiny yet fluid at room temperature.
Aim for a pourable texture around 90–95°F. If it’s too warm it will run; if too cool it may clump. Test a small dollop before you pour the full rim.
Spoon versus piping bag: controlling the drizzle
For first-timers, a spoon gives intuitive control—nudge the ganache to the edge and let gravity do the rest. Start at the back to practice length and spacing before working the front.
Advanced bakers can use a piping bag or squeeze bottle for uniform drips and speed. Either way, pour a small pool on the top and spread gently so each drip begins from an even glossy rim.
Dark, milk, or white: choosing your finish
Choose your chocolate for taste and tone: dark for deep shine, milk for a warm glow, or white for high contrast against darker coatings.
If the texture needs adjusting, add a teaspoon of warm cream to loosen or a few chopped discs to thicken until it behaves like your favorite recipe.
- Tip: keep the surface spotless and store the finished treat in a cool, stable environment to protect the glassy finish.
Mirror glaze magic for a showstopping shine
A perfectly poured mirror glaze gives a reflective, magazine-ready surface that wows every time. Start by preparing a flawless, chilled base so the glaze sets smooth and avoids streaks.
How to build a smooth base before glazing
Crumb-coat the layers, chill until firm, then add a final thin coat and freeze briefly. This creates a slick surface the glaze can cling to without melting the crumb layer.
Coloring and pouring for that galaxy effect
Soak gelatin leaves in cold water. Combine sugar, condensed milk, and water; bring to a boil. Stir in white chocolate until the mixture is fully smooth.
- Cool the glaze to about 90–95°F so it flows like silk without damaging the top.
- Divide into bowls and tint with gel colors — try midnight blue, magenta, and violet for a galaxy effect.
- Stream tinted portions into one pitcher for marbling, then pour in one confident pass over a frozen layer on a rack.
- Use a skewer to swirl gently for ribbons of color; trim drips at the base after a few minutes for a clean finish.
- Tip: add a tiny splash of vanilla to boost flavor without clouding the shine.
Finish light: keep accents minimal so the glassy surface stays the focal point. Allow extra set time in humid conditions before moving the board.
Sprinkles that steal the show
Bright sprinkles turn a simple sponge into a festive centerpiece with almost no fuss. Scatter them through batter for a funfetti interior, or shower a cooled, frosted surface for instant nostalgia.
Funfetti inside, sprinkle finish outside
Fold rainbow sprinkles into a vanilla batter so the interior surprises guests when you slice. Use a gentle fold to avoid bleeding and keep shapes intact.
For a fast party-ready finish, frost a cooled sheet cake and press sprinkles over the top. Work on a chilled, freshly frosted surface so they stick where you place them.
- Fault-line belt: press sprinkles into a central band, then pipe buttercream above and below to reveal a glittering strip.
- Pick sprinkle shapes to match your party—confetti for a birthday, metallic dragees for a chic event, or themed mixes for holidays.
- Catch extras on a rimmed sheet under your turntable for easy reuse and cleanup.
- Pair bold visuals with simple flavors like vanilla or light chocolate so the look leads the experience.
Chocolate shavings, curls, and shards for texture
Textured toppers—like long curls or jagged shards—bring height and contrast without complex tools. Use simple steps to add a showy topping that reads professional and effortless.
Quick how-tos:
- Run a warm vegetable peeler or the back of a knife along a block to form long curls. Chill briefly so they keep shape.
- Pour melted chocolate thin on parchment, chill until set, then break into dramatic shards for height and edge.
- Scatter fine shavings for a snow-like effect; they read elegant and need no extra tools.
Layer textures: place curls around the rim, cluster shards off-center, and dust micro-shavings across the surface. For stability, press base shards into a fresh coat so they anchor and the finish stays neat.
Pairings: try pretzel bark for sweet-salty crunch on triple chocolate and peanut-butter layer cake. Keep pieces chilled until assembly and store extras airtight. A final restrained drizzle lets the topper remain the star and completes the recipe.
Piping with chocolate buttercream like a pro
Mastering simple piping moves gives you control and a cleaner finish without hours of practice.
Begin by fitting your piping bag with star and round tips and filling it two-thirds full. This keeps your grip comfortable and pressure steady for consistent shapes.
Using a piping bag and essential tips
Hold the bag at 90° for tall rosettes and 45° for smooth borders. Apply steady pressure, then release and twist slightly for clean endings.
Whip buttercream until airy. Adjust texture with a spoonful of cream for smoother flow or more powdered sugar for stability. Add a touch of vanilla to lift the cocoa notes in the recipe.
Rosettes, borders, and finishing touches
Practice on parchment—pipe rows of shells and rosettes, then scrape back and repeat until shapes are even. For crisp ridges, work on a chilled surface so the frosting holds texture and resists smears.
- Mix borders: rope at the base, dots on seams, mini rosettes on the top edge.
- Keep a warm towel to wipe tips between passes for cleaner details.
- For vegan needs, swap in plant-based butter and dairy-free chocolate; the same piping rules apply.
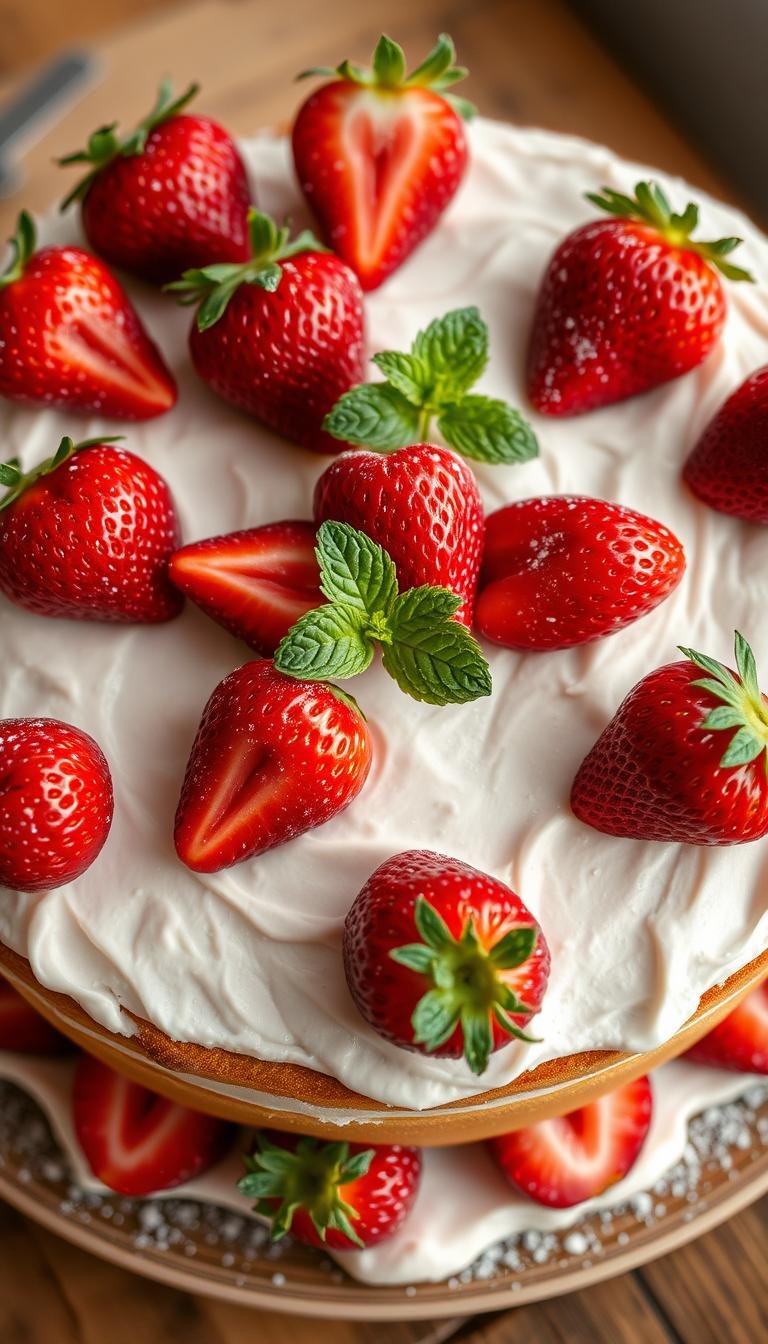
Fresh fruits and berries to balance the richness
A bright crown of fresh fruit can instantly lift a rich dessert and keep the flavor profile balanced. Use seasonal picks for the best aroma, color, and texture.
Strawberries, raspberries, and citrus slices
Brush sponges lightly with lemon and elderflower syrup to add lift and fragrance before arranging fruit. For a summer party, combine strawberries, white chocolate shards, shortbread crumbs, whipped cream, and little meringues for a playful, layered finish.
Practical tips:
- Rinse and dry berries thoroughly to avoid streaks on any glossy chocolate finish; add them just before serving for the freshest look.
- Fan strawberries across the top, tuck raspberries into rosettes, and add thin citrus slices for zesty contrast and aroma.
- Pair fruit with a lightly sweetened whipped cream topping to lift the palate and complement rich layers.
- Glaze fruit with warmed jam for neat edges and transport stability; this also gives a polished, glossy look.
- Scatter crumbled shortbread or meringue kisses between clusters for crunch while keeping the main topping sleek.
Assembly note: Build a simple crown—larger berries in the center, smaller ones radiating outward—and avoid placing fruit where the knife will slice for cleaner portions. Chill well if using juicy varieties and store leftovers covered in the fridge to enjoy within a day.
Nuts and edible flowers for a natural, gourmet look
Use edible blooms and crunchy nuts to add both texture and a delicate visual flourish to your layers.
Stack tiers with lemon mascarpone, mixed berries, edible flowers, and mint leaves for a refined finish. Choose violets, pansies, or nasturtiums — they give a gentle garden touch without strong scents that compete with flavor.
Lightly toast hazelnuts or almonds to boost aroma, chop them, and press into the base for a crunchy border. Dab a bit of cream or buttercream under petals to secure blooms without bruising delicate surfaces.

- Arrange mint, berries, and blossoms in an asymmetrical crescent for modern balance.
- Use a muted palette — ivory, blush, and green — so the centerpiece feels luxe and intentional.
- Add micro-shavings to tie the botanical look back to the core chocolate flavor and give texture in every slice.
- Place nuts near where slices begin so each portion has a satisfying crunch; refrigerate fragile blooms and add them close to serving time.
| Element | Why it works | Quick tip |
|---|---|---|
| Edible flowers | Fresh color and elegant shape | Use pansies or violas; add last minute |
| Toasted nuts | Crunch and warm aroma | Chop and press into base near slice lines |
| Lemon mascarpone tiers | Bright contrast to rich layers | Pair with mixed berries and mint |
| Micro-shavings | Visual link to flavor | Scatter lightly over petals and nuts |
Birthday-ready decorating ideas for chocolate cakes
Make birthday styling simple and joyful with a few themed touches that read polished in photos. Start with a smooth base and choose one focal element to build around.
From unicorn rosettes to themed toppers
Create unicorn magic by shaping a fondant horn and ears, brushing them with gold luster dust, and piping multicolor rosettes down one side as a flowing mane.
Anchor the design with a ganache drip or a buttercream border so the theme sits cleanly on the surface. Add a name or age plaque for a personal touch.
Candy Land, sharks, and party sprinkles
Map candy into paths and clusters to read like a playful board, rather than a random pile. Use taller lollipops and cookie pops at the back and smaller sweets up front for depth.
Go character-forward with simple toppers—sharks, princesses, or robots—and match sprinkle mixes and colors to the theme. Transport in a tall box and add sprinkles on-site if the day is warm.
- Pro tip: insert sturdy toppers into bubble tea straws or dowels for food-safe stability.
- Keep flavors classic: a reliable recipe and familiar frosting will please most guests.
| Style | What to add | Quick tip |
|---|---|---|
| Unicorn | Fondant horn, gold luster, rosette mane | Pipe rosettes down one side for motion |
| Candy Land | Mapped candy paths, lollipops, gummies | Plan paths; avoid random piles |
| Character | Themed toppers, matching sprinkles | Use dowels for stability |
| Photo-ready | Ganache drip or buttercream border | Nestle candles among big rosettes |
Elegant wedding cake finishes with chocolate
For a wedding reception, a refined finish turns tiers into the centerpiece of the room.
Start with planning: bake tiers in advance and level each layer for stability. Chill and crumb-coat to lock in moisture and keep crumbs from marring the surface.
Stacking, smoothing, and floral accents
Use cake boards and dowels so weight distributes evenly and edges stay sharp. Chill between steps to maintain smooth surfaces while you handle and assemble the stack.
Style sparingly: place small clusters of edible flowers and a few mint sprigs in arcs for an organic look. Add fresh berries only where a color pop is needed to keep the palette refined.
Berries, mint leaves, and refined palettes
Pair rich layers with lemon mascarpone or light cream fillings to keep flavors bright across a long reception. A summer day wedding can serve up to 65 people when tiers are planned and portioned well.
“Deliver in cool conditions and add final floral accents on site to preserve freshness and appearance.”
- Bake tiers ahead and chill before final assembly.
- Stack on boards with dowels for secure transport and even slicing.
- Keep the finish minimal: silky coatings, delicate borders, and a subtle sheen.
- Use a polished stand to elevate the display and frame photos.
- Follow the recipe tested for large layers and allow extra chill time.
| Step | Benefit | Quick tip |
|---|---|---|
| Level & chill layers | Stable stacking and even slices | Work on a flat surface; freeze briefly before crumb-coat |
| Boards & dowels | Even weight distribution | Match board size to tier diameter |
| Lemon mascarpone filling | Bright contrast to rich layers | Keep chilled until assembly |
| Onsite floral finish | Fresh look and longer shelf life | Secure blossoms with small dabs of cream |
Ombre, fault-line, and other trendy buttercream effects
A graduated smear or a jeweled fault line can turn simple frosting into a focal point.
Start with a smooth base. Apply tinted buttercream in horizontal bands, from darkest at the bottom to lightest at the top. Chill briefly so layers hold.
Smear, blend, and belt-of-sprinkles techniques
For an ombre smear, pipe vertical dots from dark to light then smear to the right with a spoon for a petal-like look. Use a bench scraper to blend bands into a seamless fade.
To make a fault-line, press sprinkles into a centered strip, chill, then add buttercream above and below. When you scrape the sides, the sparkling belt reveals a clean contrast.
Chocolate, caramel, and vanilla gradients
Build flavor and color together: move from vanilla to caramel to chocolate tones so taste evolves as you slice. If buttercream is too stiff, add a little cream to loosen it before blending.
Finish smart: add a restrained ganache rim to cap the top without covering the blended sides. Chill between color additions to avoid muddy mixes.
- Edge cleanly by wiping tools often to keep transitions sharp.
- Balance matte buttercream with a glossy accent for modern contrast.
- Photograph in natural light; ombre and fault lines pop best when gradients and sprinkles catch real light.
| Technique | Why it works | Quick tip |
|---|---|---|
| Ombre smear | Soft color fade that reads elegant | Pipe dots dark→light, smear with a spoon |
| Fault-line belt | Sparkle contrast without heavy tools | Press sprinkles, chill, then frame with buttercream |
| Flavor gradient | Taste evolves with color | Stack vanilla→caramel→chocolate; cap with ganache |
| Tool care | Sharp edges and clean fades | Wipe scraper between passes |
Gravity-defying chocolate sweets and drip illusions
Create a playful, gravity-defying topper that reads like a cascade frozen mid-pour. This trick uses a hidden support to lift a stream of candy into a lightweight paper bag for dramatic photos.
Quick build: spread a smooth layer of chocolate fudge icing on a chilled cake. Insert a sturdy skewer through the center and slip a straw over it to hide the support. Slide the straw until it reaches the top where a small paper bag will sit.
Skewers, straws, and the floating bag topper
Adhere candies to the straw using tiny dabs of frosting. Place heavier pieces lower and lighter sweets near the top so the column stays put. Reinforce the base with a frosting mound around the straw and refrigerate briefly to set the bond.
- Anchor with a dowel at the center; cover it with a straw for a clean look.
- Angle the bag slightly forward so the illusion reads from the front.
- Add a controlled ganache drip at the rim to echo motion without stealing focus.
- Keep the footprint compact for safe transport and present on a sturdy board.
| Step | Why it helps | Quick tip |
|---|---|---|
| Skewer + straw | Hidden structural support | Match skewer length to cake height |
| Candy placement | Balance prevents slippage | Heavy at base, light at top |
| Mound of frosting | Locks straw in place | Chill to firm before moving |
| Bag topper | Finishes the floating illusion | Use a lightweight paper bag |
Pro tip: test the full assembly on a spare board first. This simple trick makes a classic recipe feel theatrical while staying sturdy for serving.
Cookie crumbles, pretzel bark, and salted caramel finishes
A salty crunch and warm caramel can turn a layered dessert into a crowd-stopping centerpiece.
Try this mix: a triple chocolate & peanut butter layer cake with a ganache drip, peanut butter icing, and shards of pretzel bark adds sweet-salty contrast. Crumbled cookies between layers keep texture crisp against creamy frosting.
Sweet-salty crunch layers and caramel drizzles
Quick wins to follow:
- Make pretzel bark by spreading melted chocolate thin, sprinkling crushed pretzels and a pinch of salt, then snapping into shards.
- Crumble chocolate cookies between layers so bits stay crisp against the butter-based frosting.
- Pipe frosting rings to create dams that hold crunchy fillings in place while stacking.
- Add a warm caramel drizzle just before serving so it stays glossy and does not soak in.
- Accent with a restrained ganache drip to tie flavors without overwhelming toppings.
- Sprinkle a little sea salt to lift the flavors and keep each bite lively.
- Chill briefly between assembly steps so layers set and do not slide.
- Build asymmetrically—cluster bark and shards off-center for a modern look.
- Perfect for a party table: textures read from across the room and slice into photogenic pieces.
- Keep extra bark handy for quick touch-ups after transport.
| Element | Why it works | Quick tip |
|---|---|---|
| Pretzel bark | Sweet-salty crunch that breaks into dramatic shards | Spread thin; cool fully before snapping |
| Cookie crumbles | Adds texture that resists sogginess | Press into frosting dams for stability |
| Warm caramel | Glossy finish and mellowed sweetness | Drizzle at service time to avoid soaking |
| Butter-based frosting | Stable under weight and holds fillings | Chill between layers for neat stacking |
“Textural contrast makes slices interesting and photos irresistible.”
Seasonal spins: from toffee apple to holiday flair
Bring each season to life on your dessert board with simple, showy accents that match weather and mood.
Autumn calls for toffee apple drama. For a toffee-apple-style topper, dip dried apple spheres into warm caramel, twist to coat, then pull them upward so the caramel forms long, glassy drips that set hard and add vertical shine.
Caramel-dipped apple spheres and autumn texture
Quick technique: cool caramel to a manageable temperature so it coats cleanly without melting your finish. Pull the dipped apple vertically to form a frozen drip effect before it fully hardens.
Add crunch with toasted nuts or spiced cookie crumbs pressed gently into the base for warmth and contrast. Use light cinnamon or clove to hint at fall without overpowering the main flavors.
- Winter: white chocolate curls and sugared cranberries for a snowy look.
- Spring: edible blossoms and citrus zest to brighten the surface.
- Summer: berries, mini meringues, shortbread crumbles, and cream for light texture.
- Plan make-ahead elements—meringues and shards—to save time on busy celebration days.
Keep color palettes seasonal: rusts and golds for fall, jewel tones for winter, pastels for spring, and bright hues for long summer days. Plate with ribbons or seasonal greenery to finish without crowding the top.
| Season | Topper | Texture | Quick tip |
|---|---|---|---|
| Fall | Caramel-dipped apple spheres | Glassy drips, toasted nuts | Cool caramel slightly before coating |
| Winter | White curls & sugared cranberries | Snowy, crisp contrast | Add cranberries just before serving |
| Spring | Edible blossoms & citrus zest | Fresh, floral brightness | Use mild-scented flowers; add last |
| Summer | Berries, meringues, shortbread | Light, sunny crunch | Store meringues airtight until use |
Whimsical looks: unicorns, rainbows, and bright rosettes
Turn a party centerpiece into pure whimsy with a unicorn or rainbow finish that’s easy to build and great for a birthday theme.
Start simple: build a smooth base, then mark a gentle guide line down one side where the rosette mane will cascade. Shape a white fondant horn and ears, paint them with edible gold luster dust, and let them dry before inserting with toothpicks or short skewers.
Tint vanilla buttercream in coordinating pastels or bright hues. Pipe rosettes, stars, and dots in mixed sizes for playful depth. For a rainbow reveal, bake thinner, vividly colored layers and stack them high for a dramatic slice.
- Keep facial details minimal—simple closed eyes and lashes piped in dark chocolate or black buttercream read clean and cute.
- Add a light dusting of edible glitter and balance colors by repeating a hue pattern down the mane.
- Choose travel-friendly decorations and make extra rosettes on parchment as emergency patches.
Quick tip: treat the fondant pieces as the main topper and use the rosettes to hide supports. Photograph against a neutral backdrop so the colors pop and the birthday scene truly shines.
Sheet cakes, poke cakes, and easy crowd-pleasers
Sheet formats shine for parties — they bake evenly and serve many people with little fuss.
Moist poke versions are a fast win. Bake a warm sheet, pierce the surface, and pour in sauces or custard so every slice stays tender.
Quick tips: a chocolate peanut butter poke is a reliable crowd favorite. If you don’t have a chocolate mix, stir 3 tablespoons of baking cocoa into a white or yellow mix for an instant base.

Moist poke cakes and quick decorating wins
Bake in a lined pan for easy lift-out and straight edges. Trim if you want ultra-clean slices before finishing.
- Bake a simple sheet when serving many people; it slices cleanly and decorates fast with minimal tools.
- Top with whipped cream or light frosting, then add sprinkles or a drizzle for quick polish.
- Lean on boxed mixes and themed templates — princess silhouettes, BB-8 circles, or flags cut time and let you focus on piping.
- Offer topping bowls (crushed cookies, nuts) so guests customize slices at the table.
“Plan timing: bake, cool, poke, soak, and chill so flavors meld and the texture sets before finishing touches.”
| Format | Best for | Quick advantage |
|---|---|---|
| Sheet | Large groups | Slices evenly; fast to decorate |
| Poke | Extra-moist servings | Sauces soak in for flavor in every bite |
| Themed sheet | Kids’ parties / game day | Boxed mixes + templates save preparation time |
Keep decorations low-profile for easy transport. A well-timed chill day-of makes assembly smoother and helps the finish hold under lights and during serving.
chocolate cake decorating ideas you can master today
Fast wins make a big difference. Focus on simple steps—smooth edges, a neat drip, and one fresh topper—and your bake looks pulled-together in minutes.
Fast, beginner-friendly ways to elevate any cake
Start smart: smooth your frosting with a warm scraper for instant polish. Chill between steps so edges stay sharp and textures don’t smear.
- Quick ganache drip: spoon a small pool, test flow at the back, add a splash of warm cream to loosen, then finish the rim.
- Fault-line spark: press sprinkles into a chilled center band, skim buttercream above and below for a rapid reveal.
- Fresh finish: crown with berries and glaze them lightly so they stay glossy and tidy.
- Simple piping: one tip gives shells or dots that frame slices without advanced skill.
- Two-tone smear: use leftover tinted frosting to sweep sides for instant depth.
- Chocolate curls: make curls with a peeler and scatter over the top for bakery-level texture in under five minutes.
- Work the smart way: chill between additions and you can decorate up to a day ahead—just keep things cool so flavors and shine hold.
Build confidence with these bite-size techniques, then mix and match to create your signature look. Repeat the same way next time and you’ll get faster and neater each bake.
Conclusion
Conclusion
Wrap up your decorating journey with a few simple rules that make every finish feel intentional. From spooned ganache drips and mirror glaze to unicorn rosettes and fault-line belts, the techniques here help any baker create wedding-worthy stacks with mascarpone, edible flowers, candy-land toppers, or seasonal toffee-apple drips.
Start simple: practice a spooned drip, press a sprinkle band, or pipe a single rosette. Use a trusted recipe and a chilled workflow so textures stay sharp.
Keep core tools handy, prep rosettes and shards ahead, and trust proportion—clusters, arcs, and asymmetry read artful and slice clean. Most of all, have fun: your creativity is the secret ingredient that turns good cakes into unforgettable centerpieces.