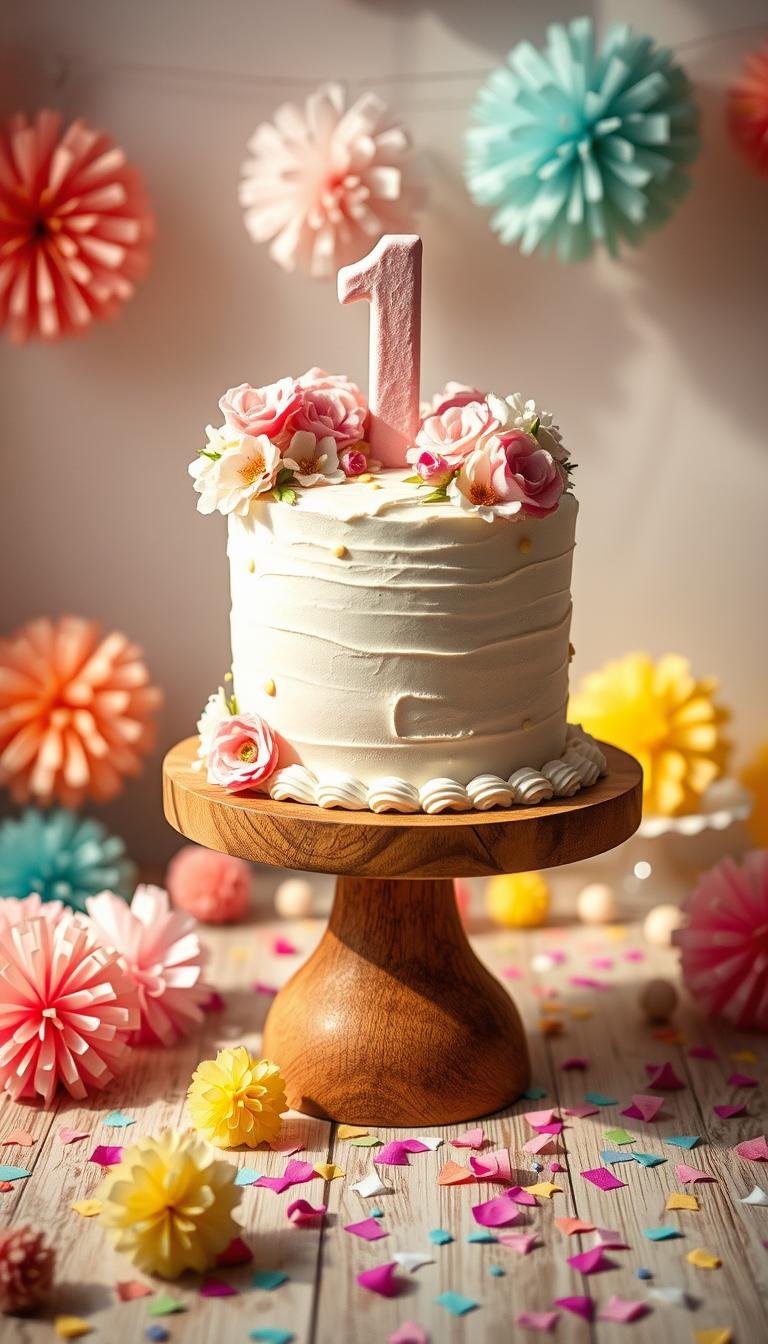
1st Birthday Cake Recipes for a Sweet First Year
Surprising stat: nearly 70% of parents choose a tiny smash cake to keep sugar low and the moment fuss-free.
This Website contains affiliate links. That means I may earn a small commission if you purchase through my links, at no extra cost to you.
Keep portions sensible and choose baby-friendly ingredients that still taste like real dessert. A smash cake is a small, low-sugar treat made with wholesome ingredients so a one-year-old can explore texture and flavor safely.
Options range from a gluten-free, dairy-free banana-nut butter cake baked in three 4-inch pans to a compact 6-inch zebra layer cake with vanilla and chocolate stripes. Use fruit or vegetable purees for moisture and mild sweetness, or ripe bananas for natural sugar.
Frosting choices include silky whipped coconut cream, lightly sweet vanilla buttercream, or freeze-dried strawberry frosting for natural color. Bake layers ahead, assemble the morning of the party, and plan whether to offer a separate guest cake.
Key Takeaways
- Choose a petite smash cake to limit sugar and waste.
- Fruit and vegetable purees add moisture and gentle sweetness.
- Three 4-inch layers or a 6-inch layer cake keep portions photogenic.
- Coconut cream and freeze-dried fruit make great dairy-free frostings.
- Bake layers a day ahead; assemble on party morning for freshness.
What Makes a Great 1st Birthday Cake
A great first-year treat balances low added sugar with soft, fruit-forward crumbs that tiny hands can explore.
Focus on gentle ingredients that give real flavor without excess sweetness. Use mashed banana, applesauce, or squash to sweeten and moisten the batter so the texture stays tender and dense — perfect for a baby’s palate.
Low sugar, baby-friendly ingredients, and soft textures
Prioritize digestible ingredients and avoid honey before 12 months. Add milk or dairy alternatives only after safe introduction and choose flours that yield a soft crumb—oat or finely ground nut flours work well in gluten-free recipes.
Right size: petite 4-inch and 6-inch layer cakes for easy “smash” moments
Three 4-inch layers make a picture-perfect smash while a 6-inch layer cake gives dramatic slices for guests. Bring wet ingredients to room temperature, mix simple one-bowl batters, and bake at 350°F for banana-based recipes to ensure even baking.
- Keep added sugar low: rely on fruit purees for natural sweetness.
- Control texture: proper temperature and short bake times prevent dryness.
- Match pans to plan: petite pans reduce leftovers and boost photos.
- Simple workflow: one-bowl mixes cut prep time and stress.
Allergy-Friendly and Sugar-Smart Baking Basics
Bake allergy-friendly treats by leaning on fruit and vegetable purees for structure and gentle sweetness.
Dairy-free and egg-free options often yield a denser, muffin-like crumb that baby hands can explore safely. Overripe bananas, applesauce, or pureed squash add moisture and natural sugar while keeping added sugar low.
Gluten-free swaps: replacing all-purpose flour with a gluten-free flour blend works for celiac needs but expect a firmer, slightly gummier texture. Adjust bake time to avoid a gummy center.
Use coconut or oat milk and coconut yogurt only after those foods are safely introduced. Flax eggs can replace eggs in some recipes, though they may change rise and crumb.
- Keep sugar low: omit coconut sugar or add just a teaspoon when needed.
- Watch bake time: fruit-heavy batters need careful timing to stay moist and fully cooked.
- Plan the day: cool layers in a calm room and assemble during a quiet part of the day.
Allergen note: remember coconut is classed as a tree nut by the FDA and labels can hide other allergens. Pre-measure ingredients to save time and reduce last-minute swaps for a smoother bake day.
Tools, Pans, and Prep: Set Yourself Up for Success
Good equipment and clear prep steps make baking calm and predictable. Start by choosing the right pans and laying out tools so you move through the recipe with confidence.
4-inch vs 6-inch pans, parchment rounds, and cooling racks
Choose 4-inch cake pans for classic smash moments and 6-inch pans when you want taller slices.
Line bottoms with parchment rounds and grease the sides to prevent sticking. Place pans on a sheet tray for easy handling and even heat.
Room temperature, oven accuracy, and clean release
Bring refrigerated items to room temperature so batters mix smoothly. Preheat to 350°F and confirm oven temperature with a thermometer for consistent results.
Run a thin spatula around pan edges before release to protect delicate sides.
Mixing, folding, and checking doneness
Mix in a large bowl and fold dry flour into wet just until no streaks remain. Fruit-based batters are thick; avoid overmixing to keep a tender crumb.
Bake until a toothpick comes out clean. Cool in pans about 10 minutes, then finish cooling on a rack. Also use an offset spatula and bench scraper to prep for frosting and final touches.
Apple Beet Smash Cake
This apple‑beet smash recipe pairs earthy beets with bright apple for a naturally red, tender mini cake.
Use raw beets, apple cider vinegar, and warm spice to boost color and mild flavor.
Flavor and color
Raw grated beet gives a vivid red crumb while orange zest and cinnamon add warmth. Apple purée keeps the mix moist and adds gentle fruit sweetness.
Apple cider vinegar helps hold that bright hue without adding extra sugar.
Step-by-step
In a large bowl, whisk grated beet, applesauce, oat milk, coconut sugar (optional), apple cider vinegar, and vanilla extract. Whisk flour, baking powder, and cinnamon as the dry ingredients, then fold into the wet until no dry streaks remain.
Divide thick batter among three 4‑inch cake pans, smooth the top of each layer, and bake at 350°F about 30 minutes until a toothpick comes clean. Let the layers sit 10 minutes in the pans, then transfer to a rack so the cakes cool fully before frosting.
Storage
Yield: three 4‑inch layers; total time about 1 hour.
| Storage | Temperature | Best for | Notes |
|---|---|---|---|
| Room | Counter, wrapped | Up to 3 days | Keep away from heat; texture stays soft |
| Refrigerator | 4°C (39°F) | Up to 1 week | Cakes become denser; let sit before serving |
| Freezer | -18°C (0°F) | Up to 2 months | Thaw in fridge at least a day before event |
- Finish: frost with chilled coconut cream or a light frosting of your choice.
- Optional: add a teaspoon of coconut sugar if you prefer sweeter flavor.
- Use parchment rounds in pans for easy release and neater tops.
Blackberry Parsnip Smash Cake
Shredded parsnips add a tender, slightly sweet texture while blackberries give bright, jewel-toned pops in each bite.
Texture and color
Shredded parsnips behave like carrot in the crumb and keep the mini moist. Use about one cup of grated parsnip. Quarter or puree blackberries to control color and speckling so the fruit doesn’t bleed too much into the batter.
Ingredient swaps and tips
In a large bowl, stir mashed banana, parsnips, orange zest, blackberries, applesauce, coconut yogurt, coconut sugar, coconut oil, and vanilla extract. Whisk flour, baking powder, and cardamom as the dry ingredients, then fold into the wet to form a thick batter.
- Choose virgin coconut oil for coconut flavor or refined for a neutral profile.
- Yogurt can be coconut-based or dairy once introduced safely.
- Portion into three 4-inch cake pans and smooth tops; bake at 350°F about 30 minutes.
- Test with a toothpick — it should comes clean. Let the pans rest 10 minutes, then let the cakes cool completely before frosting.
Yield: three 4-inch cakes; total time about 1 hour. This recipe balances gentle sweetness and texture for a baby-friendly dessert post.
Citrusy Squash Smash Cake
Soft squash puree and citrus zest combine to make a gently spiced mini that’s easy for little hands. This recipe yields three 4-inch layers and takes about an hour from start to finish.

Zesty profiles and pantry setup
Build bright flavor by whisking banana, orange zest, applesauce, coconut oil, coconut sugar, squash puree, and vanilla extract in a wet bowl.
In a separate bowl, whisk flour, baking powder, and cardamom as the dry ingredients. Keeping dry and wet separate helps even spice distribution.
Bake and finish
Fold the dry into the wet gently to form a thick batter. Spread evenly among three 4-inch cake pans, smooth the top of each layer, and bake at 350°F for about 30 minutes.
Check the center with a toothpick — it comes clean when done. Let the layers rest 10 minutes in the pans, then let the cakes cool completely before frosting so tops stay neat.
- Yield: three 4-inch layers; about 1 hour total.
- Expect a moist, dense crumb from squash and applesauce; keep added sugar minimal.
- Gluten-free flour swap works; texture may be denser or slightly gummy.
- Maintain steady oven temperature for even rise; add milk to frosting only after safe introduction.
Silky Smooth Coconut Frosting and Natural Colors
Whip cold coconut cream into a silky frosting that stays stable and baby-friendly.
Chilled coconut cream basics and whipping technique
Chill canned coconut cream for at least 24 hours. Chill a metal mixing bowl for about 15 minutes before whipping.
Open cans upside down, scoop the solid cream into the chilled bowl, and whisk with 2 tablespoons orange juice until fluffy. Avoid overmixing — it thins the frosting. If it loosens, chill 30 minutes and rewhip briefly.
Coloring with fruit and vegetable juices for ombré effects
Divide the frosting into portions and tint with drops of vegetable or fruit juice. Use beet for pink, berries for purple, and carrot for orange.
More liquid will loosen texture; add juice sparingly and chill to firm the cream. This keeps sugar low and flavor natural.
Frosting structure: crumb coat, rings, and blending for clean layers
Apply a thin crumb coat first. Then pipe or spread the darkest color at the bottom, lighter in the middle, and white on the top.
Blend rings gently with a spatula for a smooth ombré. Use a light hand so the soft layers hold their shape.
| Step | Chill time | Purpose |
|---|---|---|
| Chill cans | 24 hours | Solidify cream for whipping |
| Chill bowl | 15 minutes | Keep peaks stable while whipping |
| Re-chill if loose | 30 minutes | Firm texture before spreading |
| Refrigerate finished | Up to 2 days | Store structure; rewhip briefly before use |
- Tip: whip the frosting the same day you frost for best structure.
- Holds shape up to 2 hours at mild room temperature; refrigerate longer displays.
- Pair this cream with beet, parsnip-berry, squash, or banana-based mini cakes.
1st birthday cake Ideas: Banana-Nut Butter Smash Cake and Zebra Layers
Pair a tiny, banana‑sweetened smash cake with a striking zebra layer for guests. The small smash keeps sugar low while a larger layer cake provides dramatic slices for photos.

Gluten‑free, banana‑sweetened smash with almond and oat flour
Make a tender gluten‑free smash by using fine blanched almond flour and oat flour. Mash ripe bananas for natural sugar, add an egg for structure, a spoon of peanut or almond butter, vanilla, baking soda, and a pinch of cinnamon.
Divide batter among three 4‑inch cake pans and bake at 350°F for about 15–20 minutes. Cool completely before frosting to keep layers neat.
Four‑inch layers vs six‑inch zebra for striking slices
Three 4‑inch layers create a tall, photo‑ready smash that’s perfect for baby exploration. Use three 6‑inch pans for a showpiece.
For a zebra layer, alternate spoonfuls of vanilla and cocoa batter in the center of each pan to form concentric rings. Bake 19–22 minutes at 350°F; the striped slices look dramatic from top to bottom.
Freeze‑dried strawberry frosting: natural color and flavor
Freeze‑dried strawberry powder adds vivid pink and bright flavor without extra sugar. Reserve a plain vanilla buttercream for the filling and use the strawberry buttercream on the outside for pop and contrast.
- Make‑ahead: freeze unfrosted layers up to three months; thaw and assemble near the event.
- Timing: zebra layers bake under 25 minutes; banana smash layers often finish in 15–20 minutes depending on pans.
- Swap notes: swap peanut butter for cashew or tahini if needed; add milk to zebra batter for extra moisture.
Decorating, Make-Ahead, and Storage Tips
A neat decorating plan keeps stress low and lets simple frostings shine. Start by choosing a light finish: vanilla yogurt, vanilla buttercream, or naturally colored strawberry frosting both look and taste fresh.
From yogurt tops to buttercream and sprinkles
Dye-free sprinkles and a single small topper personalize the top without extra sugar. Use a single candle or tiny figurine for a clean look.
Make-ahead plan
Bake and cool layers up to 10 days ahead. Wrap each layer in parchment and foil, place in containers, and freeze.
Thaw in the fridge at least 24 hours before assembling. Add a thin crumb coat, chill 10–15 minutes, then finish with your final frosting coat.
How to store frosted and unfrosted treats
Store frosted desserts covered in the refrigerator for 3–5 days. For longer holds, freeze frosted or unfrosted pans up to 2–3 months.
Thaw overnight in the fridge and bring to room temperature briefly before serving to restore texture.
- Use an offset spatula, bench scraper, and turntable for smooth sides and a crisp top.
- Keep temperature in mind; sturdy buttercreams handle warm rooms better than delicate coconut or yogurt frostings.
- For a smash moment, plan a baby-sized smash and a separate birthday cake for guests.
- Consider affiliate links for cake pans, carriers, and toppers when sourcing specialty tools.
Conclusion
Finish with a petite, well-planned treat that balances flavor, texture, and safety for the little guest of honor.
A small, low‑sugar 1st birthday cake made from fruit and vegetable purees, or a gluten‑free banana‑nut butter smash cake, keeps the moment gentle and joyful. Choose a 6‑inch zebra or three 4‑inch pans for easy slices and photos.
Pick a frosting like silky coconut cream or a light vanilla buttercream. Bake ahead, freeze layers if needed, and assemble when calm. Refrigerate frosted desserts for 3–5 days and bring to room temperature before serving so the crumb softens and flavors bloom.
With simple tools, clear steps, and mindful ingredients, any home baker can craft a memorable first birthday treat that’s safe, tasty, and stress‑free.