15 Christmas Cupcake Decorating Ideas for Beginners
The holiday season is here, and what’s more fun than baking and decorating treats for loved ones? Christmas cupcakes are a big hit at holiday parties. They let you show off your creativity and add a sweet touch.
With beginner cupcake decorating getting easier, you can make festive desserts that wow everyone. This guide is for you, whether you’re new to decorating or want to try more holiday baking ideas.
Let’s explore the world of Christmas cupcakes and decorating together. You’ll see that making beautiful and tasty treats is easy. Our guide has simple designs and clear steps to make your holiday baking fun and successful.
Key Takeaways
- Discover 15 easy-to-follow Christmas cupcake decorating ideas perfect for beginners.
- Learn step-by-step decorating techniques to enhance your holiday baking skills.
- Explore creative variations and troubleshooting tips for common decorating issues.
- Find inspiration for making your holiday gatherings sweeter with festive desserts.
- Get started with beginner-friendly decorating ideas that require minimal specialized equipment.
The Joy of Christmas Cupcake Decorating
Decorating Christmas cupcakes is fun for everyone. Holiday cupcakes are a big part of Christmas. They let people show their creativity and share yummy treats.
Cupcakes are great for holidays because they’re easy to eat and decorate. You can make them in many ways. This makes them perfect for parties and gifts.
Why Cupcakes Are Perfect for Holiday Celebrations
Cupcakes are perfect for holidays because they’re easy to eat. They come in many designs. This makes them great for parties and gifts.
| Benefits of Cupcakes | Description |
|---|---|
| Individual Portions | Easy to serve and manage in gatherings |
| Versatility in Design | Allows for various themes and creative expression |
| Gift-Giving | Can be packaged in decorative wrappers or containers |
What Makes These Ideas Beginner-Friendly
The decorating ideas in this guide are easy for beginners. They use simple ingredients and techniques. This helps beginners feel confident and make great cupcakes.
These ideas are chosen for beginners. They make festive treats that everyone will love. With these ideas, anyone can decorate cupcakes well and enjoy Christmas baking.
Essential Supplies for Festive Cupcake Decorating
To make beautiful Christmas cupcakes, you need some key supplies. The right tools and ingredients make decorating easier and look better.
Basic Tools Every Beginner Should Have
Beginners should start with the basics. You’ll need:
- Piping bags and tips for making designs
- Offset spatulas for frosting
- Simple cutters for shapes from fondant or gum paste
- A turntable for easy access to your cupcakes
These tools are basic and help you make many designs without spending a lot.
Recommended Frostings and Icings for Best Results
The frosting you pick matters a lot. You can choose buttercream, cream cheese, or royal icing. Buttercream is great for beginners because it’s easy to use. Cream cheese frosting tastes tangy, and royal icing is best for detailed designs that dry hard.
Getting the right frosting consistency is key. Knowing the right mix of ingredients is important.
Holiday Color Palettes and Food Coloring Tips
Christmas colors are red, green, gold, and white. To get these colors, you need to know about food coloring. Gel coloring is stronger than liquid, so you use less. For deep red, mix red with a bit of blue. For forest green, mix green with a little blue and yellow.
Try different mixes to get the perfect Christmas colors for your cupcakes.
Preparing Your Workspace and Cupcakes
Before decorating your Christmas cupcakes, get your workspace and cupcakes ready. A good workspace makes decorating easier and helps you get professional results.
Setting Up an Efficient Decorating Station
Start by organizing your tools and ingredients. Have your frosting, piping bags, tips, and decorations ready. Protect your work surface with a plastic tablecloth or parchment paper. This makes cleanup easy and prevents damage.
Make sure you have enough space to work comfortably. Good lighting is also key. It helps you see the details and makes your cupcakes look great.
https://www.youtube.com/watch?v=ZHYnQZnodUo
Baking and Cooling Tips for Perfect Cupcake Bases
Baking the perfect cupcake base is crucial. To get flat tops and consistent size, ensure your batter is evenly distributed. Use a cookie scoop or spoon to portion it out.
To prevent doming or sinking, bake at the right temperature. Avoid overmixing the batter. Let your cupcakes cool completely on a wire rack.
This step is key to prevent frosting from melting. If you’re short on time, cool them in the fridge for a bit.
15 Christmas Cupcake Decorating Ideas for Beginners
Start your holiday baking journey with our beginner’s guide to decorating Christmas cupcakes. We have 15 fun ideas to get you started. Whether you’re new to decorating or need some inspiration, we’ve got you covered.
How to Follow Along with This Guide
Our guide makes decorating easy with clear steps for each idea. You’ll find:
- Required Materials: A list of what you need for each project.
- Step-by-Step Instructions: Detailed directions to help you decorate.
- Difficulty Level: How hard each design is, so you can pick what’s right for you.
- Time Requirements: How long each project will take, to plan your baking.
- Troubleshooting Tips: Solutions for common problems, to help you overcome them.
Follow these tips to decorate our 15 Christmas cupcake ideas with ease.
Adapting These Ideas to Your Skill Level
Our guide is flexible for all skill levels. Beginners can start with simpler designs. As you get better, you can add more details and try new techniques.
Here’s how to adjust designs:
- Use fewer colors
- Leave out complex details
- Try different ingredients or decorations
- Experiment with new decorating methods
By adjusting our designs, you’ll make beautiful cupcakes and improve your skills.
1. Classic Christmas Tree Cupcakes
Christmas tree cupcakes are a favorite holiday treat. They look great and taste even better. This design is easy for beginners to try.
Mastering the Tree-Shaped Piping Technique
To make a Christmas tree, start with green frosting. Pick a star or leaf tip for piping. Begin with a wide base and pipe up, making it narrower.
Practice makes perfect. Don’t worry if it’s not right the first time.
Creative Ways to Add “Ornaments” and a Star
After piping your tree, add ornaments and a star. Use mini M&Ms, sprinkles, or small candies for ornaments. Top it with a fondant star, a star sprinkle, or a piped star.
Experiment with different decorations to make your cupcakes special.
2. Rudolph the Red-Nosed Reindeer Design
It’s easy to make Rudolph cupcakes. They are a fun way to make your holiday celebrations special. You can make cute reindeer desserts that everyone will love.

Creating Antlers with Pretzels or Chocolate
To make Rudolph’s antlers, you can use pretzels or chocolate. For pretzel antlers, break a pretzel rod into two parts. Then, stick them on the cupcake with frosting.
For chocolate antlers, pipe melted chocolate onto parchment paper. Let it harden, then stick the chocolate antlers on the cupcake. Break pretzels right to get the right shape. Or, use a template for chocolate piping.
| Material | Ease of Use | Appearance |
|---|---|---|
| Pretzels | Easy | Crunchy, rustic look |
| Chocolate | Moderate | Smooth, elegant look |
Assembling the Face with Candy Eyes and a Red Nose
To make Rudolph’s face, start with a brown frosting base. Then, add candy eyes and a red nose. Use candy eyes or chocolate chips for the eyes. A red M&M or cinnamon candy works well for the nose.
The key to a cute Rudolph is in the expression. Try different eye and nose placements and angles.
For a final touch, add a frosting “collar” with a small bell. It adds charm and a festive look to your cupcakes.
3. Simple Snowman Cupcakes
Make your cupcakes look like snowmen with this easy guide. Snowman cupcakes are fun for winter and great for baking with kids. They’re also a nice touch for holiday parties.
Stacking and Securing Marshmallows
To make the snowman body, stack three marshmallows. Start with a cupcake covered in white frosting. Then, put a bit of frosting on the cupcake and place the first marshmallow.
Use toothpicks or frosting to keep the marshmallows steady. If toothpicks worry you, just press the marshmallows into the frosting a bit.
Tips for Stability:
- Use a small amount of frosting as “glue” between marshmallows.
- Make sure the marshmallows are lined up right.
- Chill the cupcakes in the fridge for a few minutes before serving.
Adding Personality with Edible Markers and Candy
Now, add some fun to your snowman. Draw faces, buttons, and arms with edible markers. You can also use candy and other treats for decorations.
Pretzel sticks are great for arms, and fruit roll-ups make nice scarves. Use chocolate or candy canes for hats, and tiny cookies for earmuffs.
| Decoration | Materials | Tips |
|---|---|---|
| Face | Edible markers | Try different faces. |
| Arms | Pretzel sticks | Break them to the right size. |
| Scarf | Fruit roll-ups | Wrap it around the neck. |
| Hat | Chocolate or candy canes | Melt chocolate to shape hats. |
By following these steps, you can make cute snowman cupcakes. They’re perfect for kids and adults. The best part is their handmade look, which makes them even more special.
4. Festive Santa Hat Cupcakes
Get ready to add festive cheer with Santa hat cupcakes. They are a delightful holiday treat. These adorable desserts will bring joy to your gatherings and are easy to make.
To make these charming cupcakes, focus on two main parts: the cone-shaped hat and the fluffy white trim. Let’s start with the hat.
Creating the Perfect Cone-Shaped Hat
There are two ways to get the perfect cone shape. You can use a piped cone technique or mold fondant/modeling chocolate.
- Piped Cone Technique: Use a round tip to pipe red frosting into a cone shape. Control the pressure to get the right shape.
- Molded Fondant/Modeling Chocolate: Shape the fondant or chocolate into a cone and smooth out any bumpy spots.
Adding the Fluffy White Trim and Pom-Pom
After your hat is ready, add the finishing touches. Use a star tip to pipe white frosting around the hat’s base for a fluffy trim. For the pom-pom, pipe a small white frosting ball or use a mini marshmallow.
- Tips for a Realistic Look: Make sure the red and white parts look different.
- Variations: Add edible glitter for more festivity or make a green version for elf hats.
With these simple steps, you can make striking Santa hat cupcakes. They will impress your guests and add holiday magic to your celebrations.
5. Holiday Wreath Cupcakes
Make wreath cupcakes for a charming holiday treat. They bring Christmas beauty to your table. Wreath cupcakes are great for parties, gifts, or treats for family and friends.
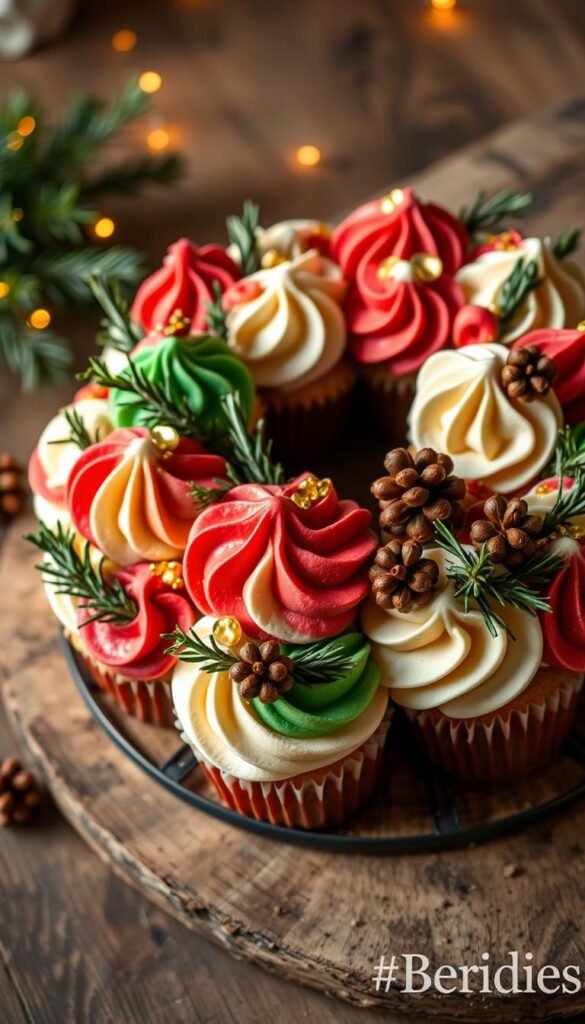
Creating these edible wreath decorations is easy. Start with green frosting for the wreath base. It looks like foliage.
Piping Techniques for Realistic Wreath Texture
Begin by loading your piping bag with green frosting. Use a leaf tip to pipe leaves in different sizes and directions. This makes the wreath look natural.
For a realistic look, vary leaf sizes and placement. If piping is hard, use a spatula to make textured frosting. This looks like pine needles.
This method is easier. You can shape the frosting to look right.
Adding Berries, Bows, and Greenery Details
After the wreath base, add decorations. Red candy pearls or cinnamon candies are great for berries. They add color.
Tiny piped bows or sugar decorations add elegance. Use darker green or sugared rosemary for depth. Arrange these elements to look balanced but not perfect.
6. Candy Cane Swirl Cupcakes
The candy cane swirl on cupcakes is both beautiful and easy to make. It mixes peppermint flavor with a cool swirl pattern. This makes it great for holiday parties. You’ll need to learn how to do two-tone frosting and pipe it right.
Loading a Piping Bag with Two-Tone Frosting
To get the candy cane look, you’ll need red and white frostings. Make sure both are right for piping. There are a few ways to fill your piping bag, like side-by-side or using plastic wrap.
Tips for Loading: Make sure both frostings are at room temperature and the same consistency. Use a spatula to put the frostings side by side in the bag. Or, try the bag-within-a-bag method for a clean look.
Creating the Perfect Red and White Swirl
Now, pipe the swirl. Hold the bag at a 90-degree angle to the cupcake. Squeeze out the frosting in a circle, starting outside and moving in. Keep the pressure steady and move smoothly for clean stripes.
Enhancing Your Design: Add peppermint flavor to your frosting. Sprinkle crushed candy canes on top. Or, use a small candy cane as a garnish to make it even more festive.
7. Snowflake Cupcake Design
Creating snowflake cupcakes is fun and creative. You can use fondant or royal icing. Both make beautiful, delicate designs that feel like winter.
For beginners, fondant is a good start. Roll out the fondant thin. Cut out snowflakes with a cookie cutter or knife. You can also use a template for more details.
Easy Fondant Snowflakes for Beginners
To add texture, use a toothpick or knife on the snowflakes. Dust them with edible glitter or pearl dust for a frosty look. Attach the snowflake to the cupcake with a little frosting or piping gel.
Piping Simple Snowflake Patterns with Royal Icing
For royal icing, get the icing right. Use a small tip to pipe snowflake patterns. You can use a template to help. It might take a few tries to get it right.
| Method | Skill Level | Materials Needed |
|---|---|---|
| Fondant Snowflakes | Beginner | Fondant, cookie cutter, toothpick |
| Royal Icing Snowflakes | Intermediate | Royal icing, piping bag, small round tip |
8. Christmas Ornament Cupcakes
Make your cupcakes look like Christmas ornaments with simple steps. They’re a fun way to make your holiday desserts special.

Creating a Smooth, Colorful Base
Use an offset spatula or the back of a spoon for a smooth frosting base. Put lots of frosting on the cupcake and shape it into a dome. For an extra smooth look, cover it with fondant.
Pick colors that match your holiday theme. Red and green are classic, but metallic looks are fancy too. Use food-safe luster dusts or sprays for a shiny effect.
Adding Simple Decorative Elements and “Hangers”
Use frosting, edible markers, or decorations in contrasting colors for details. Simple designs like stripes or dots look great. For something more complex, try a lattice pattern with royal icing or a fine tip piping bag.
- Twisted fondant ropes
- Chocolate decorations
- Pretzel sticks dipped in white chocolate
These ideas will make your desserts look like real ornaments. They’re perfect for any holiday party.
Follow these steps to make amazing holiday cupcakes. They’ll be a hit at any party!
9. Gingerbread Man Topper Cupcakes
Gingerbread man cupcakes are a fun holiday treat. They mix gingerbread charm with cupcake ease. This design combines a favorite holiday character with cupcake decorating fun.
Quick Mini Gingerbread Cookies (or Store-Bought Alternatives)
To make gingerbread man toppers, bake mini gingerbread cookies or use store-bought ones. For homemade cookies, mix molasses, ginger, and cinnamon. This makes tasty cookies.
For quick options, find small cookies that look like gingerbread men.
- Use a cookie cutter to create gingerbread men shapes
- Bake at 350°F for 8-10 minutes or until firm
- Consider using pre-made cookie mixes for convenience
Decorating and Positioning Your Gingerbread Toppers
Decorate your gingerbread men with royal icing or edible markers. Add faces, buttons, and clothes for fun. Use frosting as “glue” to stick them on cupcakes.
Tips:Use cinnamon-tinted frosting or a simple white swirl to match the gingerbread theme.
10. Holly and Berry Cupcakes
Make your cupcakes look fancy with holly and berry designs. These designs add a special touch to your holiday treats. They make your dessert table look more festive and elegant.
Techniques for Piping Realistic Holly Leaves
To make holly leaves, pick the right tip. Use a #48 or #49 tip for the right shape. Mix green frosting to match holly green.
Practice controlling the frosting to make leaves look real. Place leaves in groups on your cupcakes for a natural look.
If piping is hard, try using fondant cutters or hand-cutting leaves. These can also make beautiful holly leaves.
Options for Creating Perfect Berry Clusters
To make red berries, pipe royal icing dots or use candy. You can use red M&Ms or cinnamon candies for a quick fix. Group berries together for a realistic look.
| Method | Description | Skill Level |
|---|---|---|
| Piped Royal Icing | Pipe small dots of red royal icing to form berries. | Intermediate |
| Candy Pearls | Use red candy pearls to create berries. | Beginner |
| Red M&Ms | Use red M&Ms to create berries. | Beginner |
11. Winter Wonderland Cupcakes
Turn your cupcakes into tiny winter worlds with these decorating tips. Making a winter scene on your cupcakes adds magic to holidays.
Creating a Glistening Snow Effect
To get a real snow look, use coconut flakes, white nonpareils, or sanding sugar. Coconut flakes look like snow. White nonpareils sparkle. Sanding sugar gives a shiny snow look.
| Material | Visual Impact | Taste Considerations | Ease of Application |
|---|---|---|---|
| Coconut Flakes | Textured, snow-like appearance | Coconut flavor | Easy |
| White Nonpareils | Sparkling effect | Neutral flavor | Easy |
| Sanding Sugar | Realistic snow effect | Sweet flavor | Moderate |
Adding Miniature Winter Elements
To make a tiny winter scene, add trees, figures, or decorations. Use chocolate trees or sugar decorations for fun. Place them to tell a story, like a snowy forest or a snowman scene.

12. Peppermint Swirl Cupcakes
Peppermint swirl cupcakes are a fun holiday treat. They mix festive colors with cool mint taste. They look great and taste even better, making them perfect for Christmas.
To make these treats, you need to learn how to marble. There are two main ways to get the peppermint swirl look: surface marbling and internal marbling.
Achieving the Perfect Peppermint Marble Effect
For surface marbling, put different frosting colors on the cupcake. Then, use a toothpick to make a swirly design. This way, you can be creative and get different looks.
- Start with a base layer of white frosting.
- Add dollops of red frosting on top.
- Use a toothpick to gently swirl the colors together.
For internal marbling, fill a piping bag with red and white frosting. Pipe it onto the cupcake to get a marbled look.
Enhancing with Crushed Candy and Mint Flavors
To make your cupcakes even better, add crushed candy canes and mint flavors. Add a few drops of peppermint extract to your frosting for a strong mint taste.
Crushed candy canes on top add texture and flavor. You can also mix them into the frosting for a speckled look.
Tips for the best results:
- Use high-quality peppermint extract for the best flavor.
- Experiment with different ratios of red to white frosting to achieve your desired marbling effect.
13. Present Bow Cupcakes
Turning cupcakes into tiny presents is fun and creative. It’s a great way to celebrate Christmas. It’s perfect for holiday parties or as a sweet gift.
Simple Fondant or Buttercream Bow Techniques
There are two easy ways to make beautiful bows for your cupcakes. You can use fondant or buttercream. For fondant, color and knead it to the right shade. Roll it thin and cut out a bow shape.
You can also tie a small piece of fondant into a knot for a bow. For buttercream, pipe a swirly bow with a star tip. Try different sizes and colors to fit your holiday theme.
Creating a Gift-Wrapped Base Design
To make your cupcakes look like gifts, start with a layer of frosting. Use edible markers or frosting to draw patterns like stripes or dots. You can also use fondant strips for a textured look.
Pipe a border around the edges to look like wrapping paper. Adding “tape” strips made from fondant or frosting helps too.
To make it even more elegant, add metallic elements or edible glitter. You can also make tiny fondant gift tags. Attach them to your cupcakes for a special touch.
14. North Pole Sign Cupcakes
Make your cupcakes look like the North Pole with a fun edible sign topper. These North Pole cupcakes are great for the holiday season. They show the magic of Santa’s workshop.
Making Simple Edible Signs
You can make signs with cookies or fondant. Use rectangular cookies and decorate with royal icing or markers. Fondant makes signs last longer, dry first, then decorate.
For clean letters, use markers or piping. Or, use pre-made edible letters for a neat look.
Creating a Snowy Landscape Base
Make a snowy base with textured frosting. Pipe it to look like snow drifts. Use special tools for a real snow look.
Add things like sugar cube “ice blocks” or coconut “snow”. Use candy canes, tiny penguins, or royal icing footprints for Santa’s visit.
15. Angel Cupcakes
Angel cupcakes are a delightful addition to any holiday dessert table. They bring a touch of heavenly charm to your Christmas celebrations. These sweet treats are perfect for adding a personal touch to your holiday baking. And they’re easier to make than you might think.
Crafting Angel Wings from Wafer Cookies
To create the angel wings, you’ll need wafer cookies. Cut and shape them to achieve the characteristic wing form. Use a sharp knife or cookie cutter for this.
Or, you can use white chocolate shapes or fondant cutouts for a different look. To secure the wings to the cupcake, use a dab of frosting or melted chocolate.
Assembling the Halo and Facial Features
For the halo, use a gold dragée or twisted gold wire. Place the halo on top of the cupcake. Secure it with a small amount of frosting or melted chocolate.
For the facial features, use edible markers or tiny candy placements. Create a simple, yet endearing face. To complete the angel look, use frosting to suggest the angel’s robe or body. Choose traditional white or a more colorful interpretation.
| Angel Cupcake Component | Materials Needed | Tips for Assembly |
|---|---|---|
| Wings | Wafer cookies, frosting or melted chocolate | Cut and shape cookies to achieve wing form; secure with frosting or chocolate |
| Halo | Gold dragée or twisted gold wire, frosting or melted chocolate | Place halo on top of cupcake, securing with frosting or chocolate |
| Facial Features | Edible markers or tiny candy placements | Create simple face using markers or candy |
By following these steps, you can create a collection of angel cupcakes. They are sure to impress your friends and family. Whether you’re hosting a holiday party or simply want to add some festive cheer to your dessert table, these angel cupcakes are a great choice.
Troubleshooting Common Decorating Problems
Don’t let decorating disasters ruin your holiday cheer. Many common issues have simple solutions. Even experienced bakers can face problems. But, with quick fixes and expert advice, you can rescue your creations.
Rescuing Runny Frosting and Fixing Mistakes
If your frosting is too runny, add powdered sugar slowly. Start with 1 tablespoon at a time until it’s right. For bleeding colors, chill the cupcakes for 10 minutes before adding more details.
To fix air bubbles or uneven surfaces, use a bit of frosting. Glue down lifted edges or fill in divots.
Common mistakes like overmixing or incorrect temperature can be easily fixed. If your buttercream is too soft, chill it for a few minutes. If you’ve made a color mixing error, add a small amount of the correct color to adjust the shade.
Quick Solutions for Broken Decorations
For broken fondant or royal icing decorations, use frosting or piping gel as “glue”. If a topper has lost its shape, gently heat it (for fondant or chocolate). Or, use a toothpick to reposition broken parts.
Creativity can turn a “fix” into a design element. For example, a snapped fondant piece can become a decorative accent with a little creative repositioning.
Make-Ahead and Storage Tips
Planning ahead makes holiday baking easier. Knowing how to store decorated cupcakes is key. Making parts early can cut down on last-minute stress.
Preparing Components in Advance
Many parts of your cupcake decorations can be made early. Fondant, royal icing, and cookie toppers can be prepared ahead. Fondant decorations can last up to two weeks in airtight containers.
Royal icing decorations can dry on parchment paper. Then, store them in a cool, dry place.
| Component | Advance Preparation Time | Storage Tip |
|---|---|---|
| Fondant Decorations | Up to 2 weeks | Airtight container |
| Royal Icing Elements | Up to 1 week | Cool, dry place |
| Cookie Toppers | Up to 3 days | Airtight container at room temperature |
Proper Storage for Decorated Cupcakes
After decorating, it’s important to store cupcakes right. Use airtight containers to keep them fresh. Keep them away from sunlight and moisture.
For tall decorations, use tall containers. This way, decorations won’t touch the lid.
Creative Ways to Display and Gift Your Cupcakes
Make your cupcakes stand out with these fun display and gifting ideas. The right way to show off your holiday cupcakes can really make a difference.
Festive Presentation Ideas for Parties
For holiday parties, pick a display that matches your cupcake designs. Here are some ideas:
- Use a tiered stand for a stunning centerpiece
- Make a cupcake wreath on a pretty base
- Build a Christmas tree or winter village with cupcakes
Adding greenery, ribbons, or themed props can make your display even better.
Packaging Tips for Holiday Gifting
When you give cupcakes as gifts, how you package them matters. Try these options:
| Packaging Option | Description |
|---|---|
| Transparent Ornament Containers | Great for showing off decorated cupcakes |
| Miniature Gift Boxes | Perfect for wrapping up single cupcakes with a personal touch |
| Festive Cupcake Sleeves | Simple to use and add holiday color |
Adding your own tags, ribbons, or cards can make your gifts extra special.
Conclusion
As we wrap up our look at 15 Christmas cupcake decorating ideas, we see the true holiday spirit. It’s about making and sharing. These easy designs will help you get better at making cupcakes for Christmas.
Practice and patience are key to decorating for the holidays. Don’t worry about mistakes at first. They often add charm to your work. As you keep practicing, you’ll get better and try new things each year.
We hope you share your cupcakes with loved ones. It makes the holiday season even more fun. Homemade treats bring joy to everyone. So, keep learning and making, creating traditions of love and joy for years.

